Breville Crispy Crust BPZ600 Manual
- Instruction booklet (29 pages)
Advertisement
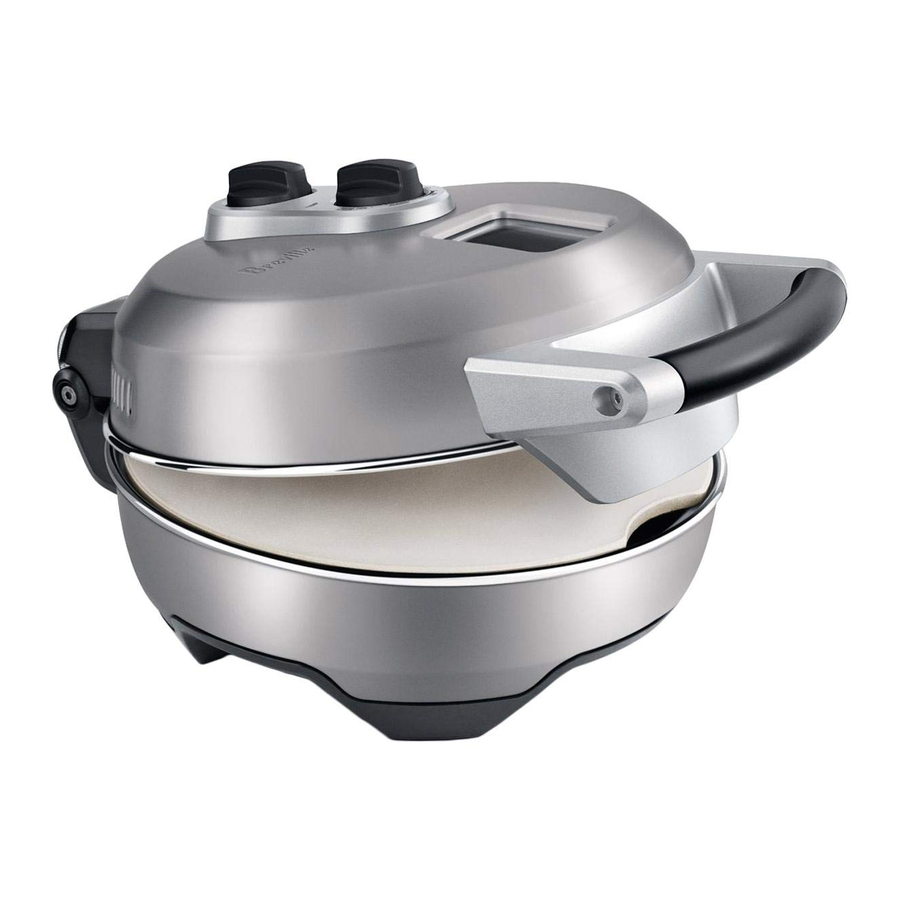
KNOW YOUR BREVILLE PRODUCT

- ON/OFF switch
Switches Pizza Oven ON or OFF. - Variable temperature control
For thick to thin crust pizzas plus low heat and keep warm. - Viewing window
Monitor the cooking progress without having to open up the lid. - Cool touch handle
For safe and easy handling. - Top and bottom heating elements
Heats the oven to a maximum of 350˚C to recreate the effects of a traditional pizza oven. - Sturdy non-slip feet
- Removable 12" pizza stone
Absorbs moisture and distributes heat evenly for a crispy crust. - 1200 watts of power
Pizza cooks in as little as 5 minutes. - Heating indicator light
Tells you when the pizza oven is heating.
OPERATING YOUR BREVILLE PRODUCT
BEFORE FIRST USE
Before using the pizza oven for the first time, remove and safely discard any packaging material, promotional labels and ensure the power cord is unplugged.
Remove the pizza stone from the pizza oven and wipe with a soft, damp cloth. Dry thoroughly. Wipe the interior surfaces of the pizza oven with a soft, damp cloth. Dry thoroughly. Re-insert the pizza stone and close the lid.
There is no need to season the pizza stone before using it for the first time.
The stone will season itself over time with repetitive use.
Residue flour or semolina used to roll out the dough will be enough to prevent the pizza dough from sticking
THE PIZZA OVEN IS NOW READY TO USE
- Insert the power plug into the power outlet. Turn the ON | OFF switch to ON position. When first switched on, the heating indicator light will illuminate to indicate Pizza Oven is in heating mode.
- Preheat the pizza oven before use. To do this, set the variable temperature control to preheat setting.
 NOTE NOTEWhen switched on for the first time, the pizza oven may give of vapours for a short period of time. This is due to the oil residue that may have been used in the manufacturing process. This is not detrimental to the performance of the pizza oven and will dissipate with use. |
- The heating indicator light will illuminate when the pizza oven is preheating. Recommend pre-heating for at least 30 minutes when first switched on.
- Turn variable temperature control to either THIN, CLASSIC or THICK crust range to suit your pizza preference. Temperature increases as selector dial is turned clockwise. When selecting CLASSIC or THICK crusts, allow Pizza oven to stand for 5 minutes to adjust to selected heat setting before starting to cook.


Carefully open the lid using oven mitts. Do not lean or stand over the Pizza Oven when opening the lid as steam may be released.
| NOTE The heating indicator light may turn on and off during operation. This is the automatic thermostat light indicating that the correct temperature is being maintained. |
- Roll out fresh pizza dough to desired thickness and place directly onto a large square of baking paper the size of the pizza stone. Prick pizza base evenly with a docker or a fork. Assemble ingredients onto pizza base and transfer pizza and baking paper onto pizza stone.
| NOTE If cooking a pre-purchased pizza, ensure that all packaging materials are removed before cooking. Some pre-purchased pizzas are packed on a sheet of paper or polystyrene which may stick to the base of the pizza or to the pizza stone. |
- Carefully close the lid and cook for 2 minutes; open lid, using oven mitts and gently slide baking paper out, leaving the pizza inside pizza oven. Close lid again and cook to desired cooking time (see cooking table for suggested cooking times).
- Use the viewing window to check on cooking progress.
- When the Pizza is cooked to desired level, carefully open the lid using oven mitts. Do not lean or stand over the pizza oven when opening the lid as steam may be released.
- Remove the pizza using a heat-proof spatula.
- To prevent smoking and burning, scrape off hot melted cheese and ingredients that may have fallen onto the stone after each pizza has been cooked.
| NOTE Never use a knife or pizza cutter on the stone as this could damage the fine-grain cooking surface. Remove the pizza from the stone prior to cutting. |
| NOTE The pizza stone will darken in color with use. This is a normal part of the natural seasoning process. Clean the pizza stone after each use. |
LOW SETTING
Ideal for reheating cold cooked pizza slices and garlic bread. Also suitable to heat up flat breads such as tortillas.
Turn variable temperature control dial within the LOW range to engage this setting.
KEEP WARM
Used to keep cooked pizzas warm when there is a delay in serving.
Turn variable temperature control dial within the KEEP WARM range to engage this setting.
| NOTE Never operate the pizza oven without the pizza stone in place. |
COOKING GUIDE
The following table should be used as a guide only. IT does not allow for individual tastes and preferences. The time may vary due to the size, shape and thickness of the pizza. As you become familiar with the pizza oven, adjust the cooking times and temperature on the variable temperature control accordingly.
| TYPE OF PIZZA | TYPE OF BASE | TEMPERATURE SETTING | COOK TIME | |
| Fresh pizza dough | Thin Crust (approx 170g) | THIN CRUST SETTING | 4–6 minutes | |
| Fresh pizza dough | Classic Crust (approx 230g) | CLASSIC CRUST SETTING | 7–10 minutes | |
| Fresh pizza dough | Thick crust (approx 290g) | THICK CRUST SETTING | 10–12 minutes | |
| Frozen pizza | All types | THIN CRUST SETTING | 6–10 minutes | |
| Stored bought pre-made chilled pizza | All types | THIN CRUST SETTING | 5–8 minutes | |
| Non-chilled pre-made pizza bases | All types | CLASSIC CRUST SETTING | 8–10 minutes | |
| Wraps and flat breads | All types | CLASSIC CRUST SETTING | 6–10 minutes | |
| NOTE These times are based on the maximum temperature for each setting. | ||||

Do not immerse power cord, pizza stone, power plug, or appliance into water or any other liquid. Do not use harsh abrasives, chemicals or oven cleaners to clean the pizza oven as this may scratch or damage the surface of the appliance.
CARE, CLEANING AND STORAGE
CLEANING AFTER USE
- Always ensure the pizza oven ON|OFF switch is set to the OFF position and the power cord is unplugged prior to moving or cleaning.
- While stone is still warm, scrape off any cheese or pizza ingredients that may have fallen onto the stone.
- Allow the pizza oven to cool completely.
CLEANING THE OUTER BODY
- After each use, wipe the outer body with a soft, damp cloth and dry thoroughly. A non-abrasive liquid cleanser may be used to avoid build-up of food residue and stains.
- Allow all parts and surfaces to dry thoroughly before plugging the pizza oven in and using.
CLEANING THE INTERIOR
To clean any food splattering, wipe the interior with a soft cloth dampened with warm water. Dry thoroughly.
CLEANING THE VIEWING WINDOW
Viewing window will darken from cooking vapors with ongoing use.
To remove built up grime, make a paste from 2 teaspoons bi-carbonate soda, 1 teaspoon white vinegar and 1 teaspoon of water.
Rub paste onto viewing window and wipe clean with a damp cloth.
 It is important to do this process regularly and always once the pizza oven has completely cooled. |
CARE AND CLEANING THE PIZZA STONE
Pizza stones are porous and will absorb fats and oils. It is normal for pizza stones to accumulate stains from dripping cheese and fatty toppings. This will not affect the taste of the pizza or the performance of the stone, however, cooking residue may create excess smoke and odor to form.
To remove stains, cool stone completely and follow instructions below:
- Small stains can be cleaned easily by scrubbing with a toothbrush and a paste made from equal parts of bi-carb soda and water. Work in small circles until stains are removed. Wipe clean with a damp cloth and dry completely before reusing.
- To remove burnt on food, use a scouring pad lightly over stubborn areas.
- If the accumulation is heavy, use a hard abrasive paper like sand paper to clean the surface.
- Make sure to wipe the stone clean with a damp cloth and allow plenty of time for the stone to dry out completely before use.
| NOTE Do not immerse the pizza stone in water or use cleaning liquids or detergents. Immersing the pizza stone in water could cause it to crack. Cleaning liquids or detergents will absorb into the stone and transfer to the pizza during baking. |
| NOTE For a deep clean, prepare a paste by mixing L cup of bicarbonate of soda with 3 tablespoons of water. Apply the paste to the desired areas of the pizza stone and leave for 15–20 minutes. Scrape off excess paste and food from the surface of the pizza stone. Using a damp cloth, wipe stone clean, and dry thoroughly. Do not reverse pizza stone to cook on the clean side if it becomes stained or discolored. |
STORAGE
When storing the pizza oven, remove the power plug from the power outlet. Ensure the appliance is completely cool, clean and dry. Ensure the lid is closed and do not place any objects on top. Store the appliance standing on its support legs.
TROUBLESHOOTING
| POSSIBLE PROBLEM | SOLUTION / CHECK |
| Unit does not switch on | Make sure the main power plug is plugged into the outlet Rotate the on and off dial to "ON" position. |
| Unit does not heat up to desired temperature level | Check to make sure the temperature set dial is correctly positioned If not hot enough, adjust the temperature dial to hotter setting. |
| Heating light does not stay on | Heating light will turn on and off during normal usage. Heating light will only turn on when the unit is in heating cycle. |
RECIPES
PIZZA BASE
Makes 4 twelve inches pizzas
INGREDIENTS
500g (strong bakers) flour or plain flour
3 teaspoons dry yeast
3 teaspoons sugar
2 teaspoons salt
1 tablespoon olive oil
1 cup lukewarm water
METHOD
- Place flour into a large mixing bowl and make a well in the centre.
- Add yeast, sugar, salt, olive oil and water and stir until combined.
- Turn out onto a lightly floured surface and knead for 5–10 minutes or until a smooth ball forms.
- Place dough ball into a lightly oiled bowl, cover with cling film or clean cloth. Set aside in a warm drought free place for 30 minutes or until dough has doubled in size.
- Turn dough out on a floured surface and knock back (punch) the dough to remove excess air, lightly knead.
- Divide dough as required.
PIZZA BIANCO
Makes 4 serves
INGREDIENTS
170g fresh pizza dough 1⁄3 cup fresh ricotta, crumbled
¼ cup grated mozzarella cheese
¼ cup grated provolone cheese
2 tablespoons grated Parmigian
1 garlic clove, finely sliced
1 teaspoon finely chopped fresh rosemary
Sea salt to taste
METHOD
- Turn the ON/OFF switch to the ON position.
- Preheat Pizza oven on setting PREHEAT for 15 minutes.
- Roll out pizza dough to form a 24cm disc and place onto a large square of baking paper.
- Prick base with a fork or pizza docker
- Spread base with ricotta, mozzarella, provolone and parmesan. Sprinkle over garlic and rosemary.
- Select THIN crust setting.
- Transfer pizza and baking paper together onto pizza stone and close lid. Cook for 2 minutes.
- Open lid and slide paper out carefully; close lid and turn cook 4–6 minutes or until cooked to your liking.
- Monitor cooking progress through viewing window. Topping should be melted and golden and base crisp and brown.
- Open lid carefully with oven mitt and remove pizza onto a chopping board.
Season with sea salt and cut into 8 wedges.
Serve immediately.
MEXICAN PIZZA
Makes 4 serves
INGREDIENTS
290g fresh pizza dough
2 tablespoons medium tomato salsa
¼ cup grated mozzarella1 3
1⁄3 cup grated cheddar cheese
1 chorizo, thinly sliced
2 tablespoons canned black beans, rinsed and drained
2 tablespoons chopped coriander sprigs ½ avocado, sliced
2 tablespoons crème fraiche
Jalapenos and lime wedges to serve
METHOD
- Turn the ON/OFF switch to the ON position.
- Preheat Pizza oven on setting PREHEAT for 15 minutes.
- Roll out pizza dough to form a 24cm disc and place onto a large square of baking paper.
- Prick base with a fork or pizza docker
- Spread base with salsa and top with mozzarella, cheddar cheese, chorizo and beans.
- Select THICK crust setting.
- Transfer pizza and baking paper together onto pizza stone and close lid. Cook for 2 minutes.
- Open lid and slide paper out carefully; close lid and cook 10–12 minutes or until cooked to your liking.
- Monitor cooking progress through viewing window. Topping should be melted and golden and base crisp and brown.
- Open lid carefully with oven mitt and Makes 4 serves remove pizza onto a chopping board.
- Sprinkle over coriander and avocado.
Cut into 8 wedges and serve immediately with jalapenos and lime wedges.
| NOTE Cooking times are based on the maximum for each crust setting. |
SPICY LAMB PIZZA
Makes 4 serves
INGREDIENTS
Pizza paste
85g roasted red capsicum, chopped
1 large red chili, chopped
1 tablespoon olive oil Sea salt, to season
Spice rub
1 clove garlic, crushed
1 teaspoon ground cumin
1 teaspoon ground coriander
½ teaspoon smoked paprika
½ teaspoon sea salt
1 tablespoon oil
140g lamb fillet, trimmed
170g fresh pizza dough
3 cherry tomatoes, halved
1 tablespoon pine nuts
100g haloumi cheese, shredded
3 tablespoons Greek-style yogurt
1 garlic clove, crushed
Lemon juice, to taste
Sea salt, to season
Fresh mint leaves
METHOD
- Turn the ON/OFF switch to the ON position.
- Preheat Pizza oven on setting PREHEAT for 15 minutes.
- In the meantime combine peppers, chili and the oil in a food processor or blender and process until smooth; season and set aside.
- Combine garlic and spices. Coat lamb in spice rub.
- In a pan, heat oil and cook lamb on each side for 1 minute. Remove from heat but keep in the pan and cover with foil to rest.
- Roll out pizza dough to form a 24cm disc and place onto a large square of baking paper.
- Prick base with a fork or pizza docker.
- Spread base with 2 ½ tablespoons pureed capsicum and top with tomatoes, pine nuts and haloumi.
- Select THIN crust setting.
- Transfer pizza and baking paper together onto pizza stone and close lid. Cook for 2 minutes.
- Open lid and slide paper out carefully. Close lid and cook for 4–6 minutes or until cooked to your liking.
- Monitor cooking progress through viewing window. Topping should be melted and golden and base crisp and brown.
- Open lid carefully with oven mitt and remove pizza onto a chopping board. Combine yoghurt, garlic and season with lemon juice and salt.
- Slice lamb thinly and put onto pizza. Add dollops of yoghurt and sprinkle with mint.
Cut into 8 wedges and serve immediately.
| NOTE Use leftover pepper puree for another pizza or add to Bolognaise sauce. |
| NOTE Adjust variable temperature control within each crust setting range to suit your cooked pizza preference. |
ITALIAN MEATBALL PIZZA
Makes 4 serves
INGREDIENTS
Meatballs (makes 24)
200g pork and veal mince
¼ cup dry breadcrumbs
1 teaspoon fennel seeds
2 tablespoons grated Parmigian
1 clove garlic, crushed
1 small egg
Freshly ground black pepper
Pizza
290g fresh pizza dough
¼ cup pizza sauce
1⁄3 cup cheddar cheese
1 tablespoon chopped parsley
4 cherry tomatoes, halved
10 pitted black olives
1 teaspoon baby capers, drained
METHOD
- Combine meatball ingredients and mix well. Roll heaped teaspoons of mixture into balls and cook in a hot pan for 2–3 minutes or until browned but not cooked through; set aside.
- Turn the ON/OFF switch to the ON position.
- Preheat Pizza oven on setting PREHEAT for 15 minutes.
- Roll out pizza dough to form 23cm disc and place onto a large square of baking paper.
- Prick base with a fork or pizza docker.
- Spread base with pizza sauce and top with cheese, parsley, tomatoes, olives and capers.
- Arrange meatballs over the top of the pizza and press down a little.
- Select THICK crust setting.
- Transfer pizza and baking paper together onto pizza stone and close lid. Cook for 4 minutes.
- Open lid and slide paper out carefully. Close lid and cook 12–15 minutes or until cooked to your liking.
- Monitor cooking progress through viewing window. Topping should be melted and golden and base crisp and brown.
- Open lid carefully with oven mitt and remove pizza onto a chopping board.
Cut into 8 wedges and serve immediately.
| NOTE You'll only need 12 meatballs for one pizza but you can freeze the other half or using it for a second pizza. |
BREAKFAST PIZZA
Makes 4 serves
INGREDIENTS
230g fresh pizza dough
2 tablespoons tomato passata
½ cup pizza cheese
4 rashers bacon, trimmed and chopped
85g roasted capsicum, drained, cut into strips
1 egg
Sea salt
Fresh oregano leaves to garnish
METHOD
- Turn the ON/OFF switch to the ON position.
- Preheat Pizza oven on setting PREHEAT for 15 minutes.
- Roll out pizza dough to form a 23cm disc and place onto a large square of baking paper.
- Prick base with a fork or pizza docker.
- Spread base with passata and top with cheese, bacon.
- Make an indentation in the centre of the pizza for the egg to fit in. Lay half of the capsicum strips around the indentation to keep the egg white in place.
- Select CLASSIC crust setting.
- Transfer pizza and baking paper together onto pizza stone and close lid. Cook for 4 minutes.
- Open lid and slide paper out carefully; Crack egg into the centre indentation. Close lid and cook for 7-10 minutes or until cooked to your preference.
- Monitor cooking progress through viewing window. Topping should be melted and golden and base crisp and brown.
- Open lid carefully with oven mitt and remove pizza onto a chopping board. Season with sea salt and sprinkle with oregano.
Cut into 8 wedges and serve immediately.

Documents / ResourcesDownload manual
Here you can download full pdf version of manual, it may contain additional safety instructions, warranty information, FCC rules, etc.
Advertisement


Need help?
Do you have a question about the Crispy Crust BPZ600 and is the answer not in the manual?
Questions and answers