Advertisement
Available languages
Available languages
Quick Links
Display settings
You can adjust the following display settings:
Backlight: Turns the backlight of the display on or off.
Contrast: Adjusts the density of the fonts on the
User's Guide
display. (Value: -5 to +5)
Language: Changes the language of the settings and
messages on the display.
inch:cm: Selects the unit of measurement for length.
To adjust display settings, follow the steps below:
1. Press
to turn on the product.
+
2. Press
.
3. Press
or
to highlight a setting, then
press
to select it.
4. Press
or
to select setting options, then
press
.
Setup
This product operates with batteries (not included) or
with an AC adapter (not included).
Inserting batteries
1. Remove the rear cover.
*41209250*
*412092500*
Read these instructions before using your product.
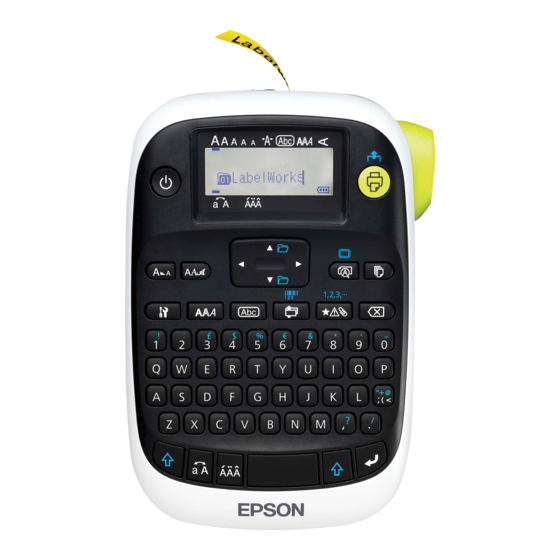
Button names and functions
23
2. Insert 6 AA alkaline batteries.
22
1
21
20
2
19
3
18
4
17
5
16
6
15
7
Note: If you need to install a tape cartridge, see "Inserting
14
a tape cartridge" below.
8
13
3. Replace the cover and snap it into place.
12
9
10
11
1.
Power
2. Font
3. Font size
4. Frame
Optional AC adapter (APT0615Z1-1)
5. Font style
Warning: Make sure to use AC adapter APT0615Z1-1 or
6. Settings
damage may occur.
7.
Character keys
1. Plug one end of the AC adapter into the product.
8. Shift key
2. Plug the the other end of the AC adapter into the wall
9. Caps lock
outlet.
10. Accent
11. Space
12. Shift key
13. Select/Enter
14. Punctuation
15. Delete (
+
deletes all text)
16. Symbols
17. Special formats
18. Print copies
Inserting a tape cartridge
19. Preview
1. Remove any slack from the ink ribbon.
20. Cursor keys (
+
,
+
goes to
previous or next label)
21. Print (
+
feeds the tape)
22.
Cut button
23. Display
Turning the power off
Press
to turn off the power. If using an AC adapter,
2. Remove the rear cover, if necessary.
disconnect it from the wall outlet and the product.
If batteries are inserted, remove them only if the product
will not be used for a long period of time.
Display indicators
Indicators on the display show whether or not settings
are enabled.
1
2 3 4 5
3. Insert the tape cartridge and press it down firmly until
it snaps into place. If there is excess tape, feed the end
11
of the tape through the tape guide slot.
10
9
8
7
6
1.
Font size
2. Font width
3. Frame
4. Font style
4. Replace the cover and snap it into place.
5. Vertical text
6. Battery level
Preparing the tape
7.
Accent mark options
After inserting a tape cartridge, make sure to feed
some tape through the tape guide slot to position it
8. Upper/lower case
for printing.
9. Cursor (blinks to indicate current position)
1. Press
to turn on the product.
10. Line number (appears when multiple lines exist)
2. Press
+
.
Note: You can print up to four lines of text.
11. Label number (you can save up to 50 labels)
3. Press
to confirm.
3. Press
or
to select a font size, then
.
4. Press the
Cut button to cut the tape.
press
Warning: Do not press the
Cut button until the tape
stops moving or the tape cartridge may be damaged.
Tip: The setting is indicated on the display.
Removing a tape cartridge
1. Remove the rear cover.
Changing the font
2. Hold the cartridge by the tabs, and lift it straight up.
1. Press
.
2. Press
or
to select a font, then
press
.
The font used for the entire line of text will change.
Available fonts
Language selection
1. Press
to turn on the product.
+
2. Press
.
3. Press
or
to highlight Language, then
press
.
4. Press
or
to select your language, then
press
.
Creating labels
Changing the font style
Use the character keys to enter text, then see below.
1. Press
.
2. Press
or
to select a style, then
Changing the letter case
press
.
Press
to enter upper case or lower case for all letters
or
+ character for a single letter.
Note: Styles applied to small or elaborate characters
may not print clearly.
Deleting characters
Press
.
Available styles
Deletes one character backward.
Normal
Italic
Bold
Deleting a label
1. Press
+
.
Shadow
S+O
B+I
2. When a confirmation message appears, press
.
All entered text will be deleted.
S+I
S+O+I
Breaking lines
Press
.
Breaks the line from the character next to the cursor.
Adding a frame
The line number is indicated on the display.
1. Press
.
Note: You can print a maximum of four lines of text. If you
2. Press
or
to scroll through the options,
try to exceed the maximum, appears and you will not be
then press
, or enter the frame number, to select
able to print. Press
to delete the
and print your label.
the desired frame.
Adding punctuation
There are two groups of available punctuation marks.
Specifying the length of labels
: ; < > [ ] { }
1. Press
.
2. Press
or
to select Label length, then
1. Press
repeatedly to scroll through the
press
.
available marks.
3. Press
or
to select a value (up to 15
2. Press
to select the desired mark.
inches [40 cm]), then press
" | _ ^ \ = - +
Tip: Selecting Auto will adjust to the proper length
1. Press
+
, then press
repeatedly to scroll
automatically.
through the available marks.
Adjusting the space between characters
2. Press
to select the desired mark.
1. Press
.
Adding symbols
2. Press
or
to select Char. spacing, then
1. Press
.
press
.
2. Press
or
to scroll through the
3. Press
or
to select Narrow or Wide,
categories, then press
to select a category.
then press
.
3. Press
or
to select a symbol, then press
.
Note: To cancel and return to the previous menu,
press
.
Note: The default setting (Narrow) is recommended.
Adding characters with an accent mark
Changing the font width
If a character can include an accent mark, you can choose
1. Press
.
it from a list indicated on the display.
2. Press
or
to select Narrow, then press
1. Press
+ letter.
.
2. Press
.
3. Repeat step 2.
A list of options appears on the display (e.g. ÈÉÊË).
3. Press
or
to select an item, then press
.
Creating vertical text
1. Press
.
Creating sequentially numbered labels
2. Press
or
to select Vertical, then
press
.
3. Press
or
to select On, then
press
.
1. Press
or
to move the cursor to a position
where you want to add a serial number, then
press
+
.
Creating mirror image text
2. Enter a number for the first label, then press
.
1. Press
.
The number increases by one when printing multiple
2. Press
or
to select Mirror print, then
copies.
press
.
Saving labels
3. Press
or
to select On then
You can create and save up to 50 labels at a time.
press
.
To create multiple labels, type in your text, then press
+
or
+
to move to the next label (the label
number appears to the left of the text).
To print a label, press
+
or
+
to select the
Creating special formats
label you want to print, then press
.
Some of the functions in this section require the
Useful functions
format to be selected before entering text. If prompted,
Below are some common functions that will help you
press
to delete the current text and show the
Special label menu. Then type your label text.
customize your labels.
Changing the font size
Note: To exit out of Special label mode, press
1. Press
.
or
to select Exit, then press
2. Press
or
to select a line layout, then
press
.
Note: You can select a maximum of four lines of text.
"Equal" indicates the same font size for all lines.
Creating an index tab label
Adjusting print density
1. When the power is off, press
2. Press
3. Use the
density, then press
Note: The default value (0) is recommended.
Attaching labels
1. Peel off the backing paper.
1. Press
.
2. Place the label on the desired surface and press it
2. Press
or
to select a size, then press
.
down firmly.
3. Press
or
to select a value or enter
Cleaning
a number for the label length, then press
.
(Maximum length is 5.0 inches (12.5 cm).)
Exterior
4. Enter text.
Use a dry, soft cloth or, for stubborn stains, a moist cloth
The same text entered in step 4 is automatically entered
that has been wrung dry.
in the next line.
Caution: Never use chemicals or solvents such as benzine,
thinner, or alcohol, or use a chemical duster. This could
damage your product.
Creating labels for cables
Cleaning the print head
Flag labels
If the print becomes faint or distorted, the print head may
need cleaning.
Remove the tape cartridge and clean the print head
using a cotton swab moistened with rubbing alcohol, as
shown.
1. Press
.
2. Press
or
to select a flag type (Flag:
Hori., Flag:Vert. or Flag:Edge), then press
.
3. Press
or
to select the length, then
press
. (Maximum length is 5.0 inches (12.5 cm).)
Outline
4. Enter text.
Note: If you want to print more than one line of text, repeat
O+I
step 4 for each line (up to 4). When you are ready to print the
label, press
.
Troubleshooting
Messages
Wrapped labels
Message
Insert tape
Check tape!
1. Press
.
Check tape
2. Press
or
to select Wrap, then
cartridge
press
.
3. Press
or
to select a value or enter
Check battery The batteries may be running out, the
a number for the label length, then press
.
(Maximum length is 5.0 inches (12.5 cm).)
.
4. Enter text.
Note: If you want to print more than one line of text, repeat
step 4 for each line (up to 4). When you are ready to print the
label, press
.
Too many
Creating a barcode label
lines
1. Press
+
.
2. Press
or
to select a barcode format,
then press
.
Text too long
3. Make any necessary settings (width, ratio, etc.), then
enter the code.
Seq. num.
•
Supported barcode formats: CODE39, CODE128, ITF,
only 1
CODABAR, UPC-A, UPC-E, EAN-8, EAN-13
•
Enter barcodes according to their standards.
Text will be
•
Check the created labels with your barcode reader to
deleted. OK?
make sure they can be read correctly.
Printing labels
Fill every digit Entered values for barcodes are
Previewing a label
Press
.
Entered text scrolls across the display.
Note: Only the text and the length of the label can be
Load wider
previewed. The actual print image will not show on the
tape
display.
Txt is too long
Printing a label
Continue?
1. Press
.
The length of the label and the number of copies
shows on the display while the label prints.
Overheated!
2. When printing stops, press the
Cut button.
Warning: Do not press the
Cut button until the tape
stops moving or the tape cartridge may be damaged.
Printing multiple copies
Cover open!
powering off
1. Press
.
2. At the next screen, press the number keys or the
or
buttons to enter the number of
copies (2-9).
Motor error!
3. Press
. The length of the label and the number of
copies shows on the display while the label prints.
, press
4. When printing stops, press the
Cut button to cut
.
the tape. A cut mark will be printed between each
copy. Using scissors, cut along the marks to separate
each label.
Problems and solutions
+
.
Check the solutions below if you are having trouble using
.
your product.
or
buttons to adjust the print
The product does not function normally
.
The product may stop functioning due to static
electricity or other causes. If your product does not
function normally (i.e. the power doesn't turn on/off or
the display is distorted), reset your product by following
the procedure below.
Warning: Resetting your product will erase all saved labels
and formatting and return your product to default settings.
1. Press
to turn the power off.
2. Press and hold
+
, and press
.
3. When a message appears, press
(to cancel, press
any other button
).
The product will be reset.
Power is on but no images appear on the display
•
Make sure the batteries are inserted correctly.
•
Replace the batteries with new ones, or use the optional
AC adapter (APT0615Z1-1).
Warning: Make sure to use AC adapter APT0615Z1-1 or
damage may occur.
•
If you are using an AC adapter, make sure that it is
securely connected to both the wall outlet and the
product.
•
Adjust the contrast (see "Display settings").
The display turns off
•
The power turns off automatically if the product is idle
for more than 5 minutes.
•
If an incorrect button sequence is entered, the display
may flicker or turn off for an instant.
Nothing prints
•
Make sure that text has been entered.
•
Replace the tape cartridge, if necessary.
•
Check the display for an error message and perform the
suggested solution.
•
Replace the batteries with new ones, or use the optional
AC adapter (APT0615Z1-1).
Problem and solution
•
Make sure the rear cover is closed.
No tape cartridge is installed. Turn the
Characters do not print properly
power off and install a tape cartridge.
•
Make sure the tape cartridge is correctly seated.
An incompatible tape cartridge
•
Clean the print head.
has been installed. Check the tape
•
Change the font (sometimes symbols do not print
cartridge.
properly when certain fonts are selected).
An incompatible tape cartridge
Printing stops in the middle of text
has been installed. Check the tape
•
Install a new tape cartridge.
cartridge.
•
Replace the batteries or use the optional AC adapter
(APT0615Z1-1).
batteries may be installed incorrectly,
Saved labels are missing
non-alkaline batteries are being used
•
You may have accidentally deleted the text by pressing
with alkaline batteries, or old and new
+
.
batteries are being used together. Turn
the power off and replace batteries
•
If the product is reset, all of the previously entered text
with new ones, or use the optional AC
will be deleted.
adapter. Make sure new batteries are
•
If the AC adapter is unplugged or the batteries are
installed correctly.
removed during operation, the text may be deleted.
You have exceeded the maximum
Cannot attach the label
number of lines (4). Press
to
•
Make sure to peel off the backing paper before
delete the lines. (See "Breaking lines" in
attaching the label.
"Editing text".)
•
Make sure the surface you are attaching to is clean
and dry. The label may not adhere to some materials,
Entered text is too long for the
rough or uneven surfaces, or surfaces subjected to
specified label length. Press
and
extreme environmental conditions, such as high
adjust the Label length or make text
humidity or heat.
shorter.
Specifications
Sequence numbers have already been
set. You can only enter one sequence
Dimensions
Width 4.33 inches (110 mm)
number per label.
(approximate)
Depth 6.70 inches (170 mm)
Height 2.20 inches (56 mm)
When creating a label with a special
format, the current text will be deleted.
Weight
14 oz (400 g) (excluding batteries, tape
Press
to delete the text and show
(approximate)
cartridge)
the special format.
Operating
50 to 95 ºF (10 to 35 ºC)
temperature
incorrect. Make sure the barcode
Storage
14 to 131 ºF (-10 to 55 ºC)
format is supported and that the
temperature
correct number of values is entered.
Unable to print on the current tape.
Use a wider tape.
Power supply -
Model
APT0615Z1-1
optional
Entered text is too long for the
Manufacturer Seiko Epson Corp.
AC adapter
specified label length. Press
to confirm and continue printing.
Input
AC100-240 V, 0.3 A,
The label length will be adjusted
50-60 Hz
automatically.
Output
DC6.5 V, 1.5 A
The print head is too hot. Turn the
Total output
10 W
power off and remove the tape
power
cartridge. Allow the print head to cool
for a while before trying to print again.
Power supply -
AA alkaline battery x 6
batteries
If you open the rear cover while the
power is on, this message displays
Supported
1/4" (6 mm), 3/8" (9 mm),
and the power turns off automatically.
tape widths
1/2" (12 mm), 3/4" (19 mm)
Always turn the power off before
(approximate)
opening the rear cover.
An error occurred in the motor
operation. Turn the power off, then
turn it back on. If the same message
appears, turn the power off and
contact Epson.
Epson technical support
Visit epson.com/support (U.S.) or epson.ca/support
(Canada) where you can view manuals, get FAQs, or e-
mail Epson.
To speak with a support specialist, call:
U.S.: (562) 276-7245, 6
to 8
, Pacific Time, Monday
am
pm
through Friday, and 7
to 4
, Saturday.
am
pm
Canada: (905) 709-2567, 6
to 8
, Pacific Time,
am
pm
Monday through Friday.
Days and hours of support are subject to change without
notice. Toll or long distance charges may apply.
Recycling
Epson offers a recycling program for end of life products.
Please go to www.epson.com/recycle for information
on how to return your products for proper disposal.
Purchase supplies and accessories
Epson offers a wide array of tapes for multiple uses.
See the table below for a list of recommended tapes (1/2"
[12 mm] widths are listed). For a complete list of available
tapes, including additional widths, visit
epson.com/LW400Tapes.
You can purchase tape cartridges and accessories at
www.epson.com/LabelWorks (U.S. sales) or
www.epson.ca/LabelWorks (Canadian sales). You can
also purchase supplies from an Epson authorized reseller.
To find the nearest one, call 800-GO-EPSON
(800-463-7766).
Type
Tape color
Text color Part
number
Standard
White
Black
LC-4WBN9
White
Red
LC-4WRN9
White
Blue
LC-4WLN9
Clear
Black
LC-4TBN9
Clear
Gold
LC-4TKN9
Espresso
White
LC-4NWT5
Black
Gold
LC-4BKP9
Black
White
LC-4BWV9
Metallic
Silver
Black
LC-4SBM9
Gold
Black
LC-4KBM9
Iron-on
White
Black
LC-4WBQ5
fabric
Blue
Black
LC-4LBQ5
Pink
Black
LC-4PBQ5
Glow-in-the-
Glow-in-the-
Black
LC-4ZBU1
dark
dark
Pearlized
Pink
Black
LC-4RBL9
Green
Black
LC-4GBL9
Blue
Black
LC-4LBL9
Pattern
White polka-
Gray
LC-4EAY9
dot on pink
Blue plaid on
Gray
LC-4CAY9
white
Epson is a registered trademark and Epson Exceed Your Vision is
a registered logomark of Seiko Epson Corporation. LC tape and
their logos are registered trademarks or trademarks of Seiko Epson
Corporation.
General Notice: Other product names used herein are for
identification purposes only and may be trademarks of their
respective owners. Epson disclaims any and all rights in those marks.
This information is subject to change without notice.
© 2011 Epson America, Inc. 6/11
CPD-34893
Printed in China
Advertisement

Related Manuals for Epson LW-400


Summary of Contents for Epson LW-400
- Page 1 Blue plaid on Gray LC-4CAY9 white Epson is a registered trademark and Epson Exceed Your Vision is a registered logomark of Seiko Epson Corporation. LC tape and their logos are registered trademarks or trademarks of Seiko Epson Corporation. General Notice: Other product names used herein are for identification purposes only and may be trademarks of their respective owners.
- Page 2 LC-4CAY9 bleus sur fond blanc Epson est une marque déposée et Exceed Your Vision est un logotype déposé de Seiko Epson Corporation. Le ruban LC et leurs logos sont des marques déposées ou des marques de commerce de Seiko Epson Corporation.