Table of Contents
Advertisement
Quick Links
Advertisement
Table of Contents

Related Manuals for Monster MGPELLET

Summary of Contents for Monster MGPELLET
- Page 1 OWNER’S MANUAL MGPELLET PELLET GRILL WITH TEMPERATURE CONTROL SYSTEM...
-
Page 2: Table Of Contents
CONTENTS Important Safety Information Product Overview General Information for Successful Assembly Parts Listing Assembly Preparing Your Grill for First Use Lighting Instructions Automatic Method Manual Method Shutdown Instructions Grill Operation Cooking Instructions Meat Probe Connection and Use Cooking Tips Cleaning and Maintenance Troubleshooting Manufacturer Support... -
Page 3: Important Safety Information
IMPORTANT SAFETY INFORMATION Please read this user manual before using this grill and keep it safe for future reference. Read the following instructions carefully Do not use the grill in wet or rainy ⚫ ⚫ and be sure your grill is properly installed, conditions. -
Page 4: Product Overview
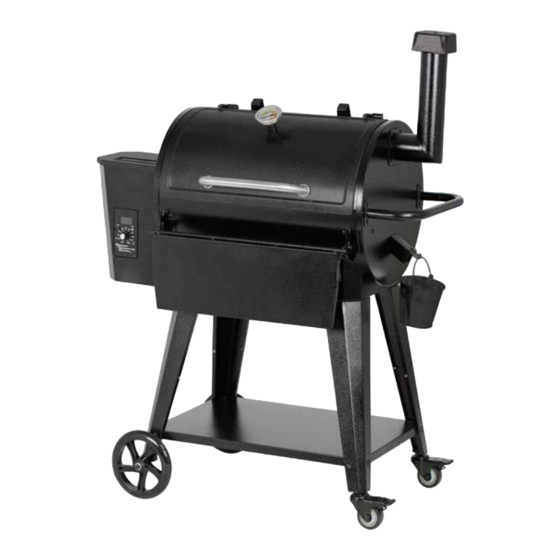
PRODUCT OVERVIEW Congratulations on the purchase of your pellet grill. Pellet grills have become popular in recent years due to their versatility in cooking and smoking food outdoors. With a large cooking area, a substantial volume of food can be cooked – perfect for entertaining! With the versatile cooking controller food can be smoked at low temperature or cooked up to 230°C or more. -
Page 5: General Information For Successful Assembly
GENERAL INFORMATION FOR SUCCESSFUL ASSEMBLY Please read the assembly instructions carefully and follow the safety precautions. Allow sufficient time for assembly. Before starting assembly, clear an area measuring approximately two to three square metres. Remove the item from the packaging and lay out all of the parts and any necessary tools so that they are within easy reach. - Page 6 Item Description Quantity 8” Wheel Temperature Bottom Gauge Panel Grease Tray Locking Caster Top Grid Bracket Smokestack Gasket Diffuser Leg – Right RTD Sensor Bucket Hopper Assembly Hanger Tray Bracket Front Table Side Handle Cord Bracket Grease Front Table Trough Bracket Cooking Lid Stop...
-
Page 7: Assembly
ASSEMBLY Please read and ensure all instructions are understood before beginning. 1. Remove Lid Save parts for Step 24 2. Position Cooking Chamber Use packaging foam to support the cooking chamber. - Page 8 3. Connect Right Legs [20] Right Leg – 2 pcs [A] M6 x 15 Hex Head Bolt – 8 pcs 4. Place Bottom Panel [17] Bottom Panel [A] M6 x 15 Hex Head Bolt – 4 pcs DO NOT TIGHTEN HARDWARE YET...
- Page 9 5. Attach Front Leg – Left and Rear Leg - Left [12] Front Leg – Left [15] Rear Leg - Left [A] M6 x 15 Hex Head Bolt – 12 pcs TIGHTEN ALL HARDWARE 6. Attach Locking Castors and 8” Wheels [16] 8”...
- Page 10 7. Install Grease Trough. With assistance, set grill upright to continue assembly [24] Grease Trough [A] M6 x 15 Hex Head Bolt – 2 pcs [D] M6 Hex Jam Nut – 2 pcs 8. Attach Smokestack [19] Smokestack Gasket [26] Smokestack [29] Chimney Cap [A] M6 x 15 Hex Head Bolt –...
- Page 11 9. Connect Side Handle [23] Side handle [A] M6 x 15 Hex Head Bolt – 4 pcs [D] M6 Hex Jam Nut – 4 pcs 10. Attach Bucket Hanger and Bucket [11] Grease Bucket [21] Bucket Hanger [A] M6 x 15 Hex Head Bolt – 1pc Suspend Bucket from Bucket Hanger...
- Page 12 11. Install RTD Temperature Sensor [5] RTD Sensor [F] M4 x 10 Bolt – 1pc [G] M4 Hex Jam Nut – 1 pc Begin by placing the Hopper Assembly into the end panel of the Cooking Chamber. Let it rest as needed to prevent it from falling out.
- Page 13 13. Attach Port Cover 13. Attach Port Cover [14] Port Cover [A] M6 x 15 Hex Head Bolt – 1 pc Do not tighten this bolt. Leaving it loose will allow the Port Cover to move. When using the Meat Probe, rotate the Port Cover open allowing the Meat Probe to pass into the Cooking Chamber.
- Page 14 15. Install Front Table [22] Front Table [A] M6 x 15 Hex Head Bolt – 1 pc [D] M6 Hex Jam Nut – 1pcs Insert right side of the Front Table into the right Front Table Bracket. Carefully move/twist the left Front Table Bracket until the Front Table will fit into the bracket.
- Page 15 17. Attach Lid Stop Brackets [10] Lid Stop Bracket [A] M6 x 15 Hex Head Bolt – 4pcs [D] M6 Hex Jam Nut – 4pcs 18. Install Cord Bracket [8] Cord Bracket [E] M5 x 12 Philips Head Bolt – 2 pcs...
- Page 16 19. Position Diffuser [4] Diffuser Note: The Diffuser includes special forming that prevents it from being installed incorrectly. Be certain the diffuser is installed correctly so that it rests in a flat position. 20. Insert Grease Tray [2] Grease Tray Caution: To prevent improper air flow and uneven heat distribution, be certain the right side rests inside the Grease Trough –...
-
Page 17: Preparing Your Grill For First Use
21. Place Grease Bucket onto Hanger [11] Grease Bucket 22. Install Cooking Grids [27] Cooking Grid... - Page 18 23. Install Top Grid [28] Top Grid 24. Replace Lid Use hardware saved from Step 1.
- Page 19 25. Attach Lid Handle [30] Bezel [31] Lid Handle [C] M6 x 20 Philips Head Bolt – 2 pcs 26. Install Temperature Gauge [1] Temperature Gauge Thread Temperature Gauge into the Lid. With the orientation correct, use the attached nut to lock the Temperature Gauge into position...
- Page 20 Assembly complete...
- Page 21 PREPARING YOUR GRILL FOR FIRST USE Firstly, ensure that you have read all safety instructions. Follow this procedure before first use or after any time the hopper and auger has been emptied. This should ONLY be performed when the grill is cool, before being used.
-
Page 22: Lighting Instructions
LIGHTING INSTRUCTIONS AUTOMATIC METHOD 1. With the grill properly set up and located for operation, ensure the control knob is in the “OFF” position. Plug the power cord into a 220 – 240V earthed electrical outlet. (Refer to instructions PREPARING YOUR GRILL FOR FIRST USE for more information. -
Page 23: Manual Method
MANUAL METHOD 1. With the grill properly set up and located for operation, ensure the control knob is in the “OFF” position. Plug the power cord into a 220-240V grounded electrical outlet. Do not use if the cord is damaged. 2. -
Page 24: Shutdown Instructions
SHUTDOWN INSTRUCTIONS 1. Turn the controller to “OFF”. The controller will begin its automatic shutdown procedure (see below) 2. Open the grill lid. Leave it open until “OFF” is displayed on the controller screen. 3. Close the grill lid and unplug the power cord. The grill controller has an automatic shutdown procedure which allows the flames to burn out naturally –... -
Page 25: Cooking Instructions
• Close the lid and allow the grill to maintain at least 205°C for about ten minutes. • Open the lid, set the controller to the desired temperature. Close the lid once the temperature is close to the desired setting. •... - Page 26 CAUTION! After cooking at high temperatures for an extended time, do not immediately unplug or turn the controller OFF. Set the grill into SMOKE mode and allow up to 15 minutes for the grill temperature to fall. Then turn the controller to OFF to enter shut down mode.
-
Page 27: Meat Probe Connection And Use
WARNING NEVER add wood pellets to the fire pot whilst it is hot or in use! Serious injury could result. POST COOKING INSTRUCTIONS Following each cooking session, it is recommended to operate the grill at a high temperature to burn off excess residue and juices and help maintain a clean appliance (similar to a self-cleaning oven). -
Page 28: Cooking Tips
A Port Cover is provided on the side of the grill enabling the Meat Probe to be passed through the grill and into the racking. Pull any loose wire back out of the grill and close the Port Cover. (See step 13 of assembly instructions) Note: When not in use the Meat Probe should be kept indoor, out of the reach of children and pets. -
Page 29: Cleaning And Maintenance
• Practice makes perfect. As with any smoker or grill, the more you use it, the more you understand the cooking temperatures and performance. • If you pre-cook meat or poultry, do so immediately before grilling. • Always wash hands thoroughly with soap and hot water prior to handling food, and after handling raw meat, uncooked poultry or seafood. -
Page 30: Troubleshooting
Depending on use, periodically remove wood pellet ash that has collected into the fire pot, the grill body and other parts. The grill COLD and UNPLUGGED. Remove the cooking grates and grease tray for access to the fire pot and grill body interior using a heavy-duty vacuum. - Page 31 The heating element only operates during the first five minutes of operation. Grill not getting hot Temperature set too low. Adjust the controller to a higher enough Grill lid left open too long. temperature. No fire burning. Open grill lid only when necessary. Inspect hopper for pellets and fire pot for ash.
- Page 32 Verify there is power at the mains / RCD. Check the operation of the RCD. If igniter is not working check the 5A fuse on the back of the controller. Replace if necessary. Controller Ensure controller is in off position. Turn controller to SMOKE.
-
Page 33: Manufacturer Support
(within several degrees) set the new desired cooking temperature. MANUFACTURER SUPPORT 0330 390 3062 Office hours: 9AM - 5PM Monday to Friday Monster Grill Unit J6, Lowfields Business Park Lowfields Way, Elland West Yorkshire, HX5 9DA...