Advertisement
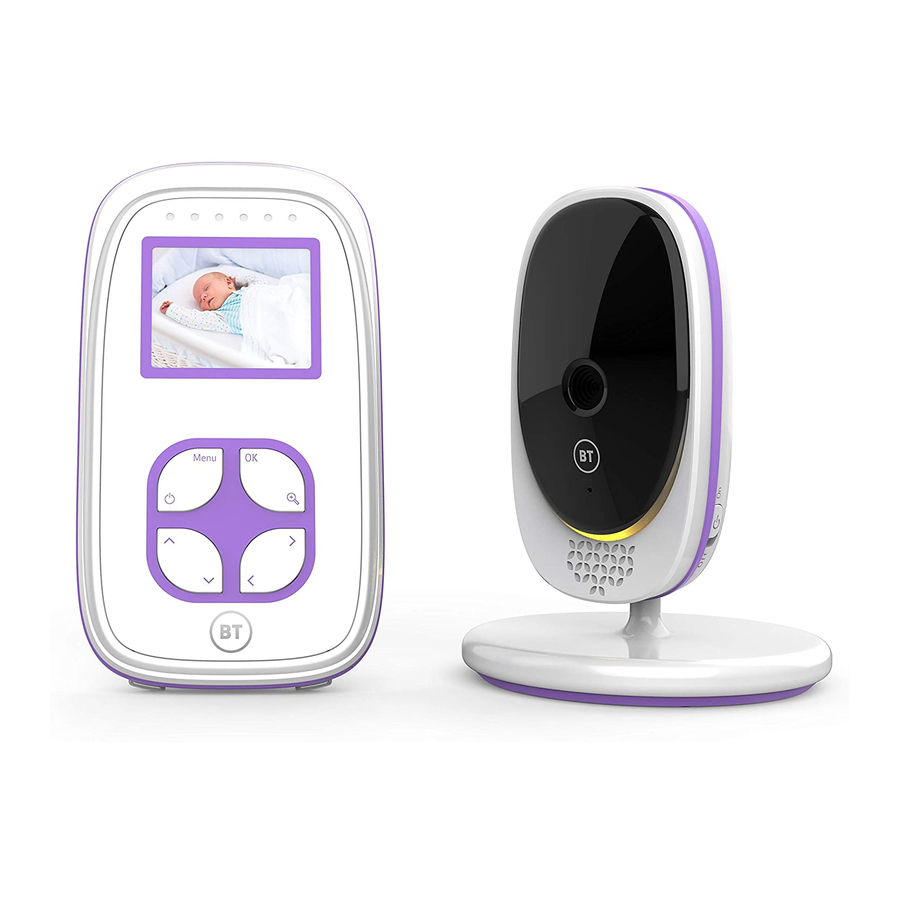
Welcome
You'll soon be able to relax knowing you can watch and listen for your baby's every breath, gurgle and wriggle.
But first things first. To get set up, just follow the steps opposite. If you need any help, go to bt.com/producthelp or give us a call on 0808 100 6554*.
Important safety notices
- Your baby monitor is designed as just an aid. It isn't a substitute for responsible and proper adult supervision.
- Make sure all cables and units are out of your baby's reach – at least one metre away.
- Never cover either unit, put them in moist places or inside the cot, bed or playpen.
- If you travel abroad, check the voltage on your unit's plugs match the local power output.
- Do not take the product apart. If you need repairs, get in touch with our helpdesk.
Getting set up
- Plug the cable into the Parent unit, then plug it into the mains power socket and switch the socket on.

- Leave to charge for 12 hours.
Tip
The first time you use the Parent unit, or if you haven't used it for a long time, it'll take 12 hours to fully charge. When the battery gets very low, it'll take about 30 minutes to charge enough for you to use it for a short time. To charge the Parent unit in the shortest amount of time, turn it off while it's charging. - Place the Baby unit near a power socket in the room where you're going to be monitoring your baby most of the time. It should also be at least one metre away from your baby.
- Plug the cable into the Baby unit, then plug it into the mains power socket and switch the socket on.

- Slide the
![]() button on the side of the Baby unit up to turn it on.
button on the side of the Baby unit up to turn it on.
Tip
Keep the power cord out of baby's reach by looping any extra length and securing it. - After the Parent unit has charged for 12 hours you can switch it on.
Before you do, move the Parent unit at least one metre from the Baby unit. Any closer and you might get audio feedback sounds.
Press the![]() button and hold for 2 seconds to turn the Parent unit on.
button and hold for 2 seconds to turn the Parent unit on.

The Parent and Baby unit are automatically linked so they are now ready to use.


 button on the side of the Baby unit up to turn it on.
 button and hold for 2 seconds to turn the Parent unit on.
What's the range?
The maximum range between your Parent and Baby units is about 250 metres outdoors and about 50 metres indoors. Thick walls and doors reduce the units' range and affect how they link to each other.
Using the Parent unit
 Turn on and off
Press and hold for 2 seconds to turn on and off.
 Using the menu
- Press
![]() to open the main menu. Scroll through the menu options using
to open the main menu. Scroll through the menu options using ![]() and
and ![]() . When the menu option you want is displayed, press. Use
. When the menu option you want is displayed, press. Use ![]() or
or ![]() to scroll through the sub menus and press
to scroll through the sub menus and press ![]() to select.
to select. - Press
![]() to exit the menu and return to the main monitoring screen.
to exit the menu and return to the main monitoring screen.
 and
and  . When the menu option you want is displayed,
 Monitoring volume and mute
There are 8 volume settings.
- In normal monitor mode (X1), press
![]() or
or ![]() to change the volume.
to change the volume. - Press
![]() to confirm.
to confirm. - To turn the sound off completely, turn the volume down to 0.
![]() will be displayed on top of the screen.
will be displayed on top of the screen.
 will be displayed on top of the screen.
 Screen brightness
There are 8 brightness levels. The default is 4.
- In normal monitor mode (X1), press
![]() or
or ![]() to select the brightness level.
to select the brightness level. - Press
![]() to confirm.
to confirm.
 Lullabies
There are 5 lullabies to choose from or you can play all 5 in sequence.
- Press
![]() ,
, ![]() is displayed, press
is displayed, press ![]() .
. - Press
![]() or
or ![]() to choose the lullaby 1-5 or press
to choose the lullaby 1-5 or press ![]() to play all five, then press
to play all five, then press ![]() .
. - Press
![]() or
or ![]() to select the volume from 1-3 and press
to select the volume from 1-3 and press ![]() to save.
to save. - To stop the lullaby playing, select
![]() .
.
 is displayed, press
  to play all five, then press
  .
. Talk to your baby
To give your baby some words of comfort, press and hold down  on the Parent unit and speak into the Parent unit's microphone. The
  icon will be displayed at the bottom right corner. Release the button when you've finished speaking.
 Zoom in and out
- Press
![]() , then press
, then press ![]() to display
to display ![]() and press
and press ![]() .
. - Press
![]() or
or ![]() to select the zoom level (X1 or X2), then press
to select the zoom level (X1 or X2), then press ![]() to save.
to save. - Press
![]() to return to the main monitoring screen.
to return to the main monitoring screen. - Whilst in X2 mode, press
![]() ,
, ![]() ,
, ![]() or
or ![]() to move the image.
to move the image. - To adjust the volume or screen brightness when in X2 zoom mode, press
![]() and select the
and select the ![]() or
or ![]() option and press
option and press ![]() .
.
 and press
  or
or  to move the image.
 or
or  option and press
 Get to know your Baby unit

Link button
The units are pre-linked. (Link button used if re-link ever required).
 Add camera
 Delete camera
 View camera

Power on/off
Slide button up to turn on and slide down to turn off.
Manual pan and tilt
Gently move the camera to adjust the angle.
Get to know your Parent unit

Sound level display
LED lights show the level of sound being detected from the Baby unit.
![]()
Press and hold to turn the unit on and off. Press once to switch to standby mode.

Press and hold to talk to your baby.
![]()
Press to select an option in the menu.

Press to open/exit the main menu.

Press to increase or decrease the brightness level, or press to move left or right when in the zoom mode (X2).

Press to increase or decrease the speaker volume, when in normal mode (X1). Press to move up or down when in the zoom mode (X2). Press to scroll up or down when you're in the menu.
Power on light
Green when Parent unit turned on. (Remains green for one minute while charging, after the parent unit is turned off).
Charging/ battery light
Blue when mains power adapter is on, red when battery low.

 Set a reminder
You can set an alert to remind you of something you need to do, for example when your baby's next feed is due. You can set it for 2, 4 or 6 hours.
- Press
![]() , then press
, then press ![]() to display
to display ![]() and press
and press ![]() .
. - Press
![]() or
or ![]() to select the reminder time (2H, 4H or 6H), then press
to select the reminder time (2H, 4H or 6H), then press ![]() to save. The
to save. The ![]() will be displayed on the top right of the screen.
will be displayed on the top right of the screen. - To cancel the alert, select
![]() .
.
 and press
  .
. Set the screen to turn on and off automatically
You can set the screen to turn on by pressing any button. On this setting, the screen will turn off automatically when no button is pressed during 1, 3 or 5 minutes.
- Press
![]() , then press
, then press ![]() to display
to display ![]() and press
and press ![]() .
. - Press
![]() and
and ![]() to select 1, 3 or 5 minutes and press
to select 1, 3 or 5 minutes and press ![]() .
. - To turn the screen back on at any time, press any button. If you want to set the screen on all the time, set the screen setting
![]() to off
to off ![]() .
.
 and press
  Turn sound activated screen mode on or off
When set to On, the screen will turn on if noise is detected from the Baby unit. If it's set to Off, the screen will stay off even if noise is detected. To use this feature, you need to set the standby mode first to 1, 3 or 5 minutes as described above.
- Press
![]() , then press
, then press ![]() to display
to display ![]() and press
and press ![]() .
. - Press
![]() and
and ![]() to select
to select ![]() (for On) or
(for On) or ![]() (for Off) and press
(for Off) and press ![]() .
. - To turn the screen back on at any time, press the
![]() .
.
 and press
  (for On) or
  (for Off) and press
  Temperature sensor
The reading from the temperature sensor will be displayed at the top of the Parent unit screen.
To change the temperature display from C to F:
- Press
![]() , then press
, then press ![]() to display
to display ![]() and press
and press ![]() .
. - Press
![]() or
or ![]() to select °C or °F, then press
to select °C or °F, then press ![]() .
.
 and press
 Other screen icon descriptions
 | Signal strength |  | Sound on |
 | Baby unit switched on |  | Mute |
 | Camera identification number e.g. Camera 1 |  | Battery status (Full battery shown, scrolling when charging) |
Using the Baby unit
 Turn on and off
- Slide the
![]() button on the side of the unit up to turn On and press down to turn Off.
button on the side of the unit up to turn On and press down to turn Off.
 button on the side of the unit up to turn On and press down to turn Off.
 Night vision
So that you can see your baby at night, the Baby unit automatically uses the light from its infrared LED lights to capture images in a dark room. Because of that, it can only show images in black and white.
The  icon will be displayed at the top of the screen.
Troubleshooting
My Parent/Baby unit isn't working. What should I do?
Check that:
- power cables are plugged in and switched on at the wall socket
- the Baby unit is plugged in and the Parent unit battery is fully charged (for 12 hours)
- both units are turned on
- the Parent unit isn't too far from the Baby unit (large obstructions or other electrical devices might affect the signal between the Parent and Baby unit).
- unplugging the power cables, waiting about 15 seconds, and then plugging them back in can help.
My Parent/Baby unit is making a high-pitched noise. What should I do?
The units might be too close together. Make sure they're at least one metre apart, even when you're using the  button.
Why is my Parent unit beeping?
The Parent unit beeps when:
- the Baby unit is turned off
- the units are too far apart – try moving them closer together (but not closer than one metre)
- the battery in the Parent unit isn't charged – try charging it for 12 hours
- Other electronic items, like TVs and mobile phones, are causing interference – try moving the Baby unit away from things like that.
Why is the Parent unit not making any sounds even though there's noise coming from my baby's room?
- the Parent unit might not be fully charged – make sure it's charged (for 12 hours).
- the speaker volume might be switched off.
- the Parent unit might be out of range of the Baby unit – try moving it closer (but not closer than one metre).
- large obstructions or other electrical devices might be affecting the signal between the Parent and Baby units). Try moving the Baby unit away from obstructions, including electrical appliances like TVs or mobile phones.
Need some help?
Frequently asked questions are available online.

bt.com/producthelp
If you cannot find the answer to your question online, call our free Helpline. Our dedicated advisors are more likely to be able to help you than the retailer where you bought your baby monitor.

0808 100 6554*
This user guide is also available in other formats: large print, Braille and audio CD. Call the helpline for a copy.
* Calls made from within the UK mainland network are free.
Mobile and international call costs may vary.

Documents / Resources
References
Download manual
Here you can download full pdf version of manual, it may contain additional safety instructions, warranty information, FCC rules, etc.
Advertisement
Thank you! Your question has been received!


Need Assistance?
Do you have a question about the 3000 that isn't answered in the manual? Leave your question here.