AEG IKE42640KB User Manual
Hide thumbs
Also See for IKE42640KB:
- User manual (408 pages) ,
- User manual (20 pages) ,
- User manual (64 pages)
Table of Contents
Advertisement
Quick Links
Advertisement
Chapters
Table of Contents

Related Manuals for AEG IKE42640KB


Summary of Contents for AEG IKE42640KB
- Page 1 IKE42640KB 用户手册 电磁灶 User Manual USER MANUAL...
-
Page 2: Table Of Contents
3. 安装........................5 4. 产品说明........................8 5. 日常使用........................9 6. 建议和提示......................12 7. 养护和清洁......................13 8. 异常处理......................14 9. 技术数据......................15 10. 能效........................15 11. AEG 家用电器 " 三包 " 服务指南............... 16 12. 环保问题......................18 力求完美 感谢您选择这款 AEG 产品。我们打造这款产品,旨在多年来始终为您提供完美的 性能,其采用了普通设备上所没有的创新技术,帮助让您的生活变得更加简单。请 花几分钟时间阅读,以便充分了解该款产品的功能。 欢迎使用 AEG 产品。 访问我们的网站: 获取使用建议、手册、故障检修工具、检修信息: www.aeg.cn... - Page 3 中文 1.1 未成年人及弱势群体安全 应对儿童加强看管,确保他们不将本机当做玩具。 • 所有包装物都必须远离未成年人,且予以妥善处置。 • 警告:使用期间,本机及其可接触部件会发热。在使用 • 和冷却期间,请让儿童和宠物远离本机。 如果本机配备未成年人安全装置,则应将其打开。 • 在无人监管的情况下,未成年人不能擅自清理和维护本 • 机。 1.2 一般安全 本机仅用于烹饪, • 本电器是为单户家庭在室内环境中使用而设计的。 • 本电器可用于办公室、酒店客房、住宿加早餐的客房、 • 农场招待所和其他类似使用量不超过(平均)家庭使用 水平的住宿场所。 警告:使用期间,本机及其可接触部件会发热。必须格 • 外注意,以免碰触发热的部件。 警告:在使用油脂或植物油在炉具上烹制食品时,如果 • 无人看守,则存在危险,并可能导致火灾。 切勿用水来扑灭烹饪的火。关闭此电器,用防火毯或盖 • 子等覆盖火焰。 警告:本机不得通过外部开关装置(例如定时器)供 • 电,也不得连接到由某一设施定期开关的电路。 小心:烹饪过程中必须有人看守。短时间烹饪也必须始 • 终有人看守。 警告:火灾危险:请勿在烹饪表面存放物品。...
-
Page 4: 安全说明
如果电源线受损,必须由制造商、授权服务方或具备类 • 似资质的人员进行更换,以免发生危险。 警告:仅使用烹饪设备制造商设计的炉具防护装置,或 • 者是本机制造商在说明书中指明适合使用的炉具防护装 置,或者是本机随附的炉具防护装置。防护装置使用不 当会造成意外事故。 2. 安全说明 2.1 安装 • 在执行任何操作前,请确保机器已断 开电源。 警告! • 确保铭牌上的参数与主供电电源的电 必须由具备资质的人员安装 气额定值兼容。 本机。 • 确保机器已正确安装。电源线或插头 松动和不正确(如果适用)会导致端 子过热。 警告! • 请使用正确的电源线。 存在人员受伤或本机受损的 危险。 • 不要让电源线缠结。 • 确保已安装防震装置。 • 去除所有包装物。 • 使用在电缆上使用卸压夹。 • 请勿安装或使用已损坏的设备。... - Page 5 中文 • 初次使用前,请取下所有包装、标签 • 注意不要让物品或炊具掉落在本机 和保护膜(如适用)。 上。否则表面可能受损。 • 确保通风口未被堵塞。 • 切勿在炊具中空或未放置炊具的情况 • 本机运行时,必须有人照看。 下启用烹饪区域。 • 每次使用后,请将烹饪区域设置为“关 • 请勿将铝箔放在本机上。 闭”。 • 铸铁质或底部受损的炊具可能造成玻 • 请勿将餐具或锅盖放在烹饪区上,它 璃/玻璃陶瓷划痕。必须在烹饪表面上 们会变热。 移动这些物品时,务必将其抬起。 • 双手潮湿或本机有水分附着时,请勿 2.4 保养与清洗 操作本机。 • 请勿将本机用作工作台面或储存台 • 定期清洁机器,以防止表面材料劣 面。 化。 • 如果本电器表面出现裂纹,请立即断 • 关闭机器,使其冷却后再进行清洁。 开电源,以防触电。...
- Page 6 上。 请勿拉扯封条。确保封条两端位 于感应炉一侧的中间。 3. 在剪切封条时,可多留出几毫米的长 min. 度。 12 mm 4. 将封条两端连接在一起。 min. 2 mm 3.5 装配 min. 500mm min. 50mm min. min. 2 mm < 20 mm min. 500 mm 30 mm 12 mm 57 mm 28 mm 41 mm...
- Page 7 中文 360 mm 360 mm 20 mm 700 mm min. 2 mm > 20 mm 安装 • 计算正确的开孔尺寸。 min. 500 mm • 准备台面开孔。 • 把设备放在柔软的表面上(如毯 12 mm 57 mm 子),底部朝上。 28 mm 41 mm • 若是铁板烧设备,则沿着玻璃陶瓷的 38 mm 31 mm 外边缘,将随附的密封条贴在设备下...
-
Page 8: 产品说明
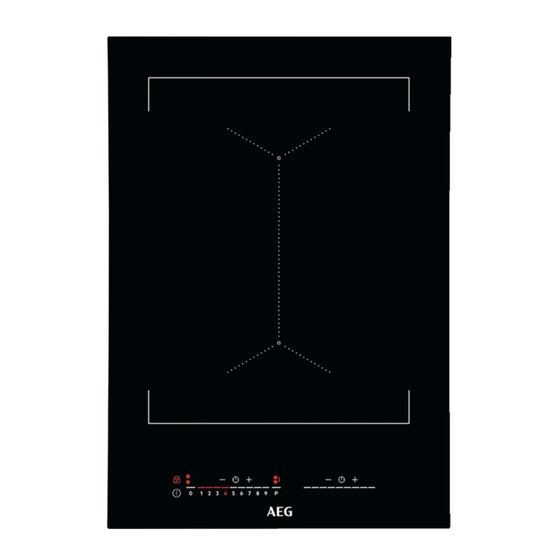
• 使用硅胶密封住设备之间以及设备与 • 请勿触摸硅胶,直到它变硬,这可能 台面之间的缝隙。 会持续一天。 • 把橡胶成型件压紧在玻璃陶瓷上,沿 • 用剃须刀小心地去除溢出的硅胶。 着边缘慢慢移动,以挤出多余的硅 • 清洁玻璃表面。 胶。 • 在硅胶上放一些肥皂水,用手指把边 缘抹平。 4. 产品说明 4.1 烹饪面布局 感应烹饪表面 控制板 4.2 控制面板布局 启用和停用感应炉。 要启用和停用 Bridge。 要启用和停用 锁定 或 儿童安全 要选择 计时器 功能。 锁。 增加和缩短时间。 要显示活动区域。 要启用和停用 暂停。... -
Page 9: 日常使用
中文 4.3 OptiHeat Control (步骤 3 可见。感应炉足够冷却之后,指示灯不再 显示。即便您没有使用旁边的烹饪区域, 余热指示灯) 旁边烹饪区域的指示灯也可能会亮起。 警告! 电感加热式烹饪区域在炊具底部直接提供 烹饪过程所需热量。玻璃陶瓷使用炊具的 小心因余热烫 热量进行加热。 伤! 指示灯显示您当前正在使用的烹饪区域的 余热水平。感应炉关闭之后,指示灯仍然 5. 日常使用 5.3 使用烹饪区域 警告! 请参阅“安全”一章。 警告 请勿在控制板上放置热炊 5.1 启用和停用 具。这样可能损坏电子部 件。 按触 1 秒钟以启用或停用感应炉。 控制板会在您启用感应炉时亮起,并在停 用感应炉时熄灭。 5.2 自动关机 在下列情况下,此功能会自动停用感应 炉: • 50 秒内您没有将任何炊具放在感应炉 上,... - Page 10 该功能自动停用。 如欲了解最大的持续时间 值,请参阅“技术数据”。 5.7 计时器 将锅放在烹饪区域上并设置加热设置之 倒计时定时器 后,即便您将锅拿走,它也会将相同的设 置保持 2 分钟。控制栏和烹饪区域指示灯 使用此功能指定在一次烹饪会话中烹饪区 闪烁 2 分钟。如果您在 2 分钟内再次将锅 域应该运作的时长。 放到烹饪区域上,加热设置会重新激活。 否则烹饪区域会停用。 先设置加热设置,然后设置此功能。 5.5 Bridge 1. 按触 以启用该功能或更改时间。 计时器数字 和指示灯 以及 出 此功能可连接两个烹饪区域,烹饪区域作 为整体运行。在使用该功能时,您可以使 现在显示屏上。 变成红色, 变成白 用较大的炊具。 色。 如果未设置计时器,所有指示灯将在 4 秒...
- Page 11 中文 2. 按触 或 设置时间。 按触 直到它变成红色即可启用该功 能。 4 秒钟后,该功能自动启动。指示灯 、 不再显示控制栏。关闭感应炉。 和 不再显示。 继续保持红色。 关闭感应炉时,该功能仍处 当您设置功能时,可以将锅拿下。 于活动状态。 计时快要结束时,声响信号响起, 闪 仅在一次烹饪时间内关闭该功能: 使用 烁。按触 可停止信号。 启用感应炉。 亮起。按触 直到 它变成白色。不再显示控制栏。50 秒钟 关闭下述功能:按触 。指示灯 和 之内设置加热设置。您可以操作感应炉。 亮起。使用 或 以便在显示屏上 使用 停用感应炉时,该功能仍处于活 设置 。 动状态。...
-
Page 12: 建议和提示
• 该功能的启用与锅的数量和大小相 关。 6. 建议和提示 6.2 运行过程中的噪音 警告! 请参阅“安全”一章。 如果您能听到: • 爆裂噪音:则炊具采用不同材料制成 6.1 炊具 (夹心结构)。 • 汽笛声:表示您使用的是具有大功率 电感加热式烹饪区域强大的 水平的烹饪区域,且炊具采用不同材 电磁场可让炊具快速升温。 料制成(夹心结构)。 • 嗡嗡声:则您使用的是大功率水平。 使用电感加热式烹饪区域 • 滴答声:电气开关打开,。 时,请配置适当的炊具。 • 嘶嘶声,嗡嗡声:则风扇正在运转。 这些噪音均为常见噪音,不代表任何故 炊具材料 障。 • 正确: 铸铁、钢、搪瓷钢、不锈钢、 6.3 节能 多层底(带有厂商的正确标记)。 • 不正确: 铝、铜、黄铜、玻璃、陶... -
Page 13: 养护和清洁
中文 加热设置 用途: 时间 建议 (分 钟) 为煮熟的食物保温。 如有必 给炊具盖上盖子。 要 1 - 2 荷兰酸辣酱,熔化:黄油、巧 5 - 25 不时搅拌。 克力、明胶。 1 - 2 凝固:松软煎蛋卷、烤蛋。 10 - 40 烹制时盖上盖子。 2 - 3 焖米饭与奶类食品,加热速食 25 - 50 加入至少两倍于大米的液体, 饭菜。 并在中途搅拌奶类食品。 3 - 4 蒸蔬菜、鱼、肉。... -
Page 14: 异常处理
8. 异常处理 警告! 请参阅“安全”一章。 8.1 如果出现以下情况,应该如何处理... 故障 可能的原因 补救方法 无法启动或操作感应炉。 感应炉未与电源连接或连接 检查感应炉是否正确连接到 有误。 电源。请参阅连接图。 保险丝断开。 请确认保险丝是否为故障原 因。如果保险丝屡次断开, 请联系有资质的电工。 您同时按触了 2 个或多个感 只触摸一个感测区域。 测区域。 暂停 在运行。 参考“日常使用”。 控制板上有水或油渍。 清洁控制板。 您无法为其中一个烹饪区域 其他区域消耗可用的最大功 降低连接至同一相位的其他 选择最大加热设置。 率。 烹饪区域的加热设置。 您的感应炉正常工作。 请参阅“电源管理”。 发出声响信号之后,感应炉 您在一个或多个感测区域上 移除感测区域上的物品。... -
Page 15: 技术数据
如果自己找不到解决问题的方法,请联系 服务中心说明与保修条件,请见保修手 经销商或授权服务中心。提供铭牌上的数 册。 据。 请确认,您对感应炉的操作正确。如 果设备因人为不当操作造成故障,则即使 9. 技术数据 9.1 铭牌 型号 IKE42640KB PNC 949 597 765 00 类型 61 A2A 00 AD 220 - 240 V 50 - 60 Hz 电感加热功率 3.65 kW 德国制造 序列号 ....3.65 kW 9.2 烹饪区域规格... -
Page 16: Aeg 家用电器 " 三包 " 服务指南
• 将较小的炊具放在较小的烹饪区域 上。 如果在日常烹调中遵循下列提示,则可以 • 将炊具直接放在烹饪区域的中央。 节能。 • 请利用余热为食物保温或融化食物。 • 需要多少开水,就烧多少水。 11. AEG 家用电器 " 三包 " 服务指南 AEG 家用电器 " 三包 " 标准 华人民共和国产品质量法》、《部分 商品修理更换退货责任规定》和有关 • 为保证使用 AEG 家用电器的消费者获 法规制定如下 " 三包 " 标准。 得满意的售后服务 , 本公司将严格遵守 国家颁布的有关法律 , 遵照 《中华人... - Page 17 中文 嵌入式电灶 电源模块、控制模块、显示模 块、加热丝、控温装置、玻璃 面板 微波炉 电机、磁控管、显示模块、电 源模块 嵌入式咖啡机 电源模块、显示模块、加热 丝、控温装置、研磨电机、酿 造电机、加热管 嵌入式烤箱 - 电源模块、显示模块、加热 丝、控温装置、散热电机、背 部电机 嵌入式电蒸箱 电源模块、显示模块、加热 丝、控温装置、散热电机、蒸 汽发生器 洗碗机 电源模块、显示模块、 洗涤 泵、加热器 嵌入式抽屉 电源模块、显示模块、电机、 真空泵 吸尘器 电源模块、控制模块、电机 厨师机 电机 去渍笔/搅拌器/烧水壶 一、 整机免费保修壹年 ,主要部件保修 • 自行或非经本公司授权维修中心拆修 期详见上表(有效期自发票开具之日算 而造成损坏的。 起)。...
-
Page 18: 环保问题
顾客地址及邮编 产品名称 产品代码( PNC) 产品型号 产品机号 销售店名称 销售店电话 维修记录 维修站名称 送修日 故障内容 故障原因 维修内容 维修技师签字 交验日期 维修站名称 送修日 故障内容 故障原因 维修内容 维修技师签字 交验日期 维修站名称 送修日 故障内容 故障原因 维修内容 维修技师签字 交验日期 12. 环保问题 电器与生活垃圾一起处理。将产品退回到 回收带有该标志 的材料。把包装材料 您当地的回收处,或联系您所在城市的办 放入适用的容器以循环利用。帮助保护环 事处。 境和人类健康,促进电气及电子产品废物... - Page 19 中文...
-
Page 20: Safety Information
11. ENVIRONMENTAL CONCERNS..............37 WE’RE THINKING OF YOU Thank you for purchasing an AEG appliance. You’ve chosen a product that brings with it decades of professional experience and innovation. Ingenious and stylish, it has been designed with you in mind. So whenever you use it, you can be safe in the knowledge that you’ll get great results every time. - Page 21 ENGLISH 1.1 Children and vulnerable people safety Children should be supervised to ensure that they do • not play with the appliance. Keep all packaging away from children and dispose of • it appropriately. WARNING: The appliance and its accessible parts •...
-
Page 22: Safety Instructions
WARNING: Danger of fire: Do not store items on the • cooking surfaces. Metallic objects such as knives, forks, spoons and lids • should not be placed on the hob surface since they can get hot. Do not use the appliance before installing it in the •... - Page 23 ENGLISH • If the appliance is installed above • Make sure not to cause damage to drawers make sure that the space, the mains plug (if applicable) or to the between the bottom of the appliance mains cable. Contact our Authorised and the upper drawer is sufficient for Service Centre or an electrician to air circulation.
-
Page 24: Installation
• If the surface of the appliance is lift these objects up when you have to cracked, disconnect immediately the move them on the cooking surface. appliance from the power supply. This 2.4 Care and cleaning to prevent an electrical shock. - Page 25 ENGLISH Serial number ......3.2 Built-in hobs Only use the built-in hobs after you assemble the hob into correct built-in units and work surfaces that align to the standards. 3.3 Connection cable • The hob is supplied with a connection cable.
- Page 26 Use only a special heat- resistant silicone. min. 2 mm The worktop cutout Distance minimum 50 mm < 20 mm from the wall Length 490 mm min. 500 mm 30 mm Width the sum of all widths of appli‐...
-
Page 27: Product Description
ENGLISH • Use silicone to seal the gaps between the appliances and those between the appliances and the worktop. • Press the rubber shape firmly against the glass ceramic and move it slowly along the edges to squeeze out excess silicone. •... -
Page 28: Daily Use
4.2 Control panel layout To activate and deactivate the To activate and deactivate Bridge. hob. To select Timer functions. To activate and deactivate Lock or To increase and decrease Child Safety Device. the time. To show the active zone. - Page 29 ENGLISH deactivates. Remove the object or and the appropriate control bar comes clean the control panel. on. A red cooking zone indicator appears • the hob gets too hot (e.g. when a above the control bar and indicates the saucepan boils dry). Let the cooking position of the pot.
- Page 30 If the timer is not set, all indicators disappear after 4 seconds. 2. Touch to set the time (00 - 99 minutes). After 3 seconds, the timer starts to count down automatically. The indicators , and disappear. stays red.
- Page 31 ENGLISH To deactivate the function: touch . The You need to activate the function for each appliance indicators light up. Use separately. to set on the display. Activate the hob first and do not set the The function has no effect heat setting.
-
Page 32: Hints And Tips
• you put something on the control • If a higher heat setting is not available panel. reduce it for the other cooking zones first. 5.12 Power management • The activation of the function depends on the number and size of pots. - Page 33 ENGLISH • humming: you use a high power level. count down timer sounds. The difference • clicking: electric switching occurs. in the operation time depends on the • hissing, buzzing: the fan operates. heat setting level and the length of the The noises are normal and do not cooking operation.
-
Page 34: Care And Cleaning
Heat setting Use to: Time Hints (min) Boil large quantities of water. PowerBoost is activated. 7. CARE AND CLEANING otherwise, the dirt can cause damage WARNING! to the hob. Take care to avoid burns. Refer to Safety chapters. Use a special hob scraper on the glass surface at an acute angle and 7.1 General information... - Page 35 ENGLISH Problem Possible cause Remedy There is water or fat stains Clean the control panel. on the control panel. You cannot select the maxi‐ The other zones consume Reduce the heat setting of mum heat setting for one of the maximum available pow‐ the other cooking zones con‐...
-
Page 36: Technical Data
Make sure, you operated the hob correctly. If not the 9. TECHNICAL DATA 9.1 Rating plate Model IKE42640KB PNC 949 597 765 00 Typ 61 A2A 00 AD 220 - 240 V 50 - 60 Hz Induction 3.65 kW... -
Page 37: Energy Efficiency
ENGLISH 10. ENERGY EFFICIENCY 10.1 Product information according to EU 66/2014 Model identification IKE42640KB Type of hob Built-In Hob Number of cooking areas Heating technology Induction Lenght (L) and width (W) of Middle L 36.5 cm the cooking area W 27.5 cm... - Page 38 www.aeg.com...
- Page 40 www.aeg.cn...