Nokia X3 User Manual
Nokia x3: user guide
Hide thumbs
Also See for X3:
- User manual (160 pages) ,
- Service manual (27 pages) ,
- Service schematics (7 pages)
Table of Contents
Advertisement
Quick Links
Advertisement
Table of Contents

Related Manuals for Nokia X3


Summary of Contents for Nokia X3
- Page 1 Nokia X3-00 User Guide Issue 2...
-
Page 2: Table Of Contents
Navigate the menus Lock the keys Functions without a SIM card Flight profile Support and updates Support My Nokia Download content Software updates using your PC Software updates over the air Restore factory settings Make it your device Basic settings... - Page 3 Date and time Alarm clock Calendar To-do list Notes Calculator Countdown timer Stopwatch Green tips Save energy Recycle Learn more Product and safety information Index...
-
Page 4: Safety
Safety Read these simple guidelines. Not following them may be dangerous or illegal. Read the complete user guide for further information. SWITCH ON SAFELY Do not switch the device on when wireless phone use is prohibited or when it may cause interference or danger. ROAD SAFETY COMES FIRST Obey all local laws. - Page 5 ACCESSORIES AND BATTERIES Use only approved accessories and batteries. Do not connect incompatible products. WATER-RESISTANCE Your device is not water-resistant. Keep it dry.
-
Page 6: Get Started
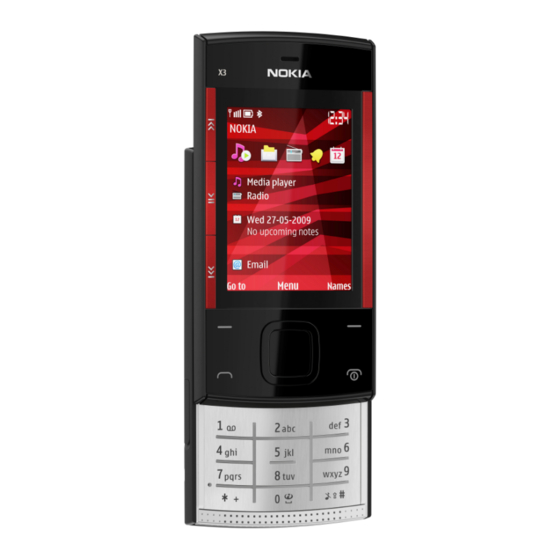
Get started Get to know your phone, insert the battery, SIM card, and memory card, and learn some important information about your phone. Keys and parts Earpiece Music key: skip/rewind Music key: play/pause Music key: skip/forward Left and right selection key Call key Microphone Display... - Page 7 Get started 10 End/Power key 11 Keypad 12 Loudspeaker 13 Loudspeaker 14 Nokia AV Connector (3.5 mm) 15 Charger connector 16 Micro USB cable connector 17 Volume keys 18 Capture key 19 Camera lens 20 Memory card slot 21 Wrist strap eyelet...
-
Page 8: Insert The Sim Card And Battery
Insert the SIM card and battery Note: Switch off the power and disconnect the charger and any other device before removing the covers. Avoid touching electronic components while changing the covers. Always store and use the device with the covers attached. The SIM card and its contacts can be easily damaged by scratches or bending, so be careful when handling, inserting, or removing the card. -
Page 9: Insert And Remove The Memory Card
Line up the battery contacts, and insert the battery. Replace the back cover. Insert and remove the memory card Use only compatible microSD cards approved by Nokia for use with this device. Nokia uses approved industry standards for memory cards, but some brands may not be fully compatible with this device. - Page 10 Your device supports microSD cards with a capacity of up to 8 GB. The size of a single file must not exceed 2 GB. Insert the memory card Open the cover of the memory card slot. Insert the card into the memory card slot with the contact surface facing down, and press until it locks into place.
-
Page 11: Charge The Battery
Charge the battery Your battery has been partially charged at the factory. If the device indicates a low charge, do the following: Connect the charger to a wall outlet. Connect the charger to the device. When the device indicates a full charge, disconnect the charger from the device, then from the wall outlet. -
Page 12: Gsm Antenna
Get started GSM antenna Your device may have internal and external antennas. Avoid touching the antenna area unnecessarily while the antenna is transmitting or receiving. Contact with antennas affects the communication quality and may cause a higher power level during operation and may reduce the battery life. The figure shows the GSM antenna area marked in grey. - Page 13 When connecting any external device or any headset, other than those approved by Nokia for use with this device, to the Nokia AV Connector, pay special attention to volume levels.
-
Page 14: Switch It On
Your device may have preinstalled bookmarks and links for third-party internet sites and may allow you to access third-party sites. These are not affiliated with Nokia, and Nokia does not endorse or assume liability for them. If you access such sites, take precautions for security or content. -
Page 15: Network Services
For more information, contact a Nokia Care point or your phone dealer. The PIN (UPIN) code, supplied with the SIM (USIM) card, helps to protect the card •... -
Page 16: Switch The Device On And Off
To view or change the security module settings for the browser, select • Menu Settings > Switch the device on and off Switch on and off Press and hold the power key. Enter the PIN code If requested , enter the code PIN code (displayed as ****). Set the time and date If requested, enter the date, the local time, and the time zone and the daylight saving time of your location. -
Page 17: Standby Mode
Standby mode When the phone is ready for use, and you have not entered any characters, the phone is in the standby mode. Display Signal strength of the cellular network Battery charge status Indicators Clock Name of the network or the operator logo Date (only if the Home screen is deactivated) Display Function of the left selection key... - Page 18 Home screen The home screen displays a list of selected features and information that you can directly access. Select Menu Settings > Activate the home screen Select Home screen mode. Organise and personalise the home screen Select Personalise view. Select a key to activate the home screen Select Home screen key.
-
Page 19: Navigate The Menus
Call the voice mailbox Press and hold 1. Use other keys as shortcuts See "Dialling shortcuts", p. 38. Indicators You have unread messages. You have unsent, cancelled, or failed messages. The keypad is locked. The device does not ring for incoming calls or text messages. An alarm is set. -
Page 20: Lock The Keys
If the selected menu contains further submenus, select one (for example, Call). Select the setting of your choice. To return to the previous menu level, select Back. To exit the menu, select Exit. To change the menu view, select select from the available options. To rearrange the menu, select moved, and select Move. -
Page 21: Functions Without A Sim Card
Flight profile to start an emergency call. Support and updates Nokia helps you in many ways to gain the most benefit from your device. You can find the model number of your device on the back cover. -
Page 22: Support
Nokia products and services. Get the most out of your Nokia phone and register at My Nokia today! For more information and availability in your region, see www.nokia.com/mynokia. Download content You may be able to download new content (for example, themes) to your phone (network service). -
Page 23: Software Updates Using Your Pc
Software updates using your PC Nokia Software Updater is a PC application that enables you to update your device software. To update your device software, you need a compatible PC, broadband internet access, and a compatible USB data cable to connect your device to the PC. -
Page 24: Restore Factory Settings
Software update settings This option may not be available, depending on your phone. To allow or disallow automatic software updates, select Phone Phone updates > Request a software update Select Menu Settings > software updates from your service provider. Select Current softw. -
Page 25: Basic Settings
Basic settings Phone settings Select Menu Settings > Select from the following: Language settings — To set the language of your device, select language and a language. To set the language of your device according to the information on the SIM card, select Memory status —... - Page 26 Make it your device programmed into your device. Call barring and call diverting cannot be active at the same time. Select from the following: PIN code request or UPIN code request — Set the device to request for the PIN or UPIN code every time the device is switched on.
-
Page 27: Personalise Your Phone
Personalise your phone Give your phone a personal touch with ringing tones, display backgrounds, and themes. Add shortcuts for your preferred features, and attach enhancements. Profiles Your phone has various setting groups called profiles, which you can customise with ringing tones for different events and environments. Select Menu Settings... - Page 28 Display Select Menu Settings > Wallpaper — to add a background image for the home screen mode Home screen — to activate, organise, and personalise the home screen mode Home screen font col. — to select the font colour for the home screen mode Navigation key icons —...
- Page 29 Navigation key — to assign other functions from a predefined list to the navigation key (scroll key) Home screen key — to select the movement of the navigation key to activate the home screen mode Assign dialling shortcuts Create shortcuts by assigning phone numbers to the number keys 2-9. Select Menu Contacts...
-
Page 30: Connect
To ensure interoperability between other devices supporting Bluetooth technology, use Nokia approved accessories for this model. Check with the manufacturers of other devices to determine their compatibility with this device. - Page 31 To make calls, you must first leave the remote SIM mode. If the device has been locked, enter the lock code to unlock it first. Open a Bluetooth connection Select Menu Settings > Select My phone's To activate Bluetooth connectivity, select Bluetooth connectivity is active.
- Page 32 To activate the phone for data transfer or image printing, connect the data cable and select the mode: PC Suite — to use the USB data cable for Nokia Ovi Suite or Nokia PC Suite Printing & media — to use the phone with a PictBridge compatible printer or with a compatible PC Data storage —...
- Page 33 Note: Not all USB storage devices are supported, depending on their power consumption. Install Nokia Ovi Suite on your PC You can manage content on your device, and keep it in sync with your computer. You can also update your device with the latest software, and download maps.
-
Page 34: Network Provider Services
Select Open folder to view files, and double-click Install_Nokia_Ovi_Suite.exe. Follow the instructions. To learn more about Nokia Ovi Suite, go to www.ovi.com. Network provider services Your network provider provides several additional services you may want to use. For some of these services, charges may apply. - Page 35 Make it your device SIM services Your SIM card may provide additional services. You can access this menu only if it is supported by your SIM card. The name and contents of the menu depend on the available services. Accessing these services may involve sending messages or making a phone call for which you may be charged.
-
Page 36: Stay In Touch
SIM messages SIM messages are specific text messages that are saved to your SIM card. You can copy or move those messages from the SIM to the phone memory, but not vice versa. To read SIM messages, select Configuration settings You can configure your device with settings that are required for certain services. -
Page 37: Make Calls
Stay in touch Make calls Make a voice call Dial a number manually Enter the phone number, including the area code, and press the call key. For international calls, press * twice for the international prefix (the + character replaces the international access code), enter the country code, the area code without the leading 0, if necessary, and the phone number. - Page 38 Adjust the volume in a call Use the volume keys. Dialling shortcuts Assign a phone number to one of the number keys, 2-9. shortcuts", p. 29. Use a dialling shortcut to make a call in one of the following ways: Press a number key, then the call key.
- Page 39 During a call, select Options Some of the network options are Hold, calls, and the following: Send DTMF — to send tone strings Swap — to switch between the active call and the call on hold Transfer — to connect a call on hold to an active call and disconnect yourself Conference —...
-
Page 40: Text And Messages
Stay in touch Call divert — Divert your incoming calls (network service). You may not be able to divert your calls if some call barring functions are active. Anykey answer — Answer an incoming call by briefly pressing any key, except the power key, the left and right selection keys, or the end key. -
Page 41: Traditional Text Input
When you write text, press and hold input, indicated by , and predictive text input, indicated by are supported by predictive text input. The character cases are indicated by To change the character case, press #. To change from the letter to number mode, indicated by , press and hold #, and select number to the letter mode, press and hold #. -
Page 42: Multimedia Messages
If the ? character is displayed after the word, the word you intended to write • is not in the dictionary. To add the word to the dictionary, select Spell. Enter the word using traditional text input, and select Save. To write compound words, enter the first part of the word, and scroll right •... - Page 43 The wireless network may limit the size of MMS messages. If the inserted picture exceeds this limit, the device may make it smaller so that it can be sent by MMS. Important: Exercise caution when opening messages. Messages may contain malicious software or otherwise be harmful to your device or PC.
- Page 44 View messages in a conversation Select Conversations. Scroll to a conversation, and select Open. Scroll to a message and select Switch between Conversations and Inbox views Select Options Inbox view > Read a message and reply Your device notifies you when you receive a message. Important: Exercise caution when opening messages.
- Page 45 To write a flash message, select Flash message. Enter the recipient’s phone number, write your message (maximum 70 characters), and select Send. Nokia Xpress audio messages Create and send an audio message using MMS in a convenient way. Select Menu Messaging >...
-
Page 46: Mail And Instant Messaging
Set up your device to send and receive mails from your mail account or to chat in your instant messaging (IM) community. Nokia Messaging IM With instant messaging (IM) you can chat with other online users using your device. You can use your already existing account with an IM community that is supported by your device. - Page 47 Create a new Nokia account To create a Nokia account, which includes mail and IM services, using your PC, visit www.ovi.com. To create an account using your device, do the following: Select Menu Messaging > Follow the instructions on the display.
-
Page 48: Notification Settings
Sign > All conversations are closed. Nokia Messaging Mail Access your mail accounts from different providers with your mobile device to read, write, and send mail. Before you can use mail, you must have an mail account. If you do not have already an mail account, create it in Ovi. - Page 49 Select Sign To sign in to an additional mail account, select Set up Ovi Mail If you do not already have a mail account, you can create a Nokia account, which includes the Ovi Mail service. Select Get Ovi Mail.
- Page 50 View and save attachments Mails with attachments, for example, pictures, are marked with a paperclip icon. Some attachments may not be compatible with your device, and cannot be displayed on your device. Expand the attachment list. Select an attachment and View. To save the attachment to your device, select Save.
-
Page 51: Image And Video
Image and video Capture images Activate the camera Press the capture key; or, if in video mode, scroll left or right. Zoom in or out In image mode, scroll up and down, or use the volume keys. Capture an image Press the capture key. -
Page 52: Camera And Video Settings
Alternatively, press the capture key. Stop recording Select Stop. Video clips are saved in Gallery. Camera and video settings Select Menu Media > In image or video mode, select Self-timer — Use the self-timer. Effects — Apply different effects (for example, greyscale and false colour) to the captured image. - Page 53 All photos — View images in a thumbnail grid. You can sort images by date, name, or size. Timeline — View images in the order they were captured. Albums — Sort images into albums. You can create, rename and remove albums. If you remove an album, the images inside the album are not deleted from the memory.
-
Page 54: Print Images
View the folders of the memory card when moving a file Scroll to the memory card, and scroll right. Print images Your device supports Nokia XpressPrint, allowing you to print images in the JPEG file format. Connect your device to a compatible printer, using a USB data cable, or, if supported by the printer, Bluetooth connectivity. -
Page 55: Entertainment
Some of the folders in Gallery that contain content used by your device (for example, Themes) can be stored on the memory card. If your memory card has not been pre-formatted, you need to format it. When you format a memory card, all data on the card is permanently deleted. Format the memory card Select Options... - Page 56 Media player To open the media player, select Music menu Access your music and video files stored in the device memory or on the memory card, download music or video clips from the web, or view compatible video streams from a network server (network service). Select Menu Media...
- Page 57 Entertainment Play songs Operate the media player Press the music keys, or use the scroll keys according to the virtual keys on the display. Adjust the volume Use the volume keys. Start or pause playing Press Skip to the next song Press Skip to the previous song Press...
- Page 58 Transfer music from a computer You can transfer music to your device in the following ways: Use Nokia Music to transfer, rip, burn, and play new music on your PC and mobile • device. Download the PC software from www.music.nokia.com/download.
- Page 59 Select Menu > Radio. Your device supports Nokia XpressRadio, allowing you to listen to radio stations with the built-in FM antenna. To improve reception, connect a compatible headset, to use as an external FM antenna. To activate the loudspeaker, select...
- Page 60 Switch to another saved station Scroll up or down. Alternatively, press the To access a station directly from the saved station list, press the number key that corresponds to the number of the station. Adjust the volume Use the volume keys. Pause or resume playback Press the scroll key ( / ).
- Page 61 Entertainment RDS — Display information from the radio data system, such as the name of the station. Auto-frequency — Allow the device to automatically switch to a frequency with better reception (available when RDS is activated). Play via — Listen using the headset or the loudspeaker. Output —...
-
Page 62: Web
Equaliser Adjust the sound when using the media player. Select Menu Media > Activate a predefined equaliser set Scroll to a set, and select Activate. Create a new equaliser set Select one of the last two sets in the list and Use the scroll key to adjust the sound controls. - Page 63 To set up the service, select sett., a configuration, and an account. Connect to a service To make a connection to the service, select standby mode, press and hold 0. To select a bookmark, select To select the last visited URL, select To enter the address of a service, select the address, and select OK.
- Page 64 Entertainment Display — Select the font size, whether images are shown, and how the text is displayed. General — Select whether web addresses are sent as Unicode (UTF-8), the encoding type for the contents, and whether JavaScript™ is enabled. The available options may vary. Cache memory A cache is a memory location that is used to store data temporarily.
-
Page 65: Games And Applications
Entertainment correctly in order to benefit from increased security. The existence of a certificate does not offer any protection by itself; the certificate manager must contain correct, authentic, or trusted certificates for increased security to be available. Certificates have a restricted lifetime. If "Expired certificate" or "Certificate not valid yet" is shown, even if the certificate should be valid, check that the current date and time in your device are correct. -
Page 66: Maps
Content such as satellite images, guides, weather and traffic information and related services are generated by third parties independent of Nokia. The content may be inaccurate and incomplete to some extent and is subject to availability. Never rely solely on the aforementioned content and related services. -
Page 67: Download Maps
Download maps Your device may contain pre-installed maps on the memory card. You can download a new set of maps through the internet using the Nokia Map Loader PC software. Download and install Nokia Map Loader To download the Nokia Map Loader on your PC and for further instructions, visit www.maps.nokia.com. -
Page 68: Maps And Gps
The pedestrian navigation is limited to a speed of 30 km/h (18.6 miles/h) and provides no voice guidance. The navigation service is not available for all countries and regions. For details, see your local Nokia website. -
Page 69: Organise
To use this service, you need a compatible external GPS receiver that supports Bluetooth wireless technology. Purchase a navigation service Select Menu Organiser > and follow the instructions. To use navigation with voice guidance, you must allow the Maps application to use a network connection. - Page 70 Select Settings Memory in use > or both for your contacts. Select Phone and SIM contacts, they are saved in the device memory. Handle contacts Search for a contact Select Menu Contacts > Scroll through the list of contacts, or enter the first characters of the contact's name. Save a name and phone number Select Menu...
-
Page 71: Business Cards
Copy all contacts Select Menu Contacts > Create a contact group Arrange contacts into caller groups with different ringing tones and group images. Select Menu Contacts > Select Options Enter the group name, optionally select an image and a ringing tone, and select Save. -
Page 72: Alarm Clock
For example, GMT -5 denotes the time zone for New York (USA), 5 hours west of Greenwich, London (UK). Alarm clock To sound an alarm at a desired time. Set the alarm Select Menu Organiser > Activate the alarm, and enter the alarm time. To repeat the alarm on selected days of the week, select days. -
Page 73: To-Do List
Make a calendar note Scroll to the date, and select in the fields. To-do list To create a note for a task that you must do, select list. To create a note if no note is added, select Add; otherwise, select Fill in the fields, and select Save. -
Page 74: Stopwatch
To stop the timer, select Interval timer To have an interval timer with up to 10 intervals started, first enter the intervals. Select Menu Organiser > To start the timer, select To select how the interval timer should start the next period, select Organiser Countd. -
Page 75: Save Energy
Disable unnecessary sounds, such as keypad and ringing tones. • Recycle Most of the materials in a Nokia phone are recyclable. Check how to recycle your Nokia products at www.nokia.com/werecycle, or with a mobile device, www.nokia.mobi/werecycle. Recycle packaging and user guides at your local recycling scheme. - Page 76 The third-party applications provided with your device may have been created and may be owned by persons or entities not affiliated with or related to Nokia. Nokia does not own the copyrights or intellectual property rights to the third-party applications. As such, Nokia does not take any responsibility for end-user support, functionality of the applications, or the information in the applications or these materials.
- Page 77 Battery and charger information Your device is powered by a rechargeable battery. The battery intended for use with this device is BL-4CT. Nokia may make additional battery models available for this device. This device is intended for use when supplied with power from the following chargers: AC-8.
- Page 78 Successful completion of the steps is not a total assurance of the authenticity of the battery. If you cannot confirm authenticity or if you have any reason to believe that your Nokia battery with the hologram on the label is not an authentic Nokia battery, you should refrain from using it, and take it to the nearest Nokia authorised service centre or dealer for assistance.
- Page 79 More detailed information is available from the product retailer, local waste authorities, national producer responsibility organisations, or your local Nokia representative. Check how to recycle your Nokia products at www.nokia.com/werecycle, or if browsing on a mobile device, www.nokia.mobi/werecycle.
- Page 80 This requirement applies in the European Union. Do not dispose of these products as unsorted municipal waste. For more environmental information, see the product Eco-Declarations at www.nokia.com/environment. Additional safety information Note: The surface of this device does not contain nickel in the platings.
- Page 81 Hold the wireless device to the ear opposite the medical device. • Turn the wireless device off if there is any reason to suspect that interference is taking place. • Follow the manufacturer directions for the implanted medical device. • If you have any questions about using your wireless device with an implanted medical device, consult your health care provider.
- Page 82 The highest SAR value under the ICNIRP guidelines for use of the device at the ear is 0.73 W/kg. Use of device accessories may result in different SAR values. SAR values may vary depending on national reporting and testing requirements and the network band. Additional SAR information may be provided under product information at www.nokia.com.
-
Page 83: Copyright And Other Notices
Nokia, Nokia Connecting People, XpressRadio, XpressMusic, and Navi are trademarks or registered trademarks of Nokia Corporation. Nokia tune is a sound mark of Nokia Corporation. Other product and company names mentioned herein may be trademarks or tradenames of their respective owners. - Page 84 Nokia reserves the right to revise this document or withdraw it at any time without prior notice.
-
Page 85: Index
Index access codes alarm clock anykey answer applications backing up data barring password battery browser business cards cache memory calculator call divert call log call waiting caller id calls camera camera settings configuration contacts — groups — saving cookies data cable dialling shortcuts digital rights display... - Page 86 46, 47, 48, microSD card 51, 52 music player My Nokia 17, 19 navigation navigation tools Nokia Ovi Suite nokia software updater Nokia support information 20, 25 notes number mode offline mode online sharing operator menu photographs...
- Page 87 radio redial restoring data restoring settings screen saver scrolling security code security module security settings service commands sharing shortcuts — services SIM card SIM messages software updates speed dialling stereo widening stopwatch strap support resources synchronisation text modes themes tones traditional text input transfer music 59, 60...