G-PROJECT G-850 G-Boom 3 Wireless Bluetooth Boombox Speaker Manual
- Manual (22 pages)
Advertisement
- 1 SPECIFICATIONS
- 2 LOCATION OF CONTROLS
- 3 POWER SOURCE
- 4 RECHARGE BATTERY
- 5 WHEN TO RECHARGE BATTERY
- 6 EQUALIZER (EQ)
- 7 CHANGING THE INPUT SOURCE
- 8 PLAYING THE RADIO
- 9 SETTING RADIO PRESETS
- 10 BLUETOOTH OPERATION
- 11 RECONNECTING YOUR BLUETOOTH DEVICES
- 12 DSS (DUAL SPEAKER STEREO)
- 13 AUX-IN CONNECTION
- 14 ONE-YEAR WARRANTY
- 15 FAQs
- 16 IMPORTANT SAFETY NOTIFICATIONS
- 17 IMPORTANT SAFETY INSTRUCTIONS
- 18 ADDITIONAL SAFETY PRECAUTIONS
- 19 Documents / Resources
SPECIFICATIONS
Power Adapter AC Input: 100-240V ~ 50/60Hz
Power Adapter DC Output: 12V 1.5A
Output Power: 2 x 10W <1% THD
Battery: 7.4V, 2000mAh, Rechargeable Li-Ion
Battery Recharging Time: 2.5 hours
Battery Playback Time: Up to 8 hours (varies by volume level and audio content)
BLUETOOTH:
Bluetooth specification: v5.1
Supported Bluetooth Profile: A2DP
Range: 33ft (10m) line of sight
RADIO:
Frequency range (FM): 87.5 ~ 108 MHz
Specifications are subject to be updated without notice.
PACKAGE CONTENTS:
- G-BOOM3 Bluetooth Wireless Boombox
- AC Power Adapter
- User Guide
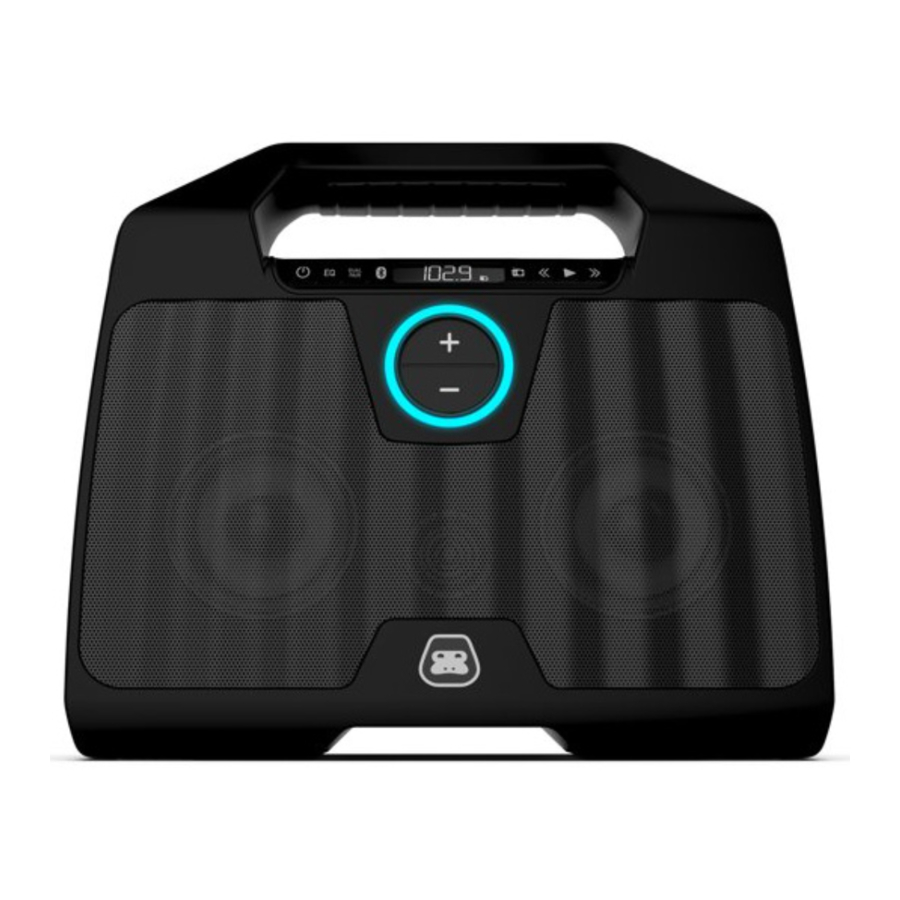
LOCATION OF CONTROLS

- Power ON / OFF Button
- EQ Button
- DSS Button
- Bluetooth PAIR Button
- LCD Display
- FM Radio
- Tune Down Button
- Play / Radio Preset Button
- Tune Up Button

- LED Ring
- Volume + Up Button
- Volume – Down Button
- LED Charging Indicator
- DC IN Jack
- Reset Button
- LINE-IN Jack
POWER SOURCE
Connect the supplied AC adapter (DC 12V 1.5A) to the DC IN Jack on the back of G-BOOM3 and plug the other end into a standard wall outlet (100~240V 50-60Hz).
NOTES: Disconnect both ends of the AC adapter when not in use. Use only the supplied AC adapter with the following spec: AC In - 100-240V AC, 50/60Hz / DC Out - 12V 1.5A
RECHARGE BATTERY
Connect the supplied AC adapter to the DC IN Jack on the back of G-BOOM3 and plug the other end into a standard wall outlet to being automatically recharging the built-in battery. The red LED charging light on G-BOOM3 will illuminate to indicate charging process and turn off when the battery is fully charged.

WHEN TO RECHARGE BATTERY
When G-BOOM3 battery is low, the red LED Charging indicator will begin flashing to warn you to recharge your G-BOOM3 for continued use and enjoyment.
NOTES
- The battery is internal and cannot be replaced
- Actual battery life varies with use, settings, and environmental conditions
- Rechargeable batteries have a limited number of charge cycles
- Charge the rechargeable battery at least biannually
EQUALIZER (EQ)
There are 3 EQ presets:
EQ1 = (Default) Dynamic: full bass and crisp high frequencies.
EQ2 = Deep: Added emphasis on bass and low mids frequencies.
EQ3 = Bright: Added emphasis on mids, vocals and high frequencies.
Press the EQ Button repeatedly to cycle through them. The LED ring will flash 1, 2 or 3 times when the EQ button is pressed to indicate preset EQ1, EQ2 or EQ3 respectively.
CHANGING THE INPUT SOURCE
When the G-BOOM3 powers "ON", the default audio input source is Bluetooth.
To switch to Radio, press the FM Radio button once and G-BOOM3 will enter FM Radio mode.
NOTE: If inserting audio cable into the Line-In Jack, G-BOOM3 will change to Line-In mode automatically regardless of the current input source.
PLAYING THE RADIO
- With G-BOOM3 powered "ON", press the FM RADIO button. The current FM station and FM icon will appear on the display.
- For manual tuning, repeatedly press the TUNE UP or TUNE DOWN button to manually adjust the tuning on the LCD display until the desired station appears.
- For auto tuning, press and hold the TUNE UP or TUNE DOWN button until the display starts to scan, then release the button. The tuner will search and stop on the next strongest station signal it finds. Repeat this process until the desired station appears on the LCD display.
NOTES: G-BOOM3 features a built-in internal FM antenna. For best reception please place the unit close to window or open area to improve reception quality. Keep digital music players or mobile phones away from G-BOOM3 as this may cause interference. Do not place G-BOOM3 near the AC power adapter as this may lead to reception interference.
SETTING RADIO PRESETS
- To preset a radio station to memory, first follow the previous steps to tune in the desired station.
- Press and hold the PLAY / RADIO PRESET button to create a preset for the current station. "P" will appear and "##" (the preset number) will blink on the LCD display.
- Press the TUNE UP or TUNE DOWN button to select a preset number (01- 10). Press the PLAY / RADIO PRESET button again to confirm the setting and the station will be saved into memory.
- Repeat these steps for up to 10 presets, as desired.
- To recall a preset station, repeatedly press the PLAY / RADIO PRESET button until the desired preset number appears in the display and the station tunes in.
NOTES: Saving a new station preset in the same position as a previously saved station will replace the previously stored station for that preset number.
BLUETOOTH OPERATION
You can stream audio wirelessly to G-BOOM3 from up to 33' away using your iPhone, iPad, iPod, Android, laptop, or other A2DP Bluetooth enabled device.
- Press the POWER ON/OFF button to turn on G-BOOM3.
- The speaker will be entered to Bluetooth mode. The LED ring will flash blue and Bluetooth icon will light up on the LCD display. .
- Turn on your compatible A2DP Bluetooth device and enable Bluetooth.
- Search for Bluetooth devices and select "G-BOOM3".
- The blue LED ring will change from flashing to solid, indicating that your Bluetooth device is connected to G-BOOM3.
NOTES:
- Press and hold the Bluetooth PAIR button for 3 seconds to disconnect the current Bluetooth connection.
- The unit will return to pairing mode and the blue LED ring will flash.
- If asked for a password, enter "0000".
RECONNECTING YOUR BLUETOOTH DEVICES
Once your Bluetooth device has been paired with G-BOOM3, it is simple to reconnect them.
- Make sure that G-BOOM3 is powered on and within range.
- Select "G-BOOM3" from the list on your Bluetooth device.
- The blue LED ring will change from flashing to solid, indicating that your Bluetooth device is reconnected to G-BOOM3.
NOTES:
- For best audio performance, turn the volume on your Bluetooth source device all the way up.
- G-BOOM3 can only play audio from one source at a time. If G-BOOM3 is connected to a LINE IN source, Bluetooth will not function. Simply unplug the 3.5mm LINE IN audio cable and press the Bluetooth PAIR button to switch to Bluetooth (if necessary, select "G-BOOM3" on your Bluetooth device).
DSS (DUAL SPEAKER STEREO)
With DSS, you can connect two G-BOOM3s together to stream in stereo to both at the same time to enjoy music with double the power and expanded stereo separation.
- Power on two G-BOOM3 speakers and switch both to Bluetooth mode.
- Follow directions to pair and connect a Bluetooth device to one G-BOOM3 (master)
- Press DSS button on the master G-BOOM3 speaker which is already connected Bluetooth device to enter DSS mode, the LED ring will flash amber.
- Press DSS button on the other G-BOOM3 speaker to enter DSS mode, the LED ring will flash amber indicating. When the two speakers are connected, the amber LED ring will change from flashing to solid.
- To disconnect the DSS, press the BLUETOOTH PAIR button on one G-BOOM3.
- Repeat the above steps to re-connect the two G-BOOM3.
NOTES:
- DSS mode require two G-BOOM3 speakers.
- You need to connect a Bluetooth device to the master speaker before you enter DSS mode.
- After connected the two speakers, the volume level in these two speakers will be synchronized. and the EQ can be individually set for each speaker.
- If you cannot connect two speakers successfully, press and hold the DSS button for 3 seconds on both G-BOOM3 to reset memory and then repeat the above steps to connect two speakers again.
- Only Bluetooth can work with DSS. Radio and LINE-IN does not work with DSS.
AUX-IN CONNECTION
You can also play audio from other Line-In digital sources using a standard 3.5mm Line-In audio cable (sold separately).
- Press the POWER ON/OFF button to turn on G-BOOM3.
- Insert one end of the 3.5mm audio cable into the Line-In jack on the rear of G-BOOM3.
- Insert the other end of the 3.5mm audio cable into the Line-Out or headphone jack of your external audio device (e.g. iPad, mobile phone, MP3 player, digital media player, etc.)
- Input source will be switched to LINE-IN mode automatically. LINE-IN icon will appear on the LCD display.
- Select the music you wish to listen to on your external audio device then press play and sound will be projected through G-BOOM3 speakers.
NOTE: For best audio performance and minimal distortion, avoid turning the volume all the way up on your external audio source.
ONE-YEAR WARRANTY
Life Lab International Ltd. (hereafter referred to as Life Lab), warrants this product to be free from defects in workmanship and materials, under normal use and conditions, for a period of one (1) year from the date of original purchase. If you are experiencing any problems with the operation or function of your product, please make sure you have reviewed our full owners manual from our website for reference or email us at support@gprojectgear.com for additional troubleshooting assistance. Should this fail to resolve the matter and service is still required by reason of any defect or malfunction during the warranty period, Life Lab will repair or, at its discretion, replace this product without charge.
FAQs
Q: Why can I not pair my Bluetooth device?
A: Occasionally the Bluetooth may need to be reset on your G-BOOM3, and/or your Bluetooth streaming device(s).
First you will need to go into the Bluetooth settings menu on your audio streaming device and delete / 'forget this device' from the list completely.
Next you will need to clear the Bluetooth memory on your G-BOOM3 which can be done by pressing and holding the Bluetooth PAIR button for 3 seconds or until the blue LED starts blinking, indicating that G-BOOM3 is searching for a compatible Bluetooth device.
Now with your Bluetooth streaming device and G-BOOM3 both powered on, try searching for compatible devices under the Bluetooth settings menu of your audio streaming device. After a few seconds it should detect G-BOOM3, at which time you can select "G-BOOM3" and establish a new connection.
Q: Why do I not hear any music?
A: Make sure that a 3.5mm Line-In cable is not plugged into the Line-In jack of G-BOOM3 as this will automatically switch the unit to LINE-IN even if there is no external audio device connected.
Q: How can play my G-BOOM3 as loud as possible?
A: When using Bluetooth or LINE-IN as the audio source, the volume of playback depends on both the volume that G-BOOM3 is set to as well as the volume on your connected device. To play at the loudest volume, please turn the volume up on both G-BOOM3 and your connected device. Note that with LINE-IN playback, maximizing the volume may cause distortion during playback.
IMPORTANT SAFETY NOTIFICATIONS
 |  |  |
| RISK OF ELECTRIC SHOCK DO NOT OPEN |
TO REDUCE THE RISK OF ELECTRIC SHOCK, DO NOT REMOVE COVER (OR BACK). NO USER-SERVICEABLE PARTS INSIDE. REFER SERVICING TO QUALIFIED SERVICE PERSONNEL.
DANGEROUS VOLTAGE: The lightning flash with arrowhead symbol, within an equilateral triangle is intended to alert the user to the presence of uninsulated dangerous voltage within the product's enclosure that may be of sufficient magnitude to constitute a risk of electric shock to persons.
ATTENTION: The exclamation point within an equilateral triangle is intended to alert the user to the presence of important operating and maintenance (servicing) instructions in the literature accompanying the appliance.
NOTE: Any unapproved changes or modifications will void the warranty.

Changes or modifications to this unit not expressly approved by the party responsible for compliance could void the user's authority to operate the equipment.

TO PREVENT FIRE OR SHOCK HAZARD, DO NOT EXPOSE THIS UNIT TO RAIN OR MOISTURE.
SURGE PROTECTORS: It is recommended to use a surge protector for AC connection. Lightning and power surges ARE NOT covered under warranty for this product.
The batteries shall not be exposed to excessive heat such as sunshine, fire or the like.
The mains plug is used as a disconnect device, the disconnect device shall remain readily operable.
IMPORTANT SAFETY INSTRUCTIONS
Some of the following information may not apply to your particular product; however, as with any electronic product, precaution should be observed during handling and use.
- Read these Instructions.
- Keep these Instructions.
- Heed all Warnings.
- Follow all Instructions.
- Do not use this apparatus near water.
- Clean only with a dry cloth.
- Do not block any of the ventilation openings. Install in accordance with the manufacturer's instructions.
- Do not install near any heat sources such as radiators, heat registers, stoves, or other apparatus (including amplifiers) that produce heat.
- Do not defeat the safety purpose of the polarized or grounding-type plug. A polarized plug has two blades with one wider than the other. A grounding-type plug has two blades and a third grounding prong. The wide blade or the third prong are provided for your safety. When the provided plug does not fit into your outlet, consult an electrician for replacement of the obsolete outlet.
- Protect the power cord from being walked on or pinched particularly at plugs, convenience receptacles, and the point where they exit from the apparatus.
- Only use attachments/accessories specified by the manufacturer.
- Use only with a cart, stand, tripod, bracket, or table specified by the manufacturer, or sold with the apparatus. When a cart is used, use caution when moving the cart/apparatus combination to avoid injury from tip-over.
- Unplug this apparatus during lightning storms or when unused for long periods of time.
- Refer all servicing to qualified service personnel. Servicing is required when the apparatus has been damaged in any way, such as power-supply cord or plug is damaged, liquid has been spilled or objects have fallen into the apparatus, the apparatus has been exposed to rain or moisture, does not operate normally, or has been dropped.
ADDITIONAL SAFETY PRECAUTIONS
- Do not expose this unit or the AC/DC adapter to dripping or splashing water. Keep liquid-filled objects, such as vases, away from this unit and AC/DC adapter.
- To ensure that this unit is completely disconnected, unplug it from the wall.
- Ensure that the AC/DC adapter is easily accessible.
- Please note the information printed underneath the unit.
- Batteries should not be exposed to excessive heat such as direct sunshine, fire, etc.
- Do not impede the ventilation of this unit by covering the ventilation openings with items such as newspapers, table-cloths, curtains, etc.
- Keep open flames, such as lighted candles, away from this unit.
- Do not place this unit in closed bookcases, racks, or other spaces without proper ventilation.
- Use only the same or equivalent type batteries as there is a danger of explosion if the incorrect batteries are used or they are installed incorrectly.
- Dispose of batteries properly according to environmental regulations
For more info, please visit our website at www.gprojectgear.com
HAVE AN ISSUE?
E-MAIL
support@projectgear.com
CALL
855-896-1795
MONDAY - FRIDAY 9AM - 5PM EST
G-PROJECT is a registered trademark of Goodhatch, LLC.
G-BOOM3 is distributed by
LifeLab International LLC • 3471 North Union Drive, Olney, IL 62450 • (855) 896-1795
The Bluetooth® word mark and logos are registered trademarks owned by Bluetooth SIG, Inc. and any use of such marks by Life Lab International LTD. is under license. Other trademarks and trade names are those of their respective owners.

Documents / Resources
References

Download manual
Here you can download full pdf version of manual, it may contain additional safety instructions, warranty information, FCC rules, etc.
Download G-PROJECT G-850 G-Boom 3 Wireless Bluetooth Boombox Speaker Manual
Advertisement
Thank you! Your question has been received!


Need Assistance?
Do you have a question about the G-Boom 3 that isn't answered in the manual? Leave your question here.