Advertisement
- 1 Box Contents
- 2 Support
- 3 Use and Care
- 4 Features
- 5 Connecting and Charging
- 6 Using the Qi Charging Pad
- 7 Bass and Treble Control
- 8 Light Mode
- 9 Pairing or Disconnecting a Bluetooth Device
- 10 Linking Two Speakers
- 11 Using the Radio
- 12 App Control
- 13 Technical Specifications
- 14 Trademarks & Licenses
- 15 Safety & Warranty Information
- 16 Documents / Resources
Box Contents
Pathfinder 4
Power/Charging Cable
Quickstart Guide/Safety & Warranty Information
Support

For the full User Guide, visit ionaudio.com.
For the latest information about this product (documentation, technical specifications, system requirements, compatibility information, etc.) and product registration, visit ionaudio.com.
For additional product support, visit ionaudio.com/support.
Use and Care
Though Pathfinder 4 is water-resistant and able to tolerate splashing water, please review the tips below to get the best performance from Pathfinder 4:
- Bring Pathfinder 4 indoors during extreme weather.
- Please do not place Pathfinder 4 in standing water.
- Please do not connect the power adapter to Pathfinder 4 in a wet environment. Make sure the power input, power adapter, and power outlet are all completely dry before making any connections.
![shock hazard]()
![]()
![shock hazard]()
Keep any non-water-resistant devices (phones, music players, etc.) in a dry place where they will not be affected by water and cause a risk of electric shock.
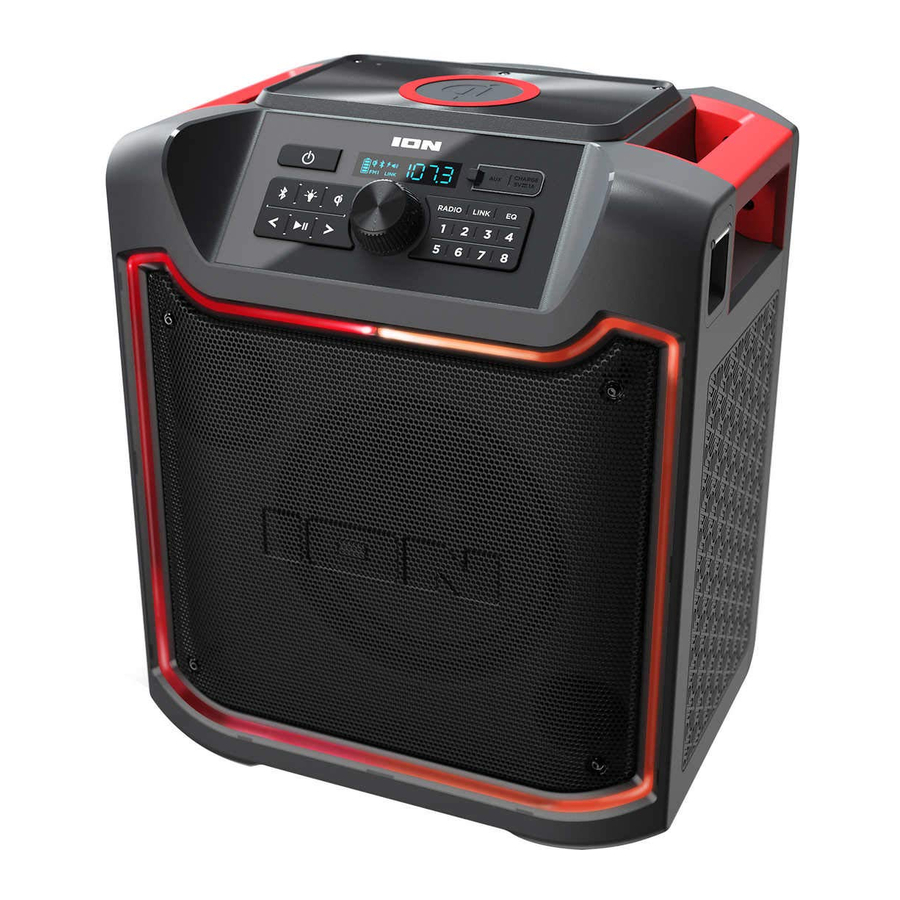
Features

- Power Button
- Bluetooth Button
- Light Mode Button
- Qi Button
- Tune/Track Buttons
- Play/Pause Button
- Radio Selector Button
- Radio Preset Buttons
- Link Button
- EQ Button
- Display
- Aux Input (1/8")
- USB Charging Port
- Master Volume/Encoder
- Bottle Opener (not shown, Rear Panel)
- Power Input (not shown, Rear Panel)
Connecting and Charging
Note: Before you first use the product, please fully charge the battery. Your unit was purposely shipped with a reduced battery charge to ensure safe transit.
Use the included power cable to connect the unit to a power outlet and let it charge for up to 12 hours. This helps ensure the longest life for your battery.
Here are some recommendations for getting the longest life from the internal battery:
- Full charge the battery before using it, and charge the battery completely after each use.
- If you leave the battery level low and do not charge it for 3 months, it may permanently lose capacity.
- If the battery fails to charge, contact ION Audio at ionaudio.com.
Using the Qi Charging Pad
To wirelessly charge your Qi-compatible device, place it on Pathfinder 4 in the Qi charging area. When a successful charging connection is made, the blue Qi LED will slowly flash to indicate the device is charging. To save battery life, press the Qi button to disable the Qi charging pad.
If no device is found or the device is not in range for charging, the Qi LED will be off. If a device is placed on top that is not compatible with Qi charging or causes interference, the LED will blink rapidly.
Bass and Treble Control
To adjust the treble level:
- Press the EQ button. "HI" (high frequency) will appear on the display.
- Turn the Encoder to the left to decrease the high frequency.
- Turn the Encoder to the right to increase the high frequency.
- Press the EQ button to confirm.
To adjust the bass level:
- Press the EQ button. "LO" (low frequency) will appear on the display.
- Turn the Encoder to the left to decrease the low frequency.
- Turn the Encoder to the right to increase the low frequency.
- Press the EQ button to confirm.
Light Mode
When Pathfinder 4 is first turned on, the lights will be in Color Cycle mode and start to slowly fade from one color to the next. To pause on a certain color, press and hold the Light button for 1 second. To enter Beat Sync mode and have the lights react to the beat of the music, press and release the Light button. Press the Light button again to turn off the lights.
Pairing or Disconnecting a Bluetooth Device
Note: To disable voice prompts, double press the Bluetooth button.
- Turn on your Bluetooth device.
- Power on Pathfinder 4.
- Press and release the Bluetooth button to enter pairing mode. You will know you are in pairing mode when the Bluetooth icon is slowly flashing and the voice prompt "Bluetooth pairing" is heard.
- Navigate to your Bluetooth device's setup screen, find "Pathfinder 4" and connect. The voice prompt "Bluetooth connected" will be heard when connected.
Note: If your Bluetooth device prompts for a pairing code, enter "0000". - Press and release the Bluetooth button to disconnect a paired Bluetooth device.
- To connect to another Bluetooth device, repeat step 3.
Note: Maximum range will be achieved when using devices with Bluetooth 5.0.
Linking Two Speakers
- Power on both Pathfinder 4 speakers.
- Press and hold the Link button on both speakers to enter Stereo Link mode. A tone will play until both speakers are linked. Once a link has been established, the word LINK will appear in the display.
Note: It may take up to 1 minute to make the connection. - Select which unit will be the primary speaker (L channel) by pressing and holding the Bluetooth button.
- To disconnect, double press the Link button on one of the two speakers.
Using the Radio
- Press the Radio button.
- First press selects FM1
- Second press selects FM2
- Third press turns off the radio
- Select a radio station using the </> buttons.
To save a preset station, press and hold one of the preset buttons 1-8.
To recall a preset station, press and release one of the preset buttons 1-8.
App Control
Use the ION Sound XP to control the following product features: Bluetooth media controls (play/pause, previous track, next track), FM radio station, Master Volume, EQ settings, and Light color control.
To ensure the best possible experience with the app, use the most current Android OS or iOS on your device.
Note: Ensure that your device has internet access via your service provider or wireless connection. You can also download the app on your computer, but remember to connect and sync your device to transfer the app.
Follow these steps to download the free app on your device:
- Open the Apple App Store or Google Play on your device.
- Search for the ION Sound XP.
- Follow the on-screen instructions to download and install the app.
- Once downloaded, the ION Sound XP will appear on your device's home screen.
Technical Specifications
Output Power: 120 W (peak)
Frequency Response: 65 Hz - 16 kHz (-3 dB)
Speaker:
Woofer: 8 " / 203.2 mm
Tweeter: 3" / 76.2 mm
Bluetooth:
Profile: A2DP, AVRCP
Module: Bluetooth 5.0
Range: Up to 100ft. (30.5 m) *
Water Resistance Class: IPX5
Battery: 12V, 7Ah sealed lead acid battery
Battery Life: 100 hours
Recharge Time: up to 10 hours
Aux Input: 3.5 mm (1/8") line level
USB Charging Port: +5 V, 1 A
Dimensions (WxDxH): 14.6" x 10.2" x 17.5" 370 x 260 x 444 mm
Weight: 22.9 lbs. / 10.4 kg
* Bluetooth range is affected by walls, obstructions, and movement. For optimal performance, place the product in the center of the room so it is unobstructed by walls, furniture, etc.
Trademarks & Licenses
ION Audio is a trademark of inMusic Brands, Inc., registered in the U.S. and other countries. The Bluetooth word mark and logos are owned by the Bluetooth SIG, Inc. and any use of such marks by ION Audio is under license. All other product names, company names, trademarks, or trade names are those of their respective owners.
Safety & Warranty Information
For complete warranty information: ionaudio.com/warranty
Important Safety Instructions
- Read these instructions. Keep these instructions. Heed all warnings. Follow all Instructions.
- Do not use this apparatus near water.
- Do not block any ventilation openings (if applicable). Install in accordance with the manufacturer's instructions. Do not install this equipment in a confined or "boxed-in" space such as a bookcase or similar unit, and maintain good ventilation conditions. The ventilation should not be impeded by covering the ventilation openings with items such as newspaper, tablecloths, curtains, etc.
- Do not install near any heat sources such as radiators, heat registers, stoves, or other apparatus (including amplifiers) that produce heat. Do not place exposed flame sources such as lighted candles on the apparatus.
- Do not defeat the safety purpose of the polarized or grounding-type plug (if applicable). A polarized plug has two blades with one wider than the other. A grounding type plug has two blades and a third grounding prong. The wide blade or the third prong is provided for your safety. If the provided plug does not fit into your outlet, consult an electrician for replacement of the obsolete outlet.
- Protect the power cord from being walked on or pinched particularly at plugs, convenience receptacles, and the point where they exit from the apparatus.
- Only use attachment/accessories specified by the manufacturer.
- Use only the cart, stand, tripod, bracket or table specified by the manufacturer, or sold with the apparatus (if applicable). When a cart is used, use caution when moving the cart/apparatus combination to avoid injury from tip-over.
![]()
- Unplug this apparatus during lightning storms or when unused for long periods of time.
- Refer all servicing to qualified service personnel. Servicing is required when the apparatus has been damaged in any way, such as power-supply cord or plug is damaged, liquid has been spilled or objects have fallen into the apparatus, the apparatus has been exposed to rain or moisture, does not operate normally, or has been dropped.
- Internal/External Voltage Selectors (if applicable): Internal or external voltage selector switches, if any, should only be reset and reequipped with a proper plug for alternative voltage by a qualified service technician. Do not attempt to alter this yourself.
- Power Sources (if applicable): This product should be connected to a power supply only of the type described in these operating instructions, or as marked on the unit.
![]()
Danger of explosion if battery is incorrectly replaced. Replace only with the same or equivalent type. Batteries (a battery pack or an installed battery) shall not be exposed to excessive heat such as sunshine, fire, etc.- (If applicable) Where the mains plug or an appliance coupler is used as the disconnect device, the disconnect device shall remain readily operable.
![]()
(if applicable): Provide an earthing connection before the mains plug is connected to the mains. When disconnecting the earthing connection, be sure to disconnect it after pulling the mains plug out from the mains.
![]()
- For Class II apparatus only (if applicable): This symbol means the equipment is a Class II or double-insulated electrical appliance. It has been designed in such a way that it does not require a safety connection to electrical earth.
![]()
![shock hazard]() Class II Wiring (if applicable): To reduce the risk of electric shock, the external wiring connected to the terminals with "Class II Wiring" requires Class II wiring installed by an instructed person or the use of ready-made leads or cords.
Class II Wiring (if applicable): To reduce the risk of electric shock, the external wiring connected to the terminals with "Class II Wiring" requires Class II wiring installed by an instructed person or the use of ready-made leads or cords.- This apparatus is for professional use only. Intended operational climate: moderate.
- (If applicable) When moving or not using the appliance, secure the power cord (e.g., wrap it with a cable tie). Be careful not to damage the power cord. Before using it again, make sure the power cord has not been damaged. If the power cord has been damaged at all, bring the unit and cord to a qualified service technician for repair or replacement as specified by the manufacturer.
![]()
(if applicable): Excessive sound pressure (high volumes) from headphones can cause hearing loss.
![]()
![]()
(if applicable): Please refer to any important information (e.g., electrical, safety, etc.) printed on the exterior bottom enclosure or rear panel before installing or operating the product.![]()
(if applicable): Terminals marked with the lightning bolt symbol may be of sufficient magnitude to constitute a risk of electric shock.- Minimum distances 10 mm around the apparatus for sufficient ventilation.


Safety Notices

TO REDUCE THE RISK OF ELECTRIC SHOCK, DO NOT REMOVE ANY COVER. NO USER- SERVICEABLE PARTS INSIDE. REFER SERVICING TO QUALIFIED SERVICE PERSONNEL ONLY.
 DANGEROUS VOLTAGE: The lightning flash with arrowhead symbol within the equilateral triangle is intended to alert the user to the presence of un-insulated "dangerous voltage" within the product's enclosure that may be of sufficient magnitude to constitute a risk of electric shock.
 INSTRUCTIONS: The exclamation point within the equilateral triangle is intended to alert the user to the presence of important operating and maintenance (servicing) instructions in the literature accompanying this appliance.


To reduce the risk of fire or electrical shock, do not expose this appliance to rain or moisture. Electrical equipment should NEVER be kept or stored in damp environments.
Service Instructions
- Disconnect power cord before servicing.
![warning]() Replace critical components only with factory parts or recommended equivalents.
Replace critical components only with factory parts or recommended equivalents.- For AC line powered units: Before returning repaired unit to user, use an ohmmeter to measure from both AC plug blades to all exposed metal parts. The resistance should be more than 2,000,000 ohms.

Documents / Resources
References
Download manual
Here you can download full pdf version of manual, it may contain additional safety instructions, warranty information, FCC rules, etc.
Advertisement
Thank you! Your question has been received!


Need Assistance?
Do you have a question about the Pathfinder 4 that isn't answered in the manual? Leave your question here.