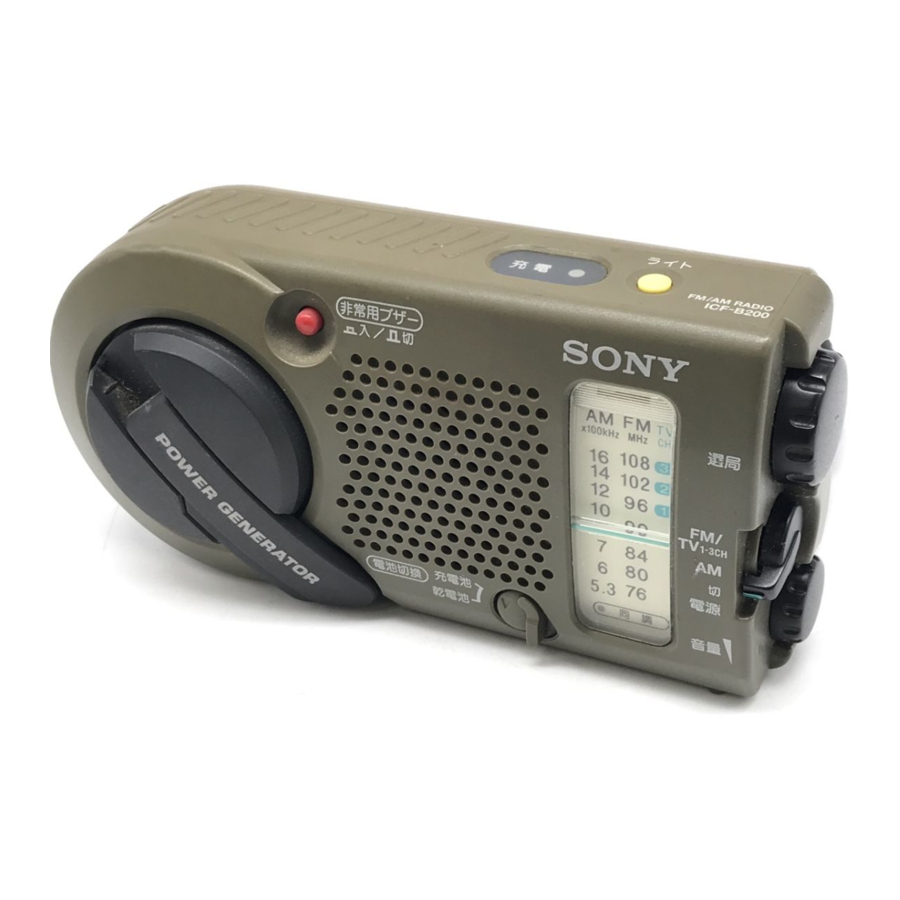
SONY ICF-B200 - FM/AM Radio Manual
- Operating instructions (2 pages) ,
- Service manual (14 pages)
Advertisement
Overview

Before You Begin
You are cautioned that any changes or modifications not expressly approved in this manual could void your authority to operate this equipment.
It will give you many hours of reliable service and listening pleasure.
Before operating the radio, please read these instructions thoroughly and retain them for future reference.
Features
Self-powered emergency radio
- You may use the radio right away by turning the handle of the power generator, which charges the built-in nickel-cadmium (Ni-Cd) rechargeable battery. —Hand generating function
- You may also use size AA (R6) dry batteries (not supplied).
- Audio Beacon that alerts the surroundings.
- Useful dial light when tuning in the dark.
- Splash-resistant for all weather operation*.
* Do not emmerse in water
This product is designed to be splash-resistant, but should not be emmersed in water or come in continuous contact with water.
Before installing the batteries, be sure to wipe off drops of water on the unit.
Precautions
- Do not drop the unit or give a shock to the unit, or it may cause a malfunction.
- Do not leave the unit in a location near heat sources, or in a place subject to direct sunlight, excessive dust, or mechanical shock.
- Should any solid object or liquid fall into the unit, remove the batteries, and have the unit checked by qualified personnel before operating it any further.
- Do not open the cabinet other than when disposing the unit.
- When the case becomes soiled, clean it with a soft cloth dampened with a mild detergent solution. Never use abrasive cleansers or chemical solvents, as they may mar the case.
- Do not leave magnetic bank cards, magnetic train passes, or other cards containing magnetic information near the speaker. The information on the card may be erased by the magnetism inside the speaker.
On splash-resistance
- Do not splash large amount of water on the unit.
- Do not emmerse the unit in water.
- Cover the jack with the attached rubber cap when the earphone is not used.
- If the unit is splashed with salt water, wipe clean with a damp cloth, then dry with a soft cloth. Do not wash under running water, do not use soap or detergent and do not dry with an electric hair dryer.
- If water has got into the speaker, turn the face of the unit down and pour the water out from the speaker.
- Before opening the battery compartment, be sure the outside of the unit is clean and dry.
For the custom ers in the USA and Canada
RECYCLING NICK EL-CADMIUM BATTERIES
Nickel-Cadmium batteries are recyclable. You can help preserve our environment by returning your unwanted batteries to your nearest point for collection, recycling or proper disposal.

Note: In some areas the disposal of nickelcadmium batteries in household or business trash may be prohibited.
RBRC (Rechargeable Battery Recycling Corporation) advises you about spent battery collection by the following phone number.
Call toll free number: 1-800-822-8837 (United States and Canada only)

Do not handle damaged or leaking nickel-cadmium batteries.
When disposing the unit
Take out the rechargeable battery for recycle.
Do not open the cabinet other than when disposing the unit.
- Unscrew 5 screws at the rear of the unit and 1 screw inside the dry battery compartment with an plus driver. Then take off the rear cabinet.
- Hold the substrate on the right side and push it tward the arrow as illustrated below. Then take out the rechargeable battery.

- Disconnect the rechargeable battery from the connector on the substrate.


Notes
- Be sure to disconnect the rechargeable battery from the substrate. If it is connected, electric leakage may occur and it is dangerous. When taking out the battery, be careful not to touch the interior of other parts.
- Be sure to confirm that the rechargeable battery is completely exhausted and then take out the rechargeable battery.
If you have any questions or problem concerning your unit, please consult the nearest Sony dealer.
Specifications
Frequency range FM: 87.5 – 108 MHz
AM: 530 – 1605 kHz
Speaker
Approx. 4.5 cm (1 3/ 4inches) dia., 8 ohms
Power output
60 mW (Using the built-in rechargeable battery)
90 mW (Using size AA (R6) dry batteries, not supplied)
Output
 jack (minijack)
Power requirements
Built-in nickel-cadmium (2.4V, 300 mAh, Ni-Cd) battery or 3V DC, two size AA (R6) dry batteries
Dimensions
Approx. 163 ×80 ×55 mm (w/ h/ d)
(6 1/ 2 × 3 1/ 4 × 2 1/ 4in)
Mass
Approx. 320 g (11.3 oz)
Approx. 355 g (12.6 oz)incl. batteries and projecting parts
Supplied accessory
Hand strap (1)
Design and specifications are subject to change without notice.
Power Sources
Using the installed recharg eable battery (see fig.  )
)

You may charge the built-in rechargeable battery and listen to the radio.
- Pull out the handle of the POWER GENERA TOR.
- To charge, turn the handle one way to either direction.
Turn the handle slowly in the beginning, and speed up the turning little by little. Then, keep turning the handle continuously at the speed that lights the OPTIMUM CHARGEindicator.
Notes
- When you turn the handle, be careful not to put your finger into the groove for the knob of the handle. You may pinch your finger.
- Be sure to fold in the telescopic antenna when charging. If you leave the telescopic antenna unfolded, the telescopic antenna may hit the surroundings and it is dangerous.
- When you charge, the built-in rechargeable battery will be charged regardless of the setting of the BATT SELECTOR switch.
- If you turn the handle of the POWER GENERATOR while listening to the radio, there may be a noise interference. In this case, turn off the radio and then charge the battery.
On charging
When you turn the handle, the power generation starts and charges the built-in rechargeable battery. The generation capacity may vary depending on the speed.
At first, turn the handle slowly and then speed up the turning little by little and the OPTIMUM CHARGE indicator will light up. Keep on turning the handle for about a minute at the speed that lights the OPTIMUM CHARGE indicator, which will be about 30 minutes* of listening to the radio.
Use this as an charging standard.
Even when you turn the handle at the speed that the OPTIMUM CHARGE indicator does not light, it will charge the built-in rechargeable battery and you may listen to the radio. The OPTIMUM CHARGE indicator is not an indicator for charging capacity.
* The listening time may defer depending on the operation of the unit.
When the rechargeable battery becomes exhausted.
The sound will become weak and distorted. If this occurs, turn the handle of the power generator to charge the rechargeable battery.
Notes
- When you use the rechargeable battery for the first time, after a long period of time of disuse, leaving the power on for a long time or the rechargeable battery is exhausted, the battery life may be short even after charging it. In this case, charge (for more than a minute) and discharge the battery several times. The battery life will be restored.
- If the rechargeable battery capacity becomes half the normal life, please consult the nearest Sony dealer.
Installing the dry batteries (see fig.  )
)

Insert two size AA (R6) batteries (not supplied).
- Open the lid as illustrated.
- Insert two size AA (R6) batteries with correct polarity.
- Close the lid of the battery compartment.
Replacing dry batteries
When the dry batteries become weak, the sound will become weak and distorted. Replace both dry batteries with new ones.
| Battery Life | (Approx. hours) | |
| FM | AM | |
| Sony size AA (R6) batteries | 37 | 44 |
Choosing the power source
Set the BATT SELECTORswitch to the source you want to use.

Check the rechargeable battery and the dry batteries once a year.
Rechargeable battery: turn the handle of the POWER GENERATOR to charge, then confirm that you can listen to the radio.
Dry batteries: turn on the radio to confirm if the sound is not weak or distorted.
Playing the Radio
- Set the BATT SELECTOR switch to choose the power source.
- Turn on the radio and select FM or AM with POWER.
- Tune in to a station with TUNING. When the station is tuned in, the TUNE indicator lights up.
- Adjust volume using VOL.
To turn off the radio
Set POWER to OFF.
To im prove radio reception
FM: Extend the telescopic antenna and adjust the length, angle and direction to obtain optimum reception.
AM: Rotate the unit horizontally for optimum reception. A ferrite bar antenna is built in the unit.
When using the earphone
Connect the earphone (not supplied) to  (earphone) jack.
When the earphone is connected, the speaker will not emit sound.

Notes
- Do not sound the alarm when using the earphone. The volume for the alarm cannot be adjusted.
- When the earphone is not connected to the
![]() (earphone) jack, be sure to close the earphone cover. If you do not close the earphone cover, the unit will not be water-resistant.
(earphone) jack, be sure to close the earphone cover. If you do not close the earphone cover, the unit will not be water-resistant.
Useful functions
Using the Audio Beacon
Press the AUDIO BEACONbutton. Regardless of the POWER switch, the alarm will sound while the AUDIO BEACONbutton is depressed. To stop the alarm, press the AUDIO BEACON button again.
On the alarm sound
The alarm sound or the volume defers depending on the power source, the capacity of the power source and when the power source become weak or exhausted.
Alarm Sound Level:
Output SPL @ 12 in (30 cm) approx. 75 dB
Notes
- The built-in Audio Beacon is intended as a general purpose signaling device and is not intended for long distance signaling or signaling of an emergency or safety nature.
- The alarm volume cannot be adjusted. Since the volume is very loud, be careful on regular basis.
- Depending on the surrounding noise, the alarm may not be heard.
Using the LIGHT
Press the LIGHTbutton, the dial light will be lit while this button is pressed.
Attaching the hand strap (see Fig.  )
)

Attach the supplied hand strap to the strap hole at the side of the unit.

Documents / ResourcesDownload manual
Here you can download full pdf version of manual, it may contain additional safety instructions, warranty information, FCC rules, etc.
Advertisement
Thank you! Your question has been received!


Need Assistance?
Do you have a question about the ICF-B200 that isn't answered in the manual? Leave your question here.