NETGEAR RangeMax WPN311 Installation Manual
Wireless pci adapter
Hide thumbs
Also See for RangeMax WPN311:
- User manual (87 pages) ,
- Installation manual (2 pages) ,
- Specifications (2 pages)
Advertisement
Quick Links
Download this manual
See also:
User Manual
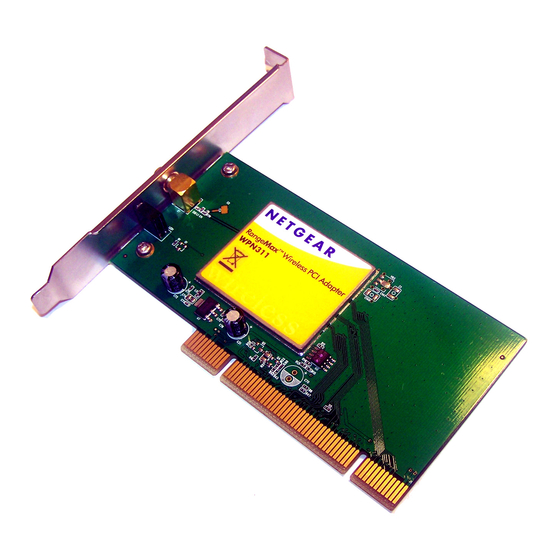
NETGEAR RangeMax™ Wireless PCI Adapter WPN311
These basic setup instructions assume that you will connect to an access point using the
default security options. Please refer to the online help and the Reference Manual on the
Resource CD for instructions on configuring wireless security, Ad-hoc mode, or advanced
options.
Estimated Completion Time: 15-25 minutes.
Windows XP
1. F
,
WPN311
.
IRST
INSTALL THE
SOFTWARE
a.
Power on your computer, let the operating system boot up completely, and log in
as needed. Insert the Resource CD for the WPN311 into your CD drive. The CD
main page will load. If this page does not automatically load, browse to the CD,
and double-click on autorun.exe.
b.
Click the Install Driver and Utility link to run the
Assistant
.
c.
Follow the Smart Wizard - Install Assistant steps.
d.
Click Finish when done, and if prompted restart your computer.
2. N
,
EXT
INSTALL THE
a.
Shut down the PC and remove the power cord from the PC. Insert the WPN311
Wireless PCI Adapter into an available PCI slot. Connect the antenna to the
adapter and position the antenna to the up position. Reconnect the power cord
and reboot the computer.
b.
After a short delay, the Found New Hardware Wizard displays. Select Install the
software automatically (Recommended) and click Next.
Note: If the Windows XP logo testing warning appears, click Continue Anyway
to proceed.
c.
You will be prompted to choose the country where you are located. Select your
location from the list.
d.
You also will be prompted to enable the NETGEAR Smart Wireless Settings
Utility configuration utility.
Click Yes to accept this option.
If you choose No, you must read the Windows XP documentation to learn
how to use the Windows XP wireless network configuration utility.
e.
Click Finish to complete the installation. You will see the WPN311 system tray
icon on the lower right portion of the Windows task bar.
3. N
,
OW
CONFIGURE YOUR
a.
Determine the current settings for your wireless access point, including the case-
sensitive SSID and security settings (if any):
•
WEP — 64 or 128 bit, Passphrase (case-sensitive) or Key # with hex key
Smart Wizard - Install
•
WPA-PSK — Passphrase (case-sensitive)
b.
Click the WPN311 icon in the Windows system tray to view the WPN311
Settings tab page.
WPN311 W
PCI A
.
IRELESS
DAPTER
WPN311
P
.
AND SAVE THE
ROFILE
c.
Change the Network Name SSID and security settings to match your wireless
access point. For WEP, select the Use WEP Encryption checkbox. For
WPA-PSK, click the Advanced button.
Tip: To view the available wireless networks, use the drop-down list or the
Networks tab and choose the one you want.
d.
Click Apply to activate the connection.
Tip: Create work and home profiles. Then, activate whichever one you need for
your current location.
4. F
,
INALLY
VERIFY WIRELESS NETWORK CONNECTIVITY
•
Use the status information at the bottom of the utility to verify your wireless
network connection. Click the Help button to view the online help.
Help button
Unlocked: the wireless network does not use security
Locked: the wireless network uses security
Note: The status bar at the bottom of the utility reports the speed of your
connection. 108 Mbps speed is only possible when your wireless network has a
108 Mbps access point such as in the NETGEAR WPN824 RangeMax™
Wireless Firewall Router or NETGEAR WGT634U 108 Mbps Wireless Router.
•
WPN311 Windows system tray icon: green or yellow indicates a working
connection; red indicates no connection.
•
WPN311 LEDs: alternating blinking means attempting to connect; blinking
together indicates a good connection; off means the WPN311 is not seated.
•
Verify connectivity to the Internet by opening a browser or verify access to
network resources such as files and printers.
.
Signal strength
indicator.
Advertisement

Related Manuals for NETGEAR RangeMax WPN311


Summary of Contents for NETGEAR RangeMax WPN311
- Page 1 Power on your computer, let the operating system boot up completely, and log in as needed. Insert the Resource CD for the WPN311 into your CD drive. The CD main page will load. If this page does not automatically load, browse to the CD, and double-click on autorun.exe.
-
Page 2: Windows 2000
Next, you will be prompted to choose the country where you are located. Select your location from the list. You will now see the WPN311 system tray icon in the lower right area of the Windows task bar. 3. N...