Advertisement
Available languages
Available languages
Quick Links
Advertisement

Related Manuals for NAMI ELECTRIC BURN-E


Summary of Contents for NAMI ELECTRIC BURN-E
- Page 1 U S E R M A N U A L...
- Page 2 Table of contents INTRODUCTION SAFETY INSTRUCTIONS AND WARNINGS BATTERY Features of the BURN-E NAMI Electric scooter DASHBOARD HOW TO TURN ON THE SCOOTER TRAVELOGUE...
- Page 3 W H O I S N A M I ? ’...
-
Page 4: Before You Begin
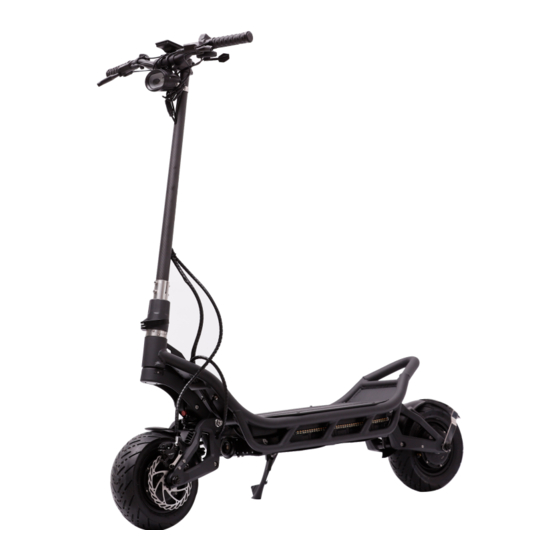
Before you begin “ ” “ ” ” *Study carried out by 6t-bureau de recherche in 2019... - Page 5 OVERVIEW Length: 1346 mm Width: 312 mm for the frame, 620 mm for the handlebars Height: 1445mm from the handlebars to the ground, 640mm when folded to the ground 1090 mm from the handlebars to the bridge, Ground clearance: 150 mm Standing deck area: 564mm x 312mm, length 766mm, rear footrest included Rake: 76...
- Page 6 OVERVIEW Length: 1346 mm Width: 312 mm for the frame, 620 mm for the handlebars Height: 1445mm from the handlebars to the ground, 640mm when folded to the ground 1090 mm from the handlebars to the bridge, Ground clearance: 150 mm Standing deck area: 564mm x 312mm, length 766mm, rear footrest included Rake: 76...
- Page 7 Captions 1 - Honk 2 - Front light 3 - Dashboard 4 - Handlebar 5 - Steering column 6 - Lock system 7 - Folding system 8 - Suspension 9 - Wheel 10 - Steering arm 11 - Béquille 12 - Rear side light system + indicator 13 - Footrest 14 - Platform...
- Page 8 15 - Charging port 16 - Brake disc 17 - Brake caliper 18 - Mudguard...
- Page 9 DRIVING ELEMENTS 1 - Right switch (Lights / Turn signals / Horn) 2 - Accelerator 3 - Left hand switch (Power / Instrument panel adjustment system)
- Page 10 4 - Rear brake lever (left) 5 - Front brake lever (right) Votre texte de paragraphe...
- Page 11 Technical specifics Tableau Excel...
- Page 12 HOW TO TURN ON THE SCOOTER Description of the folding system...
- Page 13 HOW TO TURN ON THE SCOOTER How to turn on the scooter Assembly of the scooter...
- Page 14 Dashboard power supply Power button : Mode button : + Button : - button :...
- Page 15 Maintenance of the scooter ZOOMER SUR LA VIS ROUGE How to adjust the suspensions You can adjust in two different ways: Preload adjustment: you can adjust it by the lock nut under the suspension spring. Screw it in for more hardness when starting the rebound, or unscrew it for less hardness when starting the rebound.
- Page 16 Maintenance of the scooter How to adjust the suspensions You can adjust in two different ways: Adjustment of Preload : adjusted by the locking nut under the spring, which is close to ground. Make it tighter for more support at begining, or softer to have less support at begining.
-
Page 17: Safety Instructions And Warnings
Safety instructions and warnings... - Page 20 . Reminder of the precautions before driving:...
-
Page 21: Safety Advices
SAFETY ADVICES As with any mechanical component, a vehicle is subject to high stress and wear. Various materials and components can react to wear or fatigue differently. If you exceed the expected life of a component, it can suddenly rupture and risk injury to the user. Cracks, scratches and discolorations in high stress areas indicate that the component has exceeded its service life and should be replaced. - Page 22 BATTERY Loading 1. Switch off the scooter before charging it. 2. Locate the charging port 3. Open the charging port 4. Connect the charger 5. Connect the charger to a 220V electrical outlet The charger led is red when charging. It turns green when the battery is fully charged. The charging time with a charger is 12:30.
- Page 23 Warnings ° °...
- Page 24 DASHBOARD Description of the different pictograms 4/ The brake is 3/ The dashboard USB 1/ Left turn signal 2/ Right turn signal active port can be used and is on is on driving mode cannot be changed.
- Page 25 8/ Power consumption is controller 6/ The scooter is in assisted 7/ The battery is full. ideal. reached start mode, which means You can then set the value of the The maximum power is overheating you need to pick up some desired E (Eco) mode.
- Page 26 9/ Cruise control can be 10/ Cruise control is 11/ The turbo can be 12/ The turbo is used activated switched on activated...
- Page 27 13/ The error code is active, the value will appear in section A, details will be explained in the error code table on page XXX...
- Page 28 Description of displayed values SPEED: instantaneous speed, the value will be displayed in section A AV S: average speed, the value is displayed in section A (resettable) MAX S: maximum speed, the value is displayed in section A (resettable) RANGE: remaining battery life, the value is displayed in section A (for information only) MODE: selected driving mode E: ECO mode D: dynamic mode...
- Page 29 Settings “ ” " + " " - " " " " + " " - " " " Main setting Personalized driving mode...
- Page 30 “ ” “ + ” “ - ” " " " "...
- Page 31 " + "...
- Page 32 : " " , " " " " “ ”...
- Page 33 P8 : Tire size Selected number in inches of tire size. P9 : Speed regulator Enter 0 for deactivated cruise control. Enter 1 for activated cruise control. Once the cruise control is activated, the cruise control pictogram will appear on the instrument panel. While driving, press "-"...
- Page 34 P12 : Controller overheating selected value. Value selected for the motor overheating temperature limit (110 ° C maximum). Once the selected value is reached in the front motor or the rear motor, the overheating protection pictogram is displayed on the instrument panel.
- Page 35 List of error codes...
- Page 36 Default settings P1 for driving mode as advanced setting. You can adjust the setting after knowing the parameters of the scooter and its performance. Select a different setting for a different driving mode. You can configure any combination of forward / reverse motor power, forward / reverse motor acceleration force, maximum speed, e-brake power and turbo force for each mode.
- Page 37 Basic settings...
- Page 38 TRAVELOGUE...
- Page 39 I N S T R U K C J A O B S Ł U G I B U R N - E...
- Page 40 SPIS TREŚCI WSTĘP INSTRUKCJE BEZPIECZEŃSTWA I OSTRZEŻENIA BATERIA PARAMETRY TECHNICZNE NAMI BURN-E PANEL STEROWANIA JAK URUCHOMIĆ HULAJNOGĘ CARNET DE ROUTE...
- Page 41 C Z Y M J E S T N A M I ?
- Page 42 zanim uruchomisz hulajnogę Jeśli w 1915 roku w Nowym Jorku wskakiwaliśmy na Autopeda (przodek skutera), aby uniknąć benzyny, w XXI wieku hulajnoga elektryczna staje się przyjemnym sposobem poruszania się. Sprawia to, że „zyskujemy na czasie”, kiedy jesteśmy na ”codziennych wyprawach *. *Badanie przeprowadzone przez 6t-bureau de recherche w 2019...
- Page 43 W skrócie Długość: 1346 mm Szerokość: 312 mm dla ramy, 620 mm dla kierownicy Wysokość: 1445 mm od kierownicy do ziemi, 640 mm po złożeniu do ziemi 1090 mm od kierownicy do podestu, Prześwit pod pojazdem: 150 mm Powierzchnia podestu: 564 mm x 312 mm, długość...
- Page 44 Elementy hulajnogi 1 - Klakson 2 - Przednie światło 3 - Wyświetlacz 4 - Kierownica 5 - Kolumna kierownicy 6 - Mechanizm blokady 7 - System składania 8 - Zawieszenie 9 - Koło 10 - Ramię wahacza przedniego 11 - Stopka 12 - System tylnych świateł...
- Page 45 15 - Port ładowania 16 - Tarcza hamulcowa 17 - Zacisk hamulca 18 - Błotnik...
- Page 46 elementy do obsługi jazdy 1 - Prawy włącznik (Światła / kierunkowskazy / klakson) 2 - Manetka Przyśpieszenia 3 - Lewy włącznik (Panel sterowania)
- Page 47 4 - Dźwignia tylnego hamulca tylnego (lewa) 5 - Dźwignia przedniego hamulca (prawa)
- Page 48 Specyfikacja techniczna Tabela Excel...
- Page 49 Jak uruchomić hulajnogę? Opis systemu składania...
- Page 50 Jak uruchomić hulajnogę Jak uruchomić hulajnogę Montaż hulajnogi...
- Page 51 Panel sterowania...
- Page 52 Konserwacja hulajnogi Jak ustawić zawieszenia Możesz dostosować je na dwa różne sposoby: - Regulacja napięcia wstępnego: można ją regulować za pomocą nakrętki kontrującej pod sprężyną zawieszenia. Wkręć gją, aby uzyskać większą twardość podczas rozpoczynania odbicia lub odkręć ją, aby uzyskać mniejszą twardość podczas rozpoczynania odbicia. - Regulacja odbicia: użyj czerwonego pokrętła na górze sprężyny (zobacz załączone zdjęcie).
- Page 54 Instrukcje bezpieczeństwa i ostrzeżenia...
-
Page 58: Zalecenia Bezpieczeństwa
ZALECENIA BEZPIECZEŃSTWA Jak każdy element mechaniczny, pojazd podlega dużym naciskom i zużyciu. Różne materiały i komponenty mogą różnie reagować na zużycie. Jeśli przekroczysz przewidywaną żywotność danej części, może ona pęknąć i spowodować obrażenia ciała użytkownika. Pęknięcia, rysy i przebarwienia w obszarach o wysokim naprężeniu wskazują, że komponent hulajnogi przekroczył... - Page 59 bateria Ładowanie 1. Wyłącz hulajnogę przed ładowaniem. 2. Znajdź port ładowania 3. Otwórz port ładowania 4. Podłącz ładowarkę do hulajnogi 5. Podłącz ładowarkę do gniazdka elektrycznego o 220V Podczas ładowania dioda ładowarki świeci na czerwono. Gdy świeci się na zielono, bateria jest w pełni naładowana.
- Page 60 Pamiętaj! ° °...
- Page 61 WYŚWIETLACZ Opis piktogramów 4/ Hamulec jest Port 1/Lewy 2/Prawy aktywny wyświetlaczu jest kierunkowskaz jest kierunkowskaz jest gotowy do użycia i włączony włączony. można zmienić trybu jazdy.
- Page 62 8 / Zużycie energii jest idealne. 5 / Sterownik dotarł do 6 / Hulajnoga jest w trybie 7 / Bateria jest naładowana. Maksymalna moc to mniej niż limitu ochrony przed kick start, co oznacza, że Możesz ustawić dokładną 80% pojemności, gdy prędkość przegrzaniem.
- Page 63 Tempomat jest Tempomat jest 11 / Tryb Turbo może 12/ Tryb Turbo jest gotowy do użycia włączony zostać włączony włączony...
- Page 64 błędu jest wyświetlony, wartość pojawi się w sekcji A, szczegóły zostaną wyjaśnione na liście kodów błędów na stronie 33...
- Page 65 Opis wartości na wyświetlaczu SPEED: prędkość chwilowa, wartość zostanie wyświetlona w sekcji A AV S: średnia prędkość, wartość jest wyświetlana w sekcji A (możliwa do zresetowania) MAX S: maksymalna prędkość, wartość jest wyświetlana w sekcji A (możliwa do zresetowania) RANGE: pozostały czas pracy baterii, wartość wyświetlana w sekcji A (tylko informacyjnie) MODE: wybrany tryb jazdy E: tryb ECO D: tryb dynamiczny...
- Page 66 Ustawienia „ ” . „ + ” „ - ” , „ ” , „ + ” „ - ” . „ ” , Ustawienie główne Spersonalizowany tryb jazdy...
- Page 67 Ustawienia trybu jazdy P1 Gdy wejdziesz w ustawienia P1, zobaczysz następujące tryby jazdy: E / D / S / C / X, jak na poniższym zdjęciu. Naciśnij raz przycisk „M”, a jeden z wskaźników Trybu Jazdy zacznie migać. Użyj przycisków „+” i „-”, aby wybrać tryb jazdy i uzyskać dostęp do ustawień zaawansowanych. Naciśnij przycisk „M”, aby wybrać...
- Page 68 „ + ”...
- Page 69 : „ ” , „ ” , , , " „ ” , „ ” ,...
- Page 70 Rozmiar opony Wybrana liczba rozmiaru opony w calach. Regulator prędkości Wprowadź 0, aby wyłączyć tempomat. Wprowadź 1, aby włączyć tempomat. Po włączeniu tempomatu na wyświetlaczu pojawi się piktogram tempomatu. Podczas jazdy przytrzymaj „-” przez 1 sekundę: tempomat włączy się i zostanie wyświetlony na wyświetlaczu. Po włączeniu tempomatu możesz naciskać...
- Page 71 P12: Sterownik z regulacją wartości limitu przegrzania. Wartość określająca limit, po którym następuje przegrzanie się silnika (maksymalnie 110 ° C). Kiedy silnik przedni lub tylni osiągnie wybraną wartość, na wyświetlaczu pojawia się piktogram ochrony przed przegrzaniem. Jednocześnie maksymalny prąd zostanie ograniczony do 85%, a tryb Turbo wyłączy się. P13: Ustawiona minimalna wartość...
- Page 72 Lista kodów błędu...
- Page 73 Ustawienia domyślne P1 dla trybu jazdy jako ustawienie zaawansowane. Możesz dostosować ustawienie po zapoznaniu się z parametrami hulajnogi i jej osiągami. Wybierz inne ustawienie dla każdego trybu jazdy. Możesz ustawić dowolną kombinację mocy przedniego/tylnego silnika, siły przyspieszenia przedniego/tylnego silnika, maksymalnej prędkości, moc elektrycznego hamulca i siła turbo dla każdego trybu.
- Page 75 Ustawienia podstawowe...
- Page 76 NOTATKI...