Advertisement
IMPORTANT SAFETY INSTRUCTIONS
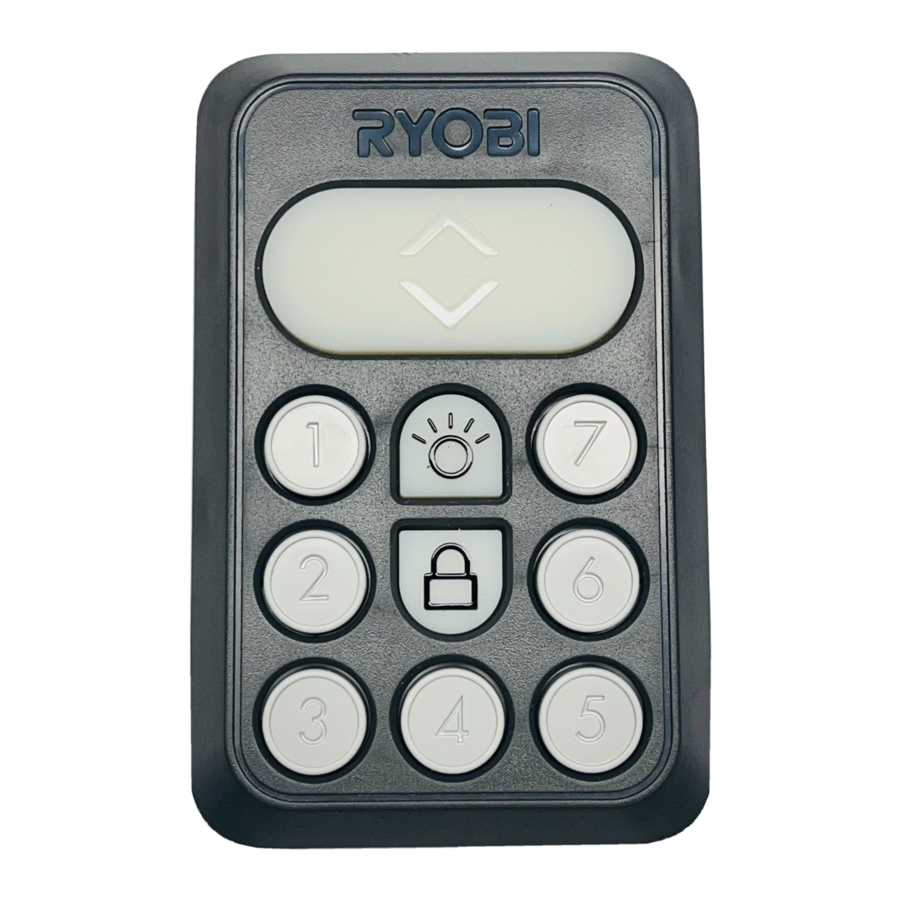
The indoor keypad is installed on the interior of the garage and can be used to open and close the garage door, activate the accessory ports, and turn the garage door opener's light on and off.

To reduce the risk of injury, do not attempt to use this product until you have read thoroughly and understand completely this operator's manual and the operator's manual for the RYOBI garage door opener. Ensure compatibility and fit before using this accessory. Do not use this accessory if a part is damaged or missing.
- Install keypad in sight of garage door and at least five feet above the floor.
- Always keep the moving door in sight and away from people and objects until it is completely closed. No one should cross the path of the moving door, which can result in death or serious personal injury.
- Do not allow children or untrained individuals to use this unit.
- Do not allow to be used as a toy. Close attention is necessary when used near children.
- Save these instructions. Refer to them frequently and use them to instruct others who may use this product.
PACKING LIST
Wireless Indoor Keypad, AA Batteries (2), Screws (2), Drywall Anchors (2), Operator's Manual
SYMBOLS
The following signal words and meanings are intended to explain the levels of risk associated with this product.
| SYMBOL/SIGNAL | MEANING |
 | Indicates a hazardous situation, which, if not avoided, will result in death or serious injury. |
 | Indicates a hazardous situation, that, if not avoided, may result in minor or moderate injury. |
| NOTICE: | (Without Safety Alert Symbol) Indicates information considered important, but not related to a potential injury (e.g. messages relating to property damage). |
Some of the following symbols may be used on this product. Please study them and learn their meaning. Proper interpretation of these symbols will allow you to operate the product better and safer.
 | Safety Alert | Indicates a potential personal injury hazard. |
 | Read Operator's Manual | To reduce the risk of injury, user must read and understand operator's manual before using this product. |
 | Moving Door | To avoid death or serious personal injury, stay clear of the garage door while it is moving and never attempt to run or walk under moving garage door. |
ASSEMBLY
INSTALLING THE INDOOR KEYPAD
See Figures 1 - 2.

- Screwdriver
- Slot
- AA batteries
- Back cover
- Indoor keypad

- Indoor keypad
- Screw
- Back cover
- Entrapment warning label
Do not use garage door opener if keypad does not start and stop the motor after it has been installed. An opener that cannot be controlled with a keypad is dangerous, can result in death or serious personal injury, and must be repaired or replaced.
Make sure the keypad is mounted high enough to prevent unauthorized activation of the garage door opener. It should be placed at least 5 feet above the floor so that it is inaccessible to children. Unauthorized activation of the opener can result in death or serious personal injury.
Do not start or stop the garage door opener if there is a person or object in the path of the door, the door has not been properly balanced, or if you cannot see the doorway. Failure to follow these instructions can result in death or serious personal injury.
Only install screws, bolts, anchors, and other hardware into sound structural supports in areas where no electrical wires, utility cables, pipes, or other obstructions are located. Failure to follow these instructions can result in death, electrical shock, or other serious personal injury.
- Find desired location indoors and in sight of the garage door.
NOTE: The keypad should be at least 5 feet above the floor so it is inaccessible to children. - Insert a flat head screwdriver into the slot on the indoor keypad and remove the back cover.
- Install new AA batteries inside the keypad according to the polarity indicators.
- Hold the back cover against the wall. Use a pencil and a level to mark screw hole placement.
- Mount the back cover to the wall using screws. Install screws using Phillips screwdriver.
NOTE: Use screws and drywall anchors (provided) when installing the keypad into drywall. To install drywall anchors, make a hole in the drywall that is slightly smaller than the plastic anchor. Use your fingers to press the anchor into the surface. Tap the head of the anchor lightly with the hammer until it is flush with the wall.
NOTE: The cover should be installed with the arrow facing up. - Position the keypad over the back cover and snap into place.
- Install Entrapment Warning Label that was provided with your garage door opener next to the keypad in a prominent location.
CONNECTING THE RECEIVER
See Figures 3 - 4.

- Receiver
- Wires
- Keypad terminals
- Metal surface

- Receiver
- Indoor keypad
- Receiver button
- Green LED
- Up/down button
- Light button
- Lock button
- Number 5
- Magnet
Use extreme care if you need to stand on a ladder to install or adjust this accessory. Ensure someone is holding the ladder on the ground to keep it stable. Failure to safely use a ladder can cause a fall and result in death or serious personal injury.
- To install wires into the keypad terminal, depress the tab above the terminal, insert the wires, and release the tab.
- Insert the red striped wire from the receiver into the left keypad terminal marked R and the white wire into the right terminal marked W.
- Using the magnet at the base of the receiver, secure the receiver to the top of the garage door rail or other metal surface away from any moving parts. For optimal reception, ensure that there are no obstructions between the receiver and the keypad.
To pair the receiver to the indoor keypad:
NOTE: When pairing, each step must be completed within 20 seconds of the previous step or the receiver will reset.
- Press and hold the receiver button until the LED begins to blink (approx. 3 seconds).
- Press the UP/DOWN button on the indoor keypad. The LED light on the receiver will stop blinking.
- Press the UP/DOWN button on the indoor keypad again. The LED light on the receiver will blink five times indicating that pairing is complete.
NOTE: Once paired, the receiver will be able to accept commands from the keypad. To turn the receiver off, unplug wires. To unpair the keypad, press and hold the receiver button for ten seconds.
After assembly is complete, perform all of the items on the Installation Verification Checklist. Refer to your garage door opener manual for details.
OPERATION
USING THE INDOOR KEYPAD
See Figure 4.
- To raise or lower the garage door, press and release the UP/DOWN button.
- To enter and exit vacation mode, press and release the LOCK
![]() button. When the unit is in vacation mode, it can only be controlled using the indoor keypad. The unit will not respond to car remotes, the outdoor keypad, the smart phone app.
button. When the unit is in vacation mode, it can only be controlled using the indoor keypad. The unit will not respond to car remotes, the outdoor keypad, the smart phone app.
NOTE: The receiver's LED will blink when the unit is in vacation mode. - To turn the garage door opener's lights on and off, press and release the LIGHT
![]() button.
button.
NOTE: When the LIGHT![]() button is pressed, garage door opener's light will illuminate for three minutes.
button is pressed, garage door opener's light will illuminate for three minutes.
 button.
Activating and Deactivating Accessory Ports:
- To activate an accessory port, press the number on the indoor keypad corresponding with the desired port. For example, to activate accessory port #5 press NUMBER 5 on your keypad.
NOTE: An active accessory port can be used to power DC accessories. Multiple ports can be activated at once. - To deactivate an accessory port, press the number on the indoor keypad corresponding with the port.
TROUBLESHOOTING
| PROBLEM | POSSIBLE CAUSE | SOLUTION |
| Receiver will not pair with keypad or keypad is working inconsistently and receiver does not flash two times when pressing keypad buttons. | Receiver is not properly plugged into garage door opener. Batteries inside keypad are loose or dead. Receiver and keypad are not in direct line of sight. Keypad mounted to a metal surface. Receiver and keypad are too far apart. Keypad is not secured with back cover. | Plug receiver wires firmly into correct color ports. Install batteries firmly or replace batteries. Move receiver to be in direct line of sight of the keypad. Offset/space keypad from metal surface or relocate keypad. Move keypad to a location closer to the receiver. Install keypad to back cover plate. |
| Keypad is the only device able to operate the door and receiver LED is slowly flashing. | Keypad is in vacation mode. | Press the LOCK ( ) button on the keypad to turn off vacation mode. ) button on the keypad to turn off vacation mode. |
| Must hold down keypad button to close door. | Safety sensors are not properly aligned. Safet y sensors are overexposed to light. | Adjust safety sensors until their green and red LED is solid. Move safety sensors into shade. |
ONE WORLD TECHNOLOGIES, INC.
P.O. Box 1288, Anderson, SC 29622 • Phone 1-877-205-5714
États-Unis, Téléphone 1-877-205-5714 • USA, Teléfono 1-877-205-5714
www.ryobitools.com

Documents / Resources
References
Download manual
Here you can download full pdf version of manual, it may contain additional safety instructions, warranty information, FCC rules, etc.
Download RYOBI GDA401 - Wireless Indoor Keypad For Garage Door Openers Manual
Advertisement
Thank you! Your question has been received!
Need Assistance?
Do you have a question about the GDA401 that isn't answered in the manual? Leave your question here.