Table of Contents
Advertisement
Quick Links
Advertisement
Table of Contents

Summary of Contents for NATURESPY NS-URSTC
- Page 1 Ursus Trail Camera Manual MODEL: NS-URSTC...
- Page 2 Thank you for purchasing the NatureSpy ® Ursus Trail Camera! NatureSpy ® is a social enterprise and all profits from each sale goes to wildlife conservation projects worldwide. We aim to provide the very best equipment, expertise and support to help people and animals live a wild life ®...
-
Page 3: Notes Before Use
You can also scan the QR code at the front of this booklet to go to the Ursus Trail Camera support page for set-up help and hints and tips or visit naturespy.org/support. Handy First Use Tips: 1. - Page 4 Notes Before Use 3. The color of the LED Indicator; ① The LED flashes red when in setup mode and the PIR is activated, or when ready for operation. The LED goes off when the camera in armed. ② When battery is too low, the indicator light turns blue. ③...
- Page 5 Notes Before Use 8. Before storing or a long period of non-use, remove the batteries. 9. The camera cannot be submerged in water.
-
Page 6: Quick Start
Quick Start 1. Load 6x lithium AA (non rechargeable) or alkaline AA batteries 2. Insert the SD card 3. Move the switch to the On position 4. Press the MENU button 5. Press the UP / DOWN button to select Photo, Video or Dual Mode 6. -
Page 7: Camera Overview
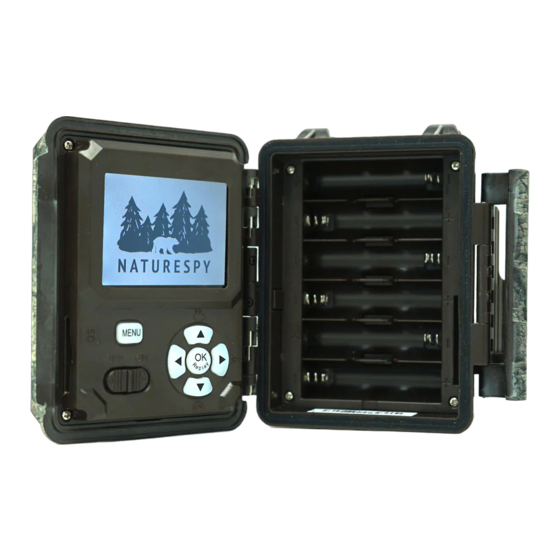
Camera Overview 2.4” Display Screen LED Indicator Lens SD Card slot IR LEDs ON / OFF Switch Controls Battery Compartment... -
Page 8: Power Supply
Power Supply Once opened, you will see the 6 slot for AA batteries. For maximum battery life, we recommend using 6x lithium AA (non-rechargeable), but the camera can also run on alkaline batteries. Please be sure to insert each battery with correct polarity to avoid damage. SD Card Insert the SD card with the camera switched off. - Page 9 Mounting We recommend mounting the camera on a sturdy tree or post. To get the optimal picture quality, the tree should be about 10-15 ft (3-4m) away from the place you want to monitor, with the camera placed at a height of 1-2ft (30-60cm) off the ground. Also, keep in mind that you will get the best results at night when the subject is within the ideal flash range, no farther than 60ft (19m).
-
Page 10: Sensing Angle And Distance Test
Sensing Angle and Distance Test To test whether the camera can effectively monitor the area you choose, you can check the sensing angle and monitoring distance of cam. To perform the test: 1. Switch cam to ON mode. 2. Move / wave your hands in front of the camera at several positions within the area where you expect the wildlife to be. -
Page 11: Operational Modes
Operational Modes You can check and change the settings of the camera using the display screen. Moving the power switch to the ON position will turn on the LCD display and you will see the screen as below (depending on camera mode). Press the MENU button to access the camera settings. Photo Mode Video Mode Video Resolution... - Page 12 Settings Set Clock Press OK and use UP/DOWN keys ( to change the setting ) and LEFT/RIGHT keys ( to move to the next field ) to set the hour ( 24- hr format only, “00”=midnight,“12”=noon) and minute, then Clock move to the next row to set the year, month and date accordingly.
- Page 13 Settings Capture Number Selects how many photos are taken in sequence per trigger in Camera mode. This setting affects photos taken in Field Scan Capture Number mode as well. MENU Exit Camera Name Allows the user to set a customised name for the camera. This is useful for identification purpose when multiple cameras are used Camera Name Input...
- Page 14 Settings Sensor Level Four options: Auto, Low, Normal, High. We recommend leaving on Sensor Level High High, and changing if you get too many false triggers. Exit MENU Flash Mode Three options: Low, Fast Motion, Long Range. We recommend Fast Flash Mode Fast Motion Motion as default, but Long Range if you need to light a bigger area,...
- Page 15 Settings Format Deletes (erases) all files stored on a card to prepare it for reuse. Always format a card that has been previously used in other devices. Execute Format Make sure you have downloaded and backed up all files you want to preserve first.
- Page 16 Settings Coordinate Input This option allows user to input latitude and longitude Coordinate Input coordinates for camera's location. This data will be embedded in photo files saved on the camera’s SD card. Exit MENU Language Language Set your preferred language. English Exit MENU...
- Page 17 Settings Version This shows firmware version being currently used in this camera. 561NC2Dx19XXX Version Exit MENU...
-
Page 18: Specification
Specification Model Number KW561 Max Pixels 30MP Lens lens: f=7.36mm F/NO:2.8 FOV=55°,HOV=42° IR-Flash Range 48*940nm LEDS Display Screen 2.4 inch HD Color Display Image Size 30MP;16MP;5MP Video Size 1920*1080; 1280*720 ; 640*480 PIR Sensitivity PIR with 4 sensitivity levels:High/ Normal/ Low/Auto Response Time Picture trigger: <... -
Page 19: Warranty And Service
. 2 year limited warranty Your NatureSpy product is warranted to be free of defects in materials and workmanship for two years from the date of purchase. In the event of a defect under this warranty, we will, at our option, repair or replace the product.