Linksys WPS11 ver. 3 Quick Installation
Instant wireless series wireless printserver
Hide thumbs
Also See for WPS11 ver. 3:
- User manual (31 pages) ,
- Specifications (2 pages) ,
- User manual (30 pages)
Advertisement
Quick Links
Download this manual
See also:
User Manual
This Quick Installation is meant to help you install the product quickly and easily. For detailed instructions on installation,
configuration, and further setup options, please consult the User Guide.
Instant Wireless™ Series
System Requirements
Wireless
• Microsoft
®
Windows 95, 98, NT, 2000,
ME, or XP
PrintServer
• One CD-ROM Drive
• One Ethernet Connection (for configura-
tion purposes) and Cable
• Internet Explorer version 4.0 or higher, or
Netscape Navigator version 4.0 or higher
• Printer with Parallel Connection
Package Contents
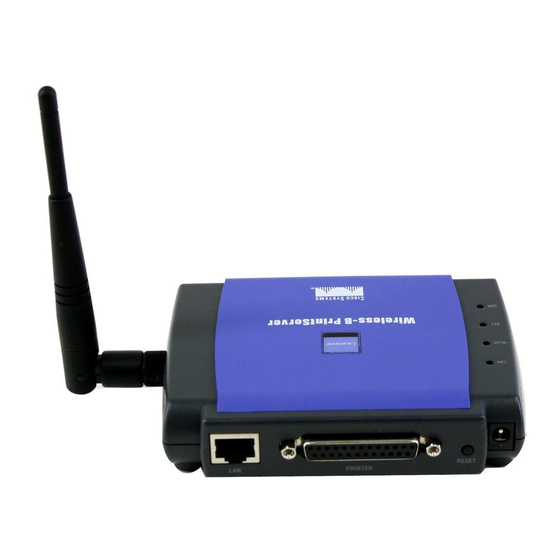
• One Wireless PrintServer (1)
• One Detachable Antenna (2)
• One AC Power Adapter (3)
• One CD-ROM (with User Guide) (4)
• Registration Card and Quick Installation
(not shown)
WPS11 ver. 3
Installing Your Wireless PrintServer
The Wireless PrintServer does not have a power switch. Whenever its power
adapter is plugged in, the Wireless PrintServer is powered on. The Wireless
PrintServer can be powered on before, during, or after your network is pow-
ered on. You can connect to the PrintServer wirelessly after the PrintServer
has been properly configured via the Ethernet connection.
Connecting the Wireless PrintServer
to Your Network
A. Plug one end of a UTP Category 5 (or better)
Ethernet cable into the Wireless PrintServer's
LAN port.
B. Connect the other end of the cable to a net-
A
worked hub or switch.
Connecting a Printer to the Wireless PrintServer
C. Connect your printer to
the Wireless PrintServer's
Printer (LPT) port with
your printer cable.
C
D. Turn on your printer.
E. Attach the antenna to the Wireless PrintServer antenna port. Orient the
antenna so that it is pointing straight up (at a 90-degree angle).
N N O O T T E E : : The Wireless PrintServer's antenna is vertically polarized.
This means it has greater transmission and reception range in a
circular area surrounding it, but a shorter range directly above and
below it. For maximum capability, the antenna should be oriented
so it is perpendicular with the horizon.
Connecting the Power
F. Plug the AC power adapter into the Wireless
PrintServer's Power port.
G. Plug the AC power adapter into the power outlet.
N N O O T T E E : : Only use the power adapter packaged with the Wireless
F
PrintServer. Using a different power adapter could damage the
Wireless PrintServer.
H. The LAN LED on the Wireless PrintServer's front will
light up. If the LAN LED does not light up, see the
Troubleshooting section of the User Guide.
H
N N O O T T E E : : Refer to the S S p p e e c c i i f f i i c c a a t t i i o o n n s s in the User Guide to deter-
mine how far other devices can be located from the Wireless
PrintServer.
Installing the Autorun Bi-Admin
Management Utility
A. Insert the Setup Utility CD. A built-
in autorun will begin the installation
of the PrintServer's Bi-Admin
Management Utility, and display the
Welcome screen. Click the product
you wish to install, and then click
the Install tab to continue.
A
B. The installation routine will begin
to run and display a second
Welcome screen. Close any other
programs you might have running
during this installation procedure,
and click Next to continue or
Cancel to forgo installation.
B
Continued on back!
Advertisement

Related Manuals for Linksys WPS11 ver. 3


Summary of Contents for Linksys WPS11 ver. 3
- Page 1 PrintServer’s Power port. G. Plug the AC power adapter into the power outlet. N N O O T T E E : : Only use the power adapter packaged with the Wireless PrintServer. Using a different power adapter could damage the Wireless PrintServer.
- Page 2 Then, click Next. D. The following screen will assign a Program Windows Taskbar. The default Program Folder is the Linksys PrintServer Driver. Click Next to continue. E. The driver installation is now com- Installing the Wireless PrintServer’s pleted, but the Print Driver still needs to be configured.