Table of Contents
Advertisement
Quick Links
Advertisement
Table of Contents

Related Manuals for Nastec MIDA 203


Summary of Contents for Nastec MIDA 203
- Page 1 MIDA Installation, use and maintenance manual V 6.0 24/04/2022...
- Page 2 Copyright © Nastec srl The information contained in this document may be changed without notice Nastec srl, Via della Tecnica, 8, 36048, Barbarano Mossano, Vicenza, Italy, Tel. +39 0444 886289, Fax +39 0444 776099, info@nastec.eu, nastec.eu...
-
Page 3: Table Of Contents
MIDA Table of Contents 1. Introduction ............................5 1.1. Purpose of the manual ......................5 1.2. Product overview ........................5 2. Safety ..............................6 2.1. Symbols ..........................6 2.2. Qualified personnel ........................6 2.3. Safety warnings ........................6 2.4. Acoustic emission ........................8 2.5. - Page 4 MIDA 9.10. Connectivity parameters ....................... 38 10. Constant pressure operation ......................39 10.1. Introduction .......................... 39 10.2. The pressure vessel ......................39 10.3. Electrical connections ......................39 11. Splitting the pumping system ......................40 11.1. Introduction.......................... 40 11.2. Variable speed pumping unit with two or more pumps in COMBO mode........40 11.2.1.
-
Page 5: Introduction
MIDA 1. Introduction 1.1. Purpose of the manual The purpose of this manual is to provide users with detailed information on the installation, operation, and mainte- nance of the product, with special regard to safety regulations. WARNING Read the manual carefully before installing and using the product. WARNING Failure to follow the instructions may result in damage to the product, the system in which it is installed and, in the worst cases, damage to property or persons with even fatal consequences. -
Page 6: Safety
MIDA 2. Safety 2.1. Symbols This symbol indicates a TIP or recommendation. NOTE This symbol indicates a NOTE or an indication or concept to be emphasised. CAUTION This symbol indicates CAUTION, thus an indication which failure to respect can lead to minor or moderate damage. - Page 7 MIDA WARNING The unsuitable use of the product, non-original spare parts or tampering with the hardware and/or firmware of the product may lead to serious damage to property or persons in addition to the loss of warranty. The manufacturer waives all liability due to the improper use of its products. WARNING Before commissioning the product, ensure that the installation is safe and in accordance with local regulations.
-
Page 8: Acoustic Emission
MIDA DANGER Make sure that the device and the loads connected to it are properly grounded with the appropriate connection terminals before commissioning. Ensure that the grounding system is compliant and refer to local regulations for grounding devices. Each load must be fitted with its own earthing cable, the length of which must be as short as possible. -
Page 9: Warranty
If the warranty is applicable, Nastec will repair the device. Nastec is willing to refurbish the product upon offer. In the absence of a warranty, Nastec will make an offer to repair and/or refurbish the device. After 60 days from the offer, if no response is received from the buyer, Nastec will scrap the product upon notice. -
Page 10: Disassembly And Repair
WARNING Failure to comply with the instructions may lead to loss of warranty. For more information contact the dealer or technical support at service@nastec.eu or by opening a support ticket on the portal service.nastec.eu 3.6. Disposal Devices marked with this symbol cannot be disposed of in household waste but must be disposed of at appropriate waste drop-off centres. -
Page 11: Handling
If the product is put back into storage after it has been used, it is advisable to contact the manufacturer for further information on storage. For more information contact the dealer or technical support at service@nastec.eu or by opening a support ticket on the portal service.nastec.eu 5. - Page 12 MIDA Model Vin +/- 15% [VAC] Max V out [VAC] Max I in Max I out Typical Maximum Size motor P2 efficiency [%] [kW] MIDA 207 1 x 230 3 x Vin MIDA 304 3 x 230 3 x Vin 0,75 MIDA 306 3 x 230...
-
Page 13: Dimensions And Weight
MIDA 5.3. Dimensions and weight 97 mm 114 mm Size Maximum weight [kg] 5.4. Cables entry Cable gland Tightening torque Cable diameter Size Size Size [Nm] [mm] MIDA 338 , MIDA 344 ,MIDA 438 , MIDA 444 3,5-7 5-10 7-13 10-17 19 -28 6. -
Page 14: Cooling
MIDA WARNING The degree of protection of the device is only ensured if, at the end of the installation, the cover screws and the cable glands have been properly tightened. Close the holes of unused cable glands with the appropriate plugs. Protect the device from direct exposure to weather and sunlight. - Page 15 MIDA In size 2 devices, the ground connection between the base and the power is made by means of four metal pins on the power side that engage into four special holes on the base with spring contacts. At the same time, these metal pins serve as a guide for a correct coupling between the base and the heat sink.
-
Page 16: Assembly On-Board The Motor
MIDA DANGER Be careful not to damage or remove the four metal pins, as this will not only compromise the mechanical coupling between the base and the power, but also the ground connection. 6.4. Assembly on-board the motor The device may be installed in place of the motor terminal box cover both horizontally and vertically. It is necessary to check with the motor manufacturer whether the base of the device can be fastened to the motor casing. - Page 17 MIDA On-board motor installation for size 1 devices P.E.
-
Page 18: Wall Installation
MIDA On-board motor installation for size 2 devices (max 100) 6.5. Wall installation Wall installation is carried out by means of the special metal bracket available on request. - Page 19 MIDA Wall installation for size 1 devices Wall installation for size 2 devices DANGER The ground continuity between the base of the device and the bracket is ensured by the special component shown in the figure. Install this component and verify the ground continuity between the bracket and the base of the device at the end of the installation.
-
Page 20: Electrical Installation
These trigger in the event of failure of a component inside the device. Supply voltage Model Recommended fuse Recommended circuit breaker ABB MCB S200 1 x 230 VAC MIDA 203 S201-C10 1 x 230 VAC MIDA 205 S201-C10 1 x 230 VAC MIDA 207... -
Page 21: Connecting Cables
[Nm] tightening torque cable with ground cable with ground MIDA 203 3 x 2,5 mm 4 x 2,5 mm MIDA 205 3 x 2,5 mm 4 x 2,5 mm MIDA 207... -
Page 22: Control Cables
MIDA WARNING Always use cables with appropriate cable lugs, which may be supplied with the product. WARNING For motor cable lengths greater than 5 meters, the use of special output filters, available on request, is recommended. 7.3.2. Control cables Model Maximum cross-section of the control cables Tightening torque [Nm] Control terminals of all... -
Page 23: Power Connections
MIDA 7.5.1. Power connections MIDA 203 , MIDA 205 , MIDA 207 MOTOR LINE N/L2 L/L1 A [mm] Pre-insulated cable lug Stripping diagram L1/L 6.3 x 0.8 mm female Faston L2/N 6.3 x 0.8 mm female Faston Power Supply LINE 6.3 x 0.8 mm female Faston... - Page 24 MIDA MIDA 304 , MIDA 306 , MIDA 309 ,MIDA 404 , MIDA 406 , MIDA 409 MOTOR LINE A [mm] Pre-insulated cable lug Stripping diagram 6.3 x 0.8 mm female Faston 6.3 x 0.8 mm female Faston Power Supply 6.3 x 0.8 mm female Faston LINE 6.3 x 0.8 mm female Faston...
- Page 25 MIDA MIDA 314 , MIDA 318,MIDA 414 , MIDA 418 DC IN/ DC IN/ DC IN/ DC IN/ BRAKE BRAKE BRAKE BRAKE A [mm] Pre-insulated cable lug Stripping diagram Wall installation (through lower cable glands) Fork for M4 screw (120) Fork for M4 screw (120) Fork for M4 screw...
-
Page 26: Control Connections
MIDA MIDA 325 , MIDA 330 , MIDA 338 , MIDA 344 ,MIDA 425 , MIDA 430 , MIDA 438 , MIDA DC IN/ DC IN/ BRAKE BRAKE DC IN/ DC IN/ BRAKE BRAKE A [mm] Pre-insulated cable lug Stripping diagram Wall installation (through lower cable glands) (120) (120) - Page 27 MIDA LINE N/L2 L/L1 Control connections for size 2 devices Type Description Functionality Comments Analog inputs 4-20 mA Sensor 1 4-20 mA Sensor 2 0-10 V External set value 0-10 V External frequency External set value 2 Power Supply +15V 15 VDC, max 100 mA Power supply for 4-20 mA ana- Do not use as a power supply for...
-
Page 28: Commissioning
MIDA Type Description Functionality Comments Active low Alarms reset Programmable as Normally Open or Normally Closed. Motor start and stop Switch between main and auxili- ary control modes Relay outputs Normally Open STATUS relay Potential-free contacts Common NO1, COM1: closed contact Max 250 VAC, 2 A with motor running. -
Page 29: Use And Programming
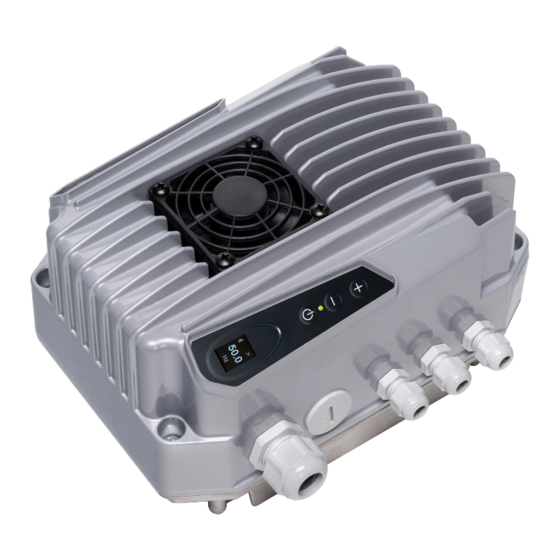
MIDA • start the motor. 9. Use and programming 9.1. Keyboard (version without display) 1. Red LED ON: the unit is powered with the correct power supply voltage. FLASHING red led: undervoltage. 2. Green LED ON: motor running. Green led OFF: motor stopped. When the unit is in "constant value" control mode, the green LED flashes with a greater frequency the closer the measured value is to the set value. -
Page 30: Keyboard And Display
The device can be controlled using a smartphone or tablet equipped with Bluetooth BTLE connectivity and with the App Nastec NOW installed. The App is available for Android and iOS and may be downloaded, free of charge, from the respective online stores. -
Page 31: Initial Display
MIDA • Access manuals and additional technical documentation. • Receive online help on parameters and alarms. 9.4. Initial display When the device is switched on, the control firmware version (LCD = X.XX), the power firmware version (INV = X.XX) and the hardware version (HW = X.XX) are communicated to the user. Next, the initial view opens. -
Page 32: Adjusting The Foc Control
MIDA 2. Power up the system and follow the initial set-up procedure specifying: a. Motor type: three-phase asynchronous or permanent magnet synchronous motor. b. Rated voltage of the motor according to its data plate. c. Rated frequency of the motor according to its data plate. d. -
Page 33: Menu
MIDA In some cases, however, it may be necessary to increase (in case of frequency oscillations) or to lower (in case of overcurrent or igbt trip alarms) the "FOC dynamic" setting in the motor parameters menu (default password 002) according to the following table: Configuration FOC dynamics Motor cables shorter than 100 m and no filter between inverter and motor. - Page 34 MIDA Parameter Default Description Max alarm value Value that can be reached in the system beyond which, even in constant frequency operating mode, the pump is stopped p = XX.X [bar] and an alarm signal is emitted. The pump is restarted only after the measured value has dropped below the maximum alarm value for more than 5 seconds.
- Page 35 MIDA Parameter Default Description Control ramp Time in which the device decreases the motor power frequen- cy from the minimum control frequency (Frequency min con- t = XX [s] trol) to the minimum motor frequency (Min motor frequency). If during this time the measured value falls below Set value - Delta control, the device restarts the motor.
-
Page 36: Motor Parameters
MIDA Parameter Default Description Dry run cosphi Cosphi value that is measured when the pump is running dry. Below this value the device stops the pump and generates a cosphi = X.XX water shortage alarm. If the motor is of the synchronous type with permanent mag- nets, this parameter represents the percentage with respect to the rated current set below which the device stops the motor and generates the no-water alarm. -
Page 37: In / Out Parameters
MIDA Parameter Default Description Ramp freq. min motor Time in which the motor reaches the minimum frequency from standstill (Min motor frequency) and vice versa. t = XX [sec] Sec. 1: Max motor frequency; 2: Frequency min control; 3: Min motor frequency; 4: PI control; 5: Ramp up time;... -
Page 38: Connectivity Parameters
MIDA Parameter Default Description Full scale sensor Full scale of the sensor. p = XXX.X [bar] Min value sensor Minimum sensor value. p = XXX.X [bar] Offset input1 Zero correction for analog input 1 (4-20 mA). XX.X [%] (20 mA x 20% = 4 mA). Offset input2 Zero correction for analog input 2 (4-20 mA). -
Page 39: Constant Pressure Operation
MIDA Parameter Default Description MODBUS baudrate 9600 MODBUS baudrate from 1200 bps to 57600 bps XXXXX MODBUS data format MODBUS data format: RTU N81, RTU N82, RTU E81, RTU O81 XXXXX MODBUS EEPROM Setting the writing mode of the parameters transmitted via MODBUS: write ON: the datum is saved in EEPROM ON/OFF... -
Page 40: Splitting The Pumping System
MIDA • AN1: 4-20 mA signal (-) • +15V: 15 VDC power supply (+) The device supports the installation of a second pressure sensor for: • Operating at constant differential pressure (read the dedicated chapter). • Automatic replacement of the main pressure sensor in case of failure. •... -
Page 41: Synchronous Operating Principle
MIDA An additional water demand, leads to an increase in the pump frequency until, having reached its maximum frequency, a third pump is started and so on. In case of reduced demand, the last pump started decreases its frequency until it switches off. 11.2.2. -
Page 42: Programming Of Slave Units
MIDA 11.2.5. Programming of slave units. Menu Parameter Value Control parameters COMBO ON to activate. Control parameters Address from 01 to 07. Control parameters Alternance ON to activate / OFF to deactivate. It is possible to determine which devices are included in the alternation and which are not. -
Page 43: Electrical Connections
MIDA 1: Inverter; 2: Pump; 3: Pressure sensor; 4: Pressure sensor; 5: Differential pressure sensor NOTE If the suction pressure is expected to drop below atmospheric pressure during operation, absolute rather than relative pressure sensors must be used. 12.2. Electrical connections The device may be connected to linear pressure sensors with 4 - 20 mA output. -
Page 44: Alarms
MIDA Menu Parameter Value Control parameters Compensation This parameter is set other than 0 if you intend to operate a proportional differential pressure control. Additional energy savings may be achieved through this type of control. The pressure difference that you want to keep constant at Max motor frequency is given by the sum of parameters Set value + Compensation. - Page 45 MIDA Alarm Description Possible solutions A01 Overcurrent motor The current absorbed by the motor ex- • Verify that the value set for the parameter Rated motor current cor- ceeds the value set in the parameter responds at least to the rated current of the motor according to its Rated motor current.
- Page 46 MIDA Alarm Description Possible solutions A05 Under voltage • Supply voltage below the minimum • Check the value of the power supply voltage both under no load and allowed value. load conditions. • Insufficient input power to power the • Verify that the source has enough power to power the load. device.
-
Page 47: Alarms (Version Without Display)
MIDA Alarm Description Possible solutions A12 Address error In COMBO mode, multiple devices in • Restore the correct value of parameter Address in all the devices in the group have the same address. the group. • Verify which situation triggers the alarm. Reset mode: •... - Page 48 MIDA Alarm Notification Description Possible solutions LINE<- Red STAND-BY Reverse the connection of the pow- • Correct the connection of the power and motor cables. >MOT led flashing very er cable and motor cable. INV. quickly. 2 flashes of the The current absorbed by the motor •...
- Page 49 MIDA Alarm Notification Description Possible solutions A05 Un- Flashing red • Supply voltage below the mini- • Check the value of the power supply voltage both under no der volt- STAND-BY led mum allowed value. load and load conditions. • Insufficient input power to power •...
-
Page 50: Warnings
MIDA Alarm Notification Description Possible solutions A12 Ad- 9 flashes of the In COMBO mode, multiple devices • Restore the correct value of parameter Address in all the devi- dress er- yellow alarm led in the group have the same ad- ces in the group. -
Page 51: Warnings (Version Without Display)
MIDA Warning Description Possible solutions W21 Overload 15V 15V power supply overload. • Check the absorption of the loads and any short circuits connected to the 15V power supply W22 EEPROM COM. No communication with EEPROM • Contact the technical support service. W23 EEPROM fault Failure in EEPROM •... - Page 52 MIDA NOTE With three-phase asynchronous motors, the correct value to which parameter Dry run cosphi is to be set depends on: • The type of motor (construction and winding data). Generally, three-phase surface motors have a higher rated cosphi than submersible motors having the same power rating. •...
-
Page 53: Ec Declaration Of Conformity
• EN 61000-6-4:2007 + A1:2011 • EN 61000-6-3:2007 + A1:2011 (MIDA 203 , MIDA 205 , MIDA 207) • EN 61000-6-1:2007 + A1:2011 (MIDA 203 , MIDA 205 , MIDA 207) •... -
Page 54: Declaration Of Conformity
• BS EN 61000-6-4:2007 + A1:2011 • BS EN 61000-6-3:2007 + A1:2011 (MIDA 203 , MIDA 205 , MIDA 207) • BS EN 61000-6-1:2007 + A1:2011 (MIDA 203 , MIDA 205 , MIDA 207) •...