Table of Contents
Advertisement
Available languages
Available languages
Quick Links
Advertisement
Chapters
Table of Contents

Related Manuals for Echo WT-1610SP


Summary of Contents for Echo WT-1610SP
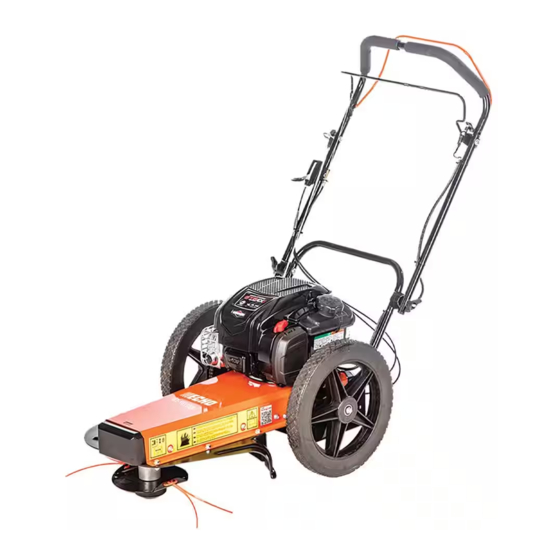
- Page 1 OPERATOR’S MANUAL WHEEL TRIMMER WT-1610SP WARNING Read and understand all provided literature before use. Failure to do so could result in serious injury. WARNING Cancer and Reproductive Harm www.P65Warnings.ca.gov 99922205843 www.echo-usa.com © 06/2022 ECHO Incorporated...
- Page 2 Register your ECHO equipment on-line at www.echo-usa.com or by filling out the product registration sheet included in this manual. Registering your product confirms warranty coverage and provides a direct link to ECHO if we find it necessary to contact you.
- Page 3 ECHO brand or inconvenience. Some states do not allow the exclusion outdoor product.
-
Page 4: Table Of Contents
TABLE OF CONTENTS SAFETY ................................... 1 1.1 SAFETY ALERT SYMBOL ..............................1 1.2 FIRE HAZARD INFORMATION ............................1 1.3 BEFORE OPERATING ................................1 1.4 OPERATION SAFETY ................................2 1.5 MAINTENANCE/STORAGE SAFETY ..........................2 1.6 SAFETY DECAL LOCATIONS ............................. 3 ASSEMBLY................................4 2.1 ADJUST THE HANDLE BAR .............................. -
Page 5: Safety
SAFETY Section The engine on your power equipment, like most outdoor 1.1 SAFETY ALERT SYMBOL power equipment, is an internal combustion engine that burns gasoline or diesel fuel (hydrocarbons). If operating your power equipment in affected areas, it must be equipped with a spark arrestor in continuous effective working order. -
Page 6: Operation Safety
SAFETY 6. Do not operate this machine if you 1.4 OPERATION SAFETY are under the influence of alcohol, medications, substances that 1. Keep hands and feet out of cutting area while machine can affect your vision, balance or is operating to avoid serious personal injury. Stop and judgement. -
Page 7: Safety Decal Locations
SAFETY 1.6 SAFETY DECAL LOCATIONS Familiarize yourself with all of the safety and operational decals on the machine and the associated hazards. See the engine owner’s manual or contact the engine manufacturer for engine safety instructions and decals. Make certain that all safety and operating decals on this machine are kept clean and in good condition. -
Page 8: Assembly
ASSEMBLY Section 2.1 ADJUST THE HANDLE BAR 2.3 FILL THE FUEL TANK 1. Open shipping box and remove packing material. WARNING 2. Loosen T-handles on handle bar. Raise upper portion of handle bar to desired position. Tighten T-handles. Gasoline and diesel fuels are highly 3. -
Page 9: Features & Controls
FEATURES & CONTROLS Section Understanding how your machine works will help you achieve the best results when using your trimmer. The following descriptions define the features and controls of your machine. REFER TO ENGINE OWNER’S MANUAL FOR FURTHER ENGINE OPERATING INSTRUCTIONS. 1. -
Page 10: Operation
OPERATION Section As with any other piece of outdoor power equipment, WARNING getting the feel for how your machine operates and getting to know the best techniques for particular jobs are Allow the machine to come to complete stop before important to overall good performance. -
Page 11: Self-Propelled Operation
OPERATION 4.4 SELF-PROPELLED OPERATION The Wheeled Trimmer can be used in either push or self-propelled mode. Check engine oil level before starting (see Engine Owners Manual). 1. Pull back on the self-propelled bail located in front of the handlebar to start moving forward. 2. -
Page 12: Service & Maintenance
SERVICE & MAINTENANCE Section 5.1 MAINTENANCE SCHEDULE The items listed in this service and maintenance schedule are to be checked, and if necessary, corrective action taken. This schedule is designed for units operating under normal conditions. If the unit is operating in adverse or severe conditions, it may be necessary for the items to be checked and serviced more frequently. -
Page 13: Cutting Height Adjustment
SERVICE & MAINTENANCE WARNING BEFORE INSPECTING OR SERVICING ANY PART OF THIS MACHINE, SHUT OFF POWER SOURCE, DISCONNECT SPARK PLUG WIRE FROM SPARK PLUG AND MAKE SURE ALL MOVING PARTS HAVE COME TO A COMPLETE STOP. 5.3 CUTTING HEIGHT ADJUSTMENT The standard cutting height is 2-3/4 inches. -
Page 14: Drive Belt Checking, Tensioning, And Replacement
SERVICE & MAINTENANCE WARNING BEFORE INSPECTING OR SERVICING ANY PART OF THIS MACHINE, SHUT OFF POWER SOURCE, DISCONNECT SPARK PLUG WIRE FROM SPARK PLUG AND MAKE SURE ALL MOVING PARTS HAVE COME TO A COMPLETE STOP. 5.5 DRIVE BELT CHECKING, TENSIONING, AND REPLACEMENT Check the condition of the drive belt annually or after 20 7. -
Page 15: Transmission Belt/Chains Tensioning And Replacement
SERVICE & MAINTENANCE WARNING BEFORE INSPECTING OR SERVICING ANY PART OF THIS MACHINE, SHUT OFF POWER SOURCE, DISCONNECT SPARK PLUG WIRE FROM SPARK PLUG AND MAKE SURE ALL MOVING PARTS HAVE COME TO A COMPLETE STOP. 5.6 TRANSMISSION BELT/CHAINS TENSIONING AND REPLACEMENT See Figure 5.1 for illustration. -
Page 16: Troubleshooting
Before performing any of the corrections in this troubleshooting chart, refer to the appropriate information contained in this manual for the correct safety precautions and operating or maintenance procedures. Contact your dealer or ECHO for service problems with the machine. - Page 17 TROUBLESHOOTING PROBLEM POSSIBLE CAUSES REMEDY Air filter dirty Clean or replace Fuel filter dirty Replace Fuel vent plugged Clean or replace Engine runs, but dies or does not accelerate Spark plug dirty/worn Clean and adjust or replace properly Carburetor vibration Adjust Cooling system dirty/plugged Clean...
-
Page 18: Specifications
SPECIFICATIONS Section DESCRIPTION ENGLISH METRIC Engine Briggs & Stratton® 675 EXi Series 163cc Drive Self-propelled Fuel capacity 0.8 quarts (0.2 gallon) Start Recoil Cutting width 24" 61 cm Cutting height 1-7/8" and 2-3/4" 4.8 cm and 7 cm Nylon cutting string 20"... -
Page 19: Bolt Torque
SPECIFICATIONS 7.1 BOLT TORQUE The tables below are for reference purposes only and their use by anyone is entirely voluntary, unless otherwise noted. Reliance on their content for any purpose is at the sole risk of that person and any loss or damage resulting from the use of this information is the responsibility of that person. -
Page 20: Options
OPTIONS Section PART NUMBER DESCRIPTION 102225155 STRING, .155 DIA, CROSS-FIRE (50 Count / 21” Strips) ® 311155066 STRING, .155 DIA, CROSS-FIRE (1 LB. DONUT) 314155056 STRING, .155 DIA, CROSS-FIRE (3 LB. SPOOL) 102225175 STRING, .175 DIA, CROSS-FIRE (50 Count /21” Strips) 311175067 STRING, .175 DIA, CROSS-FIRE (1 LB. -
Page 21: Product Registration
It’s FAST and EASY! NOTE: your information will never be sold or misused by ECHO, Inc. Registering your purchase enables us to contact you in the unlikely event of a service update or product recall, and verifies your ownership for warranty consideration. - Page 22 WHEELED TRIMMER...
- Page 24 ECHO INCORPORATED 400 Oakwood Road Lake Zurich, IL 60047 www.echo-usa.com Serial Range: 130WTB000001 - 130WTB999999 79319-00...
- Page 25 El sistema de escape del motor de este producto contiene químicos que pueden causar cáncer, defectos congénitos u otros daños en la reproducción, de acuerdo a lo que se conoce en el Estado de California. 99922205843 www.echo-usa.com © 06/2022 ECHO Incorporated...
- Page 26 Si necesita ayuda o tiene preguntas sobre la aplicación, operación o mantenimiento de este producto, llame al Departamento de Soporte de Productos para el Consumidor de ECHO al 1-800-432-ECHO (3246) de 8:00 am a 5:00 pm (Central Standard Hora) de lunes a viernes.
- Page 27 o...
- Page 28 ÍNDICE SEGURIDAD ................................1 1.1 SÍMBOLO DE ALERTA DE SEGURIDAD ..........................1 1.2 INFORMACIÓN SOBRE PELIGROS DE INCENDIO ......................1 1.3 PREFUNCIONAMIENTO ..............................1 1.4 SEGURIDAD EN LA OPERACIÓN ............................2 1.5 SEGURIDAD EN MANTENIMIENTO Y ALMACENAMIENTO ................... 2 1.6 UBICACIONES DE LAS CALCOMANÍAS DE SEGURIDAD ..................... 3 MONTAJE ................................
-
Page 29: Seguridad
SEGURIDAD Sección El motor de su equipo motorizado, como la mayoría de los 1.1 SÍMBOLO DE ALERTA DE equipos motorizados para uso al aire libre, es un motor de SEGURIDAD combustión interna que quema gasolina o combustible diésel (hidrocarburos). Si está operando su equipo motorizado en las áreas afectadas, debe estar equipado con un parachispas en buen estado de funcionamiento de manera continua y efectiva. -
Page 30: Seguridad En La Operación
SEGURIDAD ponga funcionamiento esta 1.4 SEGURIDAD EN LA OPERACIÓN máquina si está bajo la influencia de alcohol, medicamentos, o drogas que Mantenga las manos y los pies fuera del área de corte, puedan afectar su visión, equilibrio o mientras que la máquina está funcionando para evitar buen criterio. -
Page 31: Ubicaciones De Las Calcomanías De Seguridad
SEGURIDAD 1.6 UBICACIONES DE LAS CALCOMANÍAS DE SEGURIDAD Conozca en detalle todas las calcomanías de seguridad y de operación de la máquina y los riesgos asociados. Consulte el manual del propietario del motor o póngase en contacto con el fabricante del motor para obtener instrucciones y calcomanías de seguridad del motor. -
Page 32: Montaje
MONTAJE Sección 2.1 AJUSTE EL MANILLAR 2.3 LLENADO DEL TANQUE Abra la caja de envío y retire el material de embalaje. ADVERTENCIA Afloje las empuñaduras en T en el manillar. Levante la parte superior del manillar hasta la posición deseada. Apriete las La gasolina y los combustibles diésel empuñaduras en T. -
Page 33: Funciones Y Controles
FUNCIONES Y CONTROLES Sección Al entender la operación de su máquina logrará resultados óptimos con su recortadora. Las siguientes descripciones definen las características y controles de su máquina. CONSULTE EL MANUAL DEL PROPIETARIO DEL MOTOR PARA OBTENER INSTRUCCIONES SOBRE LA OPERACIÓN DEL MOTOR. -
Page 34: Operación
OPERACIÓN Sección Como con cualquier otra pieza de equipo eléctrico de exteriores, ADVERTENCIA aprender a conocer el funcionamiento de su máquina y conocer las mejores técnicas para trabajos en particular es importante para obtener un buen rendimiento general. Espere hasta que la máquina se detenga por completo antes de realizar una inspección o servicio. -
Page 35: Operación Con Autopropulsión
OPERACIÓN 4.4 OPERACIÓN CON AUTOPROPULSIÓN La recortadora sobre ruedas se puede usar en modo manual o con autopropulsión. Tire hacia atrás de la varilla de control para autopropulsión situada en frente del manillar para arrancar comenzar a avanzar. Regule la velocidad de recorte con la palanca de cambios. La posición 1 es la más lenta y la posición 3 es la más rápida. La velocidad en el suelo varía entre 1, 1,5 y 2 mph (1,6, 2,4 y 3,2 km/h). -
Page 36: Servicio Y Mantenimiento
SERVICIO Y MANTENIMIENTO Sección 5.1 PROGRAMA DE MANTENIMIENTO Se deberán verificar los elementos enumerados en el programa de servicio y mantenimiento, y si fuese necesario, se deberá llevar a cabo una acción correctiva. Este programa está dirigido a las unidades que operan bajo condiciones normales. Si la unidad está operando en condiciones de uso adversas o severas puede ser necesario verificar y hacer servicios más frecuentes a los elementos. -
Page 37: Regulación De Altura De Corte
SERVICIO Y MANTENIMIENTO ADVERTENCIA ANTES DE INSPECCIONAR O REALIZAR TAREAS DE SERVICIO EN CUALQUIER PARTE DE ESTA MÁQUINA, APAGUE LA FUENTE DE ALIMENTACIÓN, DESCONECTE EL CABLE DE LA BUJÍA RETIRÁNDOLO DE LA BUJÍA Y ASEGÚRESE DE QUE TODAS LAS PARTES MÓVILES SE HAYAN DETENIDO POR COMPLETO. 5.3 REGULACIÓN DE ALTURA DE CORTE La altura de corte estándar es 2-3/4 pulg. -
Page 38: Revisión, Tensado Y Reemplazo De La Correa De Transmisión
SERVICIO Y MANTENIMIENTO ADVERTENCIA ANTES DE INSPECCIONAR O REALIZAR TAREAS DE SERVICIO EN CUALQUIER PARTE DE ESTA MÁQUINA, APAGUE LA FUENTE DE ALIMENTACIÓN, DESCONECTE EL CABLE DE LA BUJÍA RETIRÁNDOLO DE LA BUJÍA Y ASEGÚRESE DE QUE TODAS LAS PARTES MÓVILES SE HAYAN DETENIDO POR COMPLETO. 5.5 REVISIÓN, TENSADO Y REEMPLAZO DE LA CORREA DE TRANSMISIÓN Compruebe el estado de la correa de transmisión anualmente Retire la correa gastada o rota. -
Page 39: Tensado Y Reemplazo De La Correa Y Las Cadenas De Transmisión
SERVICIO Y MANTENIMIENTO ADVERTENCIA ANTES DE INSPECCIONAR O REALIZAR TAREAS DE SERVICIO EN CUALQUIER PARTE DE ESTA MÁQUINA, APAGUE LA FUENTE DE ALIMENTACIÓN, DESCONECTE EL CABLE DE LA BUJÍA RETIRÁNDOLO DE LA BUJÍA Y ASEGÚRESE DE QUE TODAS LAS PARTES MÓVILES SE HAYAN DETENIDO POR COMPLETO. 5.6 TENSADO Y REEMPLAZO DE LA CORREA Y LAS CADENAS DE TRANSMISIÓN Ver Figura 5.1 para referencia. -
Page 40: Solución De Problemas
SOLUCIÓN DE PROBLEMAS Sección Antes de realizar cualquiera de las correcciones en esta tabla para solución de problemas, consulte la información adecuada contenida en este manual con respecto a las precauciones de seguridad y a los procedimientos de operación o mantenimiento. Póngase en contacto con su concesionario más cercano o con la fábrica acerca de problemas de servicio de la máquina. - Page 41 SOLUCIÓN DE PROBLEMAS PROBLEMA CAUSA POSIBLE SOLUCIÓN Filtro de aire sucio Limpiar o reemplazar Filtro de combustible sucio Reemplazar Respiradero del combustible taponado Limpiar o reemplazar El motor funciona, pero se apaga o no se acelera Bujía sucia/desgastada Limpiar y ajustar o reemplazar correctamente Vibración del carburador Ajustar...
-
Page 42: Especificaciones
ESPECIFICACIONES Sección DESCRIPCIÓN INGLÉS MÉTRICO Motor Briggs & Stratton® 675 EXi Series 163cc Accionamiento Auto-propulsado Capacidad de combustible 0,8 cuartos (0,2 galón) Arranque Retroceso Ancho de corte 24" 61 cm Altura de corte 1-7/8" y 2-3/4" 4,8 cm y 7 cm Tanza de corte de nylon 20"... -
Page 43: Par De Torsión De Pernos
ESPECIFICACIONES 7.1 PAR DE TORSIÓN DE PERNOS Las tablas que siguen a continuación son para referencia solamente y su uso es totalmente voluntario, a menos que se aclare lo contrario. El uso del contenido de la tabla para cualquier propósito corre por cuenta y riesgo de quien lo hace y cualquier pérdida o daño producido a partir del uso de esta información es responsabilidad de quien lo hace. -
Page 44: Opciones
OPCIONES OPCIONES Sección NÚMERO DE PIEZA DESCRIPCIÓN 102225175 0,155 DIA. CROSS-FIRE , (Tiras de 50 unidades / 21 ") ® 311155066 0,155 DIA. CROSS-FIRE, 1 Libra 314155056 0,155 DIA. CROSS-FIRE, 3 Libra 102225175 0,175 DIA. CROSS-FIRE, (Tiras de 50 unidades / 21 ") 311175067 0,175 DIA. -
Page 45: Registro De Producto
Gracias por elegir ECHO Power Equipment Por favor, ingrese a sitio we http://www.echo-usa.com/Warranty/Register- Your-ECHO para registrar su nuevo producto en línea. Es RAPIDO y FACIL! NOTA: Su información nunca será vendida o mal utilizada por ECHO, Incorporado. El registro de su compra nos permite comunicarnos con usted en el caso de una actualización de servicio, o el retiro del... - Page 47 ECHO INCORPORATED 400 Oakwood Road Lake Zurich, IL 60047 www.echo-usa.com Serial Range: 130WTB000001 - 130WTB999999 79319-00...
- Page 49 Remarque: ce produit est conforme aux normes CAN ICES-2 / NMB-2. AVERTISSEMENT Le système d’échappement du moteur de ce produit contient des produits chimiques reconnus par l’État de Californie pour causer le cancer, des anomalies congénitales ou d’autres troubles de la reproduction. 99922205843 www.echo-usa.com © 06/2022 ECHO Incorporated...
- Page 50 Enregistrez votre équipement ECHO en ligne sur www.echo-usa.com ou en remplissant la fiche d’enregistrement du produit incluse dans ce manuel. L’enregistrement de votre produit confirme la couverture de la garantie et fournit un lien direct vers ECHO si nous jugeons nécessaire de vous contacter.
- Page 51 (si c’est le cas) fournie avec ce produit pour ECHO Incorporated, garantit à l’acheteur original que ce produits en savoir plus. ECHO Incorporated se réserve le droit de modifier d’extérieur de marque ECHO® est exempt de tous vices de ma- ou d’améliorer la conception de ce produit et n’assume aucune...
- Page 52 TABLE DES MATIÈRES SÉCURITÉ ................................1 1.1 SYMBOLE D’ALERTE DE SÉCURITÉ ..........................1 1.2 INFORMATION SUR LES RISQUES D’INCENDIE ......................1 1.3 AVANT LE FONCTIONNEMENT ............................1 1.4 SÉCURITÉ DE FONCTIONNEMENT ..........................2 1.5 SÉCURITÉ D’ENTRETIEN ET DE STOCKAGE ......................... 2 1.6 EMPLACEMENTS DES DÉCALCOMANIES DE SÉCURITÉ...
-
Page 53: Sécurité
SÉCURITÉ Partie Comme sur la plupart des matériels motorisés à usage extérieur, 1.1 SYMBOLE D’ALERTE DE SÉCURITÉ le moteur de votre matériel est un moteur à combustion interne alimenté à l’essence (un carburant hydrocarboné). Si votre matériel motorisé est utilisé dans dans les régions concernées, il doit être muni en permanence d’un silencieux pare-étincelles en bon état. -
Page 54: Sécurité De Fonctionnement
SÉCURITÉ Ne faites pas fonctionner la machine si 1.4 SÉCURITÉ DE FONCTIONNEMENT vous êtes sous l’influence de l’alcool, de médicaments ou de substances qui Gardez les mains et les pieds à l’extérieur des ouvertures risqueraient de modifier votre vision, votre d’alimentation et de décharge pendant le fonctionnement équilibre et votre jugement. -
Page 55: Emplacements Des Décalcomanies De Sécurité
SÉCURITÉ 1.6 EMPLACEMENTS DES DÉCALCOMANIES DE SÉCURITÉ Familiarisez-vous avec toutes les étiquettes autocollantes de sécurité et de fonctionnement qui se trouvent sur la machine, ainsi qu’avec les dangers qui leur sont associés. Voir le guide d’utilisation du moteur ou contactez le fabricant de moteur pour les étiquettes autocollantes et les consignes de sécurité... -
Page 56: Assemblage
ASSEMBLAGE Partie 2.1 RÉGLAGE DU GUIDON 2.3 REMPLISSAGE DU RÉSERVOIR Ouvrir la caisse d’expédition et en retirer les matériaux d’emballage. AVERTISSEMENT Desserrer les poignées en T du guidon. Relever la partie supérieure du guidon jusqu’à la position désirée. Resserrer L’essence et les carburants diesel sont les poignées en T. -
Page 57: Fonctions Et Commandes
FONCTIONS ET COMMANDES Partie La compréhension du fonctionnement de votre machine vous aidera à réaliser les meilleurs résultats dans l’utilisation de votre coupe-herbe. Les descriptions suivantes définissent les fonctions et commandes de votre machine. CONSULTER LE MANUEL DU PROPRIÉTAIRE DU MOTEUR POUR DE PLUS AMPLES INSTRUCTIONS D’UTILISATION DU MOTEUR. -
Page 58: Fonctionnement
FONCTIONNEMENT Partie Comme avec toute autre pièce d’équipement motorisé extérieur, AVERTISSEMENT l’obtention de l’impression sur la manière de fonctionner de la machine et l’obtention de la connaissance des meilleures techniques à utiliser pour des travaux particuliers sont des Laissez la machine s’arrêter complètement avant de éléments importants pour avoir un fonctionnement global l’inspecter ou d’effectuer l’entretien courant. -
Page 59: Fonctionnement Autopropulsé
FONCTIONNEMENT 4.4 FONCTIONNEMENT AUTOPROPULSÉ Le taille-bordure/tondeuse à roues peut être soit poussé, soit autopropulsé. Tirez l’étrier d’autopropulsion situé devant la poignée pour commencer à avancer. Réglez la vitesse du taille bordures à l’aide du levier de vitesse. La position 1 est la plus lente et la position 3 est la plus rapide. La vitesse au sol est de 1, 1,5 et 2 milles/heure (1,6, 2,4 et 3,2 km/h). -
Page 60: Service Et Entretien
SERVICE ET ENTRETIEN Partie 5.1 CALENDRIER D’ENTRETIEN Les articles figurant au tableau des réparations et de l’entretien doivent être vérifiés et, au besoin, des mesures correctives doivent être prises. Ce calendrier d’entretien est conçu pour une utilisation normale de la machine. Lorsque l’unité fonctionne dans des conditions difficiles, il peut s’avérer nécessaire de vérifier et de réparer les articles plus fréquemment. -
Page 61: Réglage De La Hauteur De Coupe
SERVICE ET ENTRETIEN AVERTISSEMENT AVANT D’INSPECTER OU D’EFFECTUER LE SERVICE DE N’IMPORTE QUELLE PIÈCE DE CETTE MACHINE, COUPEZ LA SOURCE D’ALIMENTATION, DÉCONNECTEZ LE CÂBLE DE BOUGIE DE LA BOUGIE D’ALLUMAGE ET ASSUREZ-VOUS QUE TOUTES LES PIÈCES EN MOUVEMENT SE SONT IMMOBILISÉES. 5.3 RÉGLAGE DE LA HAUTEUR DE COUPE La hauteur de coupe standard est de 2-3/4 po (7 cm). -
Page 62: Vérification, Tensionnement Et Remplacement De La Courroie D'entraînement
SERVICE ET ENTRETIEN AVERTISSEMENT AVANT D’INSPECTER OU D’EFFECTUER LE SERVICE DE N’IMPORTE QUELLE PIÈCE DE CETTE MACHINE, COUPEZ LA SOURCE D’ALIMENTATION, DÉCONNECTEZ LE CÂBLE DE BOUGIE DE LA BOUGIE D’ALLUMAGE ET ASSUREZ-VOUS QUE TOUTES LES PIÈCES EN MOUVEMENT SE SONT IMMOBILISÉES. 5.5 VÉRIFICATION, TENSIONNEMENT ET REMPLACEMENT DE LA COURROIE D’ENTRAÎNEMENT Vérifier l’état de la courroie d’entraînement tous les ans ou... -
Page 63: Tensionnement Et Remplacement De La Courroie De Transmission/Des Chaînes
SERVICE ET ENTRETIEN AVERTISSEMENT AVANT D’INSPECTER OU D’EFFECTUER LE SERVICE DE N’IMPORTE QUELLE PIÈCE DE CETTE MACHINE, COUPEZ LA SOURCE D’ALIMENTATION, DÉCONNECTEZ LE CÂBLE DE BOUGIE DE LA BOUGIE D’ALLUMAGE ET ASSUREZ-VOUS QUE TOUTES LES PIÈCES EN MOUVEMENT SE SONT IMMOBILISÉES. 5.6 TENSIONNEMENT ET REMPLACEMENT DE LA COURROIE DE TRANSMISSION/ DES CHAÎNES Voir les figure 5.1 pour illustration. -
Page 64: Dépannage
Avant d’effectuer n’importe laquelle des corrections de ce tableau de dépannage, se reporter aux renseignements appropriés contenus dans ce manuel pour les précautions correctes de sécurité et les procédures de fonctionnement ou d’entretien. Contacter votre concessionnaire ou ECHO pour les problèmes de service concernant la machine. - Page 65 DÉPANNAGE PROBLÈME CAUSE POSSIBLE REMÈDE Filtre à air encrassé Nettoyer ou remplacer Filtre à carburant encrassé Relace Dispositif de mise à l’air libre du réservoir de Nettoyer ou remplacer Le moteur tourne, mais carburant obstrué cale ou n’accélère pas Bougie sale/usée Nettoyer et régler ou remplacer correctement Vibration du carburateur...
-
Page 66: Caractéristiques
CARACTÉRISTIQUES Partie DESCRIPTION UNITÉS ANGLAISES UNITÉ MÉTRIQUES Moteur Briggs & Stratton® 675 EXi Series 163cc Transmission Auto-propulsion Capacité du réservoir 0,8 quarts (0,2 gallon) Démarrage Lanceur à rappel Largeur de coupe 24 po. 61 cm Hauteur de coupe 1-7/8 po. et 2-3/4 po. 4,8 cm et 7 cm Fil de coupe en nylon 20 po. -
Page 67: Couple De Serrage Du Boulon
CARACTÉRISTIQUES 7.1 COUPLE DE SERRAGE DU BOULON Les tableaux ci-dessous ne servent que de référence et leur utilisation par n’importe qui est entièrement sur une base volontaire, à moins que cela ne soit noté autrement. La confiance mise sur leur contenu dans n’importe quel but constitue le risque pris uniquement par cette personne et toute perte ou tout dommage provenant de l’utilisation de cette information est sous la responsabilité... -
Page 68: Les Options
LES OPTIONS Partie Nº DE RÉFÉRENCE DESCRIPTION 102225155 ,155 DIA. CROSS-FIRE , (50 bandes / 21 “) ® 311155066 ,155 DIA. CROSS-FIRE, 1. livre 314155056 ,155 DIA. CROSS-FIRE, 3 livre 102225175 ,175 DIA. CROSS-FIRE, (50 bandes / 21 “) 311175067 ,175 DIA. -
Page 69: Enregistrement
D’ENREGISTRER VOS UNITÉS NEUVES EN LIGNE. C’EST RAPIDE ET FACILE! NOTE: VOS INFORMATIONS NE SERONT JAMAIS VENDUES OU UTILISÉES INADÉQUATEMENT PAR ECHO INCORPORÉ. L’ENREGISTREMENT DES UNITÉS NOUS PERMET DE VOUS CON- TACTER DANS L’ÉVENTUALITÉ IMPROBABLE D’UN RAPPEL OU D’UNE MISE À NIVEAU TECHNIQUE AINSI QUE CERTIFIER QUE VOUS EN ÊTES LE PROPRIÉTAIRE EN CAS DE... - Page 71 ECHO INCORPORATED 400 Oakwood Road Lake Zurich, IL 60047 www.echo-usa.com Serial Range: 130WTB000001 - 130WTB999999 79319-00...