Advertisement
Quick Links
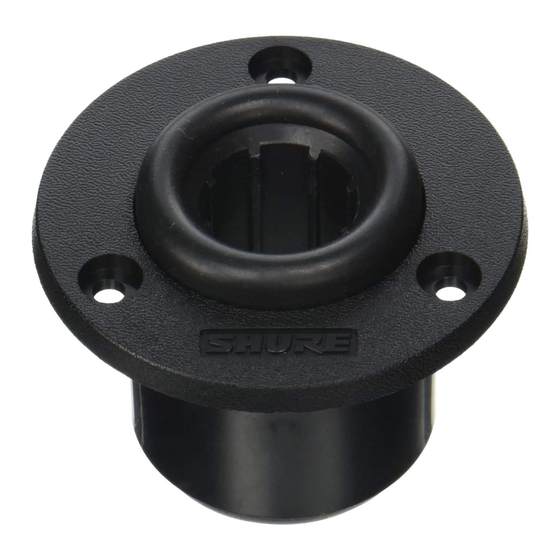
A400SM A400XLR A400SMXLR A99SMA -- Shock Mount
General Description
The following accesories allow you to install a
shock mount for gooseneck microphones in per
manent installations.
A400SM Shock Mount. Employs Shure Shock-
Stopper™ construction, which reduces the trans
mission of impact or surface noise by up to 20
dB. Fits a variety of gooseneck microphones.
A400SMXLR. Adds the A400XLR insert and a 3-
pin XLR-type (female) quick-release connector to
the A400SM Shock Mount.
A400XLR. Retrofits existing A400SM shock
mounts for quick release. Includes the A400XLR
connector and insert.
A99SMA Adaptor. Allows you to mount the
A400SM Shock Mount in holes drilled for use
with the A99SM Shock Mount (up to a 2¼ inch di
ameter).
Installing the A400SM
1. Drill a 44 mm (1 ¾ in.) hole through mounting surface.
1/4
Advertisement

Related Manuals for Shure A400SM


Summary of Contents for Shure A400SM
- Page 1 Includes the A400XLR connector and insert. A99SMA Adaptor. Allows you to mount the A400SM Shock Mount in holes drilled for use with the A99SM Shock Mount (up to a 2¼ inch di ameter). Installing the A400SM...
- Page 2 Shure Incorporated 2. Use the shock mount as a template to drill pilot holes. 3. Fasten shock mount to surface with supplied screws. Figure 2 Installing the A400SMXLR 1. Thread cable through grommet, shock mount and insert. 2. Connect cable to A400XLR Connector using two-conductor shielded microphone cable (Figure 3).
- Page 3 2. Attach the A99SMA Shock Mount Adaptor to surface using existing screw holes and provided screws (Figure 3. Insert A400SM Shock Mount into adaptor, aligning screw holes in shock mount with those in adaptor. Attach us ing provided screws (Figure 5).
- Page 4 Shure Incorporated FIGURE 5: MOUNTING THE A400SM USING THE A99SMA...