
Related Manuals for Lorex B451AJD-E


Summary of Contents for Lorex B451AJD-E
- Page 1 2K QHD Video Doorbell Quick Start Guide B451AJ Series lorex.com B451AJ_QSG_EN_R1.indd 1 B451AJ_QSG_EN_R1.indd 1 2020-11-03 11:42:25 AM 2020-11-03 11:42:25 AM...
- Page 2 Welcome! Thanks for your purchase of the 2K Video Doorbell. Here’s how to get started. B451AJ_QSG_EN_R1.indd 2 B451AJ_QSG_EN_R1.indd 2 2020-11-03 11:42:25 AM 2020-11-03 11:42:25 AM...
-
Page 3: Table Of Contents
Package contents Overview Status indicator Connect to the app Preparation Wiring the chime Secure the mounting bracket(s) Wiring the doorbell Connect the doorbell Lorex Home app overview Troubleshooting Frequently asked questions B451AJ_QSG_EN_R1.indd 3 B451AJ_QSG_EN_R1.indd 3 2020-11-03 11:42:25 AM 2020-11-03 11:42:25 AM... -
Page 4: Package Contents
Package contents Video doorbell Mounting Horizontal Vertical USB cable bracket bracket 15° bracket 5° Anchors (x2) Screws (x2) Wire caps (x3) microSD card (pre-inserted)* Chime Kit Wire harness Backup cable Extra wires (x2) 15/64” Drill bit User-supplied Tools Drill Screwdriver * See product packaging for configuration details. -
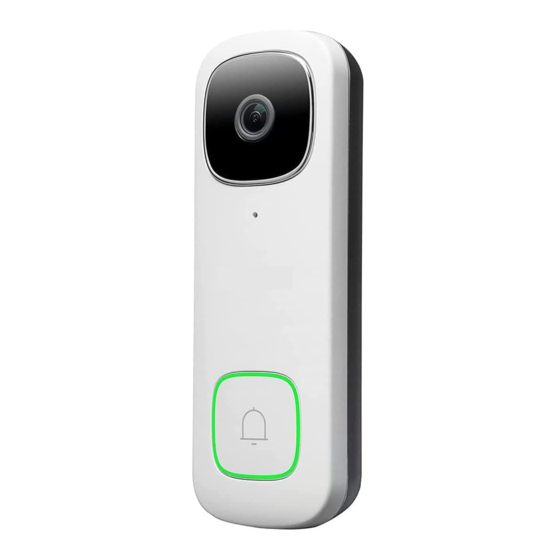
Page 5: Overview
Overview Front Panel Back Panel Camera Micro-USB port Microphone Reset hole microSD card slot Power ports Status indicator Call button Warning / night light Speaker Bottom View B451AJ_QSG_EN_R1.indd 5 B451AJ_QSG_EN_R1.indd 5 2020-11-03 11:42:37 AM 2020-11-03 11:42:37 AM... -
Page 6: Status Indicator
Status indicator Solid blue Flashing blue Flashing blue, red, The video doorbell slowly and green is powering on or The video doorbell A firmware update the video doorbell is ready to connect. is in progress. is restarting. Solid red Flashing blue Spinning red The video doorbell rapidly... -
Page 7: Connect To The App
Connect to the Lorex Home app to access the doorbell’s installation videos. 1. If you already have the app, skip this step. Scan the QR code on the right using your mobile device’s camera. Install the free Lorex Home app from the App Store™ or Google Play Store™. -
Page 8: Preparation
Preparation Before beginning setup, there are some essential preparations to make. To prepare for installation: Figure 1 Step 1 TURN OFF THE POWER RUNNING TO YOUR EXISTING DOORBELL AND CHIME BOX AT THE BREAKER (See Figure 1). Test that power has been disconnected for both the doorbell and chime box power by pressing the doorbell. -
Page 9: Wiring The Chime
Wiring the chime You must determine the type of doorbell chime you have in your home: electronic or mechanical. Not sure? If your doorbell chime is a classic *ding-dong* sound, chances are your chime is mechanical. If your doorbell sounds more like a melody, then your chime is electronic. If you are still not sure, remove the cover panel of your chime box - if you find springloaded levers and a physical metal chime, you have a mechanical chime. - Page 10 Figure 3 4. Connect the wiring from the chime kit to the FRONT and TRANS connectors in the chime box. Ensure that the existing wiring stays connected as well (see Figure 3). Note: You may connect either wire to either connector. 5.
-
Page 11: Secure The Mounting Bracket(S)
Secure the mounting bracket(s) Use the mounting accessories specified below depending on the mounting location. Step 1: Mark mounting holes Figure 1 Place the mounting bracket to fit your existing doorbell wiring. Then mark the screw holes according to the mounting bracket. - Page 12 Step 2 (Optional): Attach an angled bracket to the mounting bracket If you want to change the angle of the doorbell for a better view, attach one of the optional angled brackets to the mounting bracket. 1. Select either the horizontal or vertical bracket according to the direction you want your doorbell to face (see Figures 2&3).
- Page 13 Figure 4 3. Insert the four tabs from the horizontal or vertical bracket into the the mounting bracket as shown in Figure 4. Make sure to insert in the desired direction. 4. Press the mounting bracket down. A *click* sound will indicate that the brackets are locked in.
- Page 14 Step 3: Secure the mounting bracket When installing only the mounting bracket, refer to Figure 5-a. When installing the angled bracket attached to the mounting bracket, refer to Figure 5-b. 1. For wood, drywall or soft surfaces: Figure 5-a Secure the mounting bracket(s) to the mounting surface using a Philips-head screwdriver and the supplied mounting screws.
- Page 15 Figure 5-b Notes: • Ensure that the arrow on the mounting bracket is always pointing • The (optional) angled bracket must be attached to the mounting bracket before installation. • Ensure the power cables from the wall fit comfortably through the hole in the mounting bracket.
-
Page 16: Wiring The Doorbell
Wiring the doorbell To wire the doorbell: Figure 2 1. Loosen the power port screws of the doorbell with a Philips-head screwdriver. Note: Do not fully remove the power port screws. 2. Loop the power wires underneath the power port screws (see Figure 1). 3. - Page 17 To extend short wires (optional): Figure 3 1. If your existing doorbell wiring is too short, remove the power port screws completely, then thread the screws through the supplied extra wires. Use the supplied wire caps to extend your wiring (see Figure 3). 2.
-
Page 18: Connect The Doorbell
Connect the doorbell To attach the doorbell to the bracket: 1. Push the wiring back into the wall. 2. Insert the two tabs from the mounting bracket into the doorbell (see Figure 1). 3. Press the doorbell downwards. A *click* sound will indicate that it is locked in. Figure 1 Note - If you need to remove the doorbell from the bracket:... - Page 19 You may now reconnect power to the doorbell and chime at the breaker (see Figure 3). Figure 3 Wait 5 minutes for the doorbell to fully power on and press the doorbell’s button to ensure that the chime is operating correctly. Check section 11 for troubleshooting if needed.
-
Page 20: Lorex Home App Overview
Lorex Home app overview To customize the video doorbell, go to your Lorex Home app and select the doorbell. Tap on the icon ••• on the top right of the screen to access the doorbell’s settings. Tap on Motion Detection Settings to customize person detection. Draw designated areas Person Detection to alert for person detection and adjust how sensitive the detection level will be. - Page 21 Camera Live View Device name Shared users Settings Back Date & time Pause Live View Fullscreen view Viewing modes Mute/unmute Streaming Manual Snapshot Recording 2-Way talk Warning light Siren Privacy mode B451AJ_QSG_EN_R1.indd 21 B451AJ_QSG_EN_R1.indd 21 2020-11-03 11:43:11 AM 2020-11-03 11:43:11 AM...
- Page 22 Calling screen For a complete overview of controls available on the Lorex Home app, scan the QR code below using your mobile device’s camera. Fullscreen Listen-in: Quick Tap to listen-in on a visitor responses while your audio is muted. Ignore / end call Answer call B451AJ_QSG_EN_R1.indd 22...
-
Page 23: Troubleshooting
Troubleshooting The video doorbell is not turning on. • Make sure the breaker is turned back on. • Make sure the power source that supplies the video doorbell is 16-24 VAC. Check if the voltage is printed on your doorbell transformer or use a milimeter to test the voltage. •... -
Page 24: Frequently Asked Questions
How come I am receiving so many notifications? • The amount of notifications you receive can be adjusted in the Lorex Home app for each setting or mode. For example, you can draw Motion Zones for certain areas that you want your doorbell to ignore while effectively monitoring the area you want and reducing false alert notifications. - Page 25 Disclaimers: If your • The Lorex video doorbell requires a constant power supply with a voltage between 16V-24V. residence does not have this voltage, you will need a 16-24 VAC doorbell transformer or you can consult with a licensed electrician.
- Page 26 Copyright © 2020 Lorex Corporation As our products are subject to continuous improvement, Lorex reserves the right to modify product design, specifications and prices, without notice and without incurring any obligation. E&OE. All rights reserved. This device complies with part 15 of the FCC Rules. Operation is subject to the...