Table of Contents
Advertisement
Advertisement
Table of Contents

Related Manuals for MSI MEG PROSPECT 700R


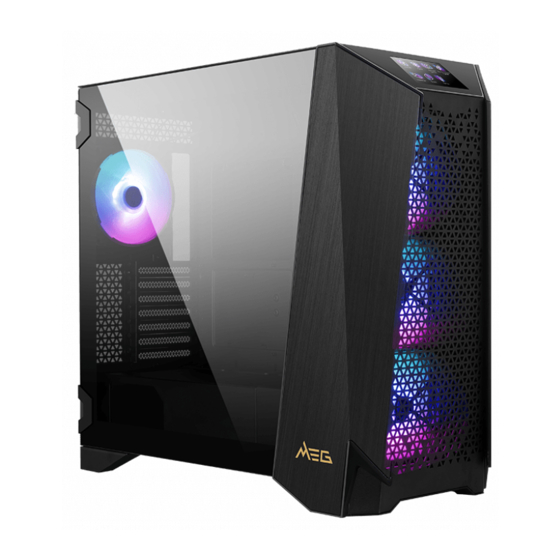
Summary of Contents for MSI MEG PROSPECT 700R
- Page 1 MEG PROSPECT 700R PC Case User Guide 使用手冊...
-
Page 2: Table Of Contents
Contents / 目錄 Accessories / 配件 ......................3 Specification / 產品規格 ....................5 Case Features / 機殼特色 ...................6 Side & Front View / 側面和前面 ..................7 IO Panel / IO 面板 ......................8 SSD, HDD Installation / 安裝 SSD 和硬碟 ..............9 Side Covers Removal / 移除側板 ................10 Front Bezel Removal/ 移除前面板... -
Page 3: Accessories / 配件
Accessories / 配件 Item 項目 Name 名稱 / Q’ty 數量 Used for 用途 Cable ties Cable management 束線帶 整線 Securing vertical L-shaped Screwdriver graphics card & holder L 型螺絲起子 固定垂直顯示卡 & 支架 Motherboard / SSD / PCIe riser cable Screw M3 5mm 主機板... - Page 4 Item 項目 Name 名稱 / Q’ty 數量 Used for 用途 Vertical graphics card Installing holder kit graphics card 垂直顯示卡支架套件 安裝顯示卡 Back cable cover Replacing the 後遮線檔版 side fan bracket 替換側風扇支架 Securing E-ATX motherboard 固定 E-ATX 主機板 E-ATX motherboard bracket E-ATX 主機板支架 * Support E-ATX motherboard up to 310mm x 304.8mm.
-
Page 5: Specification / 產品規格
Specification / 產品規格 Size Mid-Tower 尺寸 4.3” LCD Touch Panel Pixel & Definition: 480 x 800 觸控面板 Active Area: 95.04mm(H) x 53.86mm(V) Pre-Installed Fan Front: 3x 140 mm ARGB fans 預裝風扇 Rear: 1x 140 mm ARGB fan Top Panel: Steel ( 鋼板 ) Chassis: Steel (SPCC 0.8 mm) ( 鋼板外框... -
Page 6: Case Features / 機殼特色
Case Features / 機殼特色... -
Page 7: Side & Front View / 側面和前面
Side & Front View / 側面和前面 257mm 585mm... -
Page 8: Io Panel / Io 面板
IO Panel / IO 面板 1. Power button / 電源按鈕 2. Reset button / 重新開機按鈕 3. USB 3.2 Gen 2x2 Type-C 4. Audio-out / 音訊輸出 5. Mic-in / 音訊輸入 6. USB 3.2 Gen 1 Type-A 7. Touch Panel / 觸控面板... -
Page 9: Ssd, Hdd Installation / 安裝 Ssd 和硬碟
SSD, HDD Installation / 安裝 SSD 和硬碟 45°... -
Page 10: Side Covers Removal / 移除側板
Side Covers Removal / 移除側板 Left side cover 左側板 Continued on next page 下頁繼續... - Page 11 Continued from previous page 接續前頁 Right side cover 右側板...
-
Page 12: Front Bezel Removal/ 移除前面板
Front Bezel Removal/ 移除前面板 Remove the left and right side covers first, before opening the front bezel. 移除面板前,請先移除左右側板。... -
Page 13: Water Cooling Radiator Installation/ 安裝水冷排
Water Cooling Radiator Installation/ 安裝水冷排 Top water cooling radiator 頂部水冷排 ⚠ Note / 注意 Water cooling radiators must be purchased separately. For more information, please refer to water cooling radiator user guide. 水冷排需另外購買,詳細 安裝方式請參考水冷排使 用手冊。 Continued on next page 下頁繼續... - Page 14 Continued from previous page 接續前頁...
- Page 15 Side water cooling radiator 側邊水冷排...
-
Page 16: Back Cable Cover Replacement / 替換後遮線檔版
Back Cable Cover Replacement / 替換後遮線檔版 Side fan bracket -Securing liquid cooling radiator or system fan. 側風扇支架 - 固定水冷排或系統風扇 Back cable cover 後遮線擋板... -
Page 17: E-Atx Motherboard Bracket Replacement / 替換 E-Atx 主機板支架
E-ATX Motherboard Bracket Replacement / 替換 E-ATX 主機板支架 Front cable cover - Cable management 前遮線檔版 - 整線 E-ATX motherboard bracket - Support E-ATX motherboard up to 310mm x 304.8mm. E-ATX 主機板支架 - E-ATX 主機板尺寸最大可支 援 310mm x 304.8mm . -
Page 18: Motherboard Installation / 安裝主機板
Motherboard Installation / 安裝主機板... -
Page 19: Horizontal Graphics Card Installation / 安裝橫式顯示卡
Horizontal Graphics Card Installation / 安裝橫式顯示卡... -
Page 20: Vertical Graphics Card Installation / 安裝直立式顯示卡
Vertical Graphics Card Installation / 安裝直立式顯示卡 Continued on next page 下頁繼續... - Page 21 Continued from previous page 接續前頁 Connect to motherboard 連接到主機板 PCIe Riser Cable must be purchased separately PCIe 轉接線需另外購買...
-
Page 22: Psu Installation / 安裝電源供應器
PSU Installation / 安裝電源供應器... -
Page 23: Cable Connection / 連接接頭
Cable Connection / 連接接頭 SATA Power HDAUDIO JFP1 JAUD1 JUSB JUSB (USB 3.2 Gen2) (USB 3.2 Gen1) -
Page 24: Control Board Connection / 連接控制版
Control Board Connection / 連接控制版 Touch Panel 觸控面板 [PSU 電源供應器] SATA Power FAN2 FAN4 FAN6 FAN1 FAN3 FAN5 [Motherboard 主機板] JRAINBOW / JARGB Gen2 Control Board 控制板 [Motherboard 主機板] SYS_FAN ARGB1 ARGB3 ARGB5 ARGB2 ARGB4 ARGB6 Surface Temperature Sensor [Motherboard 主機板] 表面溫度感應器... -
Page 25: Touch Panel / 觸控面板
MSI Center. 觸控面板可用於控制並監控系統狀態,顯示及時的天氣及時間,也可自訂螢幕保護程式。 您可以使用 MSI Center 來設定並客製化您的觸控面板。 MSI Center User Guide / MSI Center 使用手冊 If you would like to know more information about MSI Center, please refer to http://download.msi.com/manual/mb/MSICENTER.pdf or scan the QR code to access. 如需 MSI Center 詳細資訊,請參考下方連結:... -
Page 26: Touch Panel Interface / 觸控面板介面
Tap to set Sync Mode 點擊以設定同步模式 ∙ Sync Mode - Panel / 同步模式 - 面板 Controls ARGB and Fans with touch panel. ∙ Sync Mode - MSI Center / 同步模式 - MSI Center Controls ARGB and Fans with MSI Center. - Page 27 ⚠ Note / 注意 ∙ When Sync Mode - MSI Center and Sync Mode - Motherboard are enabled; ARGB and Fans will be grayed out and can only be set in MSI Center. ∙ 當 同步模式 - MSI Center 、 同步模式 - 主機板 啟用時 ARGB、 風扇 將反灰,僅能...
- Page 28 Tap to set fans 點擊以設定風扇 ⚠ Note / 注意 ∙ The adjustable fan speed is subject to the limitations of the fan. ∙ MSI Center provides advanced settings for your fans. Download it for more information. ∙ 風扇轉速調整範圍請參考其上限。 ∙ 您可安裝 MSI Center 以調整風扇的進階設定。...
- Page 29 選擇等候時間 ⚠ Note / 注意 ou can choose from 3 default animations, or upload your own animation in MSI ∙ Center. Please note that animations should be in .mp4 format and should not exceed 5 minutes in length.
- Page 30 Setting Weather / 設定天氣 Please Install MSI Center to enable functions. 請安裝 MSI Center 已啟動此功能。 Tap any space on the screen to display home button. 點擊螢幕上任一位置以開啟回首頁按鈕。 Tap to set Weather 點擊以設定天氣...
- Page 31 Setting Clock / 設定時鐘 Please Install MSI Center to enable functions. 請安裝 MSI Center 已啟動此功能。 Tap to set Clock 點擊以設定時鐘 Tap to access Clock Style page 點擊以進入時鐘風格頁面 Setting Temp. / 設定溫度監測功能 Tap to set Temp. Tap to switch the unit 點擊以設定溫度監測功能...
- Page 32 Error Message / 錯誤訊息 ⚠ Note / 注意 Please turn off the system if the above error message appears. Then check to make sure ∙ that SATA power and USB cables are connected properly before turning the system on. ∙ 如果出現上圖錯誤訊息,請先關機。確認...