Table of Contents
Advertisement
Use & Care Guide
Manual de Uso y Cuidado
Manuel d'entretien et d'utilisation
Canister Vacuum Cleaner
Aspiradora con tanque
Aspirateur-traîneau
Model/Modelo/Modèle: BC3005
Vacuum Cleaner Help Line:
1-877-531-7321 (US) / 1-844-608-3081 (CA)
8:00am-5:00pm EST, M-F
www.kenmorefloorcare.com
Kenmore and the Kenmore logo are registered
trademarks of KCD IP, LLC and/or Transform SR
Brands LLC and are used under license.
Advertisement
Table of Contents

Related Manuals for Kenmore BC3005


Summary of Contents for Kenmore BC3005
- Page 1 Aspiradora con tanque Aspirateur-traîneau Model/Modelo/Modèle: BC3005 Vacuum Cleaner Help Line: 1-877-531-7321 (US) / 1-844-608-3081 (CA) 8:00am-5:00pm EST, M-F www.kenmorefloorcare.com Kenmore and the Kenmore logo are registered trademarks of KCD IP, LLC and/or Transform SR Brands LLC and are used under license.
-
Page 2: Table Of Contents
Kenmore Vacuum Cleaner Warranty ........ -
Page 3: Kenmore Vacuum Cleaner Warranty
WITH PROOF OF SALE a defective product will be replaced free of charge. The Kenmore brand is used under license. Direct all claims for warranty service to: Cleva North America, Inc., 1-877-531-7321 (US) / 1-844-608-3081 (CA). This warranty does not cover filters or belts, which are expendable parts that can wear out from normal use within the warranty period. -
Page 4: Important Safety Instruction
IMPORTANT SAFETY INSTRUC TIONS Read all instructions in this guide before assembling or using your vacuum cleaner. WARNING: Your safety is important to us. To reduce the risk of fire, electrical shock, injury to persons or damage when using your vacuum cleaner, follow basic safety precautions including the following: Use your vacuum cleaner only as described Do not put on chairs, tables, etc. -
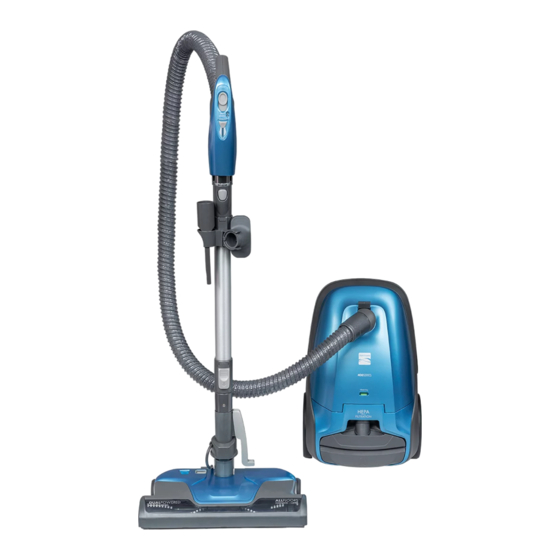
Page 5: Parts And Features
PARTS AND FEATURES It is important to know your vacuum cleaner’s parts and features to ensure its proper and safe use. Review these before using your vacuum cleaner. REPLACEMENT PARTS Part No.(US) Part No.(CA) t l e 53013 Dust Bag (2-pack): 53291 Dust Bag (6-pack): 53292... - Page 6 CANISTER ATTACHMENTS CREVICE TOOL FLOOR BRUSH DUSTING BRUSH ATTACHMENT HOLDER (STORED IN CANISTER) DUST BAG (2-PACK) - 6 -...
- Page 7 HANDLE & HOSE ASSEMBLY TELESCOPING WAND Wand Release Button POWERMATE ® Height Adjustment Pedal Height Adjustment Indicator Brushroll Status Indicator - 7 -...
-
Page 8: Assembly Instructions
ASSEMBLY INSTRUCTIONS Before assembling vacuum cleaner, check the PACKING LIST (page 2). Use this list to verify that you have received and identified all the components of your new Kenmore vacuum cleaner. WAND (TELESCOPING) -
Page 9: Operating Instructions
HOSE To remove: Do not open hood before removing hose. With hood closed, press the To install: Line up hose latch tab in to release and remove hose. the hose latch tab with the notch in CANISTER the canister hood, and insert hose 1. - Page 10 3. Lower the wand from upright position by WARNING pressing on the HANDLE RELEASE pedal. Personal Injury and Product Damage Hazard • DO NOT run over power cord with PowerMate . Personal injury or product ® damage could result. • DO NOT pull plug from wall by the power cord.
- Page 11 SUGGESTED PILE HEIGHT SETTINGS CAUTION Attention: Refer to your carpet manufacturers DO NOT leave the PowerMate ® running in cleaning recommendations. one spot for any length of time. Damage Some more delicate carpets may require to carpet may occur. that they be vacuumed with the PowerMate ®...
- Page 12 NOTE: Fast, EDGE CLEANER jerky strokes Active brush edge do not provide cleaners are on both complete sides of the cleaning. PowerMate . Guide ® either side of the PowerMate along ® base-boards or next to furniture to help remove dirt trapped at carpet edges.
- Page 13 2. Slide attachments onto handle as needed. The floor brush will click into place. See ATTACHMENT USE TABLE (page 13). 3. Slide attachments onto wand as needed. The floor brush will click into place. See ATTACHMENT USE TABLE below. ATTACHMENTS ON WAND 1.
-
Page 14: Performance/Safety Features
PERFORMANCE/SAFETY FEATURES CHECK BAG INDICATOR WARNING When the vacuum cleaner is running with normal airflow, the CHECK BAG indicator Personal Injury Hazard is green. The indicator turns to dark red To avoid accidental brushroll starting, whenever the airflow becomes blocked. If always turn off... -
Page 15: Canister Care
CANISTER CARE REMOVING CLOGS The vacuum cleaner creates suction that picks up dirt. Rapidly moving air carries the dirt to the dust bag through the airflow passages. The dust bag lets the air pass through, while it traps the dirt. For best cleaning results, keep the airflow passage open. - Page 16 DUST BAG CHANGING For best cleaning results, the dust bag should NOTE: DO NOT bend or crease the middle be changed often. The CHECK BAG indicator of the cardboard when installing the bag will come on when the bag needs to be into the bag mount slots.
- Page 17 MOTOR SAFETY FILTER CLEANING 2. Pull out motor safety filter as shown. WARNING Electrical Shock Hazard Plastic Retainer Turn off and unplug vacuum cleaner from electrical outlet. Do not operate the vacuum cleaner without the motor safety filter. Be sure the filter is dry and properly installed to prevent motor failure and/or electrical shock.
- Page 18 EXHAUST FILTER CHANGING 4. Insert the new exhaust filter cartridge WARNING into the filter cover with the rubber seal upward. Fire and/or Electrical Shock Hazard Do not operate with a clogged exhaust filter or without the exhaust filter installed. Do not operate without filter cover installed.
-
Page 19: Powermate ® Care
POWERMATE CARE ® Always follow all safety precautions when performing maintenance to the PowerMate ® WARNING Electrical Shock Or Personal Injury Hazard Always turn off and unplug vacuum cleaner before performing maintenance to the vacuum cleaner. Failure to do so could result in electrical shock or personal injury from vacuum cleaner suddenly starting. - Page 20 TO CLEAN BRUSHROLL: TO REPLACE BELT NOTE: In order to keep cleaning efficiency 1. Install new belt over motor shaft, then high and to prevent damage to your vacu- over belt path. um cleaner, the brushroll must be cleaned NOTE: See REPLACEMENT PARTS for part every time the belt is changed.
- Page 21 BRUSHROLL SERVICING TO REPLACE BRUSHROLL ASSEMBLY WARNING 1. Remove the floor brush from the Electrical Shock Or Personal Injury PowerMate ® Hazard 2. Remove PowerMate cover, belt and ® Always turn off and unplug vacuum brushroll assembly. cleaner before performing maintenance to the vacuum cleaner.
-
Page 22: Troubleshooting
TROUBLESHOOTING Review this table to find do-it-yourself solutions for minor performance problems. Any other service needed call 1-877-531-7321 (US) / 1-844-608-3081 (CA) for assistance. WARNING Always turn off and unplug vacuum cleaner before performing maintenance to the vacuum cleaner. Failure to do so could result in electrical shock or personal injury. PROBLEM POSSIBLE CAUSE SOLUTION... - Page 23 TROUBLESHOOTING Hose or hood electrical Check connections, reconnect hose ends. connections. Remove any items that may be caught or Tripped overload protector in Vacuum cleaner jammed, then restart. If vacuum cleaner starts ® PowerMate . See OVERLOAD starts but shuts and stops again, clean brushroll and end caps, PROTECTOR (page 14).