
Related Manuals for Miele KFN 7795 D


Summary of Contents for Miele KFN 7795 D
- Page 1 Operating Instructions Bottom-mount Unit To prevent accidents and machine damage, read these instructions before installation or use. en - US/CA M.-Nr. 11 930 740...
-
Page 2: Table Of Contents
Contents IMPORTANT SAFETY INSTRUCTIONS ............Caring for the environment ................15 Installation......................16 Installation location ..................... 16 Side-by-side combinations ................17 Climate class ....................17 Ventilation ....................... 18 Cabinet doors...................... 19 – Weight of the door panel ................19 Calculation of cabinet door size ..............19 Installation dimensions.................. - Page 3 Sabbath mode .................... 52 Information on Sabbath mode ..............52 Changing the time before the door alarm is triggered ....... 53 Miele@home ....................53 Changing the volume of the alarms and audible signals /..... 55 Adjusting the display brightness ............... 55 Switching off Demo mode ................
- Page 4 Contents Humidity-controlled compartment ..............63 Humidifier ....................65 Dry compartment ....................66 Freezing and storing food................. 68 What happens when you freeze fresh food?............68 Maximum freezing capacity ................68 Storing frozen food....................68 Home freezing ..................... 69 Storage time for frozen food................70 Cooling drinks quickly ..................
-
Page 5: Important Safety Instructions
“IMPORTANT SAFETY INSTRUCTIONS”. Miele cannot be held liable for injury or damage caused by non- compliance with these instructions. Keep these instructions in a safe place and pass them on to any future owner. - Page 6 The refrigeration appli- ance is also not suitable for use in areas where there is a risk of ex- plosion. Miele cannot be held liable for damage resulting from incorrect or improper use or operation. ...
- Page 7 In the event of damage: - Avoid open flames or anything which creates a spark. - Disconnect the refrigeration appliance from the power supply. - Ventilate the room where the refrigeration appliance is located for several minutes. - Contact Miele Customer Service.
- Page 8 If the power cord supplied is damaged, it must only be replaced by an original part to prevent a hazard for the user. Miele can only guarantee the safety of the appliance when original Miele parts are used.
- Page 9 The ice cube maker must only be connected to a cold water line. Miele cannot be held liable for damage caused by a faulty con- nection to the fresh water supply. Any manufacturer's warranty may be void if the appliance is not...
- Page 10 IMPORTANT SAFETY INSTRUCTIONS Faulty components must only be replaced by genuine Miele re- placement parts. Miele can only guarantee the safety standards of the appliance when Miele replacement parts are used. This refrigeration appliance is supplied with a special bulb to cope with particular conditions (e.g., temperature, moisture, chemical re-...
- Page 11 IMPORTANT SAFETY INSTRUCTIONS If storing food which contains a lot of fat or oil in the appliance, make sure that it does not come into contact with plastic compo- nents as this could cause stress cracks or break the plastic. ...
- Page 12 Observe the manufacturer's “use-by” dates and storage in- structions. Accessories and parts Use only genuine original Miele parts. If parts or accessories from other manufacturers are used, the warranty may become invalid. Miele will guarantee to supply functional spare parts for a mini- mum of 10 years and up to 15 years following the discontinuation of...
- Page 13 IMPORTANT SAFETY INSTRUCTIONS Do not use defrosting sprays or de-icers, as they could contain substances which could damage the plastic parts or which might cause the build-up of gases and pose a danger to health. Transport To avoid damage to the appliance, always transport it upright and in its packaging.
- Page 14 IMPORTANT SAFETY INSTRUCTIONS Splashes of coolant can cause damage to the eyes. Be careful not to damage any part of the pipework while awaiting disposal, e.g. by - puncturing the coolant channels in the evaporator, - kinking any pipework, - scratching the surface coating.
-
Page 15: Caring For The Environment
Caring for the environment Disposal of packaging material Disposing of your old appli- ance The packaging is designed to protect the appliance from damage during Electrical and electronic appliances transportation. The packaging materials contain many valuable materials. They used are selected from materials which also contain certain materials, com- are environmentally friendly for disposal pounds, and components which were... -
Page 16: Installation
*INSTALLATION* Installation This appliance should be installed in a Installation location dry, well-ventilated room. WARNING! Risk of damage and When deciding where to install your re- injury due to the refrigeration appli- frigeration appliance, please bear in ance tipping over. mind that it will use more energy if in- This refrigeration appliance is very stalled near to a heater, a range, or an-... -
Page 17: Side-By-Side Combinations
*INSTALLATION* Installation Climate class Risk of damage due to high hu- This refrigeration appliance is designed midity. for use within specific ambient temper- In environments with high humidity, atures (climate range). Do not use in condensation can build up on exter- ambient temperatures for which it is not nal refrigeration-appliance panels. -
Page 18: Ventilation
*INSTALLATION* Installation Ventilation passage volume of at least 31"² (200 cm ) to allow the warm air to WARNING! Fire hazard and risk dissipate unimpeded. of damage due to insufficient ventila- - If you wish to fit a grille in the ventila- tion. -
Page 19: Cabinet Doors
*INSTALLATION* Installation Calculation of cabinet door size Cabinet doors The width of the cabinet door de- An upper cabinet door for the refrigera- pends on the style of the kitchen and tor section and a lower cabinet door for the gap between the unit door panels. the freezer section are required. - Page 20 *INSTALLATION* Installation This must be taken into consideration when planning your kitchen and when replacing an old refrigeration appliance with a new one to ensure the installation conditions required are met. Door Gap X [in (mm)] panel for different edge radii B thick- Adjoining side wall ness...
- Page 21 *INSTALLATION* Installation Cabinet door dimensions / height of freezer section cabinet door / height of refrigerator section cabinet door Refrigerator section cabinet door Freezer section cabinet door Refrigerator section appliance door Freezer section appliance door Fitted unit cover panel Fitted unit cabinet base...
- Page 22 *INSTALLATION* Installation – Height of freezer section cabinet 27 3/8" (695 mm) door 9/16" (15 mm) 1. The freezer section cabinet door 24 3/4" (629 mm) must be at least A = 27 3/8" (695 mm) to cover the bottom section 38 15/16" (989 mm) of the appliance. 70 3/8" (1788 mm) 2.
-
Page 23: Installation Dimensions
*INSTALLATION* Installation Installation dimensions Installation in a tall cabinet/side view All dimensions are given in inches (mm). ≥0,2 ft² ≥200cm² ≥ 2 1 / 1 +5/8" 69 3/4" ≥ 5 + 5 / 8 " 19/32" 4 " 6 9 3 / + 3 / 8 "... -
Page 24: Connections And Ventilation
3/8" 8 7/8" a Front view b Power cord, length = 7' 2" (2,200 mm) A longer power cord is available to order from Miele Customer Service. c Water connection, length = 6' 6" (2,000 mm) d Ventilation cut-out min. 31"² (200 cm²) e Ventilation... -
Page 25: Limiting The Opening Angle Of The Appliance Doors
*INSTALLATION* Installation Limiting the opening angle of the appliance doors The door hinges are set to enable the appliance doors to be opened wide. If the opening angle of the doors needs to be limited to approx. 90°, the hinge can be adjusted to accommodate this. -
Page 26: Water Connection
This appliance meets the requirements The hose must only be replaced by of IEC 61770 and EN 61770. an original Miele spare part. The food-grade hose is available to order from the Miele online shop, from Miele Customer Service, or from your... -
Page 27: Water Supply
*INSTALLATION* Installation – Connecting the hose to the refriger- A shut-off valve must be provided be- ation appliance tween the hose and the plumbed-water connection to ensure that the water supply can be cut off if necessary. Make sure that the shut-off valve is still accessible after the appliance has been installed. - Page 28 *INSTALLATION* Installation – Connecting the hose to the shut-off valve Connect the nut to the shut-off valve . – Checking the plumbed-water con- nection Test the water connection for leaks be- fore installing the appliance in the niche. Slowly open the shut-off valve and check the screw connections.
-
Page 29: Lead-Free Certificate
This product is tested and certified by WQA against NSF/ANSI 372 for “lead free” This product F 1413 Vi (KIMSDF18US) is tested and certified by WQA against compliance. NSF/ANSI 372 for "lead free" compliance. Miele & Cie. KG Carl-Miele-Strasse 29 D-33332 Gütersloh Miele & Cie. KG Carl-Miele-Straße 29... -
Page 30: Electrical Connection
(available from Miele Customer Service). For safety reasons, such replacement may only be carried Insert the electrical plug into the back out by a qualified technician or Miele of the refrigeration appliance. Customer Service. Make sure that the electrical plug has These operating instructions and the clicked into position correctly. -
Page 31: Saving Energy
Saving energy How to save energy: Installation The refrigeration appliance has to cool more often at higher am- location bient temperatures and consumes more energy in the process. Therefore, you should: - Install the refrigeration appliance in a well-ventilated room. - Do not install the refrigeration appliance near to a heat source (heater element, range). -
Page 32: Guide To The Appliance
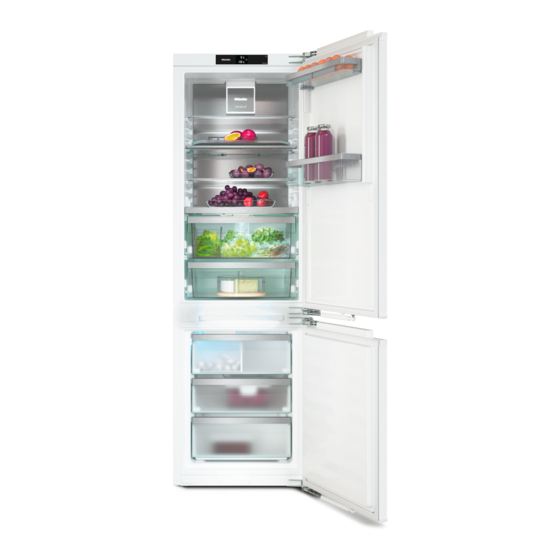
Guide to the appliance... - Page 33 Guide to the appliance a Display b Egg tray c Door shelf with fine adjustment d Fan with lighting e Dry back wall f Adjustable shelf with pivotable glass shelf (FlexiTray) g Adjustable shelf with lighting (FlexiLight 2.0) h Bottle shelf with bottle holder i Space for a baking tray (ComfortSize) j Dividing plate with bottle rack;...
-
Page 34: Status Display
Settings mode sensor control for adjusting various settings in Settings mode d Display for Miele@home connection status (only visible when the Miele@home function has been set up) e Demo-mode display (only visible when the Demo-mode function has been switched on) Using the appliance ... -
Page 35: Settings Mode
Switching the humidifier on or off or adjusting its inten- sity (see “Storing food in the PerfectFresh Active zone”) Setting up the Miele@home function for the first time, activating and deactivating WiFi, or resetting the network configuration (see “Selecting additional settings”) - Page 36 Guide to the appliance / Switching the keypad tone on or off / Changing the volume of the alarms and audible signals or switch them off entirely /level 5 (see “Selecting additional settings”) Changing the display brightness Level 4 (see “Selecting additional settings”) Changing the temperature unit...
-
Page 37: Adjusting The Interior Fittings
Guide to the appliance Press the gray buttons at the same Adjusting the interior fittings time and slide the door shelf up and Using the door-shelf fine adjustment off the guide rails. Use the fine adjustment if you need greater height clearance on the door shelf/bottle shelf. -
Page 38: Clipping The Egg Trays On
Guide to the appliance Clipping the egg trays on Moving the shelf/shelf with lighting Clip the egg trays onto the rear edge The shelves can be adjusted according of the door shelf. to the height of the food. Adjusting or removing the bottle holder The non-slip fins of the bottle holder make bottles more secure when you... -
Page 39: Moving The Adjustable Shelf With Pivotable Glass Shelf (Flexitray)
Guide to the appliance Moving the adjustable shelf with piv- Using the bottle rack in the dividing otable glass shelf (FlexiTray) plate In the dividing plate, either the bottle Risk of damage caused by load- rack or the glass shelf can be used. ing too much food and not distribut- ing items evenly. -
Page 40: Inserting The Adapters For The Baking Tray
Guide to the appliance Inserting the adapters for the baking Moving the carbon filter tray KKF-FS carbon filters with holder (Ac- The supplied adapters enable you to in- tive AirClean) are available as optional sert a baking tray in your refrigerator accessories (see “Optional acces- section with ease. -
Page 41: Optional Accessories
Guide to the appliance Bottle rack Optional accessories A range of useful Miele accessories and care products are available for your ap- pliance. KKF-FS carbon filter with holder (Ac- tive AirClean) Carbon filters neutralize unpleasant odors in the refrigerator section for im- proved air quality. -
Page 42: Switching On And Off
“Electrical connection”. alarm stops. Miele will then appear on the appliance If the alarm annoys you, tap display, followed by . ... -
Page 43: Switching Off The Appliance
Switching on and off Turning off the refrigerator section Switching off the appliance separately You can only switch the entire refrigera- The refrigerator section can be tion appliance off in Settings mode . switched off without having to switch Tap . off the freezer section. -
Page 44: To Note When Switching Off For Longer Periods Of Time
Switching on and off To note when switching off for longer periods of time If, during a long absence, the refrig- eration appliance is switched off but not cleaned and the door is left shut, there is a danger of bacteria building up inside the appliance. -
Page 45: The Correct Temperature
The correct temperature It is very important to set the correct ... in the freezer section temperature to ensure the shelf life of To freeze fresh food, a temperature of food. Reducing the temperature re- 0°F (-18°C) is required. This will prolong duces the growth rate of microorgan- the storage life of your food and retain isms. -
Page 46: Temperature Display
The correct temperature Adjusting the PerfectFresh Active Temperature display zone temperature In normal operation, the temperature The temperature in the PerfectFresh Ac- display shows the current average tive zone is automatically maintained refrigerator section temperature and between 32 and 37°F (0 and 3°C). the maximum freezer section tem- perature. - Page 47 The correct temperature If you change the temperature set- ting: Check the temperature display after a few hours. It will take this long for an accurate reading to be given. - Wait for approx. 6 hours if the refrig- eration appliance is not very full. - Wait for approx. 24 hours if the refrig- eration appliance is full.
-
Page 48: Using Automatic Supercool And Superfreeze
Using Automatic SuperCool and SuperFreeze Switching Automatic SuperCool on Automatic SuperCool and off When switched on, the Automatic Su- Touch the temperature display for the perCool function can be used to refrigerator section. rapidly reduce the temperature in the refrigerator section to its lowest set- ... - Page 49 Using Automatic SuperCool and SuperFreeze SuperFreeze You do not need to switch on the Su- perFreeze function: When switched on, the SuperFreeze - When you place food that is al- function can be used to rapidly re- ready frozen in the freezer. duce the temperature in the freezer section to its lowest setting (depend- - If you are only freezing up to 4.4 Ib...
-
Page 50: Selecting Additional Settings
Selecting additional settings Vacation mode Explanation of the different settings The Vacation-mode function is useful when you go on vacation, for Only the settings that require further ex- example, if you do not wish to switch planation are described below. off the refrigerator section completely The door alarm and other warnings or do not need a high degree of cool-... -
Page 51: Switching The Safety Lock Function / On
Selecting additional settings Touch for approx. 6 seconds. Health risk caused by decom- posing food. The display switches to the temperature controls. The usability and quality of food in the refrigerator section may deterio- Now select the required settings. rate if the temperature remains above 37°F (4°C) for an extended period. -
Page 52: Sabbath Mode
Selecting additional settings Sabbath mode Health risk caused by decom- The appliance features a Sabbath mode posing food. for the purposes of religious obser- As power failures are not indicated vance. while Sabbath mode is active, food may be exposed to increased If Sabbath mode ... -
Page 53: Changing The Time Before The Door Alarm Is Triggered
- the Miele app Swipe left or right until the time you - a Miele user account You can create want between 30 seconds and 3 min- a user account via the Miele app. utes 30 seconds is shown in the mid- dle. - Page 54 (app or WPS). Miele@home availability After you have successfully logged in, The ability to use the Miele app de- will appear on the status display. pends on the availability of the Miele@home service in your country.
-
Page 55: Changing The Volume Of The Alarms And Audible Signals
Tap OK. the middle. All entered settings and values for Tap . Miele@home are reset to the default Swipe left or right until the volume settings. you want is shown in the middle. The WiFi connection has been deacti- ... -
Page 56: Switching Off Demo Mode
Tip: This data is important when report- switched on. Do not activate this setting ing an appliance fault to Miele Cus- for domestic use. tomer Service (see “Customer Ser- If Demo mode has been switched on vice”). -
Page 57: Cleaning Mode
Selecting additional settings Cleaning mode Cleaning mode makes it easier to clean the refrigerator section (see “Cleaning and care”). The interior lighting remains switched on, even though the refrigerator section is switched off. The audible signal will stop and the symbols on the display will also go out. -
Page 58: Temperature And Door Alarm
Temperature and door alarm The audible and visual signals may be Health risk caused by decom- activated in the following situations: posing food. If the temperature in the freezer re- - You switch on the refrigeration ap- mains above 0°F (-18°C) for a long pliance and the temperature in a time, the frozen food may start to de- temperature zone differs greatly... - Page 59 Temperature and door alarm Door alarm The refrigeration appliance is equipped with a warning system to avoid increased energy consumption and food becoming warm if the appli- ance door is left open. If an appliance door is left open for a longer period of time, ...
-
Page 60: Storing Food In The Refrigerator Section
Storing food in the refrigerator section Do not load more than a maximum of If there is insufficient air circulation, 35 lb (16 kg) of food in the appliance the cooling performance will de- door. crease and energy consumption will increase. To allow air to circulate efficiently, do ... -
Page 61: Different Storage Zones
Storing food in the refrigerator section Coldest area Different storage zones The coldest area in the refrigerator sec- Due to natural air circulation, there are tion is directly above the PerfectFresh different temperature zones in the re- Active zone dividing plate and at the frigerator section. -
Page 62: Food Which Is Not Suitable For Storage In The Fridge Zone
Storing food in the refrigerator section Food which is not suitable for Storing food correctly storage in the fridge zone Ensure that food stored in the refrigera- tor section is in packaging or covered Not all food is suitable for refrigeration properly (some exceptions apply in the at temperatures below 40°F (5°C) be- PerfectFresh Active zone). -
Page 63: Storing Food In The Perfectfresh Active Zone
Storing food in the PerfectFresh Active zone PerfectFresh Active zone Humidity-controlled compart- ment The PerfectFresh Active zone satisfies the requirements of a chill compart- | | ment to DIN EN 62552:2020. The upper humidity-controlled com- The PerfectFresh Active zone provides partment has a temperature of 32 to ideal storage conditions for fruit, veg- 37°F (0 to 3°C), and the humidity level etables, fish, meat, and dairy products. - Page 64 Storing food in the PerfectFresh Active zone Selecting increased humidity Selecting low humidity When the setting is used, the hu- When the setting is used, the humid- midifier should be switched on. ifier should be switched off. Tap . The energy consumption does in- crease slightly when the humidifier ...
-
Page 65: Humidifier
Storing food in the PerfectFresh Active zone Humidifier Risk to health due to contami- nated water. When the humidifier is switched on, Using contaminated water can lead water vapor is supplied to the fruit and to poisoning. vegetables stored in the humidity-con- trolled compartment each time the ap- Use only fresh drinking water to fill pliance door is opened and approxi-... -
Page 66: Dry Compartment
Storing food in the PerfectFresh Active zone Filling the water container for the hu- Dry compartment midifier | The lower dry compartment has a temperature of 32 to 37°F (0 to 3°C) and the humidity is not increased . The dry compartment is suitable for storing perishable foods such as: - fresh fish and shellfish - meat, poultry, and sausage... - Page 67 Storing food in the PerfectFresh Active zone Observe the following tips if you find that food you have stored does not keep well (e.g., food becomes limp or wilts after only being stored for a short time): Only place fresh food in the appliance as the initial condition of the food is cru- cial to maintaining freshness.
-
Page 68: Freezing And Storing Food
Freezing and storing food Maximum freezing capacity Always observe USDA food safety guidelines. To ensure that fresh food placed in the freezer freezes through to the core as quickly as possible, Risk of fire from electrical appli- the maximum freezing capacity must ances. -
Page 69: Home Freezing
Freezing and storing food Packaging food for freezing Home freezing Freeze food in portions. Before placing food in the freezer Tip: Use suitable packaging to avoid When freezing more than 4.4 lb (2 kg) freezer burn (such as freezer contain- of fresh food, switch on the Super- ers). -
Page 70: Storage Time For Frozen Food
Freezing and storing food – Freezing small amounts of food Storage time for frozen food Place the food in the upper freezer Food group Storage time drawers. (Months) Place the food flat in the bottom of Ice cream 2 to 6 the upper freezer drawers so that it freezes through to the core as quickly Bread, baked goods 2 to 6 as possible. -
Page 71: Cooling Drinks Quickly
Freezing and storing food Cooling drinks quickly To cool drinks quickly in the refrigerator section, switch on the Automatic Su- perCool function . If you want to cool a large amount of drinks, or if you want to cool drinks in the freezer section, select Party mode ... -
Page 72: Making Ice Cubes
Making ice cubes Check and pay attention to the follow- When using the appliance for the first ing before switching the ice-cube maker time, it can take up to 24 hours for the first ice cubes to drop out of the ice- cube maker and collect in the drawer. - Page 73 Making ice cubes As soon as ice cubes are produced, they will empty automatically from the integrated ice-cube tray and into the drawer. The ice-cube tray cannot be re- moved. Ice-cube production is halted automati- cally when the ice-cube drawer is full. The drawer will not fill up to the top edge.
-
Page 74: Defrosting
Defrosting Freezer section WARNING! DANGER of injury and damage! The appliance is equipped with a Do not use any mechanical or other “NoFrost” system. The freezer defrosts types of aids which are not recom- automatically. mended by the manufacturer to ac- The moisture generated in the appli- celerate the defrosting process. -
Page 75: Cleaning And Care
Cleaning and care Cleaning agents WARNING! DANGER of electric shock! Cleaning and care products used in Unplug the appliance or trip the cir- the interior cabinet of the refrigera- cuit breaker. tion appliance must be food safe. To avoid damaging the surfaces of your WARNING! Fire hazard! appliance, do not use the following: Do not damage the coolant... -
Page 76: Preparing The Refrigeration Appliance For Cleaning
Cleaning and care Cleaning the freezer section/the en- Preparing the refrigeration ap- tire refrigeration appliance: pliance for cleaning Turn the appliance off. Cleaning the refrigerator section appears in the display and the cool- only: ing system is switched off. Switch Cleaning mode ... -
Page 77: Cleaning The Interior Of The Appliance
Cleaning and care Cleaning the interior of the ap- Cleaning accessories by hand pliance or in the dishwasher The following components must be Clean the appliance regularly, or at cleaned by hand only: least once a month. - the stainless steel trims or strips If soiling is left on for any length of - door shelf with fine adjustment time, it may become impossible to... -
Page 78: Removing, Dismantling, And Cleaning Accessories
Cleaning and care Push the shelf back down onto the - shelves and bottle shelves in the ap- pliance door (without stainless steel guide rails. trim) Dismantling the door shelf/bottle - door shelf with fine adjustment shelf - the adjustable shelves (without the Remove the stainless steel trim before strips or printing) cleaning the door shelf/bottle rack in a... - Page 79 Cleaning and care Dismantling the adjustable shelf/ad- justable shelf with lighting Risk of damage as a result of in- correct cleaning. The stainless steel trim with LED lighting will be damaged if you place it in water for cleaning. Clean the stainless steel trim with ...
- Page 80 Cleaning and care Dismantling the adjustable shelf with pivotable glass shelf (FlexiTray) Place the adjustable shelf with piv- otable glass shelf on a countertop covered with a soft material (e.g., a dish towel). Take a firm hold of the top right of the bottom adjustable shelf and pull the tray firmly off the adjustable shelf.
- Page 81 Cleaning and care Release the retainers and lift the Place the frame on the adjustable shelf so that the arrows on the ad- shelf up. justable shelf line up with the re- The glass panel comes loose. Both cesses on the frame.
- Page 82 Cleaning and care Removing the drawers from the re- Removing and dismantling the water frigerator section container for the humidifier Risk to health due to contami- nated water. Bacteria can develop in water which has been sitting in the water con- tainer for too long.
- Page 83 Cleaning and care Remove the water container. Removing the dividing plate and bot- tle rack Remove the glass shelves at the front and back of the dividing plate. Separate the water container into its 2 pieces and clean them by hand or in the dishwasher.
- Page 84 Cleaning and care Removing the drawers and glass Removing the telescopic runners shelves from the freezer section from the glass shelf Removing the drawer on telescopic runners Pull the drawer out as far as it will go. Holding the sides of the drawer at the back, lift it up and then forward and out.
- Page 85 The symbol on the status display re- minds you that the carbon filter needs to be changed. Replacement KKF-RF carbon filters can be obtained from Miele Customer Service, from your dealer, or from Miele’s website. Pull the carbon filter holder upward to remove it from the adjustable shelf.
- Page 86 Cleaning and care Touch the symbol on the display Selecting the cleaning position for to confirm that the filters have been the ice-cube tray replaced. Before selecting the cleaning position for the ice-cube tray, check the follow- The “Replace carbon filter” reminder ing: will go out on the display and the counter will be reset.
-
Page 87: Cleaning The Door Seal
(you could Switch on the Automatic SuperCool use a Miele Vacuum Cleaner dust function for a while so that the re- brush, for example). frigerator section can cool down quickly. -
Page 88: Frequently Asked Questions
The fuse has tripped. There could be a fault with the appliance, the household electrical wiring, or another appliance. Contact a qualified electrician or Miele Customer Service. The compressor runs Not a fault. To save energy, the compressor runs at continuously. - Page 89 Frequently Asked Questions Problem Possible cause and solution Close the appliance doors. After a while, the temperature will return to normal by itself. If a thick layer of ice has already formed, this will af- fect cooling and increase energy consumption. ...
- Page 90 Frequently Asked Questions Problem Possible cause and solution The compressor comes This is not a fault. The temperature setting is too on less and less often high. and for shorter periods Correct the temperature setting. of time. The tempera- ...
- Page 91 Frequently Asked Questions Other problems Problem Possible cause and solution The food is affected by There is too much condensate in the humidity-con- the setting in the hu- trolled compartment. midity-controlled com- Wipe off any condensate with a cloth. partment.
- Page 92 Frequently Asked Questions Messages in the display Message Possible cause and solution Demo mode has been activated. lights up on the Tap . status display, the refrigeration Tap . appliance does Swipe left or right until is shown in the middle. not get cold even ...
- Page 93 There is a kink in the hose. Check the hose; if it is faulty, it must only be re- placed by an original Miele spare part. The water-connection pressure is too low. Check that the water-connection pressure is be- tween 21.7 and 90 psi (1.5 and 6.2 bar).
- Page 94 Frequently Asked Questions Message Possible cause and solution lights up yellow in The door alarm has been activated. the temperature display Touch and hold in the display for a few sec- for the refrigerator sec- onds. tion and/or the freezer The alarm tone will stop and the ...
- Page 95 Frequently Asked Questions Message Possible cause and solution Indication of an interruption to the power supply: the lights up red in the temperature in the freezer section over the last few display and an alarm days or hours has risen too high because of a power also sounds.
- Page 96 Tap on the display to switch the alarm off. the display and a fault code F with Contact Miele Customer Service. numbers may ap- To report the fault, you need the fault code and also pear. An alarm the model identifier and serial number of your refrig- will also sound.
- Page 97 Frequently Asked Questions Problems with the humidifier Problem Possible cause and solution The humidifier is not The humidifier is not switched on. supplying moisture to Tap on the symbol in Settings mode . the food in the Perfect- The compartment lid has been pulled forwards to the Fresh Active zone.
- Page 98 Frequently Asked Questions Problem Possible cause and solution Only open the appliance door when necessary and for as short a time as possible. The temperature in the freezer section is too high. Select a lower temperature. The water-connection pressure is too low. ...
-
Page 99: The Interior Lighting Is Not Working
To avoid overheating, the interior lighting switches it- self off automatically after approximately 15 minutes if the appliance door is left open. If this is not the cause, there is a fault. Contact Miele Customer Service. - Page 100 Push in the shelf until it clicks into position. The LED lighting on the stainless steel trim is faulty. Replace the stainless steel trim with LED lighting. A replacement is available from Miele Customer Service. The LED lighting is not...
-
Page 101: Causes Of Noises
Causes of noises Normal Cause noises Brrrrr... A humming noise is made by the motor (compressor). This noise can get louder for brief periods when the motor switches on. Blub, blub... A gurgling noise can be heard when the coolant circulates through the pipes. -
Page 102: Customer Service
This can be found in Settings mode un- Miele dealer or Miele Customer Service. der Information (see “Selecting addi- tional settings”) or on the data plate in- You can book a Miele Service Call on- side the refrigeration appliance. line at www.miele.com/service. Appliance warranty and prod-... - Page 103 Customer Service. U.S.A. Canada Miele, Inc. Importer Miele Limited National Headquarters 9 Independence Way Headquarters and Miele Centre Princeton, NJ 08540 161 Four Valley Drive www.mieleusa.com Vaughan, ON L4K 4V8 www.miele.ca Customer Support Phone: 888-99-MIELE (64353) Customer Care Centre info@mieleusa.com...
- Page 104 KFN 7795 D en - US/CA M.-Nr. 11 930 740 / 00...