Advertisement
- 1 Precautions
- 2 Introduction
- 3 Front and rear panel
- 4 Setup
- 5 Auto Power-Off function
- 6 Program select mode
- 7 Bypass and Mute
- 8 Tuner
- 9 Creating your sound (Edit mode)
- 10 Adjusting the sensitivity of the expression pedal
- 11 Restoring the factory preset programs
- 12 Troubleshooting
- 13 Specifications
- 14 Parameter list
- 15 Videos
- 16 Documents / Resources
Precautions
Location
Using the unit in the following locations can result in a malfunction.
- In direct sunlight
- Locations of extreme temperature or humidity
- Excessively dusty or dirty locations
- Locations of excessive vibration
- Close to magnetic fields
Power supply
Please connect the designated AC adapter to an AC outlet of the correct voltage. Do not connect it to an AC outlet of voltage other than that for which your unit is intended.
Interference with other electrical devices
Radios and televisions placed nearby may experience reception interference. Operate this unit at a suitable distance from radios and televisions.
Handling
To avoid breakage, do not apply excessive force to the switches or controls.
Care
If the exterior becomes dirty, wipe it with a clean, dry cloth. Do not use liquid cleaners such as benzene or thinner, or cleaning compounds or flammable polishes.
Keep this manual
After reading this manual, please keep it for later reference.
Keeping foreign matter out of your equipment
Never set any container with liquid in it near this equipment. If liquid gets into the equipment, it could cause a breakdown, fire, or electrical shock.
Be careful not to let metal objects get into the equipment. If something does slip into the equipment, unplug the AC adapter from the wall outlet. Then contact your nearest Korg dealer or the store where the equipment was purchased.
THE FCC REGULATION WARNING (for USA)
NOTE: This equipment has been tested and found to comply with the limits for a Class B digital device, pursuant to Part 15 of the FCC Rules. These limits are designed to provide reasonable protection against harmful interference in a residential installation. This equipment generates, uses, and can radiate radio frequency energy and, if not installed and used in accordance with the instructions, may cause harmful interference to radio communications. However, there is no guarantee that interference will not occur in a particular installation. If this equipment does cause harmful interference to radio or television reception, which can be determined by turning the equipment off and on, the user is encouraged to try to correct the interference by one or more of the following measures:
- Reorient or relocate the receiving antenna.
- Increase the separation between the equipment and receiver.
- Connect the equipment into an outlet on a circuit different from that to which the receiver is connected.
- Consult the dealer or an experienced radio/TV technician for help.
If items such as cables are included with this equipment, you must use those included items.
Unauthorized changes or modification to this system can void the user's authority to operate this equipment.
Notice regarding disposal (EU only)

 If this symbol is shown on the product, manual, battery, or package, you must dispose of it in the correct manner to avoid harm to human health or damage to the environment. Contact your local administrative body for details on the correct disposal method. If the battery contains heavy metals in excess of the regulated amount, a chemical symbol is displayed below the symbol on the battery or battery package.
IMPORTANT NOTICE TO CONSUMERS
This product has been manufactured according to strict specifications and voltage requirements that are applicable in the country in which it is intended that this product should be used. If you have purchased this product via the internet, through mail order, and/or via a telephone sale, you must verify that this product is intended to be used in the country in which you reside.

Use of this product in any country other than that for which it is intended could be dangerous and could invalidate the manufacturer's or distributor's warranty. Please also retain your receipt as proof of purchase otherwise your product may be disqualified from the manufacturer's or distributor's warranty. Company names, product names, and names of formats etc. are the trademarks or registered trademarks of their respective owners.
* All product names and company names are the trademarks or registered trademarks of their respective owners.
Introduction
To ensure a long and trouble-free relationship with your StompLab, please read this manual carefully. When you've finished reading this manual, please keep it for future reference.
Main features
- 61 different modeling effect variations are built-in, and you can use up to eight different effects simultaneously (including noise reduction).
- Use these modeling effects to create your own sounds and store them in internal memory as one of 20 user programs. In addition, 100 more programs are provided as presets for immediate use.
- A built-in auto chromatic tuner lets you tune while bypassed or muted.
- The StompLab II B provides an expression pedal that lets you control wah, and volume and also many effect parameters, giving you enormous possibilities for live performances.
* All product names and company names are the trademarks or registered trademarks of their respective owners.
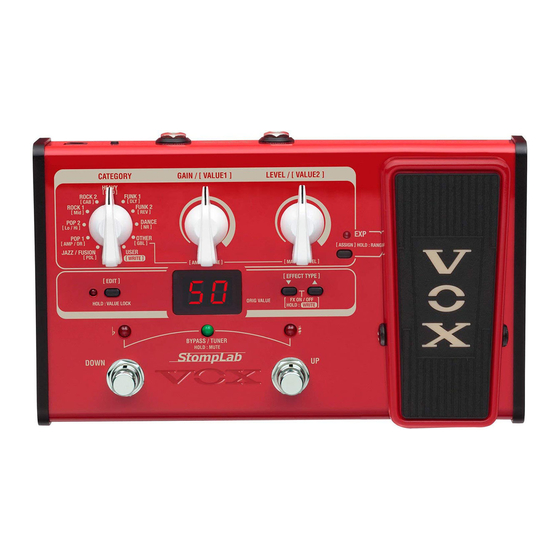
Front and rear panel
This section explains the buttons and connectors on the StompLab II B's front and rear panels.
Front panel

- CATEGORY selector
In Program select mode, use this to select the program genre and to recall the selected genre of the program.
In Edit mode, use this to select the effect that will be edited. Also, you can save the settings of an edited effect in a program when [WRITE] is selected with the selector. - VALUE 1 knob
In Program select mode, use this knob to adjust the limiter sensitivity or amplifier gain (AMP/DRIVE). When making this adjustment, the program/value display will indicate the sensitivity or gain value and the EDIT LED and Tuner center LED will blink.
In Edit mode, use this knob to set the first parameter of an effect. Also, when saving a program, use this knob to select the program location where a set program will be saved (written). - VALUE 2 knob
In Program select mode, use this knob to adjust the amplifier output level (AMP/DRIVE). When making this adjustment, the program/value display will indicate the output level and the EDIT LED and Tuner # LED will blink.
In Edit mode, use this knob to set the second parameter of an effect. - EDIT button, EDIT LED
Use this button to switch the Program select mode and the Edit mode. The modes can be switched each time the button is pressed. When in the Edit mode, the EDIT LED will light up.
In Program select mode, the Value lock function turns on when this button is pressed and held for 2 seconds and the functionality of the VALUE 1 and VALUE 2 knobs will be disabled. The Value lock function is canceled when the button is pressed and held again for 2 seconds.
![]() The Value lock function can only be enabled in Program select mode.
The Value lock function can only be enabled in Program select mode. - Program/Value display
In Program select mode, this indicates the selected program number and the knob value. When BYPASS/MUTE is active, the display indicates the name of the note that you're tuning.
In Edit mode, this indicates the effect abbreviations and parameter values. Also, this indicates the program number that was selected as the save location when the program is saved. - ▲, ▼ buttons
In Program select mode, use these to select programs. The program number will increase (decrease) each time you press the button.
In Edit mode, use these buttons to select an effect and turn it on/ off. Use them to select the program in the save location and execute the save function when saving a program.
Also, the calibration is set when the tuner is started. - Tuner LED
In Program select mode, this serves as the tuner meter when BYPASS/MUTE function is active.
In Edit mode:- The left
![]() LED will light up when the effect name is indicated in the program/value display.
LED will light up when the effect name is indicated in the program/value display. - The center LED will light up or blink when the VALUE 1 knob value is indicated in the program/value display.
- The right # LED will light up or blink when the VALUE 2 knob value is indicated in the program/value display.
The LED in the center of the tuner and the # LED will blink when the parameters shown can be set as the target function of the expression pedal. When the parameters are set as the target function of the expression pedal, the LED will remain lit up for a longer time as it blinks. When the parameters are not set as the target function, the LED will remain lit up for a shorter time as it blinks.
- The left
- Program UP/DOWN pedals
In Program select mode, use these pedals to select programs. The program number will increase (decrease) each time you press the pedal.
In Edit mode, use these to switch the display of the program/value display. The display is switched in the order of "Effect Name" ↔"VALUE 1 Value" ↔ "VALUE 2 Value". - Expression pedal LED
This LED indicates when the expression pedal is on (lit up) or off (turned off). Also, the LED will blink when the range is set to use the effect parameters with the pedal. - Expression pedal setting button
This button sets the function (volume, wah, effect parameters) of the expression pedal. You can also use this button to set the range for using effect parameters with a pedal. ("Setting the expression pedal") - Expression pedal
This pedal uses the effect parameters such as the volume and wah. You can switch the target function of the expression pedal on or off by pressing strongly on the pedal. ("Expression pedal")
Rear panel

- INPUT jack
Connect your bass to this jack. - OUTPUT/PHONES jack
Connect this jack to your bass amp, mixer, recorder or headphones. - POWER button
To turn the power on or off, press and hold down this button for 1 second. - DC 9V jack
You can connect an optional AC adapter to this jack.
Setup
Installing batteries
 Do not mix new batteries and used batteries or different types of batteries together.
- Remove the 4 screws from the rubber feet that secure the bottom cover.
- Insert four AA-size batteries, being sure to observe the correct polarity ("+" and "-" markings), and close the bottom cover.
![]()

If the battery level becomes low, noise may be generated.
Basic connections
Be sure to connect all cables with the power turned off. If you fail to use caution when connecting cables, you could damage your bass amp or speaker system, or cause other malfunctions.
- Use a cable to connect the StompLab's OUTPUT/PHONES jack to your bass amp, mixer or recorder.
![warning]() When connecting cables or turning on the power, make sure to lower the volume of your amp or mixer so that you don't hear noise
When connecting cables or turning on the power, make sure to lower the volume of your amp or mixer so that you don't hear noise
![]() If you're using headphones, plug them into the OUTPUT/ PHONES jack.
If you're using headphones, plug them into the OUTPUT/ PHONES jack.
![]() If you're using the optional AC adapter, connect it to the rear panel DC9V power supply jack, and then plug the adapter into an AC outlet to turn the power on.
If you're using the optional AC adapter, connect it to the rear panel DC9V power supply jack, and then plug the adapter into an AC outlet to turn the power on. - Connect your bass to the rear panel INPUT jack.
- Press and hold the power switch and release the switch when the program/value display lights up.
When the StompLab starts, the program/value display will indicate the program number. - Raise the volume of your amp or mixer to the appropriate volume.
Example of a connection

Auto Power-Off function
The StompLab has an Auto Power-Off function that automatically turns off the power when one hour has elapsed since the most recent user input. If the auto power-off function is activated, power will not be restored even if a button or pedal is used. Turn the power on again.
Even if there hasn't been any user input, the Auto Power-Off function will not engage if there is audio input present at the input jack.
The Auto Power-Off function is enabled as the factory default.
Enabling the auto power-off function
While holding down the EDIT button and Program DOWN pedal, turn the power on.
After "AP" is indicated, the program/value display will indicate "En."
Disabling the auto power-off function
While holding down the EDIT button and Program UP pedal, turn the power on.
After "AP" is indicated, the program/value display will indicate "dS."
![]() The setting to enable or disable the auto power-off function is saved even when the power is turned off.
The setting to enable or disable the auto power-off function is saved even when the power is turned off.
Program select mode
The Program select mode is where you can select and perform with programs.
Settings for each effect are collectively called a "program." The StompLab has 120 programs. These programs include 100 programs that are preset programs (00–99) and cannot be overwritten and 20 programs that are user programs (U0–U9, u0–u9) that can be overwritten. The 100 preset programs are divided in 10 categories with 10 programs each.
Selecting a program
- Check whether you are in Program select mode.
In Program select mode, the Tuner # LED and![]() LED will light up and the EDIT LED will turn off.
LED will light up and the EDIT LED will turn off.
When in Edit mode, the EDIT LED will light up and it will turn off when the EDIT button is pressed to switch to Program select mode. - Select a genre with the CATEGORY selector and press the Program UP or Program DOWN pedal to select the program. The program/value display shows the number of the program that you selected.
- Adjust the master volume as necessary.
"Setting the type of device that you'll be connecting to the OUTPUT/PHONES jack and master volume - [GBL] (GLOBAL)".
Expression pedal
The target function (volume, effect parameter) of the expression pedal is set for each program. By rocking the pedal up or down during a performance, the tone and volume will be changed accordingly.
For programs where the target function of the expression pedal is other than volume, the target function of the effect will turn off when the pedal is pressed strongly and the expression pedal LED will turn off. If the pedal is pressed strongly again, the effect of the target function will turn on and the expression pedal LED will light up.
When volume is set as the target function of the expression pedal, volume of the program will be set according to the current position of the pedal. For target functions other than the volume, the tone of the program cannot be changed until the expression pedal is used after the program is switched.
HINT: Set the [AMP/DRIVE] LEVEL as the target function when the volume is controlled by the expression pedal as it is controlled by the volume pedal and when the program volume does not change until the pedal is used after the program is switched.
Bypass and Mute
Bypass (which turns off all effects including noise reduction) and Mute (which mutes the StompLabs output) are convenient functions to use while you're adjusting your bass amp, tuning during a live performance, or switching basses. Here's how to use Bypass or Mute.
Bypassing the StompLab
Simultaneously press the Program UP and Program DOWN pedals; all effects will be bypassed. At this time, the program/ value display will indicate " – – ".
Muting the StompLab
Simultaneously press and hold down the Program UP and Program DOWN pedals for about one second and the output will be muted. At this time, the program/value display will indicate " _ _ ".
When bypassed or muted, the Auto Chromatic Tuner will be active. To cancel the bypass or mute function, press the Program UP or Program DOWN pedal (this will not change the program).
Tuner
The StompLab has a built-in Auto Chromatic Tuner. You can calibrate the reference pitch (the note "A") of the tuner in a range of 438Hz–445Hz.
Tuning procedure
- The Auto Chromatic Tuner will be activated when the StompLab is bypassed or muted.
![]() If you want to tune silently, such as during a live performance, simply mute the StompLab.
If you want to tune silently, such as during a live performance, simply mute the StompLab. - Play a note on your bass and the program/value display will indicate the name of the closest note. Note names are indicated as follows.
Note name C C# D D# E F F# G G# A A# B Display ![]()
![]()
![]()
![]()
![]()
![]()
![]()
![]()
![]()
![]()
![]()
![]()
- If your bass is sharp (pitch too high), the Tuner # LED will light up. If your bass is flat (pitch too low), the Tuner
![]() LED will light up. In either case, the brightness of the LEDs will indicate how far either has veered.
LED will light up. In either case, the brightness of the LEDs will indicate how far either has veered.
When in tune, both the Tuner center LED will light up.


Adjusting the tuner calibration
You can adjust the reference pitch of the internal tuner (piano center frequency A). You can calibrate this reference pitch in a range of 438Hz–445Hz.
![]() When you turn off the power, the calibration adjustment that you made will be discarded and the StompLab will automatically be set to 440Hz.
When you turn off the power, the calibration adjustment that you made will be discarded and the StompLab will automatically be set to 440Hz.
- Change the reference pitch with the ▲ or ▼ button when the tuner is starting up.
The program/value display will indicate a reference pitch (38-45: 438-445Hz).
Creating your sound (Edit mode)
The Edit mode is where you can set the effects that are used in each category, such as [PDL] (PEDAL), [AMP/DR] (AMP/DRIVE), [CAB] (CABINET), [NR] (NOISE REDUCTION), [MOD] (MODULATION), [DLY] (DELAY) and [REV] (REVERB).
Signal flow

![]() The VOLUME PEDAL can be used when the target function of the expression pedal is set to VOLUME. ("Assigning volume to the pedal")
The VOLUME PEDAL can be used when the target function of the expression pedal is set to VOLUME. ("Assigning volume to the pedal")
Entering Edit mode
- In Program select mode, press the EDIT button. You will enter the Edit mode and the EDIT LED will light up.
Selecting effects and adjusting the parameters - [PDL], [AMP/DR], [CAB], [NR], [MOD], [DLY], [REV]
Select an effect to use in each category and set the parameter.
- Select the category with the CATEGORY selector.
- Select the effect with the ▲ or ▼ button. The program/value display will indicate an abbreviation of the effect name and the Tuner
![]() LED will light up.
LED will light up.
For the effects and parameters that you can select, please refer to the end of the manual.
When you select an effect, the StompLab automatically sets the parameters of that effect to the most effective values. By adjusting the parameters, you can tweak your sound to what you have in mind.
![]() When WAH is selected in the [PDL] category, the expression pedal will automatically be set as the wah pedal.
When WAH is selected in the [PDL] category, the expression pedal will automatically be set as the wah pedal.
![]() To turn an effect on/off, press both the ▲ and ▼ buttons simultaneously. When an effect is on, the effect name is shown, and when an effect is off, the display indicates "oF".
To turn an effect on/off, press both the ▲ and ▼ buttons simultaneously. When an effect is on, the effect name is shown, and when an effect is off, the display indicates "oF". - Set the effect parameter with the VALUE 1 knob and VALUE 2 knob.
As you turn a knob, the program/value display will indicate the values. For VALUE 1 the Tuner center LED will light up or blink and for VALUE 2 the Tuner # LED will light up or blink.
For the effect parameters that are assigned to each knob, please refer to the end of the manual.
![]() [Lo/Hi] and [Mid] are part of the [AMP/DR] parameter. If [AMP/DR] is turned off, the effect will be disabled. Also, you can set the volume level of the program with the [AMP/DR] VALUE 2 knob (LEVEL).
[Lo/Hi] and [Mid] are part of the [AMP/DR] parameter. If [AMP/DR] is turned off, the effect will be disabled. Also, you can set the volume level of the program with the [AMP/DR] VALUE 2 knob (LEVEL).
![]() For noise reduction, select [NR] with the CATEGORY selector and adjust the sensitivity with the VALUE 1 knob. Adjust the noise reduction sensitivity so that you don't hear noise (hiss) when you're not playing your bass. Depending on the bass that you're using, sustained notes may be cut off if you raise the noise reduction value excessively. This parameter should be adjusted so notes ring out naturally.
For noise reduction, select [NR] with the CATEGORY selector and adjust the sensitivity with the VALUE 1 knob. Adjust the noise reduction sensitivity so that you don't hear noise (hiss) when you're not playing your bass. Depending on the bass that you're using, sustained notes may be cut off if you raise the noise reduction value excessively. This parameter should be adjusted so notes ring out naturally.
Setting the expression pedal
Assigning parameters to the pedal
To assign parameters to the pedal, set them in the edit mode.
- Enter the edit mode.
- Display the effect parameter value that you want to use with the expression pedal on the program/value display. Check that the tuner center LED or tuner #LED is blinking.
![warning]() If the tuner center LED or tuner #LED does not blink, you cannot assign the parameters to the expression pedal.
If the tuner center LED or tuner #LED does not blink, you cannot assign the parameters to the expression pedal. - Press the pedal setting button. "CP" will appear briefly on the program/value display and the effect parameter can be used by the expression pedal.
![]() If the effect parameter is set as the target function of the expression pedal, the effect of the target function will turn on automatically.
If the effect parameter is set as the target function of the expression pedal, the effect of the target function will turn on automatically.
![]() If the effect parameter that is set as the target function of the expression pedal is selected and the pedal setting button is pressed, "--" will appear briefly on the program/ value display and the expression pedal will not have a target function.
If the effect parameter that is set as the target function of the expression pedal is selected and the pedal setting button is pressed, "--" will appear briefly on the program/ value display and the expression pedal will not have a target function.
Assigning volume to the pedal
To assign volume to the expression pedal, press the pedal setting button after the master volume ([GBL] VALUE2) appears on the program/value display. "CP" will appear briefly on the program/value display and the volume can be changed by using the expression pedal.
Setting the range of the parameter that will be used by the pedal
Set the range of the effect parameter that will be used by the expression pedal in the pedal setting mode.
- Press and hold the pedal setting button for approximately 1 second.
The mode will switch to the pedal setting mode and the expression pedal LED will blink. - Set the value when the expression pedal is fully returned upright with the VALUE 1 knob.
- Set the value when the expression pedal is fully pressed down with the VALUE 2 knob.
![]() The tone will change within the set range when the pedal is used.
The tone will change within the set range when the pedal is used. - When you finish adjusting your settings, press the pedal setting button to exit the pedal setting mode.
- Enter the edit mode to save the settings.
"Saving a program — [WRITE]"
The set range will return to the previous setting if they are not saved when the program is switched or when the power is turned off.
If the program is saved after using the expression pedal, the position of the expression pedal (inclined) will be saved as the set value.
The following values cannot be saved.
- Volume
- Input level to delay effect [PDL]
- Input level to reverb effect [REV]
- Pitch parameter of [MOD] PITCH SHIFT
![]() To control the volume with the pedal, assign the master level ([GBL] VALUE 2). To control the input levels of the reverb and delay effects, assign MIX parameters ([DLY] VALUE 2 and [REV] VALUE 2).
To control the volume with the pedal, assign the master level ([GBL] VALUE 2). To control the input levels of the reverb and delay effects, assign MIX parameters ([DLY] VALUE 2 and [REV] VALUE 2).
When a target function of the effect pedal is not available, "- -" appears briefly on the program/parameter display and the pedal cannot be set.
Effect/parameter type and parameter value display
In the Edit mode you can switch the effect names or the VALUE pedals. The tuner  LED will light up when the effect name is 1 and VALUE 2 values indicated with the Program UP/DOWN indicated, the tuner center LED will light up when VALUE 1 is indicated and the tuner # LED will light up when VALUE 2 is indicated.
Checking the values saved in a program (Original Value)
The Original Value LED in the program/value display lets you check the parameter values of a saved program. When you use the knob or buttons to modify the value of a parameter, the Original Value LED will light up when that value matches the value that's already been saved in the program (i.e., the original value).
")
![]() In Program select mode, the Original Value LED will light up if the values of all parameters match the values that are saved in the program.
In Program select mode, the Original Value LED will light up if the values of all parameters match the values that are saved in the program.
Saving a program — [WRITE]
Here's how to save (write) a sound that you've created.
![]() If you switch to a different program in Program mode or turn off the power without writing your settings into memory, the changes that you made will be lost.
If you switch to a different program in Program mode or turn off the power without writing your settings into memory, the changes that you made will be lost.
- Set the CATEGORY selector to [WRITE].
The program number will blink in the program/value display. - Use the VALUE 1 knob or the ▲/▼ buttons or the Program UP/ DOWN pedals to select the program location where you want to save your settings.
- Press the ▲ button and ▼ button simultaneously for 1 second. The program will be saved, and the program/value display will indicate "CP" briefly.
The newly saved program will overwrite (i.e., replace) the existing settings, so the previous program in that location will be lost.
![]() To cancel saving the program, select a category other than [WRITE] with the CATEGORY selector.
To cancel saving the program, select a category other than [WRITE] with the CATEGORY selector.
Setting the type of device that you'll be connecting to the OUTPUT/PHONES jack and master volume - [GBL] (GLOBAL)
You can set the type of device that you'll be connecting to the OUTPUT/ PHONES jack and the master volume of the StompLab.
![]() These settings are common settings for all programs. The type of device setting will be saved when the power is turned off. When the power is turned off, the master volume will be initialized at 7.0.
These settings are common settings for all programs. The type of device setting will be saved when the power is turned off. When the power is turned off, the master volume will be initialized at 7.0.
- Select [GBL] with the CATEGORY selector.
- Set the type of device that you'll be connecting to the OUTPUT/ PHONES jack with the VALUE 1 knob.
This setting compensates the output from the bass amp model so that it will be suitable for connection to the input jack of your device.
AP: Use this setting if you've connected the StompLab to a bass amp.
Ln: Use this setting if you've connected the StompLab to a line input, to a headphones, to the power amp input of a bass amp, or to a recorder. - Set the master volume with the VALUE 2 knob.
Adjusting the sensitivity of the expression pedal
If the minimum and maximum values of the parameter are assigned as the minimum and maximum values of the expression pedal, but the effect or volume fails to reach the maximum (or minimum) setting when the expression pedal is fully advanced (or returned), you can adjust the sensitivity of the expression pedal as follows so that it will function optimally.
![]() When adjusting the sensitivity, you must use the expression pedal with your foot; in some cases, it may not be possible to adjust the pedal sensitivity if you use it with your hand.
When adjusting the sensitivity, you must use the expression pedal with your foot; in some cases, it may not be possible to adjust the pedal sensitivity if you use it with your hand.
- Turn the power off.
- While holding down the Expression pedal setting button and ▲ button, turn the power on.
- When the program/value display indicates "Pd," release the buttons.
- Advance the expression pedal so that the effect switches on/off. This will be assigned as the weight that will switch on/off the effect assigned to the expression pedal.

- Use your foot to slowly return the expression pedal toward yourself, and take your foot off when the pedal stops.

- Softly advance the expression pedal, and take your foot off when the pedal stops.
![]() If you decide to cancel this sensitivity adjustment, press the ▼ switch.
If you decide to cancel this sensitivity adjustment, press the ▼ switch. - Press the ▲ switch.
"CP" will appear on the program/value display and the mode will automatically switch to the program select mode. If the sensitivity adjustment could not be performed correctly, the program/value display will blink "Er", and will then indicate "Pd". In this case, perform the procedure from step 4.


![]() If you are repeatedly unsuccessful in adjusting the sensitivity, it is possible that the StompLab has malfunctioned. Please contact your local VOX dealer.
If you are repeatedly unsuccessful in adjusting the sensitivity, it is possible that the StompLab has malfunctioned. Please contact your local VOX dealer.
Restoring the factory preset programs
Here's how to restore (reload) the StompLab's programs back to the original factory preset programs.
![]() When you perform this operation, all of the programs you created and stored inside the StompLab will be erased, and replaced by the factory programs.
When you perform this operation, all of the programs you created and stored inside the StompLab will be erased, and replaced by the factory programs.
- While holding down the ▲ button and the ▼ button, turn on the power.
- The program/value display will indicate " rL ", and the TUNER # and
![]() LEDs will blink. Take your hand off both buttons you had been pressing.
LEDs will blink. Take your hand off both buttons you had been pressing.
If you decide to cancel the reload operation at this point, press the ▼ button. - If you wish to reload the factory settings press the ▲ button. The program/value display will indicate " Ld " and reloading will begin. When reloading has completed, the program/value display will indicate "CP", and the StompLab will automatically enter Program select mode.
Never turn off the power while reloading.
Troubleshooting
If you suspect a malfunction, please check the following points. If this does not resolve the problem, please contact a nearby dealer.
Power does not turn on
- Have the batteries have run down?
When the batteries run low, the program/value display will be dark. We recommend that you replace the batteries as soon as possible. If batteries become unusable, remove them immediately. Leaving drained batteries in the unit can cause malfunctions (such as battery leakage). You should also remove the batteries if you won't be using the StompLab for an extended period of time. - Make sure the batteries are inserted with the polarities (+, -) in the correct orientation.
- Is the AC adapter connected to the rear panel DC9V jack?
- Is the AC adapter plugged into an AC outlet?
- Could the AC adapter be damaged?
No sound
- Is the volume of your bass turned down?
- Is your bass cable connected correctly?
- Is your bass cable broken?
- Are the [AMP/DR] VALUE 1 (GAIN) or VALUE 2 (LEVEL) parameters currently set to a low value?
- Are the [Lo/Hi] or [Mid] parameters currently set to a low value? For some amp models, there may be no sound from the amp if the LO, MID, and HI control values are low.
- Is the volume turned down for another effect?
- Is the Mute function activated?
Refer to "Bypass and Mute" and cancel the Mute function. - Is the master volume turned down?
Set the CATEGORY selector to [GBL], and turn the VALUE 2 knob to adjust the master volume. - Is the expression pedal fully returned when volume, [AMP/DR] VALUE1 knob (GAIN) and VALUE2 knob (LEVEL) are set as the target funciotn of the expression pedal?
Effects don't apply
- Could an effect be off?
- Is the [MOD] VALUE 2 knob (DEPTH) or the [DLY] or [REV] VALUE 2 knob (MIX) set to a low value?
- Is the StompLab in Bypass mode?
Refer to "Bypass and Mute" and cancel the Bypass function.
High frequencies are distorted when using [PDL] (PEDAL) AC (ACOUSTIC)
- Are you applying too much drive? Lower the [AMP/DR] VALUE 1 (GAIN) setting.
- Are you using a bass that has high output humbucking pickups? Lower the volume of your bass.
Sound source connected to the bass amp is distorted, or sounds wrong
- Is the VALUE 1 knob (StompLab output jack connection volume) in [GBL] set at Ln (LINE)?
Set to AP (AMP). - Is the VALUE 2 knob (LEVEL) in [AMP/DR] or the VALUE 2 knob (MASTER LEVEL) in [GBL] set too high?
Specifications
| Number of effects: | Pedal types: 9 Amp/Drive Models: 18 Cabinet Models: 12 Modulation types: 9 Delay types: 8 Reverb types: 3 Noise Reduction: 1 Volume Pedal: 1 |
| Number of programs: | 120 (20 user/100 preset) |
| Audio input: | INPUT (mono) |
| Audio output: | OUTPUT/PHONES (stereo) |
| Signal processing: | A/D conversion: 24 bit D/A conversion: 24 bit |
| Tuner: | Detection range: A0–E6 |
| Calibration: | A=438 – 445 Hz |
| Power supply: | Four alkaline AA batteries or DC9V AC adapter (separately sold) |
| Battery life | 7.5 hours (using four alkaline AA batteries) |
| Dimensions (W X D X H): | 207 X 125 X 64mm / 8.15" X 4.92" X 2.52" |
| Weight: | 780 g / 1.72 oz. |
| Included items: | Owner's manual, four AA-size batteries |
| Options (separately sold): |  DC9V AC adapter DC9V AC adapter |
* Specifications and appearance are subject to change without notice for improvement.
Parameter list
 : Parameters that can be controlled by the pedal.
PDL (PEDAL)
| Effect | Display | VALUE 1 | VALUE 2 | ||
| COMP | Co | SENS* | 0...10 | LEVEL | 0...10 |
| EXCITER | EC | FREQ | 0...10 | EFFECT* | 0...10 |
| WAH | WH | MANUAL* | 0...10 | TYPE (V847/V845) | 1/2 |
| AUTO WAH | AW | SENS/POLARITY | 0...10 (up), 0...10 (down) | RESONANCE* | 0...10 |
| BRN OCTAVE | oC | DIRECT | 0...10 | EFFECT* | 0...10 |
| ACOUSTIC | AC | TONE* | 0...10 | --- | |
| U-VIBE | Uv | SPEED* | 0.1...10 | DEPTH | 0...10 |
| TONE | to | TONE* | 0...10 | --- | --- |
| RING MOD | rM | MANUAL* | 0...10 | BALANCE | 0...10 |
AMP/DR (AMP/DRIVE), Lo/Hi, Mid
| AMP/DRIVE | Lo/Hi | Mid | |||||||||||
| Effect | Display | VALUE 1 | VALUE 2 | VALUE 1 | VALUE 2 | VALUE 1 | VALUE 2 | ||||||
| C(Clean) | C1...C7 | LIMITER SENS* | 0...10 | LEVEL | 0...10 | LO | 0...10 | HI | 0...10 | MID | 0...10 | MID fc | 0...10 |
| o(Overdrive) | o1...o3 | GAIN* | 0...10 | 0...10 | 0...10 | 0...10 | 0...10 | 0...10 | |||||
| d(Distortion) | d1...d4 | 0...10 | 0...10 | 0...10 | 0...10 | 0...10 | DIRECT | 0...10 | |||||
| F(Fuzz) | F1...F4 | 0...10 | 0...10 | 0...10 | 0...10 | 0...10 | 0...10 | ||||||
AMP Model
| AMP MODEL | 1 | 2 | 3 | 4 | 5 | 6 | 7 |
| C(Clean) | VALVE 1 | VALVE 2 | CLASSIC | SCOOPED | LA STUDIO | GOLD PANEL | JAZZ |
| o(OverDrive) | STUDIO | AC100 | UK MAJOR |
Drive
| DRIVE MODEL | 1 | 2 | 3 | 4 |
| d(Drive) | TUBE OD | FAT DIST | ORANGE DIST | SHRED DIST |
| F(Fuzz) | FUZZ | OCTA FUZZ | TECHNO FUZZ | CRUSHER |
CAB (CABINET)
| Effect | Display | VALUE 1 | |
| LA 4x10 | L1 | --- | --- |
| LA 1x18 | L2 | --- | --- |
| METAL 4x10 | ML | --- | --- |
| UK 4x12 | U1 | --- | --- |
| UK 4x15 | U2 | --- | --- |
| CLASSIC 8x10 | CL | --- | --- |
| MODERN 4x10 | Mo | --- | --- |
| STUDIO 1x15 | St | --- | --- |
| JAZZ 1x15 | JA | --- | --- |
| AC 2x15 | AC | --- | --- |
| COMBI | Co | --- | --- |
| CUSTOM | CU | CHARACTER | 0...20 |
MOD (MODULATION)
| Effect | Display | VALUE 1 | VALUE 2 | ||
| CE CHORUS | CH | SPEED* | 0.1...10 | DEPTH | 0...10 |
| MULTI CHORUS | MC | SPEED* | 0.1...10 | DEPTH | 0...10 |
| FLANGER | FL | SPEED* | 0.1...10 | RESONANCE | 0...10 |
| ORG PHASE | PH | SPEED* | 0.1...10 | RESONANCE | 0...10 |
| TWIN TREM | tr | SPEED* | 0.1...10 | DEPTH | 0...10 |
| G4 ROTARY | ro | SPEED* | 0.1...10 | DEPTH | 0...10 |
| PITCH SHIFT | Pt | PITCH* | -12...0, dt, 1...12 | BALANCE | 0...10 |
| FILTRON1 (AUTO) | F1 | SENS/POLARITY | 0...10 (up), 0...10 (down) | RESONANCE* | 0...10 |
| FILTRON2 (MANUAL) | F2 | MANUAL* | 0...10 | RESONANCE | 0...10 |
DLY (DELAY)
| Effect | Display | VALUE 1 | VALUE 2 | ||
| ANALOG DELAY 1 | A1 | TIME | 0.1...10 | MIX* | 0...10 |
| ANALOG DELAY 2 | A2 | TIME | 0.1...10 | MIX* | 0...10 |
| ANALOG DELAY 3 | A3 | TIME | 0.1...10 | MIX* | 0...10 |
| ANALOG DELAY 4 | A4 | TIME | 0.1...10 | MIX* | 0...10 |
| ECHO 1 | E1 | TIME | 0.1...10 | MIX* | 0...10 |
| ECHO 2 | E2 | TIME | 0.1...10 | MIX* | 0...10 |
| ECHO 3 | E3 | TIME | 0.1...10 | MIX* | 0...10 |
| ECHO 4 | E4 | TIME | 0.1...10 | MIX* | 0...10 |
For ANALOG DELAY (1-4) and ECHO (1-4), the feedback volume may vary. The feedback volume will be larger as the number increases.
REV (REVERB)
| Effect | Display | VALUE 1 | VALUE 2 | ||
| ROOM | rM | TIME | 0.1...10 | MIX* | 0...10 |
| SPRING | SP | TIME | 0.1...10 | MIX* | 0...10 |
| HALL | HL | TIME | 0.1...10 | MIX* | 0...10 |
NR (NOISE REDUCTION)
| Effect | Display | VALUE 1 | |
| NR | nr | SENS | 0...10 |
GBL (GLOBAL)
| Display | VALUE 1 | VALUE 2 | |||
| GLOBAL | GL | OUTPUT SEL | AP, Ln | MASTER LEVEL | 0...10 |
VOX AMPLIFICATION LTD.
1 Harrison Close, Knowlhill, Milton Keyes, MK5 8PA, UK
http://www.voxamps.com
© 2012 VOX AMPLIFICATION LTD.

VideosVOX StompLab Series Product Overview Video
Documents / Resources
References
Download manual
Here you can download full pdf version of manual, it may contain additional safety instructions, warranty information, FCC rules, etc.
Advertisement
Thank you! Your question has been received!


Need Assistance?
Do you have a question about the StompLab IIB that isn't answered in the manual? Leave your question here.