Table of Contents
Advertisement
Available languages
Available languages
Quick Links
お問い合わせ
ソニー株式会社
B & I 営業本部
北 海 道
営業所 (011)231-8121
名 古 屋
営業所 (052)201-6871
東 北
営業所 (022)257-7830
北 陸
営業所 (076)240-8110
関 東
営業所 (048)645-6880
京 滋
営業所 (075)691-7860
新 潟
出張所 (025)270-3253
大 阪
営業所 ( 06 )531-4111
千 葉
営業所 (043)297-8531
神 戸
営業所 (078)322-0851
東 京
営業所 (03)5448-6740
中 国
営業所 (082)241-9211
東京システム営業所 (03)5448-6740
四 国
営業所 (0878)31-3003
多 摩
営業所 (0425)75-0201
九 州
営業所 (092)741-2761
システム営業1部/2部 (03)5448-5446
松 本
出張所 (0263)25-4551
横 浜
営業所 (045)243-6711
静 岡
営業所 (054)284-3601
ソニー株式会社
〒141-0001 東京都品川区北品川6-7-35
Printed in Japan
Projection Lens
プロジェクションレンズ
取付説明書
2ページ
Installation Manual
Page 13
Manual de instalación
Manuel d'installation
Page 21
Manuale d'installazione
Installationshandbuch
Seite 29
Àµ ˜ È
お買い上げいただきありがとうございます。
安全のための注意事項を守らないと、
警告
火災や人身事故になることがあります。
この取付説明書には、事故を防ぐための重要な注意事項と製品の取り扱いかたを示
してあります。この取付説明書をよくお読みのうえ、製品を安全にお使いください。
VPLL-ZM100
© 1997 by Sony Corporation
3-860-532-02(1)
Página 37
Pagina 45
53"
Advertisement
Chapters
Table of Contents

Related Manuals for Sony VPLL-ZM100


Summary of Contents for Sony VPLL-ZM100
- Page 1 営業所 (03)5448-6740 中 国 営業所 (082)241-9211 東京システム営業所 (03)5448-6740 四 国 営業所 (0878)31-3003 多 摩 営業所 (0425)75-0201 九 州 営業所 (092)741-2761 システム営業1部/2部 (03)5448-5446 松 本 出張所 (0263)25-4551 横 浜 営業所 (045)243-6711 VPLL-ZM100 静 岡 営業所 (054)284-3601 ソニー株式会社 〒141-0001 東京都品川区北品川6-7-35 Printed in Japan © 1997 by Sony Corporation...
- Page 2 日本語 安全のために お客様へ 警告表示の意味 注意を促す記号 この説明書は、 サービス専用です。 この取付説明書および製品では、 お客様が、 この説明書に記載されたレンズ交換や設置などを行う と 次のような表示をしています。 表 注意 火災 感電や火災、 人身事故につながる こ とがあ り ます。 お客様自身では、 示の内容をよく理解してから本文 をお読みく ださい。 絶対に行わないでく ださい。 感電 この説明書は、 サービス ト レーニングを受けた技術者のみご使用く 警告 ださい。 この表示の注意事項を守らない 行為を禁止する記号 と、 火災や感電などにより死亡や 大けがなど人身事故につながるこ サービス技術者へ とがあります。...
- Page 3 目次 日 安全のために ......................................本 概要 ..........................................語 レンズ交換のしかた ....................................レンズ交換の手順 ....................................レンズ交換の際のご注意 ................................. 主な仕様 ........................................設置寸法 ........................................床置きの場合 ....................................天井つりの場合 ....................................
- Page 4 下記の注意を守らないと、 警告 火災や感電 死亡 大けが により や につながることがあります。 火災 感電 感電にご注意を • 部品交換の場合は感電の危険があるので電源プラグを抜いてください。 • 内部には高電圧の部分があり、 通電時においては感電の危険がありますの プラグをコン で充分にご注意ください。 セントから抜く 部品の取り付けや配線の引き回しは元どおりに レンズ交換のために、 動かしたハーネスや開放したクランパーなどは、 その ままでは、 発熱部品や高電圧部品および可動部分などに触れる危険がありま 強制 すので、 必ず元どおりにハーネスを引き回し、 クランパーで元どおりに固定 してください。 サービス後は安全点検を サービスのために取りはずしたネジ、 部品、 配線が元どおりになっているこ と、 また異物が入っていないことを確認してください。 またサービスした箇 強制 所の周辺の部品および線材の損傷してしまったところがないかなどを点検し てください。 •...
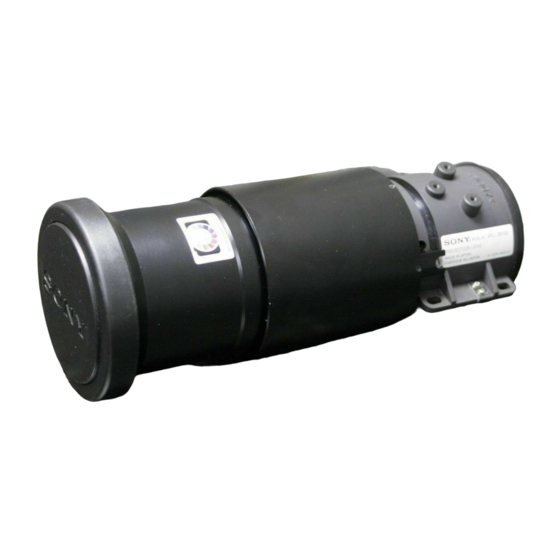
- Page 5 レンズをのぞかない 投影中にプロジェクターのレンズをのぞくと強い光が目に入り、 目に悪影響 を与えることがあります。 禁止 レンズ交換時には安全性を確保する レンズ交換作業は、 作業台に置いて行い、 天井つり状態では行わないでくだ さい。 強制 概要 このVPLL-ZM100は、 ソニーLCDプロジェクター用の長焦点 (ズーム) 交換レンズです。 対象機種は、 以下のとおりです。 ・ソニーLCDプロジェクターVPL-V500QJ ・ソニーLCDプロジェクターVPL-S500J ・ソニーLCDビデオプロジェクターVPL-W400QJ...
- Page 6 レンズ交換のしかた レンズ交換の手順 プロジェクターの電源を切る。 シール ドケースの上ぶたをはずす。 配 線 止めをは ずし基 板に接 続されているコネクター( VPL- V500QJ/S500Jは7か所、 VPL-W400QJは8か所) および、 3か所 プラス ドライ バーを使用して上部カバーの4本 (3×8) のネジを取 の LCD パネルのフ レキシブルケーブルを端子から取り はずす。 り はずす。 シールド ケース 上ぶた フレキシブル ケーブル(3か所) コネクター 配線止め (各1か所) コネクター 上部カバーからC基板に接続されているコネクター (1か所) をは (3か所) ずし、上部カバーをはずす。...
- Page 7 C 基板を固定しているネジ2本(3× 8)および、 4か所のクラン 交換レンズのラベル側を上にして、 本体側と交換レンズ側の白い パーをはずす。 ペイ ン ト マーク ( ) を合わせ、本体に組み込む。 C基板を上側に垂直に上げ、 C基板下部のQ基板/B基板と接続 4本(4×12)のネジで交換レンズを固定する。 されているコネクター3か所をはずす。 C基板 クランパー クランパー コネクター レンズを固定している 4本のネジ (4×12) をはずし、 レンズを前 側に取りはずす。...
- Page 8 レンズ交換のしかた ご注意 はずしたコネクター (VPL-V500QJ/S500Jは7か所、 VPL-W400QJ 基板を元に戻す前に、 結線類が基板と本体の間に挟ま らないよ う にし は 8 か所) を端子につなぎ直し、配線止めをはめる。 てく ださい。 シール ドケースの上ぶたをかぶせる。 手順 5 で取り はずした C 基板を下部の3 か所のコネク ターをはめ て、取り付ける。 クラ ンパー4か所をとめ、 2 本のネジ (3×8) で基板を固定する。 LCDパネルのフ レキシブルケーブル3か所をしっかり とはめ込む。 フ レ キ シ ブ ル ケーブル...
- Page 9 線材をはさ まないよう に上部カバーを元どおりかぶせ、 4 本のネジ (3×8)で固定する。 プロジェク ターを設置する。 ◆設置寸法については 62〜73 ページをご覧く ださい。...
- Page 10 レンズ交換のしかた レンズ交換の際のご注意 • 取り はずしたレンズまたは取り付ける レンズを置く と きは、 しっかり した 水平な台の上に静かに横にして置いてく ださい。 レンズ面は傷つきや すいので取り扱いには充分注意してく ださい。 • レンズ面には手を触れないよう にしてく ださい。...
- Page 11 主な仕様 長焦点ズームレンズ F=3.0〜4.6 f=72.3〜141.0 mm マニュアルフ ォーカス、 マニュアルズーム 投影画面サイ ズ 80〜300イ ンチ (VPL-V500QJ/S500Jの 場合) 90〜300イ ンチ (VPL-W400QJ 16:9スク リ ーンの場合) 80〜250イ ンチ (VPL-W400QJ 4:3スク リ ー ンの場合) 投影距離 VPL-V500QJ/S500J 100イ ンチ 5500〜10430 mm 200イ ンチ 11150〜20880 mm VPL-W400QJ ( 16 : 9) 100イ ンチ 5330〜10120 mm 200イ ンチ 10820〜20260 mm VPL-W400QJ (...
-
Page 13: Table Of Contents
Contents Precautions ....................................14 Overview ..................................... 14 Replacing the lens ..................................15 Replacing the lens ................................15 Notes on lens replacement ............................. 19 Specifications ..................................... 20 Installation Diagram ................................... 62 Installing on the floor............................... 62 Installing on the ceiling ..............................67... -
Page 14: Precautions
Precautions Overview To the user: The VPLL-ZM100 lens is a long focus zoom lens designed for use with the Sony LCD projectors. This manual is intended only for authorized service personnel. You can use any of the following projectors for this lens. -
Page 15: Replacing The Lens
Replacing the lens Replacing the lens Turn off the MAIN POWER switch of the projector. Remove the shield case lid. Remove the cable harness and remove all the plugs from their connectors in the circuit board (7 plugs in the VPL- Remove the four screws (3 x 8 mm) on the top panel with V500Q/QM, S500U/E/M;... - Page 16 Replacing the lens Remove the two screws (3 x 8mm) and the four clamps With the VPLL-ZM100 replacement lens label facing that hold circuit board C in place. upwards, align the painted white mark ( ) on the lens Lift up circuit board C and remove the three connectors...
- Page 17 Note Replace all of the plugs in their respective connectors (7 When replacing the circuit board, be careful not to pinch any plugs for the VPL-V500Q/QM, S500U/E/M; 8 plugs for cables between the boards and the projector chassis. the VPL-W400Q/QM) and attach the cable harnesses. Replace the shield case lid.
- Page 18 Replacing the lens Replace the top panel taking care not to pinch any of the cables. Secure it with the four screws (3 x 8 mm). Install the projector in its intended place of use. For details on installation, see pages 62 to 73.
-
Page 19: Notes On Lens Replacement
Notes on Lens Replacement • Lenses scratch easily. When handling lenses, always place them gently on a stable, level surface in a horizontal position. • Avoid touching the lens surface. -
Page 20: Specifications
Specifications Diameter: φ 86 mm (3 Long focus zoom lens F=3.0 to 4.6 Dimensions inches) f= 72.3 to 141.0 mm Length : 233.8 mm (9 inches) Manual focus, Manual zoom Mass Approx. 1650g (3 lb 10 oz) × Projection picture size 80 to 300 inches (when using Supplied accessories Spare screws (PSW 4... - Page 21 Table des matières Précautions ....................................22 Aperçu ......................................22 Remplacement de l’objectif ............................... 23 Remplacement de l’objectif ............................. 23 Remarques sur le remplacement de l’objectif ....................... 27 Spécifications ..................................... 28 Schéma d’installation ................................62 Installation au sol ................................62 Installation au plafond ..............................67...
-
Page 22: Précautions
Précautions Aperçu Pour l'utilisateur: L’objectif VPLL-ZM100 est un zoom à focale longue destiné Le présent mode d'emploi est exclusivement destiné au aux projecteurs LCD Sony. personnel d'entretien agréé. Ne remplacez et n'installez pas Vous pouvez utiliser cet objectif avec l’un des projecteurs l'objectif vous-même;... -
Page 23: Remplacement De L'objectif
Remplacement de l’objectif Remplacement de l’objectif Coupez l’interrupteur MAIN POWER du projecteur. Enlevez le couvercle du boîtier blindé. Retirez le faisceau de câbles et enlevez toutes les fiches de leurs connecteurs dans la carte de circuits (7 fiches dans Enlevez les quatre vis 3 x 8 mm sur le panneau supérieur le VPL-V500Q/QM, S500U/E/M;... - Page 24 Remplacement de l’objectif Enlevez les deux vis 3 x 8mm et les quatre attaches L’étiquette de l’objectif de remplacement VPLL-ZM100 maintenant la carte de circuits C en place. étant tournée vers le haut, alignez le repère blanc ( ) de Levez la carte de circuits C et enlevez les trois connecteurs l’objectif sur le repère blanc (...
- Page 25 Remarque Replacez toutes les fiches dans leurs connecteurs respectifs Lors du remplacement de la carte de circuits, veillez à ne pas (7 fiches pour le VPL-V500Q/QM, S500U/E/M; 8 fiches coincer les câbles entre les cartes et le châssis du projecteur. pour le VPL-W400Q/QM) et fixez les faisceaux de câbles.
- Page 26 Remplacement de l’objectif Replacez le panneau supérieur en veillant à ne pas coincer les câbles. Fixez-le avec les quatre vis 3 x 8mm. Installez le projecteur à son emplacement d’utilisation. Pour plus de détails sur l’installation, voir les pages 62 à...
-
Page 27: Remarques Sur Le Remplacement De L'objectif
Remarques sur le remplacement de l’objectif • Les objectifs se griffent aisément. Lors de la manipulation des objectifs, placez-les toujours sur une surface stable de niveau en position horizontale. • Evitez de toucher la surface de l’objectif. -
Page 28: Spécifications
Spécifications Objectif zoom à focale F=3,0 à 4,6 f= 72,3 à 141,0 mm VPL-W400Q/QM (4:3) longue Mise au point manuelle, Zoom 100 pouces: 6580 à 12420 mm manuel (259 à 489 pouces) Format de l’image projetée 80 à 300 pouces (Lors de 200 pouces: 13310 à... - Page 29 Inhaltsverzeichnis Sicherheltsmaßnahmen ................................30 Übersicht ..................................... 30 Auswechseln des Objektivs ..............................31 Auswechseln des Objektivs ............................31 Hinweise zum Auswechseln des Objektivs ........................35 Technische Daten ..................................36 Installationsdiagramm ................................62 Installation am Boden ..............................62 Installation an der Decke ..............................67...
-
Page 30: Sicherheltsmaßnahmen
Sicherheltsmaßnahmen Übersicht Für den Benutzer: Das Objektiv VPLL-ZM100 ist ein Zoom-Objektiv mit Diese Anleitung richtet sich nur an autorisiertes langer Brennweite, das für LCD-Projektoren von Sony Kundendienstpersonal. Tauschen Sie das Objektiv nicht konzipiert wurde. selbst aus, und setzen Sie es auch nicht selbst ein. -
Page 31: Auswechseln Des Objektivs
Auswechseln des Objektivs Auswechseln des Objektivs Schalten Sie den Projektor am Schalter MAIN POWER aus. Entfernen Sie den Deckel des abgeschirmten Gehäuses. Entfernen Sie den Kabelbaum, und ziehen Sie alle Stecker aus den Buchsen in der Leiterplatte (7 Stecker beim VPL- Entfernen Sie die vier 3 x 8-mm-Schrauben an der oberen V500QM, S500E/M, 8 beim VPL-W400QM). - Page 32 Auswechseln des Objektivs Lösen Sie die zwei 3 x 8-mm-Schrauben und die vier Richten Sie die weiße Markierung ( ) an dem VPLL- Klemmen, mit denen die Leiterplatte C befestigt ist. ZM100-Ersatzobjektiv an der weißen Markierung ( Heben Sie die Leiterplatte C an, und lösen Sie die drei am Projektor aus, und setzen Sie das Objektiv ein.
- Page 33 Hinweis Stecken Sie alle Stecker wieder in die richtigen Buchsen Achten Sie darauf, daß die Kabel nicht zwischen der (7 Stecker beim VPL-V500QM, S500E/M, 8 beim VPL- Leiterplatte und dem Projektorgehäuse eingeklemmt werden, W400QM), und befestigen Sie den Kabelbaum. wenn Sie die Leiterplatten wieder anbringen. Schließen Sie den Deckel des abgeschirmten Gehäuses.
- Page 34 Auswechseln des Objektivs Bringen Sie die obere Abdeckung wieder an, und achten Sie darauf, die Kabel nicht einzuklemmen. Befestigen Sie die Abdeckung mit den vier 3 x 8-mm-Schrauben. Installieren Sie den Projektor am dafür vorgesehenen Ort. Näheres zur Installation finden Sie auf Seite 62 bis 73.
-
Page 35: Hinweise Zum Auswechseln Des Objektivs
H i n w e i s e z u m A u s w e c h s e l n d e s Objektivs • Objektive zerkratzen leicht. Achten Sie beim Umgang mit Objektiven immer darauf, sie vorsichtig horizontal auf eine stabile, ebene Oberfläche zu legen. -
Page 36: Technische Daten
Technische Daten Durchmesser: φ 86 mm Zoom-Objektiv mit langer F=3,0 zu 4,6 f=72,3 zu Abmessungen Brennweite 141,0 Länge : 233,8 mm Manueller Fokus, Gewicht ca.1650 g Manueller Zoom Mitgeliefertes Zubehör Ersatzschrauben (PSW 4×12) (4) Größe des projizierten 80 bis 300 Zoll Bildes (Bei Verwendung des Projektors, VPL-V500QM, S500E/M) - Page 37 Indice Precauciones ....................................38 Descripción general ................................... 38 Sustitución del objetivo ................................39 Sustitución del objetivo ..............................39 Notas sobre la sustitución de objetivos ........................43 Especificaciones ..................................44 Diagrama de instalación ................................62 Instalación en el suelo ..............................62 Instalación en el techo ..............................
-
Page 38: Precauciones
Precauciones Descripción general Al usuario: El VPLL-ZM100 es un objetivo de zoom de enfoque de larga Este manual está destinado únicamente a personal de servicio distancia diseñado para utilizarse con proyectores LCD de técnico autorizado. El usuario, por sí sólo, no debe sustituir ni Sony. -
Page 39: Sustitución Del Objetivo
Sustitución del objetivo Sustitución del objetivo Apague el interruptor MAIN POWER del proyector. Retire la tapa de la carcasa de protección. Retire la instalación de cables y todas los enchufes de sus conectores en la tarjeta de circuitos (7 enchufes en VPL- Retire los cuatro tornillos de 3 x 8 mm en el panel superior V500Q/QM, S500U/E/M;... - Page 40 Sustitución del objetivo Retire los dos tornillos de 3 x 8 mm y las cuatro abrazaderas Con la etiqueta del objetivo de sustitución VPLL-ZM100 que fijan la tarjeta de circuitos C en su posición. hacia arriba, alinee la marca blanca (...
- Page 41 Nota Vuelva a colocar todas las clavijas en sus enchufes Al volver a colocar la tarjeta de circuitos, tenga cuidado de no respectivaos (7 clavijas en el VPL-V500Q/QM, S500U/ atrapar los cables entre las tarjetas y el chasis del proyector. E/M;...
- Page 42 Sustitución del objetivo Vuelva a colocar el panel superior con cuidado de no atrapar ninguno de los cables. Fíjelo con los cuatro tornillos de 3 x 8 mm. Instale el proyector en el lugar en que va a utilizarlo. Para más detalles sobre la instalación, consulte las páginas 62 a 73.
-
Page 43: Notas Sobre La Sustitución De Objetivos
Notas sobre la sustitución de objetivos • Los objetivo se arañan con facilidad. Cuando los maneje, colóquelos siempre con suavidad una superficie estable y nivelada en posición horizontal. • Evita tocar la superficie de los objectivos. -
Page 44: Especificaciones
Especificaciones Diámetro : φ 86 mm (3 Dimensiones Objetivo de zoom de F=3,0 a 4,6 f= 72,3 a pulgadas) amplia distancia focal 141,0 mm Longitud : 233,8 mm (9 Enfoque manual, Zoom manual pulgadas) Tamaño de la imagen 80 a 300 pulgadas (Al utilizar el Masa Aprox.1650 g (3 lb 10 oz) proyectada... - Page 45 Indice Precauzioni ....................................46 Cenni generali .................................... 46 Sostituzione dell'obiettivo ................................. 47 Sostituzione dell'obiettivo ............................... 47 Note sulla sostituzione dell'obiettivo ..........................51 Caratteristiche tecniche ................................52 Schema dell'installazione ................................62 Installazione al pavimento ............................... 62 Installazione al soffitto ..............................67...
-
Page 46: Precauzioni
Precauzioni Cenni generali Informazioni per l'utente: L’obiettivo VPLL-ZM100 è un obiettivo a focale variabile Questo manuale è indirizzato solo a personale qualificato con messa a fuoco per lunghe distanze progettato per l'utilizzo autorizzato. con proiettori a cristalli liquidi della Sony. -
Page 47: Sostituzione Dell'obiettivo
Sostituzione dell'obiettivo Sostituzione dell'obiettivo Spegnere l'interruttore MAIN POWER del proiettore. Rimuovere la custodia di protezione. Rimuovere il cavo preassemblato e tutte le spine dalle rispettive prese nella scheda del circuito (7 spine nel VPL- Rimuovere le quattro viti da 3 x 8 mm sul pannello V500QM, S500E/M;... - Page 48 Sostituzione dell'obiettivo Rimuovere le due viti da 3 x 8mm ed i quattro morsetti Con le etichette di sostituzione dell'obiettivo del VPLL- che assicurano la scheda del circuito C. ZM100 rivolte verso l'alto, allineare il segno bianco Sollevare la scheda del circuito C e rimuovere le tre prese sull'obiettivo ( ) con il segno bianco sul proiettore ( collegate alle schede dei circuiti Q e B di sotto.
- Page 49 Nota Sostituire tutte le spine nelle rispettive prese (7 spine per Quando si sostituiscono la scheda del circuito, prestare il VPL-V500QM, S500E/M; 8 per il VPL-W400QM) e attenzione a non stringere i cavi tra le schede e il telaio del collegare il cavo preassemblato.
- Page 50 Sostituzione dell'obiettivo Sostituire il pannello superiore prestando attenzione a non stringere i cavi. Assicurarlo con le quattro viti da 3 x 8mm. Installare il proiettore nel luogo in cui si intende utilizzarlo. Per dettagli sull’installazione, vedere le pagine da 62 a...
-
Page 51: Note Sulla Sostituzione Dell'obiettivo
Note sulla sostituzione dell'obiettivo • Gli obiettivi si graffiano facilmente. Nel maneggiare gli obiettivi, assicurarsi sempre di installarli delicatamente su una superficie stabile e uniforme, in posizione orizzontale. • Evitare di toccare la superficie dell’obiettivo. -
Page 52: Caratteristiche Tecniche
Caratteristiche tecniche Obiettivo zoom a fuoco F=3,0 a 4,6 f= 72,3 a 141,0 mm lunga Messa a fuoco manuale, Zoom manuale Dimensione dell'immagine da 80 a 300" (Quando si utilizza proiettatail VPL-V500QM, S500E/M) da 90 a 300" (Quando si utilizza uno schermo 16:9 col VPL- W400QM) da 80 a 250"... - Page 53 設置寸法 / Installation Diagram / Schéma d’installation / Installationsdiagramm / 床置きの場合 / Installing on the floor / Installation au sol / Installation am Boden / Instalación en el suelo / Installazione al pavimento / ÷ ”⁄µÿ Ê 壁 / Wall / Mur / Wand / 単位...
- Page 54 Diagrama de instalación / Schema dell’installazione / ®Œªfl¥Á スク リ ーンから レンズの中心までの距離 Distance between the screen and the center of the lens Distance entre l’écran et le centre de l’objectif Abstand zwischen dem Projektionsschirm und der Mitte des Objektivs Distancia entre la pantalla y el centro del objetivo Distanza tra lo schermo ed il centro dell’obiettivo æµÕ÷––ƒÕ¡ƒª÷ƺ‰µƒæ‡¿Î...
- Page 55 設置寸法 / Installation Diagram / Schéma d’installation / Installationsdiagramm VPL-V500QJ、S500Jの設置寸法 / Installation measurements of the VPL-V500Q/QM,S500U/E/M / Mesures d’installation pour le VPL-V500Q/QM,S500U/E/M / Abmessungen für die Installation des VPL-V500QM,S500E/M / Medidas de instalación para el VPL-V500Q/QM,S500U/E/M / Misure di installazione del VPL-V500QM,S500E/M / VPL-V500QM,S500M µƒ...
- Page 56 Diagramma de instalación / Schema dell’installazione / ®Œª fl¥Á VPL-W400QJの設置寸法 / Installation measurements of the VPL-W400Q/QM / Mesures d’installation pour le VPL-W400Q/ QM / Abmessungen für die Installation des VPL-W400QM / Medidas de instalación para el VPL-W400Q/QM / Misure di installazione del VPL-W400QM / VPL-W400QM µƒ...
- Page 57 設置寸法 / Installation Diagram / Schéma d’installation / Installationsdiagramm 単位 : mm (インチ) / Unit : mm (inches) / Unité : mm (pouces) / Einheit : mm (Zoll) / Unidades : mm (pulgadas) / Unità : mm (pollici) / µ•Œª£ mm (”¢¥Á) 4:3スクリーンサイズ...
- Page 58 Diagramma de instalación / Schema dell’installazione / ®Œª fl¥Á 天井つりの場合 / Installing on the ceiling / Installation au plafond / Installation an der Decke / Instalación en el techo / Installazione al soffitto / µı ± 天井 Ceiling Plafond スクリーン中心 Decke Center of Screen Techo...
- Page 59 設置寸法 / Installation Diagram / Schéma d’installation / Installationsdiagramm a: スク リ ーンから レンズの中心までの距離 Distance between the screen and the center of the lens Distance entre l’écran et le centre de l’objectif Abstand zwischen dem Projektionsschirm und der Mitte des Objektivs Distancia entre la pantalla y el centro del objetivo Distanza fra lo schermo e il centro della lente ¡ƒªÕæµÕ÷––ƒ÷ƺ‰µƒæ‡¿Î...
- Page 60 Diagramma de instalación / Schema dell’installazione / ®Œªfl¥Á VPL-V500QJ、S500Jの設置寸法 / Installation measurements of the VPL-V500Q/QM, S500U/E/M / Mesures d’installation pour le VPL-V500Q/QM, S500U/E/M / Abmessungen für die Installation des VPL-V500QM, S500E/M / Medidas de instalación para el VPL-V500Q/QM, S500U/E/M / Misure di installazione del VPL-V500QM, S500E/M / VPL-V500QM, S500Mµƒ fl¥...
- Page 61 設置寸法 / Installation Diagram / Schéma d’installation / Installationsdiagramm VPL-W400QJの設置寸法 / Installation measurements of the VPL-W400Q/QM / Mesures d’installation pour le VPL- W400Q/QM / Abmessungen für die Installation des VPL-W400QM / Medias de instalación para el VPL-W400Q/QM / Misure di installazione del VPL-W400QM / VPL-W400QM µƒ fl¥...
-
Page 62: Installation Diagram
Diagramma de instalación / Schema dell’installazione / ®Œª fl¥Á 単位 : mm (インチ) / Unit : mm (inches) / Unité : mm (pouces) / Einheit : mm (Zoll) / Unidades : mm (pulgadas) / Unità : mm (pollici) / µ•Œª£ mm (”¢¥Á) 4:3スクリーンサイズ(インチ)... - Page 63 設置寸法 / Installation Diagram / Schéma d’installation / Installationsdiagramm / Installation measurements of the PSS-500 プロジェクターサスペンションサポートPSS-500の設置寸法 projector suspention support / Mesures d’installation pour le support de suspension pour projecteur PSS-500 / Abmessungen für die Installation der Projektoraufhängung PSS-500 / Medidas de instalación para el soporte de suspensión para proyector PSS-500 / Misure di installazione del supporto di sospensione del proiettore PSS-500 / Õ...
- Page 64 Diagramma de instalación / Schema dell’installazione / ®Œª fl¥Á 216.6 125 (4 83.5 (3 41.5 (1 125 (4 スクリーン中心 レンズの中心 128.3 Center of the Screen Center of lens Centre de l’écran Centre de I’objectif 天井用マウントブラケット Mitte des Mitte des Objektivs Upper ceiling mount bracket Projektionsschirms Centro del objetivo...