Advertisement
Quick Links
Advertisement

Related Manuals for Core Innovations CLC14364


Summary of Contents for Core Innovations CLC14364
- Page 1 CORE INNOVATIONS CLC14364 User Manual 14.1” Laptop with Windows™ 10 S...
- Page 2 Read Before Use 1. This laptop works best in non-tropical areas below 6560 feet (2000 meters). 2. Protect your device from impact from bumps and falls. 3. Do not use this device for extended periods of time in environments that are either too cold, too hot, too humid or too dusty.
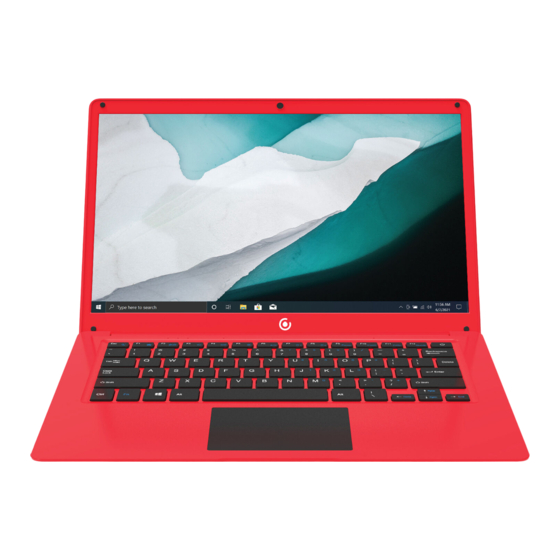
- Page 3 Unit at a Glance FRONT BOTTOM LEFT RIGHT 1. Power Button: Turn your device on or off. Use to set your device to Sleep or to wake it from Sleep. 2. Front Camera: Take photos and videos. 3. Touchpad: Use the touchpad to move your cursor.
- Page 4 Unit at a Glance (Continued) 4. Keyboard: Use the keyboard for typing. 5. Indicators: 1 - The first light from the left indicates that the Power is on. 2 - The middle light indicates that Caps Lock is on. 3 - The third is the Num Lock indicator. When this light is on, you may use the secondary keys on your keyboard.
- Page 5 Interface Introduction Windows™ 10 S Start Menu You will see many applications fixed on the Start menu. These apps are displayed in the form of magnets, allowing you to easily visit programs at the click of a button. You will need to log in to your Microsoft™ account before the applications can fully run.
- Page 6 Windows™ 10 in S Mode Microsoft™-Verified Security With Windows™ 10 in S mode, your favorite applications, such as Office, Evernote and Spotify are available from the Microsoft™ Store where they’re Microsoft™-verified for security. Feel secure when you’re online. Microsoft Edge™, your default browser, gives you more protection against phishing and socially-engineered malware than Chrome or Firefox.
- Page 7 Windows™ 10 in S Mode (Continued) 2. In the Microsoft™ Store, search for “Switch out of S Mode.” 3. Click on the Get button. Once the software has downloaded, click on the Install button and follow the onscreen instructions to complete the setup.
- Page 8 Applications Introduction In addition to the applications already fixed on the Start Menu, all other apps can be accessed from your laptop’s homepage. To add multiple apps to the Start Menu: 1. Right click on the app icon you wish to pin to the Start Menu 2.
- Page 9 Downloading Apps You can download more apps from the Microsoft™ Store found on the Windows™ Start Menu. Note: You need a Microsoft™ account to be able to download apps. You can create an account by logging on to https://account.microsoft.com/account Once you’ve created an account, go to the Microsoft™ Store app on your laptop and sign in by clicking the icon.
- Page 10 Search The Search Bar can be found in your Start Menu. Use it to find documents or files stored in your device. You can also use the Search Bar to search for anything on the Web when an Internet connection has been setup. You can see notifications on the Action Center.
- Page 11 Cortana™ What is Cortana™? Cortana™ is your virtual assistant. She’ll help you get things done. The more you use Cortana™, the more personalized your experience will be. To get started, type a question in the search box, or select the microphone and talk to Cortana™.
- Page 12 Multitasking Multitasking allows you to use multiple desktops to organize your files and documents more efficiently. 1. Click the Task View button next to the search bar, or press Alt+Tab on your keyboard to switch between or view apps. 2. To use two or more apps at a time, grab the top of an app window and drag it to the side.
- Page 13 Action Center The Action Center allows you to view and manage your accumulated notifications. It also gives you quick access to commonly customized settings. To open the Action Center, click on the Windows Key ( ) on your keyboard while pressing the letter A. on or off.
- Page 14 Battery You can view your battery status at the lower right corner of the Lock Screen or the lower right corner of Desktop Taskbar.
- Page 15 Connect to a Wireless Display 1. Open the Action Center and click "Connect". 2. Your laptop will search for wireless display and audio devices. 3. Choose the wireless device you wish to connect to and follow the on- screen instructions. CLC14364...
- Page 16 Personalizing Your Laptop Create Tiles Pin your favorite apps and websites to the Start Screen. To pin an app: Click and hold the desired app, then select "Pin to Taskbar". To pin a website (Microsoft™ Edge Browser only): Go to the website using the installed Micrisoft™ Edge Browser. Click (...) on the right hand side.
- Page 17 Personalizing Your Laptop (Continued) Background and Color You can also customize the Start Screen colors and background. At the Start Screen, open the Action Center and click "All Settings", then select "Personalization". Personalize Your Lock Screen Open the Action Center, and click "All Settings". Select Personalization > Lock screen >...
- Page 18 Network ® ® Wi-Fi can only be used when the device connects to a Wi-Fi Access Point ® (AP) or a free, unsecured Wi-Fi hotspot. NOTE: This laptop supports 2.4GHz Wi-Fi ® networks only. ® Turn On Wi-Fi Within the Action Center menu, select the "Network" icon. ®...
- Page 19 Network (Continued) Turn Off Wi-Fi ® again. Turn off Wi-Fi ® ® Under "Networks", click Wi-Fi when you are not using it to extend the life of your battery between charges. ® Forget a Wi-Fi Network Click "All Settings" in the Action Center > Network and Internet > Wi-Fi > Manage Known Networks >...
- Page 20 User Accounts Choose whether you want to use a Microsoft™ account or a local account. Microsoft™ Account Use this account to sign into Windows™ and shop for apps in the Windows™ Store. All your files are also saved to OneDrive™ by default, allowing you to access them from any device.
- Page 21 Ease of Access Ease of Access settings allow you to customize your laptop's accessibility settings to cater to your needs. For Ease of Access Settings: 1. Open the Action Center > click "All Settings" 2. Click "Ease of Access". 3. Configure your settings. Laptop Settings Activate Windows: Install the latest version of Windows™...
-
Page 22: Specifications
Restart Refresh Device 1. In the Action Center, click "All Settings" 2. Click on "Update and Security", then click "Recovery" 3. Choose how you want to refresh the device Restart Device 1. In the Action Center, click "All Settings" 2. Click on "Update and Security", then click "Recovery" 3. - Page 23 You may also reach a Core Innovations customer service representative by calling 1-833-909-CORE (1-833-909-2673). We are available Monday - Friday, 9am - 5pm PST, except major holidays. Core Innovations strongly urges customers to email their inquiry prior to calling, as this will enable us to better assist you.
- Page 24 Warranty Information Limited Warranty Core Innovations (the "Company") warrants this new product purchased and contained in this package (the "Product") against defects in material or workmanship for 90 Days (Parts & Labor) and 1 Year (Limited). In order for the Company to honor this limited warranty, you must present a valid proof of purchase (i.e.
- Page 25 Warranty Information Company within a period of ninety (90) calendar days from the date of purchase of the Product. The customer is responsible for transportation cost and insurance charges (if applicable) to the Company and must be able to document a clear proof of delivery to the Company as well as proof of registered receipt by the Company.
- Page 26 CORE INNOVATIONS Core Innovations intends to make this manual accurate and complete. However, Core Innovations makes no claim that the information contained herein covers all details and conditions. The information in this document is subject to change without notice at any time.
- Page 27 FCC Caution This device complies with part 15 of the FCC Rules. Operation is subject to the following two conditions: (1) This device may not cause harmful interference, and (2) this device must accept any interference received, including interference that may cause undesired operation.