Advertisement
Quick Links
Advertisement

Related Manuals for Browning SUB MICRO Series


Summary of Contents for Browning SUB MICRO Series
- Page 1 MODEL BTC-6FHD PLEASE READ THIS MANUAL BEFORE USE...
- Page 2 We hope you enjoy scouting game for years to come with your new Browning Trail Camera. Our customer service team is here to help you with any questions you may have operating or setting up your new trail camera.
- Page 3 QUICK START GUIDE STEP 1 STEP 2 Press the battery tray eject Using the contral pad, button to release the battery set the time and date. tray. The tray will eject about 1/2”. With a slight pull, the tray will completely eject. Insert 6 AA Alkaline Batteries and an SD card into the camera.
- Page 4 TABLE OF CONTENTS 1- Package Contents 1- Batteries and SD Cards 2- Camera Diagram 3- Battery Installation 4- Home Screen 5- Set Time and Date 6- Operation Mode 7- Photo and Video Quality 8- Video Length / Picture Delay 9- Mulitshot Settings 10- Temperature / Camera Name 11- Image Date / Motion Test 12- Motion Detection / Battery Type / Trigger Speed / Default Settings...
- Page 5 I n s t a l l a g o o d q u a l i t y m e m o r y c a r d . T h e b e s t b r a n d s o f S D c a r d s a r e Browning branded cards, S a n d i s k o r K i n g s t o n b r a n d e d c a r d s .
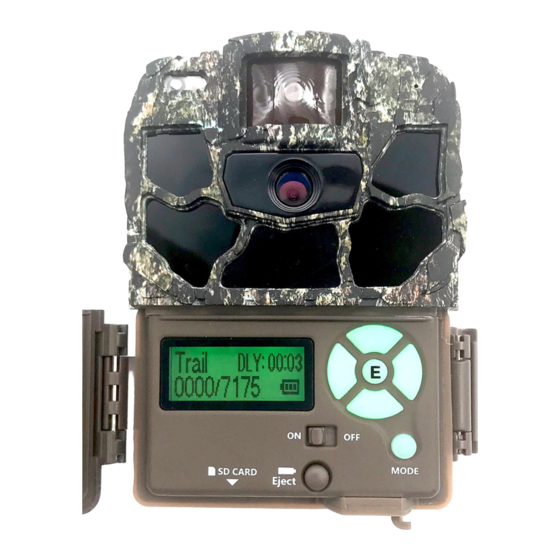
- Page 6 Camera Diagram PIR Sensor Aim LED Light Sensor Microphone Camera Lens IR LEDs Programming Buttons Screen Power Switch 12 Volt Ext Battery Eject SD Card Slot Button Power Port...
- Page 7 For optimal performance we recommend using Battery Browning branded batteries, Eject Energizer™or Duracell™. Button S l i d e t h e b a t t e r y t r a y...
- Page 8 Home Screen Turn the camera’s power on by sliding the power switch to the ON position. The home screen displays the camera operation mode, pictures or videos taken, pictures or videos possible on the SD card, camera delay countdown and battery life icon.
- Page 9 Set Time and Date SET DAT E / T I M E 01 / 05 / 22 12:21PM To S e t t h e t i m e a n d d a t e : From the HOME screen, press the MODE button once. This will take you to the SET TIME AND DATE screen.
- Page 10 OPERATION MODE Operation Mode TRAIL To set the camera’s CAPUTRE MODE , press the ENTER button once. The selection TRAIL will begin to flash. Using the UP or DOWN arrow keys, select the operation mode for your camera. Press the ENTER key when finished. CAPTURE MODE OPTIONS: - TRAIL CAM This setting will take still pictures of game...
- Page 11 Photo Quality To set the PHOTO QUALITY, press the ENTER button once. The selection w i l l b e g i n f l a s h i n g. U s e t h e U P a n d D O W N a r r o w ke y s t o m a ke y o u r s e l e c t i o n .
- Page 12 Video Length VIDEO LENGTH Yo u c an selec t th e len g th of you r v i d e o cl i p a s w e l l i n t he VIDEO LENGHT window. Your options are: 5, 10, 20, 30 seconds, 1 minute or 2 minute lengths.
- Page 13 UP and DOWN arrows. Press the ENTER button to save your selection. Your Browning Trail Camera can take multiple shots each time the camera is triggered. The default setting is 1 picture. Your options are as follows: -MULTI SHOT OFF Thi s is th e d efa ul t s e t ti n g.
- Page 14 Temperature Units Your temperature units can be displayed on the picture’s info bar in Fahrenheit or Celsius. To change the selection, Press the ENTER button once, and then use the UP and DOWN arrows to make your selection. Press ENTER to save your selection.
- Page 15 Image Data Strip Your trail camera has an information bar that is printed at the bottom of each photo t a ke n . T h i s i n f o s t r i p s h o w s t h e following information: time, date , moonphase, temperature, barometric pressure and camera ID.
- Page 16 Motion Detection The motoin detection distance can be adjusted to either 60ft or 80ft. Simply press the ENTER button to toggle between selections using the UP and DOWN buttons, and press ENTER to save selection. Battery Type To achieve the most accurate battery level reading, your camera can be adjusted to monitor either Alkaline, Lithium or Rechargeable batteries.
- Page 17 Timelapse Settings Your Browning Trail Camera has the ability to function as a timelapse camera. This is useful if you want to view the entire activity in a given area such as a large field. We recommend you use the...
- Page 18 Smart IR Video Smart IR Video is a feature that will allow a daytime video clip to keep recording as long as the camera detects movement during filming. If the deer stands still in front of the camera and the camera does not detect movement, the camera will end the video clip.The maximum reocrd time for a video clip using this feature is 5 minutes.
- Page 19 Delete All By selecting DELETE ALL , all of the images on your SD card are erased. This function also reformats your SD card. It is a good idea to use the DELETE ALL function and reformat your SD card each time you install it in the camera for use. IR Flash Power You can adjust the IR LED power in night photos to your specific application.
- Page 20 Capture Timer The capture timer allows you to set a start and stop time for your camera to take pictures or videos. The default setting is 24 hrs. For example, if you wanted to only take night photos, you could set the START time at 7pm, and the STOP time to 5am. This would allow the camera to only capture photos and videos from 7pm until 5am.
- Page 21 Image Retrieval The most popular way to review the images on your SD card is to review the images on your home computer. The pictures can be viewed on both PC and Mac computers. Simply insert the SD card into the SD card slot on your desktop or laptop computer.
- Page 22 PICTURES AND VIDEOS CLIPS. In order to playback your TIMELAPSE FILES, you need to install the Browning Buck Watch Timelapse Viewer software. This software will work on any PC running Windows XP or later versions. The Buck Watch Timelapse Viewer can be downloaded from our website at: www.browningtrailcameras.com, and...
- Page 23 For optimal trail camera mounting, we recommend using the Browning Trail Camera Tree Mount. This mount has a locking gimbal that can position your trail camera at the optimal angle.
- Page 24 Warranty ONE YEAR LIMITED WARRANTY Your Browning Trail Camera warranty covers your trail camera for one year. We warrant that your camera will be free from defects in workmanship and materials when operated in normal use and conditions. This warranty will allow Browning Trail Cameras, at its discretion, to repair the product or replace it with a new or refurbished unit.
- Page 25 We o f f e r a f u l l l i n e o f a c c e s s o r i e s f o r u s e w i t h your new Browning Trail Camera.
- Page 26 FCC Statement This device complies with Part 15 of the FCC Rules. Operation is subject to the following two conditions: (1) this device may not cause harmful interference, and (2) this device must accept any interference received, including interference that may cause undesired operation.
- Page 27 Camera Specifications Effec�ve Pixels PHOTOS 1920 x 1080 Removable Memory Ultra 22 MP up to 512GB 0.13 - 0.7 Seconds Adjustable High Trigger Time 8 MP Medium 4 MP Field of View 40 degrees Shoo�ng Modes S�ll, Video, Timelapse Plus 2 MP Ba�ery Requirements 6 AA Alkaline, Lithium or Rechargeable Ba�eries...