InFocus IN32 User Manual
Hide thumbs
Also See for IN32:
- User manual (9 pages) ,
- Setup instructions (8 pages) ,
- Brochure (4 pages)
Table of Contents
Advertisement
Advertisement
Table of Contents
Troubleshooting

Related Manuals for InFocus IN32


Summary of Contents for InFocus IN32
- Page 1 IN34 IN36 IN32 User's Guide...
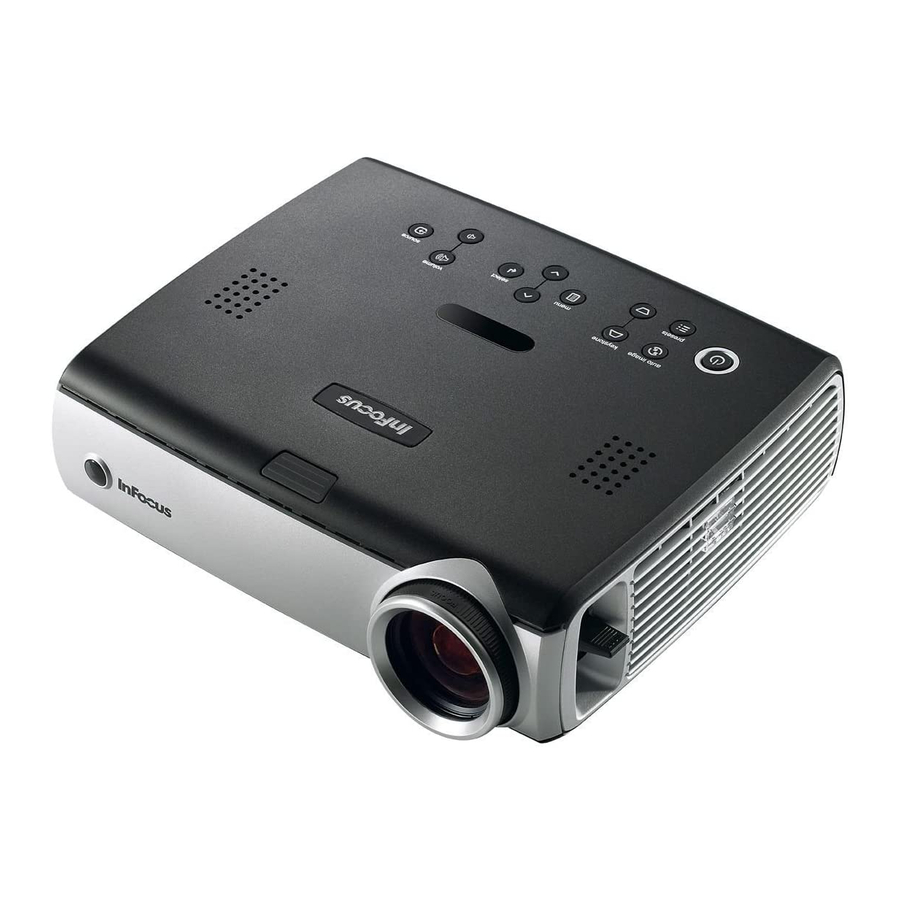
- Page 2 Put batteries in the remote The remote uses 2 AA batteries. Please dispose of batteries in an environmentally proper manner. Buy a Full-Featured Remote and Other Custom Accessories www.infocus.com/store Power/Standby Service Required Status Indicator Panel The top of your projector includes a convenient indicator panel with symbols that light up to show important status.
- Page 3 DVD or VCR* (using optional cables) Connect video using either an S-Video or a Composite Video cable www.infocus.com/store part no. SP-SVIDEO-10M or SP-CPSTVID-5M Connect audio using a Mini-Plug to RCA Audio Y-Cable Available from A/V dealer or retailer ...
-
Page 4: Turn On The Projector
HP/Compaq Fn+F4 or Fn+F6 Toshiba Fn+F5 Fujitsu Fn+F10 Sony Fn+F7 Complete laptop activation chart at www.infocus.com/support Important: If there is still no video, restart your computer (first make sure it's connected to the source projector and the projector is turned on). -
Page 5: Projector Location
150" / 3.8m 18'4" / 5.6m 22'8" / 6.9m Interactive Screen Size and Press the keystone buttons to Distance Calculator make the picture square. www.infocus.com/calculator Zoom and focus Buy a Screen and Other Custom Accessories www.infocus.com/store Focus Ceiling mount? To flip the image, enable Ceiling in the... -
Page 6: Turn Off The Projector
It's printed on the label on the back of the projector. You'll need it to register (and if you ever need to contact support). Serial number: Go to www.infocus.com/register Read the Reference Guide Insert the CD-ROM, or go to www.infocus.com/support The Reference Guide is on the CD-ROM in multiple languages. -
Page 7: Troubleshooting
More troubleshooting options are in the Reference Guide The Reference Guide is on the included CD-ROM, or download it at www.infocus.com/support Warning: In the unlikely event of a lamp rupture, particles may be ejected from the projector. Keep out of the area under and around the projector when it is turned on. See the safety... - Page 8 Changes or modifications to this equipment that are not expressly approved by InFocus Corp. may void the user’s authority to operate the equipment.
-
Page 9: Reference Guide
Reference Guide... - Page 10 EMC Directive 89/336/EEC, Amended by 93/68/EEC Other specific Country Approvals may apply, please see product certification label. EMC: EN 55022 EN 55024 This user’s guide applies to models IN32, C175, W320, IN34, C185, W340, IN36, C310, EN 61000-3-2 and W360. EN 61000-3-3 InFocus reserves the right to alter product offerings and specifications at any time.
-
Page 11: Table Of Contents
Locate the projector at least 4' (1.2 m) away from any heating or cooling Connecting a video device vents. Displaying a video image • Use only InFocus-approved ceiling mounts. Shutting down the projector • Use only the power cord provided. A surge-protected power strip is recommended. -
Page 12: Introduction
XGA 1024x768 resolution. The projector is easy to connect, easy to use, and easy to maintain. Product specifications To read the latest specifications on your multimedia projector, be sure to visit our website at www.infocus.com, as specifications are subject to change. speaker Accessories... - Page 13 Connector Panel Connector panel The projector provides computer and video connectors: composite RJ-45 serial control M1-D/A video • one M1-D/A (HD, DVI, and computer) VESA in computer s-video monitor out • one VESA (HD, HD component, and computer) • one VESA (monitor out) •...
-
Page 14: Connecting A Computer
Connecting a computer connect computer cable Required computer connections Connect the black end of the computer cable to the Computer 1 connector on the projector. Connect the blue end to the video port on your computer. If you are using a desktop computer, you first need to disconnect the monitor cable from the computer’s video port. - Page 15 If you are using a desktop computer and want to see the image on your connect monitor cable computer screen as well as on the projection screen, plug the monitor cable to the Monitor Out connector on the projector. connect VESA cable If you prefer connecting your projector to your computer with an optional VESA cable, connect one end of the cable to the VESA port on your com- puter, and connect the other end of the cable to the blue Computer 2 con-...
-
Page 16: Displaying A Computer Image
Displaying a computer image remove lens cap Remove the lens cap. Press the Power button on the top of the projector or the remote. press Power button The Power light on the Status Indicator Panel (page 12) blinks green and the fans start to run. -
Page 17: Adjusting The Image
Adjusting the image release button adjust height Adjust the height of the projector, if necessary, by pressing the release but- ton to extend the elevator foot. rotate Rotate the leveling foot (located at the bottom back right corner), if neces- leveling elevator sary. -
Page 18: Connecting A Video Device
Connecting a video device connect S-video and audio cables No video or audio cables are included with your projector. If the video device uses a round, four-prong S-video connector, plug an S-video cable into that connector on the video device and into the Video 2 connector on the projector. -
Page 19: Displaying A Video Image
Displaying a video image remove lens cap Remove the lens cap. press Power button Press the Power button on the top of the projector or the remote. The Power light on the Status Indicator Panel (page 12) blinks green and the fans start to run. - Page 20 Adjust the zoom or focus rings by rotating them until the desired image size adjust zoom and focus and focus are produced. zoom focus If the image is not square, adjust the vertical keystone using the buttons on adjust keystone the keypad.
-
Page 21: Shutting Down The Projector
If your image appears correctly on the screen, skip to the next section minute, then turn the projector on again. If the service lamp turns on again, service (page 21). If it does not, troubleshoot the setup. is required. Visit www.infocus.com/service to contact Service. - Page 22 Source Troubleshooting Problem Solution Result Plug power cable in, press Power button. No startup screen Correct image Remove lens cap. Computer image projected Only startup screen appears Press the Source button Activate laptop’s external port or restart laptop...
- Page 23 Adjust computer refresh rate in Control Computer image projected No computer image, just the words “Signal out of Panel>Display>Settings>Advanced> range” Adapter (location varies by operating system) You may also need to set a different resolution on your computer, as shown in the following problem, “Image fuzzy or cropped”...
- Page 24 For Macintosh: Image fuzzy or cropped Set your computer’s display resolution to Image clear and not cropped the native resolution of the projector (Apple menu>System Preferences>Displays, choose 1024x768) Disable “Extend my Windows Desktop” in Only my laptop’s background appears, not the Background and Desktop projected Control Panel>Display>Settings>Display 2 Desktop icons...
- Page 25 The video embedded in my PowerPoint Turn off the internal LCD display on your Embedded video plays correctly presentation does not play on the screen laptop Projector troubleshooting Problem Solution Result Square image Image not square Adjust keystone on keypad or Picture menu Adjust the focus lens or Sharpness in the Correct image Image not sharp...
- Page 26 Change aspect ratio to 16:9 in Correct image Image does not fit 16:9 screen Picture>Aspect ratio menu Image upside down Correct image Turn off Ceiling in Settings>System menu Image reversed left to right Correct image Turn off Rear in Settings>System menu...
- Page 27 Correct image Projected colors don’t match source Adjust color, tint, color temperature, brightness, contrast in the menus COLOR COLOR Move projector, adjust zoom, adjust height Correct image Image not centered on screen zoom Adjust horizontal or vertical position in Picture>Advanced menu...
- Page 28 Make sure vents aren’t blocked; allow Unplug projector; wait one minute; plug in Lamp won’t turn on, Temperature light is on projector to cool for one minute projector and turn it on: lamp lights Temperature light “Change lamp” message appears at startup, lamp Lamp must be replaced (page 33) won’t turn on, Lamp light is turned on Lamp turns on...
-
Page 29: Using The Keypad Buttons
Using the keypad buttons Most buttons are described in detail in other sections, but here is an over- view of their functions: power–turns the projector on (page 7) and off (page 12). menu–opens the on-screen menus (page 24). select–confirms choices made in the menus (page 24). up/down arrows–navigates to and adjusts settings in the menus (page 24). -
Page 30: Using The Remote Control
Using the remote control The remote uses two (2) provided AA batteries. They are easily installed by sliding the cover off the remote’s back, aligning the + and - ends of the bat- navigation teries, sliding them into place, and then replacing the cover. buttons Caution: When replacing the batteries, be aware that using batteries other than the type provided with the projector may risk severe damage to the... -
Page 31: Using The Audio
Using the audio connect audio cable To play sound from the projector, connect your source to the Audio In con- nector on the projector. To adjust the volume, use the buttons on the keypad. To adjust the balance or turn off the projector’s chime, use the Audio menu (see page 28). -
Page 32: Optimizing Computer Images
• Adjust the Keystone, Contrast, Brightness, Color, or Tint in the Picture Optimizing computer images menu. See page 25. After your computer is connected properly and the computer’s image is on • Change the Aspect ratio. Aspect ratio is the ratio of the image width to the screen, you can optimize the image using the onscreen menus. -
Page 33: Using The Menus
Using the menus To open the menus, press the Menu button on the keypad or remote. (The Menu menus automatically close after 60 seconds if no buttons are pressed.) The button Main menu appears. Use the arrow buttons to move up and down to high- light the desired submenu, then press the Select button. -
Page 34: Picture Menu
Picture menu To adjust the following six settings, highlight the setting, press Select, use the up and down arrows to adjust the values, then press select to confirm the changes. decreasing keystone increasing keystone Keystone: adjusts the image vertically and makes a squarer image. You can also adjust keystone from the keypad. - Page 35 Presets: Presets are provided that optimize the projector for displaying computer presentations, film images, and video images. Film input is mate- rial originally captured on a film camera, like a movie; video input is mate- rial originally captured on a video camera, like a TV show or sporting event. There are also user-definable presets.
- Page 36 Advanced settings The following 4 options are for computer and component sources only. Advanced Phase: adjusts the horizontal phase of a computer source. Tracking: adjusts the vertical scan of a computer source. Horizontal/Vertical Position: adjusts the position of a computer source. Sync Threshold Adjust: (enhanced and high definition sources only) If a hardware device, such as a DVD player, is not syncing properly with the projector, select this option to help it sync.
-
Page 37: Settings Menu
Settings menu Audio: allows adjustments to the volume and balance, and turns the projec- tor’s startup Chime on and off. Audio Sources allows you to assign a particular input to a specific source key when using an optional remote. Also allows selection of a default Power-up Settings Source and enables or disables Autosource. - Page 38 PC Screen Saver Off: prevents your computer from going into Screen Save mode. This feature is only available if the USB portion of the computer cable is connected to your computer (page 5). Power Save: automatically turns the lamp off after no signals are detected for 20 minutes.
- Page 39 Custom Key (for use with optional remote only): allows you to assign a dif- ferent function to the Custom button on the remote to quickly and easily use the effect. Only one effect can be enabled at a time. Highlight an effect and press Select to choose a different one.
- Page 40 Once you enable the PIN feature, you must enter the PIN before you can project an image. To use this feature, you must register your projector at www.infocus.com/ register and follow the instructions there to get a default PIN. The PIN con- sists of a sequence of 5 navigation button presses.
-
Page 41: Maintenance
Maintenance clean the lens Cleaning the lens with a soft dry cloth and non-abrasive Apply a non-abrasive camera lens cleaner to a soft, dry cloth. cleaner Avoid using an excessive amount of cleaner, and don’t apply the cleaner directly to the lens. Abrasive cleaners, solvents or other harsh chemicals might scratch the lens. -
Page 42: Replacing The Projection Lamp
When the expected lamp life has been reached, the Lamp indi- cator icon lights red (page 12). NOTE: You can order new lamp housings from www.infocus.com (in select turn off and unplug areas), your retailer or your dealer. Use only a replacement lamp with the the projector same type and rating as the original lamp. - Page 43 • Be extremely careful when removing the lamp housing. In the unlikely event that the lamp ruptures, small glass fragments may be generated. The lamp module is designed to contain most of these fragments, but disconnect lamp connector use caution when removing it. Before replacing a ruptured lamp, clean the lamp compartment and dispose of cleaning materials.
-
Page 44: Cleaning The Lamp Filter Screens
Cleaning the lamp filter screens In dirty or dusty environments, the dust filter screens on the lamp module screen and lamp door and in the lamp compartment can become clogged, causing high temperatures inside the lamp module. These high temperatures can screen impact lamp performance and operating life. -
Page 45: Appendix
Appendix Projected image size Table 2: Image sizes Minimum Maximum Minimum Maximum Distance Diagonal Horizontal Horizontal Diagonal to screen (feet/m) (feet/m) (feet/m) (feet/m) (feet/m) 5/1.5 2.75/0.83 3.4/1.02 2.2/0.66 2.73/0.82 10/3 5.5/1.65 6.8/2.04 4.41/1.32 5.46/1.64 15/4.6 8.25/2.53 10.2/3.13 6.61/2.03 8.2/2.51 20/6.1 11/3.36 13.6/4.15 8.81/2.69... - Page 46 5 lamp won’t turn on 19 external speakers 22 Language 30 video device 9 laptop connector panel 4 connecting 5 contacting InFocus 19 external video port 7 Contrast 8, 11, 25 lens, cleaning 32 Custom key 23 leveling foot 8...
- Page 47 lock, security 32 Low Power 28 Rear 28 remote control 21 Macintosh troubleshooting 15 replacing the lamp 33 Main menu 24 Reset 30 menu system 24 resetting the lamp timer 34 Monitor connector 6 resolution 3 RS-232 4, 6 no computer image 14 no startup screen 13 Screen Save 12, 29 screens, cleaning 35...