
Summary of Contents for ALDI Estate City
- Page 1 Electric Bicycle (Unisex) Model Number ESTC27U INSTRUCTION MANUAL AFTER SALES SUPPORT info@tempo.org 1300 886 649 MODEL: ESTC27U PRODUCT CODE: 704458 04/2021...
-
Page 2: Welcome
Welcome Congratulations on choosing to buy an ESTATE product. All products brought to you by ESTATE are manufactured to the highest standards of performance and safety and, as part of our philosophy of customer service and satisfaction, are backed by our comprehensive 1 Year Warranty. -
Page 3: Table Of Contents
Contents 02 Welcome 04 Warranty Details 05 General Safety Instructions 08 Product Overview 09 Getting Started 10 Assembly 16 Battery Charging 18 Instructions 23 FAQs and Troubleshooting Guide 24 Other Useful Information 27 Repair and Refurbished Goods or Parts Notice AFTER SALES SUPPORT info@tempo.org 1300 886 649... -
Page 4: Warranty Details
Electric Bicycle (Unisex) Warranty Details REGISTER YOUR PURCHASE AT www.aldi.com.au/en/about-aldi/product-registration/ TO KEEP UP-TO-DATE WITH IMPORTANT PRODUCT INFORMATION The product is guaranteed to be free from defects in workmanship and parts for a period of 12 months from the date of purchase. Defects that occur within this warranty period, under normal use and care, will be repaired, replaced or refunded at our discretion. -
Page 5: General Safety Instructions
General Safety Instructions IMPORTANT SAFETY INSTRUCTIONS READ CAREFULLY AND KEEP FOR FUTURE REFERENCE Read this manual thoroughly before first use, even if you are familiar with this type of product. The safety precautions enclosed herein reduce the risk of injury and product damage. - Page 6 General Safety Instructions (Cont.) • Recommended torque requirements in Newton metres (N·m) for the following: (A) Front axle nuts: 15-25 N·m (B) Back axle nuts: 20-30 N·m (C) Handlebar clamp nut/bolt: 8-12 N·m (D) Handlebar stem expander bolt: 30N·m (E) Seat pillar clamp: quick release (F) Brake cable anchor bolt: 1.5-4 N·m (G) Brake mounting bolt: 8-12 N·m (H) Seat clamp nuts: 12 N·m...
- Page 7 General Safety Instructions (Cont.) • Charging the battery: Only charge the battery in a well-ventilated area. Do not expose the battery to heat or charge it in direct sunlight or in the rain. • Do not disassemble or modify the battery. Do not connect the (+) and (-) connections of the battery with a metal object.
-
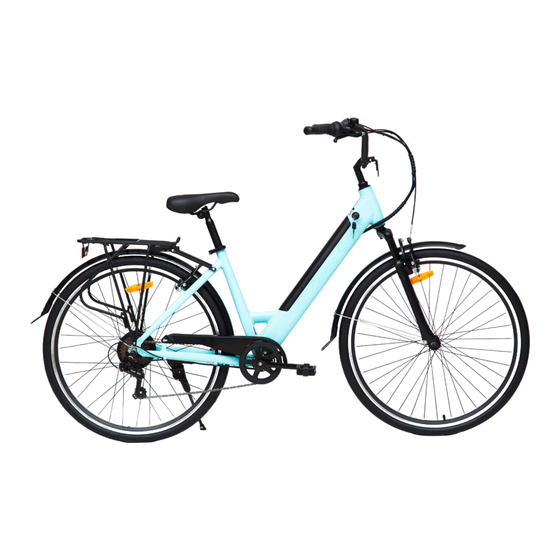
Page 8: Product Overview
Product Overview Scope of delivery Electric bicycle (unisex) Handlebar with grips and display Saddle Seat post Fork Rear rack Front brake Battery Front tyre Rear brake Fender/ mud guard Motor Pedal Spokes Rear tyre Chain Pedal B Other inclusions Battery Multipurpose charger tool... -
Page 9: Getting Started
Getting Started Before first use • Unpack the e-bike, making sure to remove all parts from the packaging carton. The carton staples may be sharp, take care that you do not hurt yourself when reaching into the carton to remove parts. •... -
Page 10: Assembly
Assembly Step 1: front wheel assembly 1. Turn the fork until the fork plate points to the front of the bicycle (Fig. 1). 2. If the brake cable is closed, undo it, then insert the wheel into the fork (Fig. 1). 3. - Page 11 Assembly (Cont.) Step 2: front fender (mudguard) assembly 1. Attach the fender hanger on the fork crown, using a tool to tighten the screw from the front (washer against the bike part) (Fig. 5). 2. Adjust the fender position to ensure there is an equal distance between each fork tube.
- Page 12 Assembly (Cont.) Step 4: stem and handlebar assembly 1. Insert the stem pillar into the fork tube up to the minimum insertion line indicated on the stem pillar. 2. Face the handlebar stem forward, directly in line with the front wheel (Fig. 8). Then tighten both stem pillar bolts to a torque requirement of or 17–19 N·m (12–15 ft.lb.).
- Page 13 Assembly (Cont.) Step 5: saddle assembly The saddle is pre-assembled to the seat post. 1. Loosen the seat clamp, then insert Seat the seat post into the bicycle frame, making sure that the minimum Top portion insertion mark on the seat post is completely inserted into the frame and not visible (Fig.
- Page 14 Assembly (Cont.) Step 6: pedal assembly 1. Look for the letters “R” or “L” stamped on the pedal spindle. 2. Thread the pedal marked “R” into the crank arm on the chain side of the bike. Turn the pedal spindle in a clockwise direction. Securely tighten the pedal spindle (Fig.
- Page 15 Assembly (Cont.) Step 7: reflector assembly Front reflector (white) and bell 1. Remove the clamp screw from the reflector (or bell) bracket (Fig. 12). 2. Push open the bracket 'loop' and slide it onto the handlebar. (If there is a sizing insert included with the bracket, make sure it is inside the clamp loop before mounting.) 3.
-
Page 16: Battery Charging
Battery Charging Battery The e-bike comes with a removable lithium battery installed on the down tube of the bike. Also supplied is a key (and a duplicate), attached to the brake cables, which you should have removed earlier in the assembly process. The key is required for locking the battery in place or unlocking it for removal of the battery. - Page 17 Battery Charging (Cont.) Charger The e-bike comes with a smart charger for easy charging. 1. Insert the AC plug into an appropriate electrical outlet. 2. Open the battery cover and insert the DC connector into the battery (Fig. 16). 3. When the battery is charging, the charging light illuminates red (Fig. 17). 4.
-
Page 18: Instructions
Instructions The e-bike's control panel, located on the left side of the handlebar, lets you turn on the bike for electric power, select riding modes and check the battery status. Fig. 18 Battery Pedal assis- status tance level PLUS / increase Bluetooth indicator POWER... - Page 19 Instructions (Cont.) Operation Turning on/off • Long-press the POWER [ ] button to turn on the e-bike (display). The display will show the approximate battery status and pedal assistance modes. When the LED is switched on, the integrated USB port will be powered. •...
- Page 20 Instructions (Cont.) Pedal speed changing Fig. 19 The e-bike is equipped with a Shimano 7-speed system with the shifter located at the right side of the handlebar. • Turn the shifter to get a different tooth ratio in order to change the pedal speed (Fig.
- Page 21 Instructions (Cont.) Connecting the app Once installed, the Zippo Cycling app will appear in your app storage on your device. To pair the bike with your mobile device, proceed as follows: • Turn on the e-bike display and the Bluetooth function on your mobile device. Click the app to open it.
- Page 22 Instructions (Cont.) Using the app • You can use the Zippo Cycling app to: – check the riding speed (shown in km/h on the digital display and speedometer) – check the pedal assistance level in use (1, 2, 3, 4, 5) –...
-
Page 23: Faqs And Troubleshooting Guide
FAQs and Troubleshooting Guide If you experience problems with your e-bike, check in the table below for solutions to common problems. If the problem persists after checking the suggested solutions, please contact our after sales support centre for advice. Problems Possible cause Solution When turned on, the... -
Page 24: Other Useful Information
Other Useful Information Cleaning and care WARNING! Clean the e-bike properly and maintain it in good working condition. The warranty will not apply in case of corrosion due to lack of maintenance. • After every ride, wash your bike with soapy water (liquid dish soap is recommended for its ability to remove grease without damaging the bike), but do not wash any electrical parts. - Page 25 Other Useful Information (Cont.) Storage When it is not in use, store the e-bike in a cool, dry place, protected from dust, high humidity and frequent temperature changes, and out of reach of children. For prolonged storage we recommend using the original carton for the bike and storing the battery separately.
- Page 26 Other Useful Information (Cont.) Technical specifications Electric Bicycle (Unisex) Model number ESTC27U EPAC cut-off speed 25km/h Mass of EPAC in the most usual configuration 22kg (weight) Electric motor max. continuous rated power 250W Max. permissible total weight 122kg (bicycle + rider + luggage) Dimensions (assembled) 185 x 70 x 118 cm Rechargeable li-ion battery 10INR19/66-3...
-
Page 27: Repair And Refurbished Goods Or Parts Notice
Please be assured though, refurbished parts or replacements are only used where they meet ALDI’s stringent quality specifications. If at any time you feel your repair is being handled unsatisfactorily, you may escalate your complaint. - Page 28 Warranty returns Should you for any reason need to return this product for a warranty claim, make sure to include all accessories with the product. Product does not work? If you encounter problems with this product, or if it fails to perform to your expectations, make sure to contact our After Sales Support Centre on 1300 886 649 for advice.