
Related Manuals for Hawking HGU1


Summary of Contents for Hawking HGU1
- Page 2 Internet solution for Laptop or Desktop users. Use it to connect to your Home, Office, or Gaming Networks. The HGU1 Gigabit USB Ethernet Adapter enables you to plug into an available Universal Serial Bus port and connect your desktop or laptop with out the hassle of taking apart your computer.
-
Page 3: Package Contents
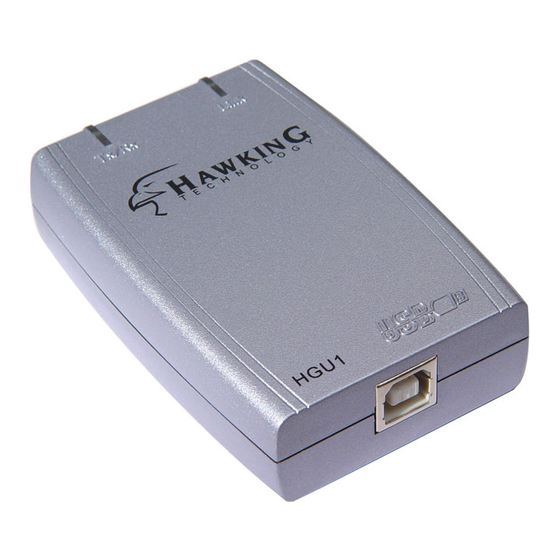
Package Contents One Gigabit USB Adapter One USB Cable Software CD (includes User’s Manual and Driver for Windows 2000 and XP) Quick Installation Guide System Requirement CD-ROM Drive An Available USB Port Operation System: Windows 2000 or XP 1000Base-T Gigabit Ethernet, 100Base-TX Fast Ethernet or 10BaseT Ethernet connectivity to your local area network. - Page 4 USB Device Cable (Type A-to-Type B connection): Connects the HGU1 Gigabit Adapter to your computer (USB host port). USB Type-B Device Port: USB port for the USB Device Cable. USB Gigabit Network Adapter Link LED indicator: 10M: Yellow & Green when connected and blinking when transmitting data.
- Page 5 2. Connect the other end of the USB device cable into the USB Type- B Device port. 3. Connect the Ethernet Cable in to the HGU1’s Ethernet port 4. Connect the other end of the Ethernet Cable into a Hub.
-
Page 6: Installation For Windows 2000
Installation for Windows 2000 1. After you finish with the hardware installation, turn on your computer if you haven’t done so already. automatically detect the newly installed hardware. “Welcome to the Found New Hardware Wizard” will help you to install the device driver. 2. - Page 7 3. Insert the HGU1 software CD into your CD-Rom drive. Select Specify a location and then click Next. 4. Click Browse to select the driver folder and then click OK. 5. When the Driver Files Search Results screen appears, click Next.
- Page 8 6. You will receive the message “Digital Signature Not Found”. Click Yes to continue the installation. 7. When Windows has finished installing the software for this device. Click Finish. - 7 -...
-
Page 9: Installation For Windows Xp
Windows will automatically detect the newly installed hardware. The Welcome to the Found New Hardware Wizard will prompt you to insert the installation CD. Insert the HGU1 Software CD now and select Install the software automatically continue. - Page 10 Windows will start searching for the driver. When the following screen appears, click Continue Anyway. When the wizard has finished installing the software. Click Finish. Go to Start Control Panel Network Connections. Double-click Local Area Connections. - 9 -...
- Page 11 When the Network dialog box appears, click Install to set the appropriate protocols and client. When you have completed, click OK. Restart your computer to activate the HGU1 USB Gigabit Adapter. - 10 -...
-
Page 12: Setup Diagnostics
Setup Diagnostics To verify if the device exists in your computer and is enabled, go to Start Control Panel System Hardware. Click the Device Manager button. If the 10/100 Gigabit USB2.0 Ethernet Adapter is found, it means that your device is properly installed and enabled.