Table of Contents
Advertisement
12 Months Guarantee
GUARANTEE CONDITIONS
(a) Any claim during the period of the guarantee MUST
BE ACCOMPANIED WITH THE RECEIPT relating to the
original purchase.
(b) The unit must be correctly installed and operated in
accordance with the manufacturer's instructions and
used for normal domestic purposes.
(c) The guarantee does not cover accidental damage,
misuse or alterations which are likely to affect the units.
(d) The guarantee is invalid if the unit is tampered with,
or repaired by any unauthorised person.
(e) The guarantee in no way affects your statutory rights.
(f ) Mainland U.K only.
Procedure when reporting a fault
1. Give full name, address including post code, home telephone number and
business telephone number if appropriate.
2. Quote sales receipt number, make and model number of faulty appliance.
This product's reference is as follows:
ADP 8352
3. Give a summary of the problem.
08457 959722
:- issue 1, 18 July 05
18
DIPLOMAT
Fully Integrated Dishwasher
How to get the
most from your
ADP 8352
Advertisement
Table of Contents

Related Manuals for Diplomat ADP8352


Summary of Contents for Diplomat ADP8352
- Page 1 2. Quote sales receipt number, make and model number of faulty appliance. This product's reference is as follows: ADP 8352 3. Give a summary of the problem. 08457 959722 :- issue 1, 18 July 05 DIPLOMAT Fully Integrated Dishwasher How to get the most from your ADP 8352...
-
Page 2: Specifications
A Helping Hand on the Home Front From now on washing dishes, glassware, cutlery and saucepans should be as simple as loading your dishwasher and switching on. Contents Page No. Installation 1 - 4 Your Dishwasher Program Chart 7 - 8... -
Page 3: Troubleshooting
- the rinse aid dosage is correct. Error Messages The dishwasher is equipped with a safety system that is able to detect operating problems and malfunctions. These malfunctions are signalled by the rapid blinking of one of the program LEDs. Only in the case where the indicator light for the soak cycle (see table for cycles) blinks rapidly should you cancel the cycle as described in the section entitled, 'Changing a Cycle while Under-way.”... - Page 4 INSTALLATION - ELECTRICAL CONNECTIONS WARNING: THIS APPLIANCE MUST BE EARTHED Fuse Replacement If the mains lead of this appliance is fitted with a BS1363A 13 amp fused plug, to change the fuse use an A.S.T.A. approved fuse to BS1362 and proceed as follows: Remove the fuse cover (A) and fuse (B).
-
Page 5: Cleaning And Maintenance
General warnings and recommendations • Avoid the use of acidic or abrasive detergents. • Clean the outer surfaces and door lining of the dishwasher regularly, using a soft cloth moistened with warm soapy wate. • Clean the door gaskets with a damp sponge. -
Page 6: Energy Saving Tips
Energy Saving Tips It is important to try and run the dishwasher when it is fully loaded in order to save on energy. Choose the right wash cycle: the choice of cycle depends on the type of dishware, cookware and utensils being washed and how dirty they are. -
Page 7: Starting Wash Program
Starting the Wash Program (cont.) Setting The Start Delay Time Open the door of the dishwasher partially. Turn on the appliance by pressing the ON- OFF button '3'. The start time for the wash cycle can be delayed for 2,4 or 6 hours. -
Page 8: Program Chart
Detergent Rinse- Turn on the water to the appliance, partially open the door of the dishwasher, and press the ON-OFF button “3” located on the control panel. The power indicator light '4' will come on. At this point, the appliance is on and ready to be programmed. -
Page 9: Loading
Salt The hardness of the water varies from place to place. If hard water is used in the dishwasher, deposits will form on the dishes and utensils. -
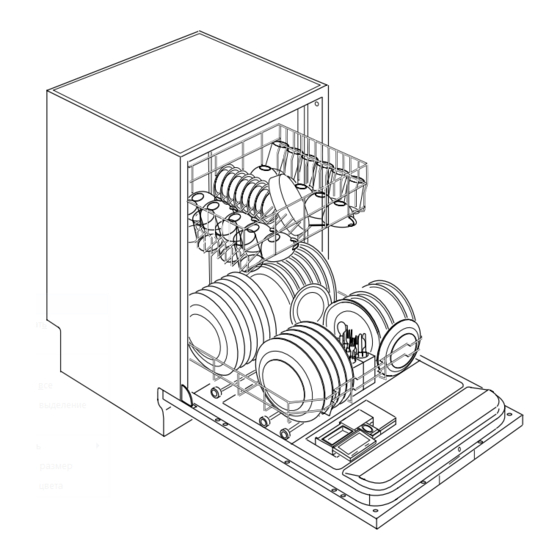
Page 10: Detergent And Rinse Aid Dispenser
WARNING: The introduction of detergent into the rinse aid dispenser, even in liquid form, will damage the dishwasher. Loading The dishwasher has a capacity of 9 place-settings, including servingdishes. Lower Basket The lower basket receives the full force of the lower spray arm, and should therefore be used for the “toughest”...