Table of Contents
Advertisement
Quick Links
Advertisement
Table of Contents

Related Manuals for Cisco N9K-C93108TC-FX


Summary of Contents for Cisco N9K-C93108TC-FX
- Page 1 Cisco Nexus 93108TC-FX ACI Mode Hardware Installation Guide First Published: 2017-04-11 Last Modified: 2019-03-28 Americas Headquarters Cisco Systems, Inc. 170 West Tasman Drive San Jose, CA 95134-1706 http://www.cisco.com Tel: 408 526-4000 800 553-NETS (6387) Fax: 408 527-0883...
- Page 2 Any products and features described herein as in development or available at a future date remain in varying stages of development and will be offered on a when-and if-available basis. Any such product or feature roadmaps are subject to change at the sole discretion of Cisco and Cisco will have no liability for delay in the delivery or failure to deliver any products or feature roadmap items that may be set forth in this document.
-
Page 3: Table Of Contents
Minimizing Electromagnetic and Radio Frequency Interference Shock and Vibration Requirements Grounding Requirements Planning for Power Requirements Airflow Requirements Rack and Cabinet Requirements Clearance Requirements C H A P T E R 3 Installing the Switch Chassis Cisco Nexus 93108TC-FX ACI Mode Hardware Installation Guide... - Page 4 Replacing a Power Supply Module Replacing an AC Power Supply Replacing a High Voltage (HVAC/HVDC) Power Supply Replacing a DC Power Supply A P P E N D I X A Rack Specifications Overview of Racks Cisco Nexus 93108TC-FX ACI Mode Hardware Installation Guide...
- Page 5 Rack Mount Kit NXK-ACC-KIT-1RU Rack Mount Kit N3K-C3064-ACC-KIT A P P E N D I X E Site Preparation and Maintenance Records Site Preparation Checklist Contact and Site Information Chassis and Module Information Cisco Nexus 93108TC-FX ACI Mode Hardware Installation Guide...
- Page 6 Contents Cisco Nexus 93108TC-FX ACI Mode Hardware Installation Guide...
-
Page 7: Preface
Braces and a vertical bar within square brackets indicate a required choice within an optional element. Indicates a variable for which you supply values, in context where italics variable cannot be used. Cisco Nexus 93108TC-FX ACI Mode Hardware Installation Guide... -
Page 8: Related Documentation
Downloadable Documentation • Knowledge Base Articles (KB Articles)are available at the following URL: https://www .cisco.com/c/en/us/support/cloud-systems-management/application-policy-infrastructure-controller-apic/products-configuration-examples-list.html • Cisco Application Centric Infrastructure Controller Release Notes • Cisco Application Centric Infrastructure Fundamentals Guide • Cisco APIC Getting Started Guide • Cisco ACI Virtualization Guide •... - Page 9 • Cisco ACI System Messages Reference Guide • Cisco APIC Layer 4 to Layer 7 Services Deployment Guide • Cisco APIC Layer 4 to Layer 7 Device Package Development Guide • Cisco APIC Layer 4 to Layer 7 Device Package Test Guide •...
-
Page 10: Documentation Feedback
What's New in Cisco Product Documentation, at: https://www.cisco.com/warp/public/687/Directory/DirTAC.shtml. Subscribe to What's New in Cisco Product Documentation, which lists all new and revised Cisco technical documentation as an RSS feed and delivers content directly to your desktop using a reader application. The RSS feeds are a free service. -
Page 11: Overview
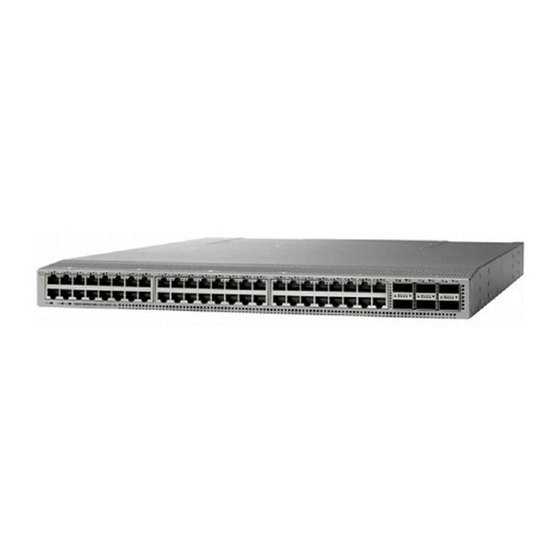
Overview, on page 1 Overview The Cisco Nexus 93108TC-FX switch (N9K-C93108TC-FX) is a 1-RU, fixed-port switch designed for spine-leaf-APIC deployment in data centers. This switch has 48 10GBASE-T Application Policy Infrastructure Controllers (APICs) facing ports that support 100-Megabits, 1- or 10-Gigabit Ethernet connections, and it has six fixed 40/100-Gigabit QSFP28 spine-facing ports. - Page 12 To determine which transceivers, adapters, and cables this switch supports, see the Cisco Transceiver Modules Compatibility Information document. The following figure shows the hardware features seen from the power supply side of the chassis. Cisco Nexus 93108TC-FX ACI Mode Hardware Installation Guide...
- Page 13 If the switch has port-side exhaust airflow (blue coloring for fan modules), you must locate the ports in the hot aisle. If you locate the air intake in a hot aisle, the switch can overheat and shut down. Cisco Nexus 93108TC-FX ACI Mode Hardware Installation Guide...
- Page 14 Overview Overview Cisco Nexus 93108TC-FX ACI Mode Hardware Installation Guide...
-
Page 15: Preparing The Site
Altitude Requirements Altitude rating is based on power supply installed; see critical components list in the system CB report for altitude rating. Cisco Nexus 93108TC-FX ACI Mode Hardware Installation Guide... -
Page 16: Dust And Particulate Requirements
The wiring is unlikely to emit radio interference if you use a twisted-pair cable with a good distribution of grounding conductors. If you exceed the recommended distances, use a high-quality twisted-pair cable with one ground conductor for each data signal when applicable. Cisco Nexus 93108TC-FX ACI Mode Hardware Installation Guide... -
Page 17: Shock And Vibration Requirements
Planning for Power Requirements The switch includes two power supplies (1-to-1 redundancy with current sharing) in one of the following combinations: • Two 500-W AC power supplies • Two 1200-W HVAC/HVDC power supplies Cisco Nexus 93108TC-FX ACI Mode Hardware Installation Guide... - Page 18 • Ensure that the protective devices are rated not greater than 30A when the switch is powered with regular DC power supplies (rated 48-60VDC). • Ensure that the protective devices are rated not greater than 10A when the switch is powered with HVDC power supplies (rated 240-350VDC). Cisco Nexus 93108TC-FX ACI Mode Hardware Installation Guide...
-
Page 19: Airflow Requirements
If you must change the airflow direction for the switch, you must shutdown the switch before changing the modules. Rack and Cabinet Requirements You can install the following types of racks or cabinets for your switch: • Standard perforated cabinets Cisco Nexus 93108TC-FX ACI Mode Hardware Installation Guide... -
Page 20: Clearance Requirements
Work with your cabinet vendors to determine which of their cabinets meet the following requirements or see the Cisco Technical Assistance Center (TAC) for recommendations: • Use a standard 19-inch (48.3-cm), four-post Electronic Industries Alliance (EIA) cabinet or rack with mounting rails that conform to English universal hole spacing per section 1 of the ANSI/EIA-310-D-1992 standard. - Page 21 19.0 in (43.3 cm) Note Both the front and rear of the chassis must be open to both aisles for airflow. Cisco Nexus 93108TC-FX ACI Mode Hardware Installation Guide...
- Page 22 Preparing the Site Clearance Requirements Cisco Nexus 93108TC-FX ACI Mode Hardware Installation Guide...
-
Page 23: Safety
Starting the Switch, on page 26 Safety Before you install, operate, or service the switch, see the Regulatory, Compliance, and Safety Information for the Cisco Nexus 3000 and 9000 Series for important Safety Information. Warning Statement 1071 Warning Definition IMPORTANT SAFETY INSTRUCTIONS Before you work on any equipment, be aware of the hazards involved with electrical circuitry and be familiar with standard practices for preventing accidents. -
Page 24: Installation Options With Rack-Mount Kits
You can install the switch using the following rack-mount options: • Rack-mount kit (NXK-ACC-KIT-1RU) which you can order from Cisco. This option offers you easy installation, greater stability, increased weight capacity, added accessibility, and improved removability with front and rear removal. - Page 25 This product relies on the building's installation for short-circuit (overcurrent) protection. Ensure that the protective devices is rated not greater than 20A (North America), 16A (Europe), and 13A (UK). Note For DC input application, please refer to the statement below: Cisco Nexus 93108TC-FX ACI Mode Hardware Installation Guide...
-
Page 26: Unpacking And Inspecting The Switch
• Burgundy (fan modules, AC power supplies, and DC power supplies) • Port-side exhaust airflow modules • Blue (fan modules, AC power supplies, and DC power supplies) • Dual-direction airflow power-supply modules Cisco Nexus 93108TC-FX ACI Mode Hardware Installation Guide... -
Page 27: Installing The Switch Using The Nxk-Acc-Kit-1Ru Rack-Mount Kit
The holes that you use depend on the requirements of your rack and the amount of clearance required for interface cables (3 inches [7.6 mm] minimum) and module handles (1 inch [2.5 mm] minimum). Cisco Nexus 93108TC-FX ACI Mode Hardware Installation Guide... - Page 28 (see the following figure). Tighten 12-24 screws to 30 in-lb (3.39 N·m) of torque and tighten 10-32 screws to 20 in-lb (2.26 N·m) of torque. Cisco Nexus 93108TC-FX ACI Mode Hardware Installation Guide...
- Page 29 Holding the chassis level, insert screws (12-24 or 10-32, depending on the rack type) in each of the two front rack-mount brackets (using a total of six screws) and into the cage nuts or threaded holes in the vertical rack-mounting rails (see the following figure). Cisco Nexus 93108TC-FX ACI Mode Hardware Installation Guide...
-
Page 30: Installingtheswitchusingthen3K-C3064-Acc-Kitrack-Mount Kit
• Front rack-mount brackets (2) • Rear rack-mount brackets (2) • Slider rails (2) • M4 x 0.7 x 8-mm Phillips countersink screws (12) • The rack is installed and secured to its location. Cisco Nexus 93108TC-FX ACI Mode Hardware Installation Guide... - Page 31 Four M4 screws used to attach the bracket to the chassis chassis Rear rack-mount guide aligned to the module end of Two M4 screws used to attach the bracket to the the chassis chassis Cisco Nexus 93108TC-FX ACI Mode Hardware Installation Guide...
- Page 32 Two customer-supplied 12-24 or 10-32 screws used rack to attach each slider rail to the rack c) Repeat Step 3 to attach the other slider rail to the other side of the rack. Cisco Nexus 93108TC-FX ACI Mode Hardware Installation Guide...
- Page 33 Holding the chassis level, insert two screws (12-24 or 10-32, depending on the rack type) in each of the two front rack-mount brackets (using a total of four screws) and into the cage nuts or threaded holes in the vertical rack-mounting rails (see the following figure). Cisco Nexus 93108TC-FX ACI Mode Hardware Installation Guide...
-
Page 34: Grounding The Chassis
You can also ground the chassis, which is required if the rack is not grounded, by attaching a customer-supplied grounding cable. Attach the cable to the chassis grounding pad and the facility ground. Cisco Nexus 93108TC-FX ACI Mode Hardware Installation Guide... - Page 35 Step 3 Secure the grounding lug to the chassis grounding pad with two M4 screws, see the previous figure. Tighten the screws to 11 to 15 in-lb (1.24 to 1.69 N·m) of torque. Cisco Nexus 93108TC-FX ACI Mode Hardware Installation Guide...
-
Page 36: Starting The Switch
• When connecting to an HVAC power source, insert the C14 or LS-25 plug in a receptacle for the HVAC power source. • When connecting to an HVDC power source, do the following: Cisco Nexus 93108TC-FX ACI Mode Hardware Installation Guide... - Page 37 A setup utility automatically launches the first time that you access the switch and guides you through the basic configuration. For instructions on how to configure the switch and check module connectivity, see the appropriate Cisco Nexus 9000 Series configuration guide.
- Page 38 Installing the Switch Chassis Starting the Switch Cisco Nexus 93108TC-FX ACI Mode Hardware Installation Guide...
-
Page 39: Connecting The Switch To The Aci Fabric
As shown in the following figure, each APIC is connected to one or two leaf switches and each leaf switch should be connected to every spine switch in the same fabric. Cisco Nexus 93108TC-FX ACI Mode Hardware Installation Guide... -
Page 40: Preparing To Connect To Other Devices
Cisco equipment. In situations where long parallel cable runs cannot be separated by at least 3.3 feet (1 meter), we recommend that you shield any potential noise sources by housing them in a grounded metallic conduit. -
Page 41: Connecting Leaf Switches To Apics
Connecting Leaf Switches to APICs You must downlink one or two (recommended for redundancy) Cisco Nexus 9300 platform ACI-mode leaf switches to each Application Policy Infrastructure Controller (APIC) in your ACI fabric. The type of virtual interface card (VIC) installed on the APIC determines the types of interface cables that you can use to connect the leaf switches to the APICs. - Page 42 Connect the other end of the interface cable to a downlink port on a leaf switch. • For a Cisco 10GBASE-LR or -SR transceiver and cable, insert the transceiver into a downlink optical port on a leaf switch before connecting the cable to the transceiver.
-
Page 43: Connecting Leaf Switches To Spine Switches
• 32-port 100-Gigabit (such as: N9K-X9732C-EX) • 36-port 100-Gigabit (such as: N9K-X9736C-FX) • 16-port 400-Gigabit (such as: N9K-X9716D-GX) Note You cannot include NX-OS line cards in the same chassis when running in ACI mode. Cisco Nexus 93108TC-FX ACI Mode Hardware Installation Guide... -
Page 44: Installing A Gigabit Ethernet Module (Gem)
To determine which transceivers, adapters, and cables support this switch, see the Cisco Transceiver Modules Compatibility Information document. To see the transceiver specifications and installation information, see Transceiver Module Installation Guides. Cisco Nexus 93108TC-FX ACI Mode Hardware Installation Guide... -
Page 45: Setting Up An Optional Console Interface
First-generation Cisco Nexus 9000 Series switches include those switches that do not contain an EX or an FX in the PID (product identification). Second-generation Cisco Nexus 9000 Series switches include those switches that have an EX or an FX in the PID. -
Page 46: Setting Up An Optional Management Connection
DB-9 connector on the other end of the cable to the serial port on the console device. What to do next You can now perform the initial configuration for the switch (see the Cisco ACI Getting Started Guide). Setting Up an Optional Management Connection You can optionally set up an out-of-band management connection for monitoring and troubleshooting purposes. -
Page 47: Optic Transceiver Removal Using The Optics Extraction Tool
Remove the fiber-optic cables from the transceiver module before removing the transceiver module. Step 2 Use the wide side of the optics extraction tool to release the bale latch (see the following image). Cisco Nexus 93108TC-FX ACI Mode Hardware Installation Guide... -
Page 48: Maintaining Transceivers And Optical Cables
• Inspect routinely for dust and damage. If you suspect damage, clean and then inspect fiber ends under a microscope to determine if damage has occurred. Cisco Nexus 93108TC-FX ACI Mode Hardware Installation Guide... -
Page 49: Replacing Components
On the fan module that you are removing, press the two sides of the fan module handle next to where it connects to the fan module and pull on the handles enough to unseat it from its connectors. Step 2 Holding the handle, pull the module out of the chassis. Cisco Nexus 93108TC-FX ACI Mode Hardware Installation Guide... -
Page 50: Installing A Fan Module
You can determine the airflow direction by looking at the coloring of the latch on each power supply. AC power supplies with burgundy latches have port-side intake airflow direction, and power supplies with blue latches have port-side exhaust airflow direction. Cisco Nexus 93108TC-FX ACI Mode Hardware Installation Guide... -
Page 51: Replacing A High Voltage (Hvac/Hvdc) Power Supply
Verify that the power supply is operational by making sure that the power supply LED is green. Replacing a High Voltage (HVAC/HVDC) Power Supply You can replace an HVACHVDC power supply during operations so long as the other power supply provides power to the switch. Cisco Nexus 93108TC-FX ACI Mode Hardware Installation Guide... - Page 52 Attach the Saf-D-Grid end of the power cable to the electrical outlet on the front of the power supply. d) Make sure that the other end of the power cable is attached to the appropriate power source for the power supply. Cisco Nexus 93108TC-FX ACI Mode Hardware Installation Guide...
-
Page 53: Replacing A Dc Power Supply
Remove the DC power connector block from the power supply by doing the following: 1. Push the orange plastic button on the top of the connector block inward toward the power supply. 2. Pull the connector block out of the power supply. Cisco Nexus 93108TC-FX ACI Mode Hardware Installation Guide... - Page 54 Attach the power connector block end of the power cable to the electrical outlet on the front of the power supply. d) Turn on the circuit breaker for the power source. e) Verify that the power supply is operational by making sure that the power supply LED is green. Cisco Nexus 93108TC-FX ACI Mode Hardware Installation Guide...
-
Page 55: Rack Specifications
• Standard 19-inch (48.3 cm) (two- or four-post EIA cabinet or rack, with mounting rails that conform to English universal hole spacing per section 1 of ANSI/EIA-310-D-1992). For more information, see Requirements Specific to Perforated Cabinets, on page Cisco Nexus 93108TC-FX ACI Mode Hardware Installation Guide... -
Page 56: Requirements Specific To Standard Open Racks
• The roof should be perforated with at least a 20 percent open area. • The cabinet floor should be open or perforated to enhance cooling. The Cisco R Series rack conforms to these requirements. Cable Management Guidelines To help with cable management, you might want to allow additional space in the rack above and below the chassis to make it easier to route all of the fiber optic or copper cables through the rack. -
Page 57: System Specifications
Operating 0 to 13,123 feet (0 to 4,000 meters) Switch Dimensions Switch Width Depth Height Cisco Nexus 93108TC-FX 17.3 inches (43.9 cm) 22.5 inches (57.1 cm) 1.72 inches (4.4 cm) (1 RU) Cisco Nexus 93108TC-FX ACI Mode Hardware Installation Guide... -
Page 58: Switch And Module Weights And Quantities
Switch Typical Power Maximum Power Heat Dissipation Consumption (AC or DC) Consumption (AC or DC) Requirement Cisco Nexus 276 W 460 W 1569.585 BTUs per hour 93108TC-FX Cisco Nexus 93108TC-FX ACI Mode Hardware Installation Guide... -
Page 59: Power Specifications
Input voltage Nominal (Range) • AC (for 1230 W output) • 200 to 277 VAC • DC (for 1230 W output) AC input frequency Nominal: 50 to 60 Hz (Range: 47-63 Hz) Cisco Nexus 93108TC-FX ACI Mode Hardware Installation Guide... -
Page 60: 930-W Dc Power Supply Specifications
35 A (sub-cycle duration) Maximum hold-up time 8 ms at 930 W Power supply output voltage 12 VDC Power supply standby voltage 12 VDC Efficiency rating Greater than 92% at 50% load Form factor RSP1 Cisco Nexus 93108TC-FX ACI Mode Hardware Installation Guide... -
Page 61: Power Cable Specifications
North America CAB-N5K6A-NA 200/240V, 6A, 8.2 feet (2.5 m) Peoples Republic of China CAB-250V-10A-CN 250 V, 10 A, 8.2 feet (2.5 m) South Africa CAB-250V-10A-ID 250 V, 10 A, 8.2 feet (2.5 m) Cisco Nexus 93108TC-FX ACI Mode Hardware Installation Guide... -
Page 62: Hvac/Hvdc Power Cables Supported By Aci-Mode And Nx-Os Mode Switches
6.6-foot (2.0 m) cable with Saf-D-Grid and three terminal connectors 300V AC / 400V DC (+200/-200 V DC) NO-POWER-CORD All except Argentina, Brazil, and Not applicable Japan No power cord included with switch Cisco Nexus 93108TC-FX ACI Mode Hardware Installation Guide... -
Page 63: Dc Power Cable Specifications
Products should comply with CE Markings according to directives 2004/108/EC and 2006/95/EC. Safety • CAN/CSA-C22.2 No. 60950-1 Second Edition • EN 60950-1 Second Edition • IEC 60950-1 Second Edition • IEC 623681 • AS/NZS 60950-1 • GB4943 Cisco Nexus 93108TC-FX ACI Mode Hardware Installation Guide... - Page 64 • CNS13438 Class A EMC: Immunity • EN55024 • CISPR24 • EN300386 • KN 61000-4 series RoHS The product is RoH-6 compliant with exceptions for leaded-ball grid-array (BGA) balls and lead press-fit connectors. Cisco Nexus 93108TC-FX ACI Mode Hardware Installation Guide...
-
Page 65: Leds
Temperature exceeds the major alarm threshold. The switch is not receiving power. Green Fans and power supply modules are operational. Amber At least one fan or power supply module is not operating. Cisco Nexus 93108TC-FX ACI Mode Hardware Installation Guide... -
Page 66: Fan Module Leds
Power supply is on and outputting power to the switch. Flashing Power supply is connected to a power source but not outputting power to the green switch—power supply might not be installed in the chassis. Power supply is not receiving power. Cisco Nexus 93108TC-FX ACI Mode Hardware Installation Guide... - Page 67 Power supply warning—possibly one of the following conditions: • High voltage • High power • Low voltage • Power supply installed in chassis but not connected to a power source • Slow power supply fan Cisco Nexus 93108TC-FX ACI Mode Hardware Installation Guide...
- Page 68 LEDs LEDs Cisco Nexus 93108TC-FX ACI Mode Hardware Installation Guide...
-
Page 69: Additional Kits
• M4 x 8-mm Phillips pan-head screws (2) Not applicable EAC Compliance document Not applicable Hazardous substances list for customers in China The following table lists and illustrates the console cable (CAB-CONSOLE-RJ45) that can be ordered. Cisco Nexus 93108TC-FX ACI Mode Hardware Installation Guide... -
Page 70: Rack Mount Kit N3K-C3064-Acc-Kit
Not applicable Hazardous substances list for customers in China The following table lists and illustrates the console cable (CAB-CONSOLE-RJ45) that can be ordered. Illustration Description Quantity Console cable with DB-9F and RJ-45F connectors Cisco Nexus 93108TC-FX ACI Mode Hardware Installation Guide... -
Page 71: Site Preparation And Maintenance Records
Your completion of each task ensures a successful switch installation. Planning Activity Verification Time and Date Space evaluation: Space and layout Floor covering Impact and vibration Lighting Physical access Maintenance access Environmental evaluation: Ambient temperature Humidity Altitude Atmospheric contamination Airflow Cisco Nexus 93108TC-FX ACI Mode Hardware Installation Guide... -
Page 72: Contact And Site Information
(transceivers) EMI evaluation: Distance limitations for signaling Site wiring RFI levels Contact and Site Information Use the following worksheet to record contact and site information for the installation. Contact person Contact phone Cisco Nexus 93108TC-FX ACI Mode Hardware Installation Guide... -
Page 73: Chassis And Module Information
Domain name IP broadcast address Gateway/router address DNS address Use the following worksheet to record information about the modules in the switch. Module Slot Module Type Module Serial Number Notes Fan module 1 Cisco Nexus 93108TC-FX ACI Mode Hardware Installation Guide... - Page 74 Site Preparation and Maintenance Records Site Preparation and Maintenance Records Module Slot Module Type Module Serial Number Notes Fan module 2 Fan module 3 Fan module 4 Power Supply 1 Power Supply 2 Cisco Nexus 93108TC-FX ACI Mode Hardware Installation Guide...