
Summary of Contents for Microtek H-Screen 911
- Page 1 Document Camera H-Screen 911 H-Screen 911L H-Screen 912L User's Manual www.microtek.com...
- Page 2 The contents of this manual have been checked carefully for accuracy, and every effort has been made to ensure that there are no errors. However, Microtek makes no guarantee as to the accuracy of the contents of this document and reserves the right to make changes to the contents without prior warning.
-
Page 3: Table Of Contents
Table of Contents Introduction ................5 Features ................5 Taking a Closer Look ............... 6 Initial Setup ................7 Step 1: Unpacking Package Contents ........7 Step 2: Installing the Software ..........8 Step 3: Connecting the Scanner ..........9 Step 4: Positioning Documents ..........10 Step 5: Activating Software .......... - Page 4 ID Card Recognition .............. 34 Shooting Video ..............35 Image Post-processing and Applications ........ 36 Appendix ................37 FAQ and Solutions ..............37 Specifications of H-Screen 911 ..........38 Specifications of H-Screen 911L ..........39 Specifications of H-Screen 912L ..........40 H-Screen Series User's Manual...
-
Page 5: Introduction
Introduction Microtek’s H-Screen document camera carries out a newly foldable design. Adopted with high-quality CMOS sensor and auto-focus lens, it can capture images of most objects and generate images with superior quality. H-Screen document camera requires only the power of the connected computer, without consuming extra external power at all. -
Page 6: Taking A Closer Look
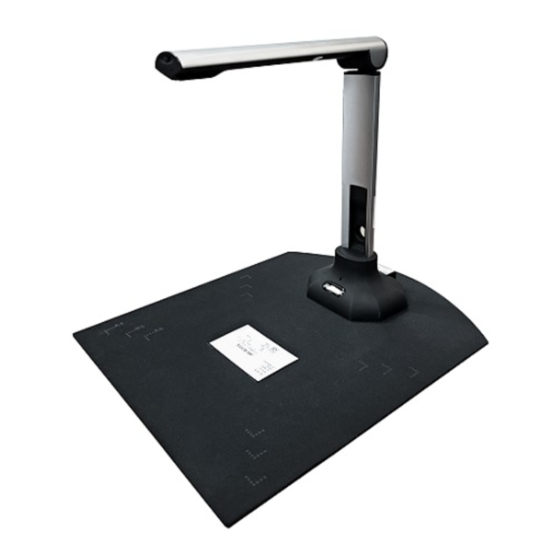
Taking a Closer Look Fill Light Switch Lens Power Indicator Fill Light (6 LEDs) USB Port H-Screen Series User's Manual... -
Page 7: Initial Setup
NOTE: • Please check for all components come with your document camera package. If something is missing, please contact with your local dealer or Microtek's customer service center. • Do not place the document camera on any slippery, slanted, or unstable surface. -
Page 8: Step 2: Installing The Software
1. Turn on your computer. 2. Place the Microtek Software DVD into a drive. From a pop-up window, click “Run autorun.exe” to start the installation of the software. NOTE: If the Microtek Software Installer screen does not come up automatically, double-click the following in succession: “My Computer”;... -
Page 9: Step 3: Connecting The Scanner
Step 3: Connecting the Document Camera 1. Connect one end of the 2.0 cable to the document camera's USB port. 2. Connect the other end the USB 2.0 cable to your computer. When done, the power indicator at the front bottom of the document camera will light up in blue. -
Page 10: Step 4: Positioning Documents
Step 4: Positioning Documents 1. Place the Black Pad on a flat and stable surface, with the side with texts facing up. 2. Locate a cross mark on the Black Pad, aim the document camera for the cross mark and then place it down on the Black Pad, with the front side facing frontward. -
Page 11: Step 5: Activating Software
Step 5: Activating Software To activate the software: Double-click the “Microtek ScanWizard CAM” icon, shown as the left graph, on the desktop to activate the software. If the document camera is connected correctively, you should be able to preview the real-time image taken by the lens on the screen. -
Page 12: Basic Shooting
Place the target on the center of the Black Pad, aligning the side to be scanned facing up and toward the lens. 2. Double-click the “Microtek ScanWizard CAM" icon on the desktop to activate the software interface. 3. Click the “Select” button at the top-right side of the interface to select a preferred storage path for the saved file. -
Page 13: Shooting Your First Video
Shooting Your First Video 1, Refer to the step 1 to 3 in “Shooting Your First Still Image” section for how to put on your target, enable the software program and select a storage path for the saved file. 2. Click the “REC” button at the bottom of the interface. The REC window will pop up on the screen. -
Page 14: Camera Imaging Software
Launching Software To launch Microtek ScanWizard CAM, double-click the “Microtek ScanWizard CAM” icon on the Windows desktop; or choose Start, All Programs, Microtek ScanWizard CAM , then Microtek ScanWizard CAM . When the software is activated, if the document camera is connected correctively, you should be able to preview the real-time image taken by the lens and the interface will look like as the graph shown below. -
Page 15: User Interface & Navigation
User Interface & Navigation A. Storage Path/Select/Open: Used to select a folder to save the captured images or recorded videos. B. Attribute: Used to switch between the primary lens and secondary lens. C. Basic image settings: Used to select a desired resolution, file format and color mode for captured images. - Page 16 Set button: Click to activate the Set window to set up file names, JPEG quality and the language used in the interface. Mark button: Click to set up parameters related to the watermark appearing on the captured image. K. Instant Function buttons: Used to capture image with specific function applied.
-
Page 17: Software Functions
Software Functions File Save Location Setting Storage Path displays the specific folder in which the captured images and videos are saved. Click the “Select” button to toggle through possible saving paths appearing in a pop-up window and to select the one you want to use to save the captured images. -
Page 18: Shooting Modes
Shooting Modes Normal Shooting When the document camera is activated successfully, click the “Capture” button to start a capture of the image. When done, the captured image will be displayed as a thumbnail image in the Thumbnail View window at the left side of the interface. Timed Shooting This shooting mode allows the camera to capture images continuously at a pre- defined time interval. -
Page 19: Smart Shooting
Smart Shooting This shooting mode allows the camera to capture images continuously when detecting of changes of targets automatically. Click the “WShoot” button to activate the WiseCapture window. Please note that do not place the target into the shot range before clicking the “Start”... -
Page 20: Basic Image Settings
Basic Image Settings Resolution Setting Select a resolution for the captured image. Click the “PreviewResolution” options menu at the right side of the interface to see the available resolutions supported by the document camera in use. Click to select the resolution you want to use for the captured image. -
Page 21: Image Color Mode Setting
Image Color Mode Setting Select color types for the captured images. At the right side of the interface, look for the “ColorMode” column and then select the preferred color type for the captured images. The supported options are Color, Gray and Binary. H-Screen Series User's Manual... -
Page 22: Advanced Image Settings
Advanced Image Settings Cutting Mode Setting This lets you decide if you have a need to crop the shooting frame of the original target. At the right side of the interface, look for the “CutMode” column and then select either of three cutting ways. These three cutting ways are NoCut, AutoCut and Custom. - Page 23 — Custom: This allows you to manually define the size of the crop frame. All you have to do is directly frame the area to be cropped in the Preview window. Custom The frame of Custom effect (in blue) H-Screen Series User's Manual...
-
Page 24: Image Quality Adjustments
Image Quality Adjustments The “Video Proc Amp” column includes some image correction tools which allow you to adjust or enhance images for outputting your captured images. You can preview these changes to the images before you capture. By default, adjustable parameters displayed here are Brightness, Contrast, and Exp (Exposure). -
Page 25: Image Processing Functions
Image Processing Functions The “ImageEffect” column includes some image improvement tools which can remove unwanted black boarders, background colors and noise of captured images and sharpen details of captured images at the same time. — delBlackEg: This lets the camera automatically removes black boarders around the captured image. -
Page 26: The Preview Window
The Preview window The Preview window display a real-time preview image captured by the document camera. The size of the Preview window depends on the model of document camera in use. The Thumbnail View window The Preview window The Preview Auxiliary tools The Preview Auxiliary Tools By using the auxiliary tools under the Preview window, users can make the... -
Page 27: Enabling And Setting Up Secondary Lens Buttons
Enabling and Setting Up Secondary Lens Buttons Secondary Lens Buttons can work only when the model of the document camera in use support these functions. Click “ ” button to activate the secondary lens. The screens of the main lens and secondary lens will be displayed in the interface. -
Page 28: The Setup
The Setup In the “Set” window, you are allowed to name files by different methods, to adjust quality for JPG image, set up printing parameters and on-screen display language. Click the “Set” button to enable the Set window and then start to use functions inside. -
Page 29: Jpeg Image Quality Setting
Named by using the Time method Named by using the Custom method Named by using the Fixed Name method Named by using the Barcode method JPEG Image Quality Setting When the FileType is set as “JPG”, you are allowed to drag the slide bar in the “JPG Quality”... -
Page 30: Watermark Setting
Watermark Setting The “Mark” function button allows you to add watermarks, such as texts, images or time, into your captured images. To activate the function, click the “Mark” button to enable the WaterMark window first. When “Add WaterMark” option is checked, customized watermarks will be added into the captured image. -
Page 31: Instant Function Buttons
Instant Function Buttons Instant Printing The “Print” function button allows the document camera to work like a copier. Using together with your printer, captured images can be printed out successively without interruptions. Click the “Print” button to start printing out the captured image. Instant Document The “Document”... -
Page 32: Creating A Multi-Page Pdf
Creating a Multi-page PDF The “MulPDF” function button can merge all continuously captured images as one PDF file. To activate the function, click the “MulPDF” button to enable the MulPDF window first. In the MulPDF window, click the “Add Page” to start a shot of an image. The captured image should be displayed in the window immediately when it is done. -
Page 33: Merging Multiple Images Into One Image
Merging Multiple Images into One Image The “Merge” function button can combine multiple captured images as one image to save. To activate the function, click the “Merge” button to enable the MergeImage window first. In the MergeImage window, set up numbers of pages and directions used for the merged image;... -
Page 34: Id Card Recognition
ID Card Recognition By using together with an ID card reader or OCR software, the“ IDCard” function button is able to transform and export information of ID cards as editable files, for instance, Excel, and then to save it for further applications. Please note that some models of document cameras do not support ID card readers. -
Page 35: Shooting Video
Shooting Video The “REC” function button allows you to record images captured by a document camera or the images shown on a screen as a video for further applications. Click the “REC” button to activate the REC window. Click the button to start recording In the REC window, select a recording source, Camera or Display, by clicking the “Src”... -
Page 36: Image Post-Processing And Applications
Image Post-processing and Applications The “Edit” function button allows you to use captured images for further applications, such as file conversions, OCR, sending to E-mail or clouds to share, printing and so on. Of course, you can also directly perform post-processing image effects on these captured images, for instance, rotating, size adjustments, cropping, text adding, color modification and image quality adjustments. -
Page 37: Appendix
Appendix FAQ and Solutions 1. How can I get a better result when using the delBlackEg tool? In order to get a better result when using the delBlackEg tool, it is suggested that there should be chromatic aberration between a shooting object and the background. -
Page 38: Specifications Of H-Screen 911
Specifications of H-Screen 911 Type Document Camera Image Sensor CMOS Focus Auto focus Color Depth 24-bit Resolution Still Image: 4000 x 3000 (12 megapixels) Video: 750 x 630 pixels Shooting Size A4, A5, A6 Shooting Speed 1 sec/page Color Mode... -
Page 39: Specifications Of H-Screen 911L
Specifications of H-Screen 911L Type Document Camera Image Sensor CMOS Focus Auto focus Color Depth 24-bit Resolution Still Image: 4000 x 3000 (12 megapixels) Video: 750 x 630 pixels Shooting Size A3, A4, A5, A6 Shooting Speed 1 sec/page Color Mode Color, grayscale, and black-and-white Fill Light 6 LEDs... -
Page 40: Specifications Of H-Screen 912L
Specifications of H-Screen 912L Type Document Camera Image Sensor CMOS Focus Auto focus Color Depth 24-bit Resolution Still Image: 4608 x 3456 (16 megapixels) Video: 750 x 630 pixels Shooting Size A3, A4, A5, A6 Shooting Speed 1 sec/page Color Mode Color, grayscale, and black-and-white Fill Light 6 LEDs...