Motorola i870 User Manual
Digital multi-service data-capable phone
Hide thumbs
Also See for i870:
- User manual (252 pages) ,
- Quick start manual (2 pages) ,
- User manual (219 pages)

Related Manuals for Motorola i870

Summary of Contents for Motorola i870
- Page 1 Motorola iDEN Digital Multi-service Data-capable Phone i870 Phone User’s Guide DRAFT @NNTN6539A@ NNTN6539A...
- Page 3 For more information on SIM card compatibility, go to www.motorola.com/iden/support. Defects or damage to your Motorola phone that result from the use of non-Motorola branded or certified Accessories, including but not limited to replacement housings and or other peripheral accessories, are excluded from warranty coverage.
-
Page 5: Table Of Contents
Contents Using Speakerphone........26 Using Mute ............27 Making Emergency Phone Calls .....27 Getting Started........... 1 Locating Your SIM Card ........3 TM ............28 MOTOtalk Battery ...............4 Switching to MOTOtalk ........28 Activating Service..........7 Exiting MOTOtalk ..........29 Powering On and Off.........7 Channels and Codes........29 Phone Programming .........8 Private MOTOtalk Calls........31 Finding Your Phone Number......9... - Page 6 Advanced Calling Features .....54 Deleting Items ..........39 Making Calls From the Recent Calls List ..39 Call Waiting .............54 Switching Between Calls .........54 Contacts ........... 41 Putting a Call on Hold ........55 Accessing Contacts.........42 Calling 2 People ..........55 Creating Entries..........42 Creating Pauses and Waits While Dialing..56 Storing Numbers Faster ........44 Making International Calls .......56 Editing Entries ..........45...
- Page 7 Assigning Ring Tones to Contacts ....72 Reading from the Message Center ....82 Viewing Ring Tone Assignments.....72 Creating and Sending Messages ....82 Downloading More Ring Tones .......73 Sorting Messages ...........85 About DRM Ring Tones ........73 Managing Memory ..........85 Managing Memory...........73 Camera ............86 Deleting Custom Ring Tones ......73 Accessing the Camera ........86 Entering Text..........
- Page 8 Locking Items ..........98 Managing DRM Items ........111 Deleting Items ..........98 Using Send via PTT ........114 Accessing the Camera ........99 Sending a Picture ..........114 Copying and Moving Items......99 Receiving a Picture ........115 Changing Storage Preference......99 Sending My Info and Contact Information ..116 Accessing the Audio Player......100 Managing Memory.........100 My Info .............119...
- Page 9 Running Applications........128 Viewing Your Approximate Location .....145 Suspending Applications .......128 Enhancing GPS Performance .......146 Resuming Applications........129 Updating Satellite Almanac Data ....147 Ending Applications........129 Setting Privacy Options .........148 Downloading Applications ......129 Using GPS with Map Software ......149 Deleting Applications........130 Voice Records ........152 Managing Memory.........130 Viewing Voice Records .........152 Shortcuts on the Main Menu ......130...
- Page 10 Operational Cautions ........178 Accessory Safety Information .......179 Shortcuts ..........167 Creating a Shortcut ........167 Hearing Aid Compatibility .....181 Using a Shortcut..........167 MOTOROLA LIMITED WARRANTY ..183 Editing a Shortcut ..........168 Deleting Shortcuts .........168 Limited Warranty Motorola Communication Products Using a Headset........169 (International)........187...
- Page 11 Responsible Party Name: Motorola, Inc. communications. However, there is no guarantee that interference will not occur Address: 8000 West Sunrise Boulevard in a particular installation.
-
Page 12: Getting Started
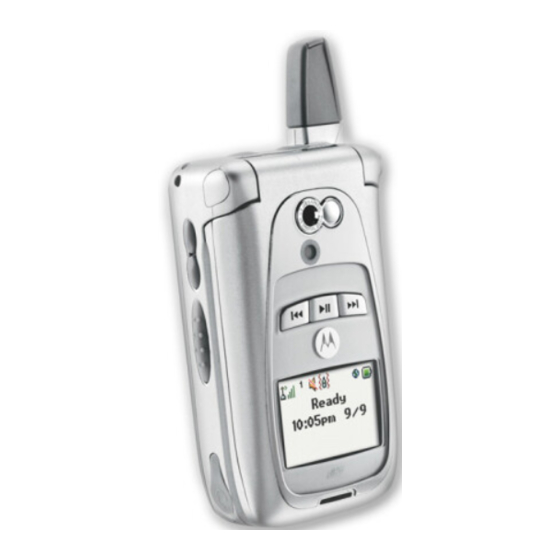
Getting Started retractable antenna camera lens quick flip button spotlight mirror volume controls external light sensor display Push-To-Talk audio player camera key (PTT) button keys speaker (in back) audio jack memory card slot power button microphone accessory connector... - Page 13 Power button. Acts like s when the flip is closed; turns speaker on; used with voice names and Navigation key — press the arrows to voice records. scroll through menus and lists. Acts like e when the flip is closed; accesses recent calls;...
-
Page 14: Locating Your Sim Card
SIM card When an audio file is playing, rewinds and skips to the previous audio file. To start using your i870 phone: • Make sure your SIM card is in place. • Charge the battery. If your SIM card is not in the SIM card holder, it •... -
Page 15: Battery
Battery Battery 3 Allow the battery door to pop up, slide it forward, and remove it from the back of your phone. Removing the Battery Door 1 Make sure the phone is powered off. See “Powering On and Off” on page 7. 2 Slide the release button back until it releases the battery door. - Page 16 Getting Started 3 Replace the battery door and press it gently until 2 Open the connector cover. you hear a click. connector cover Charging the Battery Your phone comes with a rapid travel charger. 3 Plug the other end of the charger into the 1 Plug the charger into an electrical outlet.
- Page 17 Rapid Mid-Rate Battery Use and Maintenance High 2 hours 4 hours Performance • The Motorola iDEN Approved Lithium Ion chargers provide optimum performance. Other Maximum 3.5 hours 7.5 hours chargers may not fully charge the iDEN Lithium Capacity Ion battery or may yield a reduced number of lifetime charge cycles.
-
Page 18: Activating Service
Getting Started Note: When powering on, if you press p for • Lithium Ion batteries have a self discharge rate and without use, lose about 1% of their charge more than 5 seconds, you will turn off per day. calls and other transmissions. See “Temporarily Turning Off Transmissions”... -
Page 19: Phone Programming
Phone Programming 2 Press A under Ok. As your phone connects to the network, you will see a welcome message and a connecting 3 You are prompted to enable security. Press A message. When the idle screen appears, the under Yes. A series of screens appears. If you phone is ready to use. -
Page 20: Finding Your Phone Number
Getting Started Finding Your Phone Number The external display shows a shortened version of the internal display. To see more information, open My Info lets you view your phone number, Private the flip. ID, and other phone information: status icons 1 Press m to access the main menu. - Page 21 Phone Basics Display Options • Confirms actions • Places and answer calls Two display options appear at the bottom of most screens. You select a display option by pressing Menu Key the option key below it. Many features provide context-sensitive menus Menus and Lists that let you access related features and actions.
- Page 22 Getting Started Contacts Create, view, store, edit Profiles Groups of settings you Contacts and SDG lists*. apply together. See See page 41. page 162. * Selective Dynamic Group Calling Call Alert Lists call alerts. See (SDGC) may not be offered by page 34.
- Page 23 Phone Basics Status Icons * Audio Player Access the MP3 audio player. See page 101. Status icons appear at the top of the display. Some appear at all times. Others appear only when your Quick PTT Access* any Private IDs phone is engaged in certain activities or when you and SDG lists on your have activated certain features.
- Page 24 Getting Started Active Phone Line — 1 indicates Transmitters — Your phone is set phone line 1 is ready to make calls; not to receive calls and other 2 indicates phone line 2 is ready to transmissions. See “Temporarily make calls. Turning Off Transmissions”...
-
Page 25: Using The Memory Card
• The filename can only contain ASCII characters. The audio player on your i870 phone works with the memory card and supports the following file • The filename can be up to 32 characters long, formats: including the file extension. - Page 26 Getting Started • Pictures sent via Bluetooth Images View GIF (GIF89A and GIF87A), JPEG, WBMP, PNG Setting Your Storage Preference Capture You can choose whether media items are saved to Video Playback H.263, MPEG4 your phone’s memory or to the memory card. Record H.263 To set the media storage option in Settings:...
- Page 27 Using the Memory Card 2 Slide in the memory card. 2 Open the memory card slot cover. 3 Your phone may prompt you to use the memory 3 Push the memory card to release it from the slot. card to store new media items, or to go to the 4 Pull out the memory card.
-
Page 28: Sim Card Security
Getting Started SIM Card Security Important: If you enter your PIN incorrectly 3 times, your SIM card is blocked. To unblock Your SIM card protects your personal information. your SIM card, you must contact your The SIM card stores all your Contacts information. service provider. - Page 29 SIM Card Security Turning the PIN Requirement On and Important: If you unsuccessfully enter the PUK code 10 times, your SIM card is permanently blocked and must be When the SIM PIN requirement is on, you are replaced. If this happens, all data is prompted to enter your PIN each time you turn on lost.
- Page 30 Getting Started Inserting and Removing Your SIM • Datebook events Card • Options set using the Personalize menu Important: Do not touch the gold-colored areas of Inserting Your SIM Card your SIM card. 1 With your phone powered off, remove the Switching SIM Cards battery door and battery.
- Page 31 SIM Card Security 3 Open the SIM card holder. 5 Close the SIM card holder. 4 Carefully slide your SIM card into the SIM card 6 Slide the latch toward the SIM card holder. holder. Removing Your SIM Card Important: To avoid loss or damage, do not remove your SIM card from your phone unless absolutely necessary.
- Page 32 Getting Started 2 Slide the latch away from the SIM card holder. 4 Carefully slide your SIM card out of the SIM card holder. latch 3 Open the SIM card holder. 5 Close the SIM card holder. 6 Slide the latch toward the SIM card holder. Note: Protect your SIM card as you would any delicate object.
-
Page 33: Antenna
Antenna Antenna Important: Failure to fully extend or retract the antenna until the antenna clicks into The retractable antenna on your i870 phone is place causes severely degraded designed to be extended during calls. performance, which may result in missed calls, dropped calls, or garbled To extend the antenna, pull gently on the tip until audio. -
Page 34: Making Calls
With the Flip Closed You can make phone calls with the flip closed Your i870 phone makes two types of calls: digital using a voice name or the recent calls list to select cellular phone calls and Private calls. With Private the number you want to call. -
Page 35: Receiving Calls
Receiving Calls Press e. -or- Tip: To let someone know you want to talk to him or her on a Private call, send a call Press A under No. alert. See “Call Alerts” on page 34. Ending Receiving Calls If the flip is closed, press . -
Page 36: Choosing A Number To Call
Making Calls Choosing a Number to Call • Select the number in a text message you have received. See “Receiving a Message” on page You can choose the number you want to call in many ways: Using a Voice Name •... -
Page 37: Missed Phone Calls
Missed Phone Calls Using Speed Dial and Turbo Dial ® With the Flip Open If you want to dismiss the missed call message, Each phone number stored in Contacts is assigned press A under Back. -or- a Speed Dial number, which you can use to call that number. -
Page 38: Using Mute
Making Calls With the Flip Closed When you make an emergency call, your phone’s GPS Enabled feature can help emergency service When you make a call with the flip closed, personnel find you, if you are in a location where speakerphone is always on. -
Page 39: Mototalk Tm
Switching to MOTOtalk MOTOtalk • Data transmission • Incoming message notification Note: This feature may not be offered by your • Musical ring tones service provider. • Call forwarding With MOTOtalk, you can make and receive 2-way • Messages radio calls without network coverage. If you are travelling outside your service provider's coverage •... -
Page 40: Exiting Mototalk
MOTOtalk Exiting MOTOtalk MOTOtalk opens to the last code and channel used on your phone. You can view the code and To switch to network mode: channel your phone is currently set to on the MOTOtalk idle screen. 1 From the MOTOtalk idle screen, press m. 2 Scroll to MT Options and press O. - Page 41 Channels and Codes 4 Select a code. Note: An incoming MOTOtalk call can be terminated at any time by pressing e. 5 When you are finished, press A under Back to return to the MOTOtalk idle screen. Receiving All MOTOtalk Calls Making Code Calls If you set the code to Receive All, your phone can receive MOTOtalk transmissions from any phone...
-
Page 42: Private Mototalk Calls
MOTOtalk Private MOTOtalk Calls To set the code to Pvt Only: 1 From the MOTOtalk idle screen, press A under If you want to have a private conversation without Edit. other parties listening in, you can make a private 2 Scroll to Code. MOTOtalk call. -
Page 43: Making Emergency Calls While In Mototalk Tm Mode
Making Emergency Calls while in MOTOtalk Mode Setup Options Ending Code Calls and Private MOTOtalk Calls You can set up MOTOtalk options on the MT Code calls and private MOTOtalk calls will end Options screen. You can access this screen in both automatically after 6 seconds of inactivity. - Page 44 MOTOtalk Note: If Direct Launch is set to On, the MOTOtalk setup options will be unavailable from the main menu. However, you can still access setup options while in MOTOtalk by pressing m and selecting MT Options. To turn off Direct Launch: 1 From the Setup screen, scroll to Direct Launch and press O.
-
Page 45: Call Alerts
Call Alerts Receiving Call Alerts When you receive a call alert, you must answer, Sending a call alert lets the recipient know you queue, or clear it. You cannot receive phone calls want to talk to him or her on a Private call. or Private calls until you do. - Page 46 Call Alerts Viewing Call Alerts 4 Press the PTT button until Alert Successful appears on the display. 1 From the main menu, select Call Alert. Deleting Call Alerts 2 Scroll through the list. To delete a call alert from the queue: Viewing Date and Time 1 From the call alert queue, scroll to the call alert To view the date and time a call alert was received:...
-
Page 47: Recent Calls
Recent Calls The Private ID Contacts type icon appears when you receive a Private call or call alert, even if the number is not stored in Contacts. The recent calls list displays information associated with calls you have made and received Call alerts you have received appear as Private and call alerts you have received. -
Page 48: Contact Information From Other Phones
Recent Calls • The Contacts type icon associated with the This icon appears with My Info from other number or address contained in the contact phones on the recent calls list, along with the information. If the item contains more than one Private ID of the person who sent the information. -
Page 49: Storing Items To Contacts
Storing Items to Contacts 2 Press A under Store. -or- To view the details of an item o the list: If Store is not one of your options: Press m. From the recent calls list, select the item you want information on. Select Store or Update Contacts. -
Page 50: Deleting Items
Recent Calls Deleting Items • If you scroll to My Info from another phone, you can make a call to the Private ID of the To delete an item from the recent calls list: phone that sent the information. • If you scroll to contact information from 1 From the recent calls list, scroll to or select the another phone, you can make a call to any of item you want to delete. - Page 51 Making Calls From the Recent Calls List 2 Press the volume controls to scroll to the name or number you want to call. • If you scroll to a call, you can make a call to the number that made the call. •...
-
Page 52: Contacts
Contacts • A Contacts type — Each number or address stored must be assigned a Contacts type: Contacts stores up to 600 numbers or addresses. Mobile phone number Each Contacts entry can store several numbers or addresses. Private Private ID Information stored in Contacts is saved on your SIM card. -
Page 53: Accessing Contacts
Accessing Contacts Creating Entries • A number or address — Each Contacts entry must contain a number or address. This may be any type of phone number, Private ID, SDG list A number or address and a Contacts type are number, Talkgroup number, email address, or IP required for all Contacts entries. - Page 54 Contacts 3 If you want to assign a ring tone or picture to the 7 If you want to add more numbers or addresses entry, select [Ring Tone/Picture]. See to the entry: “Assigning a Ring Tone or Picture”. Scroll past the information you already entered. 4 To assign a Contacts type to the number or Enter the additional information for the entry address being stored:...
-
Page 55: Storing Numbers Faster
Storing Numbers Faster Scroll to Picture. Scroll left or right to choose a 3 If you want to create a voice name for a phone picture. -or- number, select Voice Name. Select Picture. Select the picture you want to As directed by the screen prompts, say and assign. -
Page 56: Editing Entries
Contacts 6 If you want to add more information to the entry, • A small version of the picture assigned to the follow the applicable instructions in “Creating entry, if you have set Contacts to show pictures Entries” on page 42. in the Contacts list. - Page 57 Viewing Entries To select an entry: Viewing a Large Picture 1 From the Contacts list, select the entry you want To view a large version of the picture assigned to to view. an entry: 2 Scroll to view the numbers and addresses 1 Select the entry.
-
Page 58: Deleting Entries
Contacts Searching for a Name Deleting Entries To search for a name in Contacts: Delete an Entry 1 From the Contacts list, press A under Search. 1 From the Contacts list, scroll to or select the -or- entry you want to delete. If Search is not one of your options: Press m. -
Page 59: Checking Capacity
Checking Capacity Checking Capacity To program a wait: Press and hold * until the letter W appears. The To see how many numbers are stored in Contacts: W means your phone waits before dialing 1 From the Contacts list, press m. further. -
Page 60: Making Calls From Contacts
• Your phone places the call to the phone number GSM phone, download iDEN Phonebook Manager. assigned to the Contacts type displayed. Go to idenphones.motorola.com/iden/support for • If the Contacts type displayed is not a phone more information. number, your phone places the call to the phone... - Page 61 Accessing Contacts with GSM Phones You can use iDEN Phonebook Manager to make the Contacts information saved to your i870 phone’s SIM card accessible in this type of phone.
-
Page 62: Call Forwarding
Call Forwarding Phone line 2 is active; calls to phone lines 1 and 2 are being forwarded. Call forwarding sends calls to the phone numbers you specify. You can forward all calls to one To forward all calls: number or forward missed calls to different 1 From the main menu, select Call Forward >... -
Page 63: Turning Off Call Forwarding
Turning Off Call Forwarding Turning Off Call Forwarding Note: If you want a type of missed call sent to voice mail, the call forwarding number for If you do not want all your calls forwarded, turn the that type of missed call must be your feature off: voice mail access number. -
Page 64: Viewing Call Forwarding Settings
Call Forwarding Viewing Call Forwarding Settings 1 From the main menu, select Call Forward > Forward > All Calls. 2 With To highlighted, press A under Status. -
Page 65: Advanced Calling Features
Advanced Calling Turn Off Call Waiting To turn off Call Waiting during a call: Features 1 Press m. 2 Select In Call Setup > Call Waiting. Call Waiting 3 Set this option to Off. Call Waiting lets you receive a second call while on Tip: To turn Call Waiting back on while still on an active call. -
Page 66: Putting A Call On Hold
Advanced Calling Features Putting a Call on Hold Merging 2 Calls into a 3-Way Call 1 While on an active call, press m. After you put a call on hold and place a second call, you can combine these calls into a 3-way call: 2 Select Hold. -
Page 67: Creating Pauses And Waits While Dialing
Creating Pauses and Waits While Dialing Creating Pauses and Waits Making International Calls While Dialing Note: This feature may not be offered by your service provider. You can enter a pause or wait while dialing a number. For information on using pauses and Plus Dialing lets you place an international call to waits, see “Creating Pauses and Waits”... -
Page 68: Quick Ptt
Advanced Calling Features To A Private ID Quick PTT lets you quickly access any Private IDs on your phone so that you can make a Private call, 1 From the main menu, select Settings > 2-Way or create a SDG list and make a SDG call. For Radio >... -
Page 69: Setting Flip Actions
Setting Flip Actions Note: If you do not assign a name, the SDG list To set your phone not to end calls when you close is named “SDG” followed by the number the flip: of members in the SDG list. For example, Set Flip to End to Off in step 2. -
Page 70: Using Your Phone As A Modem
Advanced Calling Features • Circuit Reset — keeps a running total of all of phone and the other device.To connect your phone your circuit data use, until you reset it. wirelessly, you must have a Bluetooth adapter for the other device. To create a wired connection, use •... -
Page 71: Making Tty Calls
To use these services, you must install the iDEN Wireless Data Services software (available separately). For more information on setting up your computer and your i870 phone for packet and circuit data calls, refer to the Wireless Data Services User’s Guide or contact your service provider. - Page 72 Advanced Calling Features 3 Use your phone to enter phone numbers and • VCO (Voice-Carry-Over) — You speak into your make calls. phone and read text replies on your TTY device. • HCO (Hearing-Carry-Over) — You type text on When you make a TTY call, these icons appear on your TTY device and listen to voice replies on the phone’s display: your phone speaker.
- Page 73 Making TTY Calls Important: When you are using HCO, the sound coming from your phone speaker may be uncomfortably loud. Use caution when putting the phone to your ear. (For information on setting the volume of your phone speaker, see “Setting the Volume”...
-
Page 74: Group Calls And Selective Dynamic Group Calls
Activated • Selective Dynamic Group calls — calls to a SDG Dialing list Note: In order to store SDG lists to your i870, you must use a SDG-capable SIM card. Group Calls For more information about SDG-capable SIM cards, contact your service provider. - Page 75 Group Calls Joining a Talkgroup The Private ID or name of the person who is speaking will appear on the display below the Your sales representative or your service provider Talkgroup number. establishes Talkgroups for you and assigns each Talkgroup a Talkgroup number. You can choose a Turning off Group Calls name for each of your Talkgroups when you create To set your phone to prevent you from hearing...
-
Page 76: Selective Dynamic Group (Sdg) Calls
Group Calls and Selective Dynamic Group Calls Selective Dynamic Group Note: If you do not assign a name, the SDG list is named “SDG” followed by the number (SDG) Calls of members in the SDG list. For example, “SDG (8)” for a SDG list with 8 members. Note: This feature may not be offered by your service provider. - Page 77 Selective Dynamic Group (SDG) Calls 2 Press A under Edit. To add members from Contacts, the recent calls list, or Memo: 3 Scroll to the member you want to remove. 4 Press m. 1 While creating a SDG list, select [Add Member]. -or- 5 Select Remove Member.
- Page 78 Group Calls and Selective Dynamic Group Calls From an Active SDG Call With the Flip Closed 1 During an active SDG call, press m. To make a SDG call from the recent calls list with the flip closed: 2 Select Store SDG. 1 Press ..
- Page 79 Selective Dynamic Group (SDG) Calls 5 If you want to save the SDG list you have In the SDG Call Details view, these icons appear created: Press m. Select Store SDG. -or- next to member names or Private IDs: If you do not want to save the SDG list, press A under Done.
- Page 80 Group Calls and Selective Dynamic Group Calls 2 Press m. 3 Select Send SDG via PTT. 4 To include yourself in the list, press A under Yes. -or- To exclude yourself from the list, press A under Note: If you choose to include yourself and the list already contains 20 members, you will be prompted that the list is full.
-
Page 81: Memo
Memo To store the memo number to Contacts: 1 From the main menu, select Memo. Memo lets you store a number, make a call to that 2 Press m. number, and save it to Contacts. 3 Select Store to Contacts. To create a memo: 4 To store the number as a new entry, select [New Contact]. -
Page 82: Ring Tones
Ring Tones 1 From the main menu, select Ring Tones > VibeAll. 2 Set this option to On. To set the ring tone your phone makes when you receive phone calls, call alerts, message Tip: Pressing the volume controls to turn down notifications, pictures sent using Send via PTT, or the volume as far as possible sets VibeAll Datebook reminders:... -
Page 83: Ring And Vibrate
Ring and Vibrate Assigning Ring Tones to These icons indicate how the ringer is set. Contacts Q The phone always vibrates instead of making a sound. You can set the ring tone your phone makes when you receive phone calls or call alerts from The phone vibrates instead of making a someone you have stored in Contacts. -
Page 84: Downloading More Ring Tones
Ring Tones 4 Press m. 6 Scroll to view ring tones assigned to features and Contact entries. 5 Select Memory Usage. Deleting custom ring tones frees memory. Downloading More Ring Note: Ring tones are stored in your phone using Tones the same memory space used to store messages, voice records, pictures, If you want to use other ring tones, you can... - Page 85 Deleting Custom Ring Tones 3 Scroll to the ring tone you want to delete. 4 Press m. 5 Select Delete. 6 Press A under Yes to confirm.
-
Page 86: Entering Text
Entering Text Using Word Mode In Word mode, T9 Text Input analyzes the letters You can enter text, numbers, and symbols into on the keypad button you press and arranges them your phone using Alpha, Word, Numeric, or to create words. As you type, T9 Text Input Symbol text input modes. -
Page 87: Special Function Keys
Special Function Keys Adding Words to the Database Capitalization When you press and hold the # key, it acts as a 1 Select Alpha as your text input mode. 3-way toggle. Press and hold # to make the next 2 Type the word using Alpha mode. letter typed uppercase (shift), to make all 3 Select Word as your text input mode. - Page 88 Entering Text Note: Additional punctuation symbols are available in Symbols mode.
-
Page 89: Messages
Messages If you dismiss the notification, the message is not deleted. It can be accessed through the message center. You can receive the following types of messages on your phone: If you are not on a phone call when you receive a message, your phone sounds a notification tone •... -
Page 90: Message Center
Messages Message Center The message center manages your messages. All your messages are stored in the message center. The message center shows how many messages you have of each type. To access your messages through the message center: 1 From the main menu, select Messages. 2 Scroll to the type of message you want to access. -
Page 91: Voice Mail Messages
Voice Mail Messages Sending Unanswered Calls to Voice Mail Note: To receive voice mail messages, you must first set up a voice mail account with your To send a phone call to voice mail instead of service provider. answering it: If the flip is closed, press .. -
Page 92: Mosms Messages
When you are finished, press O. MOSMS Messages 7 Select Expire After. Note: This feature may not be offered by your This is the amount of time messages you send service provider. are saved at the service center if they cannot be If your service provider offers MOSMS, your phone delivered. -
Page 93: Reading From The Message Center
Reading from the Message Center If your phone is powered off when you receive a storing the sender’s number in Contacts, press text message, your phone notifies you the next time you power it on. If you are out of your Creating and Sending coverage area, your phone alerts you when you return to your coverage area. - Page 94 MOSMS Messages To use a quick note: Press A under Browse. 5 Follow step 3 through step 4 of “Creating and Scroll to the quick note you want. For more Sending Messages” on page 82. information on quick notes, see “Using Quick Beginning Messages From the Idle Notes”.
- Page 95 Creating and Sending Messages Tip: For more options, including sending the Deleting Sent Messages quick note, press m. To delete a sent message: Using Drafts 1 From the main menu, select Messages > Text Outbox. When you save a message as a draft, it is saved in the drafts folder.
-
Page 96: Sorting Messages
MOSMS Messages 4 Select Lock. The text inbox holds 20 messages. If the text inbox is full, you cannot receive messages until you Unlocking a Message delete some. 1 From the main menu, select Messages > Text The outbox and drafts folder share memory space. Outbox. -
Page 97: Camera
Camera Taking Pictures 1 Access the camera. The camera in your i870 phone takes pictures and 2 If you want to adjust the zoom, spotlight, picture records videos. You can save these pictures and quality, picture size, or a timer, set these options. - Page 98 Camera Setting Picture Options 1X is the default. Spotlight When you take a picture, you can set the zoom, spotlight, picture quality, and picture size, and set a The Spotlight option turns on or off the camera’s timer to delay capturing the picture. spotlight to provide additional light for close-up pictures.
-
Page 99: More Actions For Captured Pictures
More Actions for Captured Pictures If you plan to use the image as wallpaper, it is best Choosing any of these options automatically saves to select the Wallpaper size. the captured picture. When you receive your phone, Medium is the Sending in Private Calls default. -
Page 100: Recording Videos
Camera release A under Record. Releasing the key Setting as Wallpaper starts the recording. 1 After you have captured a picture, press m. 8 If you want to end the video, press c or press A 2 Select Set As Wallpaper. under Stop. -
Page 101: Accessing The Media Center
Accessing the Media Center Accessing the Media Center Note: The volume of the shutter sound is controlled by your phone’s speaker You can access the media center from the camera volume.To set your phone’s speaker at any time, except when you are using the volume, see “Setting the Volume”... - Page 102 Camera Tip: This option is available from many context-sensitive menus when you are using the camera. To free memory on your phone, delete items from the media center, voice records, or Java applications. To free memory on the memory card, delete items from the card’s folders.
-
Page 103: Media Center
To view files stored on the memory card, you must software you can download. Go to store the given file in its corresponding format idenphones.motorola.com/iden/support folder: audio files to the Audio folder, pictures to for more information. You can also the Images folder, and videos to the Video folder. -
Page 104: Viewing The Media Center
Media Center Viewing the Media Center If you do not have the memory card in your phone, you have these filtering options: To access the media center: • All — all items accessible through the media From the main menu, select Media Center. -or- center. -
Page 105: Forward Locked Items
Forward Locked Items • Card: Video — all videos on the memory card 4 Select Sort. that are accessible through the media center. 5 Select By Time or By Name. • Card: Audio — all audio recordings on the Forward Locked Items memory card that are accessible through the media center. -
Page 106: Drm Items
Media Center DRM Items Pictures Except for Java applications, which download to The media center lets you view pictures, send Java Apps, the default location for any DRM items them via Private calls or Bluetooth, assign them to that you download is the media center. Depending Contacts entries, or set them as your phone’s on the storage preference you have chosen, these wallpaper.