Table of Contents
Advertisement
Quick Links
Advertisement
Table of Contents

Related Manuals for Jensen JWM6ABK


Summary of Contents for Jensen JWM6ABK
- Page 1 JWM6A MOBILE AUDIO SYSTEM Installation and Operation Manual...
-
Page 2: Table Of Contents
JWM6A CONTENTS Introduction ..........................3 Disc Notes ..........................4 Installation ..........................5 Wiring ............................6 Basic Operation ........................7 Tuner Operation........................10 Disc Operation ......................... 11 CD Operation .......................... 11 MP3/USB Operation ....................... 14 Bluetooth Operation ........................ 16 App Operation ........................17 Remote Control Operation ...................... -
Page 3: Introduction
Use Recommended Accessories. Thank you for choosing a Jensen product. We hope you will find the instructions in this owner’s TO REDUCE THE RISK OF FIRE OR ELECTRIC SHOCK AND ANNOYING manual clear and easy to follow. If you take a few minutes to look through it, you’ll learn how to INTERFERENCE, USE ONLY THE RECOMMENDED ACCESSORIES. -
Page 4: Disc Notes
JWM6A DISC NOTES Be sure to use only round CDs for this unit and do not use any special shape CDs. Use of Depending on the recording status, conditions of the disc, and the equipment used for recording, special shape CDs may cause the unit to malfunction. ... -
Page 5: Installation
It’s a good idea to read all of the instructions before beginning the installation. We recommend NOTE: Before cutting the mounting hole, make sure the area behind the mounting having your Jensen JWM6A installed by a reputable RV dealership location is clear of wires, fuel and vacuum or brake lines. -
Page 6: Wiring
JWM6A WIRING WARNING: Wiring harness comes with stripped and tinned leads to aid in the The wiring diagram depicts all the wiring connections required for proper operation of the unit. installation process. Any unused speaker wires must have their exposed ends cut off or insulated individually. -
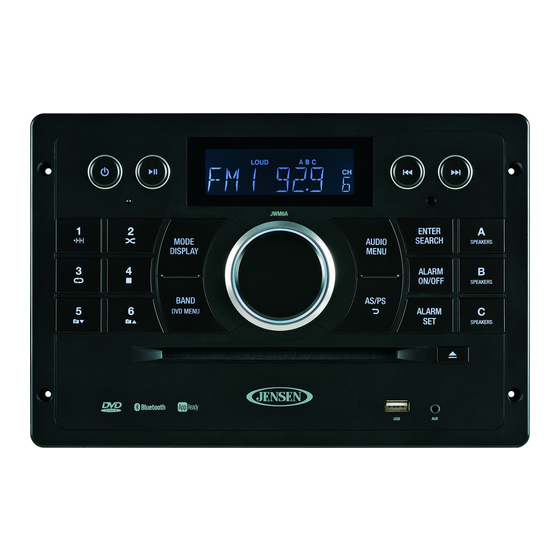
Page 7: Basic Operation
JWM6A BASIC OPERATION Audio Menu Press the AUDIO MENU button (18) to access the audio menu. You can navigate through the audio menu items by pressing the >>| or |<< buttons (16, 15) or AUDIO MENU button repeatedly. Once the desired menu item appears on the display, adjust that option by rotating the volume encoder knob clockwise or counter-clockwise within 5 seconds Press the ENTER SEARCH button (20) to confirm your selection and exit audio menu. - Page 8 JWM6A Bluetooth (On/Off): Choose “Bluetooth On” or “Bluetooth Off”. Liquid Crystal Display (LCD) PRESET VOL:(1/40-40/40): Select an automatic turn-on volume. RESET <ENTER>: Press the ENTERSEARH button to return the JWM6A to factory The current activated functions and time are shown on the LCD panel (1). default set up values.
- Page 9 JWM6A Remote Sensor Infrared receiver (17) is located on the front panel to receive infrared signal emitted by the remote control. Speaker Output The three speaker output buttons (A SPEAKERS (19), B SPEAKERS (21) and C SPEAKERS (23)) control speaker output from the radio. A SPEAKER (19) also controls the output of the rear line level audio out.
-
Page 10: Tuner Operation
JWM6A TUNER OPERATION Recall a Station Select a band (if needed). Press a 1-6 preset button to select the corresponding stored station. Automatically Store / Preset Scan (AS/PS) Automatically Store Select an AM or FM band. Press and hold the AS/PS button (25) for more than 3 seconds and the unit will automatically scan for and store 12 or 18 strongest stations for AM or FM respectively. -
Page 11: Disc Operation
JWM6A DISC OPERATION Track Select Press the >>| button (16) or |<< button (15) to advance to the previous or next track on the CD. The selected track number will appear on the display. Press the || button to start the playback of the selected track. - Page 12 JWM6A GOTO Direct Track/Chapter Access MENU Select Use the GOTO function to access a track (chapter) directly. While in menu mode, press the BAND DVD MENU button (12) to select a menu option. Press the GOTO button (25) on the remote control. The On Screen Display information Language Selection will appear with the track number highlighted.
- Page 13 JWM6A SUBTITLE: Press to select an alternate subtitle language, if available, ANGLE: Press to select an alternate viewing angle, if available. ZOOM: Press to zoom the picture at ZOOM 2, ZOOM 3, ZOOM 4, ZOOM 1/2, ZOOM 1/3 or ZOOM 1/4, or select OFF to return to normal view.
-
Page 14: Mp3/Usb Operation
JWM6A MP3/USB OPERATION skipped Maximum number of folders: 512 (including skipped directories) Maximum number of folder levels: 12 Maximum number of MP3 files: 999 Maximum number of characters for MP3 file name and folder name: 32 ... - Page 15 JWM6A GOTO Direct Track/Chapter Access current disc. Press 1 again to end the scan and play the selected track. Repeat (RPT) Use the GOTO function to access a track (chapter) directly. Press the GOTO button (25) on the remote control. The On Screen Display information Press the 3 button (8) on the control panel or the RPT button (20) on the remote control will appear with the track number highlighted.
-
Page 16: Bluetooth Operation
JWM6A BLUETOOTH OPERATION Bluetooth Pair <ENTER>: Press and hold the ENTER SEARCH (20) button for about 4 seconds to start pairing with a Bluetooth enabled device. Bluetooth Device: Press the ENTER SEARCH button to view a list of previously paired The JWM6A includes built-in Bluetooth technology that allows you to connect this head unit to mobile devices models. -
Page 17: App Operation
Bluetooth mobile device when the power is restored. your JENSEN stereo right from your phone or tablet by transforming your mobile device into a functional stereo remote control! -
Page 18: Remote Control Operation
JWM6A REMOTE CONTROL OPERATION DESCRIPTION TUNER WEATHERBAND BLUETOOTH CD/MP3/USB Power Turn radio on/standby Turn radio on/standby Turn radio on/standby Turn radio on/standby Turn radio on/standby mode. mode. mode. mode. mode. VOL +/- Adjust volume up/down. Adjust volume up/down. Adjust volume up/down. Adjust volume up/down. - Page 19 JWM6A TITLE Press to view title menu. Use directional arrows and play button to play selected title. May not be supported by all discs. Repeat track. Repeat chapter. SOURCE Select source for Select source for Select source for Select source for Select source for playback.
-
Page 20: Dvd Setup Menu
JWM6A DVD SETUP MENU Language Setup The Language Setup menu controls the following features: Press the (setup) button (10) on the remote control to access the SETUP menu and adjust system settings for the following categories: System Setup Language Setup ... - Page 21 JWM6A Video Setup Digital Setup The Video Setup menu controls the following features: The Digital Setup menu controls the following features: Brightness: Adjust the brightness of the screen from the following levels: 12, 10, 8, 6, 4, 2 OP Mode: Select LINE OUT or RF REMOD.
-
Page 22: Care And Maintenance
JWM6A CARE AND MAINTENANCE TROUBLESHOOTING Keep the product dry. If it does get wet, wipe it dry immediately. Liquids might contain minerals that can corrode the electronic circuits. Symptom Solution Keep the product away from dust and dirt, which can cause premature wear of parts. Radio will not turn ON or No Try the reset button. -
Page 23: Specifications
JWM6A SPECIFICATIONS FCC Notes FM Tuner Frequency Coverage (USA) ......... 87.5 to 107.9 MHz WARNING! Changes or modifications to this unit not expressly approved by the party responsible for compliance could void the user’s authority to operate the equipment. - Page 24 ASA Electronics Corporation www.asaelectronics.com www.jensenrvdirect.com ©2016 ASA Electronics Corporation...