
Related Manuals for Daikin Altherma EKRTCTRL2


Summary of Contents for Daikin Altherma EKRTCTRL2
- Page 1 USER MANUAL Daikin Altherma heat pump convector options EKRTCTRL1 EKRTCTRL2 EKWHCTRL0 EKWHCTRL1 EKPCBO...
- Page 2 By following the suggestions contained in this manual, the product you have purchased will operate without problems, giving you optimum room temperatures with minimum energy costs. DAIKIN EUROPE N.V. Compliance This unit complies with the following European Directives: •...
- Page 3 GENERAL General warnings ..............5 Fundamental safety rules .
-
Page 4: Table Of Contents
EKRTCTRL2 SMART TOUCH electronic control panel with fixed speed modulation ......14 Display ................14 Key function . - Page 5 GENERAL General waenings This instruction is an integral part of the booklet of the It is forbidden to modify the safety or adjustment appliance on which the kit is installed. Please consult devices without authorisation from and indications of the this booklet for general warnings and fundamental safety manufacturer.
-
Page 6: Display
EKRTCTRL1 SMART TOUCH electronic control panel with device side continuous modulation These controls make room temperature adjustment (with After 20 seconds from the last action the panel offset settable from the keyboard) completely autonomous brightness will be reduced for improved night-time through the AUTO, SILENT, NIGHT and MAX programmes comfort, and the room temperature will appear on the by means of a probe located in the lower part of the device,... -
Page 7: General On Switch
General On Switch In order to manage the device via the control panel, this also be switched on. must be connected to the mains electricity. - Turn the device on by activating the general switch If a general switch is installed on the power line, this must Activation To activate the device Operation... -
Page 8: Key Lock
Automatic operation Operation Display Press and hold the AUTO key. The function being activated is indicated by the relevant symbol appearing on the display. Ventilation speed adjustment is carried out automatically the distance of the actual room temperature from the set between the minimum and maximum values, according to point, according to a PI-type algorithm. -
Page 9: Deactivation
2.15 Deactivation Operation Display Press and hold the ON Stand-By key for approx. 2 seconds. No illuminated signals on the display at all means that the system is in stand-by (no operation). The controller also ensures anti freezing when in stand-by. 2.16 Room temperature probe regulation offset As the detection probe is towards the bottom of the... - Page 10 EKWHCTRL1 Wall-mounted SMART TOUCH electronic control panel with room probe The remote wall-mounted control EKWHCTRL1 is an Anti-freeze protection guaranteed electronic thermostat with a room temperature probe for temperature probe when in stand-by. controlling one or more (up to a maximum of 30) fan coils / cooler-radiators in broadcast mode (with simultaneous After 20 seconds from the last action, the panel control transmission) equipped with electronic control for...
- Page 11 General On Switch In order to manage the device via the control panel, this also be switched on. must be connected to the mains electricity. - Turn the device on by activating the general switch If a general switch is installed on the power line, this must Activation To activate the device Operation...
- Page 12 Automatic operation Operation Display Press and hold the AUTO key. The function being activated is indicated by the relevant symbol appearing on the display. Ventilation speed adjustment is carried out automatically the distance of the actual room temperature from the set between the minimum and maximum values, according to point, according to a PI-type algorithm.
- Page 13 3.15 Deactivation Operation Display Press and hold the ON Stand-By key for approx. 2 seconds. No illuminated signals on the display at all means that the system is in stand-by (no operation). The controller also ensures anti freezing when in stand-by. 3.16 Room temperature probe regulation offset As the detection probe is towards the bottom of the...
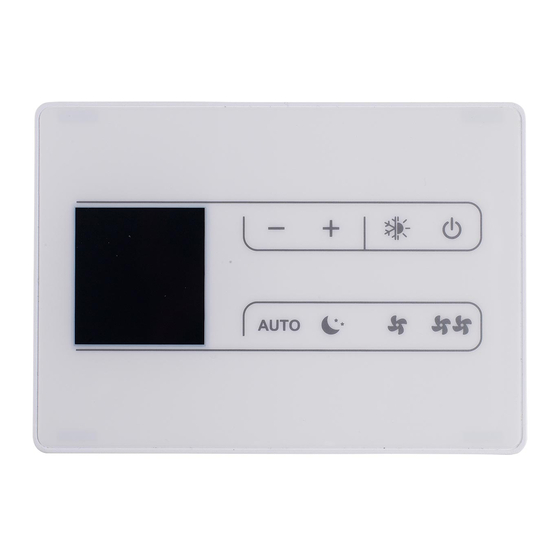
- Page 14 EKRTCTRL2 SMART TOUCH electronic control panel with fixed speed modulation These controls make room temperature adjustment (with After 20 seconds from the last action the panel offset settable from the keyboard) completely autonomous brightness will be reduced for improved night-time through the four speeds by means of a probe located in comfort, and the room temperature will appear on the the lower part of the device, ensuring anti-freeze safety...
- Page 15 General On Switch In order to manage the device via the control panel, this also be switched on. must be connected to the mains electricity. - Turn the device on by activating the general switch If a general switch is installed on the power line, this must Activation To activate the device Operation...
- Page 16 Ventilation speed regulation Operation Display The fan speed is selected by using one of the 4 keys (automatic, minimum, super silent and maximum). The activation of the function is indicated by the relevant symbol on the display. In automatic mode, the fan carries out a "stepped" By setting the highest speed, the maximum possible adjustment to move the room temperature closer to the power level is activated immediately whether heating or...
- Page 17 4.13 Room temperature probe regulation offset As the detection probe is towards the bottom of the Use this adjustment with care, and only after having device, the temperature detected may at times differ from actually detected a discrepancy compared with the actual the actual room temperature.
-
Page 18: Ekpcbo
EKPCBO On-board speed selector for connecting to standard thermostat The command is for switching on and off and selecting the Controls cannot be installed on the FWXM-series. 4 speeds directly from the fan coil. Switching on and off takes place via closing of the external After 20 seconds from the last action, the LED brightness thermostat contact. -
Page 19: Activation
Activation To activate the device Operation Display Off → On Press the mode/off key Select one of the 4 operating speeds by pressing the relative mode/off key. If the red symbol is flashing, it means that the room thermostat is not connected; it therefore needs to be activated. -
Page 20: Maintenance
MAINTENANCE External cleaning Before every cleaning and maintenance intervention, Do not use abrasive sponges or abrasive or corrosive disconnect the appliance from the mains by switching detergents to avoid damaging the painted surfaces. off the master switch. When necessary, clean the outer surfaces of the heat Wait until the parts have cooled down to avoid the risk pump convector with a soft damp cloth. - Page 21 Front grill Filter Grill hook Cleaning filtering seats suck up the powder with a vacuum cleaner The appliance is fitted with a safety switch that wash the filter with running water without using prevents the operation of the cooler with the mobile detergents or solvents, and leave to dry.
- Page 22 Ending Cleaning Operations For the versions with a grill with flaps, insert the two lugs into the special slots, turn it and hook it up with a slight tap on the upper part. Filter Front grill Grill hook The filter housing Energy saving tips Always keep the filters clean;...
-
Page 23: Troubleshooting
TROUBLESHOOTING Troubleshooting Ventilation does not start even if there is hot or cold In the event of water leaks or anomalous operation, water in the hydraulic circuit. disconnect mains power immediately and close all The device leaks water when heating. water taps.