Panasonic KX-TG2670N Operating Instructions Manual
2.4ghz, pulse-or-tone-dialing capability
Hide thumbs
Also See for KX-TG2670N:
- Operating instructions manual (92 pages) ,
- Operating instructions manual (92 pages)
Table of Contents

Related Manuals for Panasonic KX-TG2670N


Summary of Contents for Panasonic KX-TG2670N
-
Page 1: Table Of Contents
2.4GHz Cordless Answering System KX-TG2670N Model No. Pulse-or-tone-dialing capability Operating Instructions Contents: Location of controls Connections Battery charge Recording a Greeting Message Making/Answering calls with the handset Making/Answering calls with the base unit Caller ID Service Automatic Answering Operation Listening to messages... -
Page 2: Location Of Controls
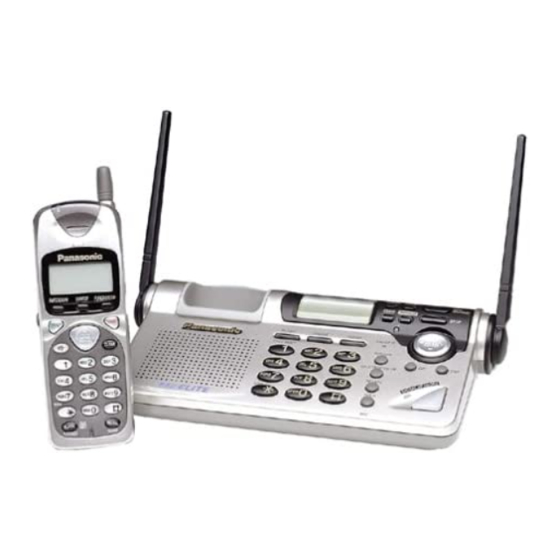
Please read IMPORTANT SAFETY INSTRUCTIONS on page 11 before use. Read and understand all instructions. Location of controls Handset Antenna Ringer Indicator Button (INTERCOM) Display Button (DIRECT) Button (FUNCTION/CH) Headset Jack Button (OFF) Navigator Key (Talk) Button (Speakerphone) Button Button (CLEAR) Button Button... - Page 3 Base Unit Antennas Button (LOCATOR/INTERCOM) Button (RINGER) Display Charge Contacts Button (FLASH) Button (PAUSE) Button (REDIAL) Button (HOLD) MIC (Microphone) DIGITAL SP-PHONE (Speakerphone) /HEADSET Button and Indicator –3–...
- Page 4 Base Unit Button (GREETING!CHECK) Button and Indicator (ANSWER!ON) Button (GREETING!RECORD) Button (STOP) Button (ERASE) (NEW!MESSAGE) Button Headset Jack Button (TONE) Navigator Key Button (CLEAR) CALLER ID Indicaor Button (EDIT) Button (EXIT) –4–...
-
Page 5: Connections
(AC 120 V, 60 Hz) AC Adaptor Single-Line Telephone Jack (RJ11C) Telephone Line Cord • USE ONLY WITH Panasonic AC ADAPTOR PQLV10. • The AC adaptor must remain connected at all times. (It is normal for the adaptor to feel warm during use.) –5–... -
Page 6: Battery Charge
Battery charge To power the handset, charge the battery. Place the handset on the base unit for about 8 hours before initial use. Recharge Recharge the battery when: –"Recharge battery" is displayed, –" " flashes on the display, or – the handset beeps every minute while it is in use. •... -
Page 7: Recording A Greeting Message
Recording a Greeting Message You can record a personal greeting message of up to 2 minutes. If a greeting message is not recorded, one of two pre-recorded greetings will be played when a call is received. • All messages (greeting, incoming, etc.) are stored in digital memory. The total recording time is about 15 minutes. -
Page 8: Making/Answering Calls With The Handset
Making/Answering calls with the handset To make a call 1 Press 2 Dial a telephone number. 3 To hang up, press OFF or place the handset on the base unit. • If "No link to base. Place on cradle and try again" is displayed and an alarm tone sounds in step 1, move closer to the base unit or place the handset on the base unit, and try again. -
Page 9: Making/Answering Calls With The Base Unit
Making/Answering calls with the base unit To make a call Using the digital duplex speakerphone: 1 Press DIGITAL SP-PHONE. 2 Dial a telephone number. 3 Talk into the MIC (microphone). 4 To hang up, press DIGITAL SP-PHONE. • To redial the last number, press DIGITAL SP-PHONE, then press REDIAL. •... -
Page 10: Automatic Answering Operation
Automatic Answering Operation When the unit answers a call, a greeting message is played and the caller’s message is recorded. Setting the unit to answer calls Press ANSWER ON to turn on the answering system. • The indicator lights and “Answer set” is heard. Listening to Messages You can see the total number of recorded messages on the base unit display. -
Page 11: Important Safety Instructions
Important Safety Instructions When using this unit, basic safety precautions should always be followed to reduce the risk of fire, electric shock, or personal injury. 1. Read and understand all instructions. 2. Follow all warnings and instructions marked on this unit. 3. - Page 12 CAUTION: To reduce the risk of fire or injury to persons, read and follow these instructions. 1. Use only the battery(ies) specified. 2. Do not dispose of the battery(ies) in a fire. They may explode. Check with local waste management codes for special disposal instructions. 3.
-
Page 13: Fcc And Other Information
FCC and other information If requested by the telephone company, inform them as follows: FCC Registration No..........(found on the bottom of the unit) Ringer Equivalence ..................... 0.1B The particular telephone line to which the equipment is connected. This unit must not be connected to a coin operated line. If you are on a party line, check with your local telephone company. - Page 14 • If there is any trouble — disconnect the unit from the telephone line and connect a known working phone. If the known working phone operates properly, have your unit repaired by one of the authorized Panasonic Factory Service Centers. If the known working phone does not operate properly, consult your telephone company.
- Page 15 Symptom • Send the unit to an authorized servicenter, prepaid and adequately insured. • Do not send your unit to the Panasonic Consumer Electronics Company listed on the back cover or to executive or regional sales offices. These locations do not repair consumer products.
- Page 16 Panasonic Consumer Electronics Company, Division of Matsushita Electric Corporation of America One Panasonic Way, Secaucus, New Jersey 07094 Panasonic Sales Company, Division of Matsushita Electric of Puerto Rico, Inc. Ave. 65 de Infantería, Km. 9.5, San Gabriel Industrial Park Carolina, Puerto Rico 00985...