
Related Manuals for Westinghouse WES31-1592


Summary of Contents for Westinghouse WES31-1592
- Page 1 WES31-1592 HANGING & MURAL INFRARED PATIO HEATER with Remote Control RADIATEUR À INFRAROUGE SUSPENDU ET MURAL POUR TERRASSE avec télécommande Instruction Manual Guide d’utilisation...
-
Page 2: Table Of Contents
Please read instructions carefully before assembly Veuillez lire attentivement les instructions avant l'assemblage Retain this manual for reference Conservez ce manuel pour référence CONTENT 1. Assembly 2. Operation 3. For your safety 4. Cleaning and storage 5. Specifications 6. Grounding instructions 7. - Page 3 Step 3: Fix the radiator mounting bracket over the four Step 4 : Finished! Wall mounted (Other surfaces): Step 1: Using the radiator wall mount bracket as a template mark the four screw holes where you plan to install the radiator. Step 2: Place the radiator mounting bracket on the four marks and tighten four screws (not included).
- Page 4 Step 5: You can attach the power cord to the hanging Wire using metal ties. Make sure the power cord does not hang less than 50cm behind the heater. Ceiling mounted Step 1: Screw the ‘U’ shaped bracket to the heater. Step 2: Attach the ‘U’...
-
Page 5: Operation
3. OPERATION MAKE SURE THE HEATER IS NOT FUNCTIONING BEFORE YOU HANG IT ON A GAZEBO, OR UNDERNEATH A BALCONY OR A ROOF. NOTE: Wait until the heater’s heating element has cooled down before moving it. REMEMBER: Portable electric heaters are designed for spot heating or as a supplementary heat source. They are not intended to be the main source of heat during cold months. -
Page 6: Cleaning And Storage
8. Extreme caution is necessary when any heater is used near a child or someone physically disabled. 9. DO NOT LEAVE THE UNIT UNATTENDED WHEN IN OPERATION. 10. This heater is hot when in use. To avoid burns, do not let bare skin touch hot surfaces. Use handles (not provided) when moving this heater. -
Page 7: Warranty
power cord provided with the product. If it does not fit the wall outlet, have a proper outlet installed by a qualified electrician. Do not use any type of adaptor with this product. 8. WARRANTY LIMITED ONE (1) YEAR WARRANTY This product is guaranteed against all manufactured faults and defects for a period of one (1) year from the date of purchase. - Page 8 Attention : Si vous devez utiliser une rallonge, celle-ci doit être au moins de taille No. 14 AWG et calibrée à au moins 1 875 W. Assurez-vous d’avoir toujours un minimum de 1 pi 6 po (50 cm) d’espace libre au-dessus du radiateur, soit 9 po (25 cm) sur les côtés et 5 pi (1,80 m) sous le radiateur.
-
Page 9: Fonctionnement
Installation murale (bois et autres) Étape 1: Utilisez le support de montage mural du radiateur comme modèle pour marquer les quatre trous où vous prévoyez d'installer le radiateur. Étape 2: Vissez 4 vis M6*50 sur le support de montage mural du radiateur. Suspendu au plafond Étape 1: Avec les 4 vis M6 * 12 et rondelles M6, Étape 2: Fixez le support en ‘U’... -
Page 10: Pour Votre Sécurité
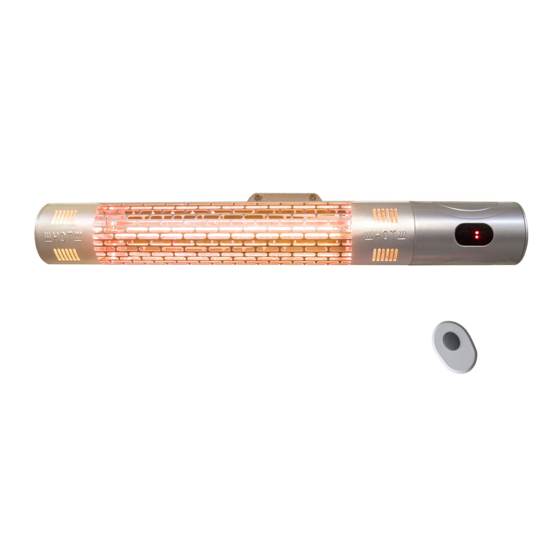
Panneau de contrôle Télécommande Appuyez sur le bouton Marche / Arrêt principal pour activer le radiateur. Appuyez sur le bouton On / Off de la télécommande pour activer ou désactiver le chauffage. IMPORTANT: Pour fonctionner correctement, la télécommande doit être pointée vers le récepteur de la télécommande. -
Page 11: Nettoyage Et Rangement
11. NE COUVREZ PAS le radiateur lorsqu’il est en marche ou peu après l’avoir mis hors tension. 12. N’enroulez pas le cordon d'alimentation autour de l'appareil. 13. N’insérez pas ou ne laissez pas de corps étrangers pénétrer dans les bouches de ventilation ou de sortie d’air de l'appareil, car ceci pourrait causer un choc électrique, un incendie ou endommager l'appareil. -
Page 12: Garantie
8. GARANTIE GARANTIE LIMITÉE DE UN (1) AN Ce produit est garanti contre tout vice de matières et de fabrication pour une durée de un (1) an à compter de la date d’achat. En cas de défectuosité, veuillez communiquer avec notre service à la clientèle au 1-866-967-7333. Ayez à portée de la main votre preuve d’achat.