Table of Contents
Advertisement
Quick Links
WEEE Warning Message
Symbol for Separate Collection in European Countries
This symbol indicates that this product is to be collected
separately.
The following apply only to users in European countries:
This product is designated for separate collection at an
appropriate collection point. Do not dispose of as
household waste.
For more information, contact the retailer or the local
authorities in charge of waste management.
FCC STATEMENT
This device complies with Part 15 of the FCC Rules. Operation is subject to the
following two conditions:
(1).
This device may not cause harmful interference, and
(2).
This device must accept any interference received, including interference that
may cause undesired operation.
Note:
This equipment has been tested and found to comply with the limits for Class B digital
devices, pursuant to Part 15 of the FCC rules. These limits are designed to provide
reasonable protection against harmful interference in a residential installation. This
equipment generates uses and can radiate radio frequency energy and, if not installed
and used in accordance with the instructions, may cause harmful interference to radio
communications.
However, there is no guarantee that interference will not occur in a particular
installation. If this equipment does cause harmful interference to radio or television
reception, which can be determined by turning the equipment off and on, the user is
encouraged to try to correct the interference by one or more of the following
measures:
Reorient or relocate the receiving antenna
Increase the separation between the equipment and receiver
Connect the equipment into an outlet on a circuit different from that to which the
receiver is connected
-1-
English
Advertisement
Table of Contents

Related Manuals for Genius G-Shot DV53


Summary of Contents for Genius G-Shot DV53
-
Page 1: Fcc Statement
WEEE Warning Message Symbol for Separate Collection in European Countries This symbol indicates that this product is to be collected separately. The following apply only to users in European countries: This product is designated for separate collection at an appropriate collection point. Do not dispose of as household waste. -
Page 2: Product Information
Use of shielded cable is required to comply with Class B limits in Subpart B of Part 15 of the FCC rules. Do not make any changes or modifications to the equipment unless otherwise specified in the manual. If such changes or modifications should be made, you could be required to stop operation of the equipment. - Page 3 Do not disassemble, change or repair the camera. This might cause fire or electric shock. For repair or internal inspection, ask retailer where you purchased it. Do not use the camera in areas near water. This might cause fire or electric shock. Take special care during rain, snow, on the beach, or near the shore.
- Page 4 Before you move the camera, disconnect cords and cables. Failure to do this might damage cords and cables, resulting in fire and electric shock. Notes on Battery Usage When you use the battery, carefully read and strictly observe the Safety Instructions and the notes described below: Use only the specified battery Avoid using the battery in extremely cold environments as low temperatures can...
-
Page 5: Table Of Contents
CONTENTS GETTING TO KNOW YOUR CAMERA_______________________________ 8 ____________________________________________________ 8 VERVIEW TANDARD CCESSORIES ___________________________________________________ 9 RONT ____________________________________________ 9 AD ILLUSTRATION ____________________________________________________ 10 GETTING STARTED ____________________________________________ 11 OADING THE ATTERY NSERTING AND EMOVING AN ROTECTING ATA ON AN URNING THE AMERA URNING THE AMERA RECORD MODE _______________________________________________ 13 _____________________________________________ 13... - Page 6 Self-timer (Camera Mode Only) _________________________________ 26 Sharpness__________________________________________________ 26 White Balance_______________________________________________ 27 Multi-Snap (Camera Mode Only) ________________________________ 27 Backlight (Camera Mode Only)__________________________________ 28 Date Printing (Camera Mode Only) ______________________________ 29 Night Mode _________________________________________________ 29 __________________________________________________ 30 OICE MODE _______________________________________________ 30 FFECT ETTING ________________________________________________ 31 ETTING...
- Page 7 VIEWING MOVIE ON PC_________________________________________ 52 MPEG-4 M _______________________________________________ 52 OVIE MPEG-4 M OVIE ON MPEG-4 M HARE OVIE VIEWING PICTURES AND MOVIES ON A TV ________________________ 52 SYSTEM REQUIREMENT ________________________________________ 53 TRANSFERRING DATA TO A COMPUTER __________________________ 53 NSTALLING THE IGITAL ONNECTING AMERA TO A...
-
Page 8: Getting To Know Your Camera
Getting to Know Your Camera Overview Thank you for purchasing the new digital video camera! This multi-function digital video camera with a 5.2 Mega Pixel CMOS sensor can take up to 11 mega pixel still images by interpolation. It also can take video in MPEG-4 format in VGA and QVGA resolution. -
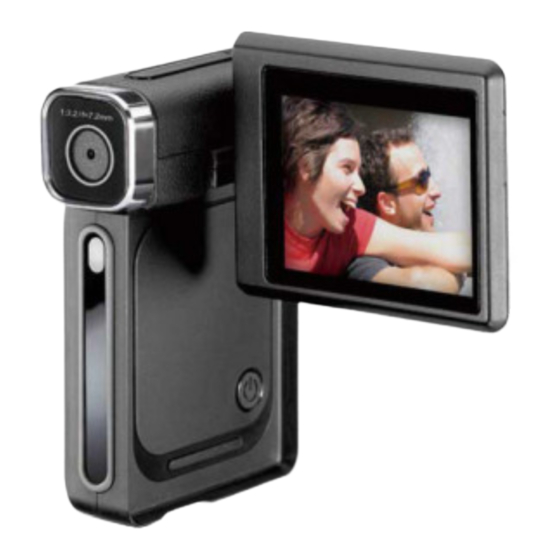
Page 9: Front View
Front View Lens LED light KeyPad illustration LCD Panel TV Out /ear Phone Port Mini USB 2.0 port Strap hole Power Button Green /Red LED Movie Shutter Button Picture Shutter Button Enter Button Tele/Wide Button Right Button Left Button Record/Play Button English... -
Page 10: Side View
English Side View Speaker Focus setting Battery cover Microphone -10-... -
Page 11: Getting Started
Getting Started Loading the Battery Before using the camera, end users must load NP60 rechargeable Li-ion Battery. 1. Follow the arrow direction and slide to eject the battery cover. 2. Insert the batteries according to the correct polarity marks ( + or -) 3. -
Page 12: Turning The Camera O N And Turning The Camera Off
Turning the Camera On and Getting Started To turn on the camera: 1. Flip out the LCD panel and the camera will turn on automatically. 2. Or you can press the Power Button for one second to turn it on. To take a movie, press the Movie Shutter Button ( To take a picture, press the Picture Shutter Button ( To record voice, press the Enter Button and Right/Left Button for voice... -
Page 13: Record Mode
Record Mode Button Function LCD Monitor Information The indicators below will display on the LCD when movies and pictures are recorded: Power Button: Press down for one second to turn on or turn off the camera. Movie Shutter Button: 1. Start to take a movie, or record voice. 2. - Page 14 Record Mode Movie Record Mode Picture Record Mode Voice Record Mode Motion Stabilization Night Mode Multi-Snap Mode Backlight Mode Resolution Movie : High / Picture: High / Number of images or recording time of movie that can still be taken at current resolution.
-
Page 15: Movie Recording
Self-timer enabled (10) 8X digital zoom (11) Date: YYYY/MM/DD Time: HH:MM:SEC (12) Motion Detection Movie Recording Press Movie Shutter button ( time indicator will display on the LCD monitor. To stop recording, press Movie Shutter Button ( ) again. Press RECORD/PLAY Button to view the recorded movie. Three resolution settings are available: Quality High Quality... -
Page 16: Ode
Options for Record Mode Movie Mode Camera Mode Resolution Resolution Exposure Exposure Light Two in One Sharpness Photo Frame Flash White Balance Self-timer Stabilization Sharpness Motion Detect White Balance Night Mode Multi-snap Exit Backlight Date printing Night Mode Exit Operations for Record Mode Operation 1. -
Page 17: Default Setting Andv
Default Setting and Validation The following table indicates the camera’s default setting as well as its validation. Always: The settings always stay valid. One Time: The setting is only valid once or till camera power is off. Resolution Exposure Light Sharpness White Balance Stabilization... -
Page 18: Possible Recording Time / Sec (Video Clip)
3. Use Tele/Wide Button to select Resolution then press Enter to switch to Resolution submenu. 4. Use Tele/Wide Button to move between three settings. 5. Press Enter to validate the setting and exit. Display screen Possible recording time / sec (video clip) 64 MB Quality internal... -
Page 19: Light
Display screen Light There are two flash settings under Movie. To change flash settings, press the hot key (Right Button) or select from the option menu. On ( ): The LED will be turned on and provides light in a low light environment. Off: The LED is turned off. -
Page 20: Sharpness
Sharpness You can soften and sharpen images to achieve different effects. To change Sharpness setting: 1. In Movie/Picture Record Mode, press Enter to switch to record menu screen. 2. Use Right/Left Buttons to select Movie Mode. The submenu of Movie Mode will appear on the screen. -
Page 21: Stabilization
Display screen Stabilization To enable Stabilization: 1. In Movie/Picture Record Mode, press Enter Button to switch to record menu screen. 2. Use Right/Left Buttons to select Movie Mode. Submenu of Movie Mode will pop out on the screen. 3. Use Tele/Wide Button to select Stabilization then press Enter Button to switch to Stabilization submenu. -
Page 22: Night Mode
consecutive seconds. It will stop recording if there is no movement for three seconds. Display screen Night Mode Use Night Mode for night scenes or low light conditions. A longer exposure captures more detail of background subjects. Display screen NOTE To avoid blurry pictures, place the camera on a flat, steady surface, or use a tripod. -
Page 23: Possible Number Of Shots (Still Image)
Display screen Possible number of shots (still image) 64 MB Quality internal 128MB memory High Standard Exposure The camera adjusts image exposure automatically. In certain circumstances you may wish to adjust the exposure compensation setting by yourself. To change Exposure setting: 1. -
Page 24: Two In One (Camera Mode Only)
Two in One (Camera Mode Only) With camera set to Two in One mode, you can combine two snapshots into one picture. To enable Two in One: 1. In Movie/Picture Record Mode, press Enter to switch to record menu screen. 2. -
Page 25: Flash
Your camera features a popular electronic photo frame. You can take your picture with a preferred electronic photo frame. To enable Photo Frame: 1. In Movie/Picture Record Mode, press Enter to switch to record menu screen. 2. Use Right/Left Buttons to select Camera Mode. The submenu of Camera Mode will appear on the screen. -
Page 26: Self-Timer (Camera Mode Only)
The LED light is available when you use the hot key to change the Flash setting. Display screen Self-timer (Camera Mode Only) The self-timer allows you to take pictures with a ten-second time delay. You can activate the Self-timer using either the hot key (Left Button) or Option Setting. The self-timer LED on the front of the camera beneath the flash light will also blink. -
Page 27: White Balance
4. Use Tele/Wide Button to move between the nine levels. 5. Press Enter to validate the setting and exit. Display screen White Balance The camera adjusts the color balance of images automatically. Three manual white balance settings are available: 1. Auto (Default): The camera automatically adjusts white balance. 2. -
Page 28: Backlight (Camera Mode Only)
1. In Movie/Picture Record Mode, press Enter to switch to record menu screen. 2. Use Right/Left Buttons to select Camera Mode. The submenu of Camera Mode will appear on the screen. 3. Use Tele/Wide Button to select Multi-Snap, then press Enter to switch to the Multi-Snap submenu. -
Page 29: Date Printing (Camera Mode Only)
Date Printing (Camera Mode Only) To enable Date Printing: 1. In Movie/Picture Record Mode, press Enter to switch to record menu screen. 2. Use Right/Left Buttons to select Camera Mode. The submenu of Camera Mode will appear on the screen. 3. -
Page 30: Voice Mode
NOTE To avoid blurry pictures, place the camera on a flat, steady surface, or use a tripod. Voice mode To enable voice recording: 1. In Movie/Picture Record Mode, press Enter to switch to record menu screen. 2. Use Right/Left Buttons to move to Voice Option. Then the Voice Submenu will appear on the screen. -
Page 31: Setting Menu
previewed immediately. 4. Press Enter to validate the setting and exit. Setting Menu The Setting submenu contains options for configuring your camera set up. To change to advanced settings: 1. In Movie/Picture Record Mode, press Enter to switch to record menu screen. 2. -
Page 32: Start-Up Screen
Start-up Screen Customize the Start-Up Screen with your favorite pictures. Press Right/Left Buttons to select the picture you want and press Enter to validate the setting and exit. Display screen If you do not want to customize the start up screen, press Left/Right Buttons and select No Start-Up Screen. -
Page 33: Format Memory
3. Select Exit to leave Time Setting without any change. Display screen Format Memory Display screen Yes: Format the SD Card / built-in memory. No (Default): Do not format SD Card / built in memory. NOTE All the data will be erased if the SD card is formatted. Make sure all the data is duplicated to the PC before formatting a SD card. -
Page 34: Selecting Interface Language
Selecting Interface Language You can select what language you want by using the Tele/Wide Button, then press Enter to validate the setting. Default Setting To restore the default factory setting, select this option. Display screen Enter Button Display screen Default setting option Enter Button -34- English... -
Page 35: Playback Mode
Playback Mode Press RECORD/PLAY Button to switch from Record Mode to Playback Mode. The Playback Mode is for viewing and managing movies and pictures as well as listening to voice or music on the built-in memory or on an optional memory card. Press RECORD/PLAY Button to switch from Record Mode to Playback Mode Main Menu. -
Page 36: Lcd Monitor Information
LCD Monitor Information Indicators on the LCD screen while in Playback Mode: Mode Indicator Movie Playback Mode Picture Playback Mode Tele/Wide Button Tele : 1. Zoom in 2. Volume adjustment Wide : 1. Zoom out 2. Volume adjustment 3. LCD information ON/OFF Enter Button: Enter movie, picture, or voice option menu. -
Page 37: Movie Playback
Resolution Indicator High Resolution Standard Resolution Low Resolution Indicates the selected movie/picture is locked. Indicates the single movie/voice/MP3 is being repeated. Indicates all of the movies/voices/MP3 are being repeated. Indicates the slide show is playing. Current Number/ Total number of movie, picture, voice, or MP3. Magnification Indicator. -
Page 38: Delete Movies
3. Use Right/Left Buttons to go to the next or last movie. 4. Press Movie Shutter Button to play and press it again to pause. 5. While playing movie, press Right/Left Buttons to fast forward/backward, then release the button to stop. 6. -
Page 39: Thumbnail Function
2. Press Enter to go to the Delete menu. 3. Use Right/Left Buttons to select the movie. 4. Use Wide Button to delete a single movie and the Tele Button to delete all movies. 5. Before a movie is deleted, a confirmation screen will appear;... -
Page 40: Lock Movies
Lock Movies Single or all movies can be locked. This function can prevent the movies from being deleted accidentally. Operation 1. Use Right/Left Buttons to select the Lock option. 2. Press Enter to go to the Lock menu. 3. Use Right/Left Buttons to select the movie. 4. -
Page 41: Picture Playback
Picture Playback Operation 1. Use Tele/Wide Button or Right/Left Buttons to select the Picture option. 2. Press Enter to go to Picture Playback Mode. 3. Use Right/Left Buttons to go to the next or last picture. 4. While the picture is selected, use Tele/Wide Button to magnify. -
Page 42: Delete Picture
Delete Picture Operation 1. Use Right/Left Buttons to select the Delete option. 2. Press Enter to go to the Delete menu. 3. Use Right/Left Buttons to select the picture. 4. Use Tele Button to delete all pictures and Wide Button to delete a single picture. 5. -
Page 43: Lock Pictures
1. Use Right/Left Buttons to select the Thumbnail option. 2. While selecting Thumbnail option, press Enter to view nine thumbnail pictures. 3. To view a picture, use Right/Left Buttons to select the picture. 4. Press Enter to view the selected picture. Lock Pictures Single or all pictures can be locked. -
Page 44: Slide Show
2. Press Enter to go to the Lock menu. 3. Use Right/Left Buttons to select the picture. 4. Use Tele Button to lock/unlock all pictures and Wide Button to lock/unlock a single picture. 5. Before a picture is locked/unlocked, a confirmation screen will appear;... -
Page 45: Voice Playback
Voice Playback Tele/Wide and Right/Left Buttons Function In Voice Playback Mode, the Tele/Wide and Right/Left Buttons have the following functions: Operation 1. Use Tele/Wide or Right/Left Buttons to select the Voice option. 2. Press Enter to go to Voice Playback Mode. 3. - Page 46 Operation 7. Use Tele Button to select Delete option and Wide Button to select Repeat option. Delete option Operation 1. In Voice Playback mode, press Enter to go to the voice playback option menu. 2. Use Tele Button to select Delete option. 3.
- Page 47 Repeat option Operation 1. In Voice Playback mode, press Enter to go to the voice playback option menu. 2. Use Wide Button to select Repeat option. 3. Use Tele Button to repeat a single voice file; press twice to repeat all voice recordings.
-
Page 48: Listening To Mp3 Music
Listening to MP3 Music Transfer MP3 Music to the camera 1. Connect your camera to the computer USB port. 2. The red LED will light when the camera is connected to the computer and is in Mass Storage Mode. 3. Transfer MP3 music to My Computer\Removable Disk\MP3. 4. -
Page 49: Listen To Mp3 Music With Earphone
4. Press Enter Button to start playing back the selected music. Press Move shutter button again to stop and play. 5. Use Tele/Wide Button to adjust the volume. 6. Use Right/Left Buttons to play next / previous music. 7. Press Enter Button to go to the Music playback option menu. -
Page 50: Reading Ebook
Reading eBook eBook An eBook is an electronic edition of a physical book. eBooks in your camera have many features that traditional paper books do not: you have the freedom to control the look and feel of your eBook through colors, your own bookmarks, and you can carry your eBooks anywhere with your camera. - Page 51 Operation 3. Use Tele/Wide Buttons select eBook you want to read, or press Right/Left Buttons to jump to the next/previous page. There is an icon in the front for those eBooks with bookmark added. 4. Press Enter Button to read the eBook. 5.
-
Page 52: Viewing Movie On Pc
English Viewing Movie on PC MPEG-4 Movie MPEG-4, the multimedia format and compression standards, is a cutting-edge compression technology developed by MPEG (Motion Picture Expert Group). It not only enhances the image quality but also improves the efficiency of recording capacity. -
Page 53: System Requirement
NOTE The LCD monitor does not work when the camera is connected to a television. System Requirement Windows 98SE/2000/ME/XP/Vista, Mac OS9.1 above Pentium III 800MHz or higher 256MB RAM CD ROM 1GB free HDD space Available USB port Transferring Data to a Computer Installing the Digital Camera Driver Before connecting this camera to a computer for the first time, you should install a driver on the computer. -
Page 54: Installing The Digital C Connecting Your Camera To A Mass Storage Device Mode
Mass Storage Device Mode The red LED will light up when the camera is connected to the computer. Movies, pictures and voice recordings can be found on your computer at “My Computer\Removable Disk\DCIM\”. Music can be found on your computer at “My Computer\Removable Disk\MP3\”. eBook can be found on your computer at “My Computer\Removable Disk\EBOOK\”. -
Page 55: Burning The Recorded Clip Into Dvd
English Burning the Recorded Clip into DVD ArcSoft Showbiz DVD is for burning the movie clip into a DVD. You can preserve your precious movies on a DVD to share with family and friends. To create a DVD: 1. Install Arcsoft Showbiz DVD 2. - Page 56 English 5. Click ” Create ” 6. Click “ Start “ to start DVD burning -56-...
-
Page 57: Arcsoft Media Converter
English Arcsoft Media Converter Bundled software CD contains Arcsoft Media Converter that features video file converter to convert multiple video formats into MPEG4 Xvid compatible format with your camera. In this way, you can convert various video files formats and playback your favorite movies on your camera. - Page 58 English 5. Click “Add Media” -58-...
- Page 59 English 6. Select Video file you want to convert -59-...
- Page 60 English 7. You can preview your media files before converting. To preview media files, use the following control functions. * Click to start previewing *Click to stop previewing Make sure your media files can be previewed before converting 8. Click on to begin converting files -60-...
-
Page 61: A Rcsoft M Edia C Onverter 1
English 9. Task Report window will pop out after the task is completed. 10 Before transferring the converted file to your camera, rename the converted file to “ Clip0001.avi”. (Please note: if Clip0001.avi exists in the camera, then the converted file has to be renamed to clip0002.avi) 11. - Page 62 English -62-...
- Page 63 English 5. Select the video file you want to convert. -63-...
- Page 64 English 6. Click “Select Destination” to choose the location you want to store the converted video file. -64-...
- Page 65 English 7. Click “ Convert” to start video converting. -65-...
- Page 66 English 8. Task Report window will pop out after the task is completed. 9. Before transferring the converted file to your camera, rename the converted file to “ Clip0001.avi”. (Please note: if Clip0001.avi exists in the camera, then the converted file has to be renamed to clip0002.avi) 10/ Connect your camera to PC and transfer the converted video to “My Computer\Removable Disk\DCIM\200Movie”...
- Page 67 English -67-...
-
Page 68: Specifications
Specifications Item Image Sensor Lens Focus Range LCD monitor Digital Zoom Shutter Type Storage Media Image Resolution Movie Resolution White Balance Exposure Self-Timer Flash File Format Image Play Interface TV Output Power Saving Mode Battery type Dimensions Weight Description 5.2 Mega Pixel CMOS Sensor F3.2 (f=7.2mm) Marco: center 20cm;... -
Page 69: Troubleshooting
Troubleshooting Refer to the symptoms and measures listed below before sending the digital video camera for repairs. If the problem persists, contact your local reseller or service center. Power Supply Symptom The power does not come on. Symptom The power cuts out during use. - Page 70 Shooting Symptom Even if I press the shutter button, the digital video camera does not shoot. Images do not appear on the LCD monitor. Although it is set to Auto Focus, it does not focus. The flash does not fire. The flash cannot recharge.
- Page 71 Symptom Even though the flash fired, the image is dark. The image is too dark. The image is too bright. The image lacks natural color. Playback Symptom Cannot playback. The contents of memory card cannot be replayed. Files cannot be deleted.
-
Page 72: Oftware
Other Problems Symptom Cannot load the memory card. Even when the digital video camera’s buttons are pressed, it does not operate. The date and time is wrong. The date set has disappeared. About connecting to your computer/software Symptom Cannot download files. Cause The card is facing the wrong way.