
Related Manuals for Kenwood KM08


Summary of Contents for Kenwood KM08
- Page 1 KM080 series TYPE KM08 instructions istruzioni instrucciones Bedienungsanleitungen gebruiksaanwijzing Instrukcja obsługi instruções...
-
Page 2: Table Of Contents
English 4 - 18 Nederlands 19 - 35 Français 36 - 52 Deutsch 53 - 68 Italiano 69 - 84 Português 85 - 100 Español 101 - 116 117 - 132 Ekkgmij... -
Page 3: English
English know your Kenwood Cooking Chef Kitchen Machine safety Read these instructions carefully and retain for future reference. Remove all packaging and any labels. If the cord is damaged it must, for safety reasons, be replaced by KENWOOD or an authorised KENWOOD repairer. - Page 4 This appliance shall not be used by children. Keep the appliance and its cord out of reach of children. Only use the appliance for its intended domestic use. Kenwood will not accept any liability if the appliance is subject to improper use, or failure...
- Page 5 The cooking functionality of your Kenwood Cooking Chef is similar to using a saucepan on your cooker hob. The added advantage is that the Chef will automatically stir your food and regulate the cooking temperature to your precise requirements, leaving you free to confidently perform other tasks in your kitchen.
- Page 6 You may also notice the static light begin to flash if the mixing frequency is increased. You will quickly find that your Kenwood Cooking Chef is simple to use and will help make your everyday food preparation easy.
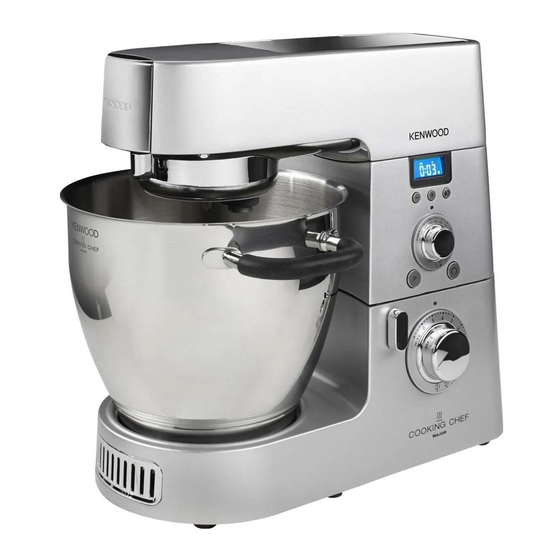
- Page 7 Kenwood Cooking Chef (To buy an attachment not included in your pack, see service and customer care.) attachment outlets high speed outlet medium speed outlet slow speed outlet tool socket the mixer medium/high speed outlet cover mixer head...
- Page 8 control panel timer/temperature display timer decrease button timer increase button temperature control pulse button/high speed, high temperature whisk button speed control timer/temperature selector button temperature indicator light fold button speed control indicator light...
- Page 9 adjusting the height of the tools Please refer to page 11 on how to assemble the mixer. whisk, stainless steel K beater, stirring tool For best performance the whisk, K beater and stirring tool should be almost touching the bottom of the bowl .
- Page 10 the mixer the mixing tools and some of their uses K-beater For making cakes, biscuits, pastry, icing, fillings, éclairs and mashed potato. whisk For eggs, cream, batters, fatless sponges, meringues, cheesecakes, mousses, soufflés. Don’t use the whisk for heavy mixtures (e.g. creaming fat and sugar) - you could damage it.
- Page 11 s peed control The following speeds are a guide only and will vary depending upon the quantity and the temperature of the ingredients being mixed etc. Turn the speed control clockwise to obtain speeds ‘min’ through to ‘max’. K-beater creaming fat and sugar start on min , gradually increasing to ‘max’ . beating eggs into creamed mixtures 4 - ‘max’.
- Page 12 hints Some recipes, in particular those with a high water content, will not be able to reach a cooking temperature above 100°C (as this is the boiling point of water). When adding ingredients to the bowl during cooking, turn the speed down and add the ingredients slowly and evenly.
- Page 13 Plug in and switch on. If these or any other error codes continue to appear on the display contact Kenwood Customer Care. to use the countdown timer The timer can be used in both the cooking and non cooking modes. If a countdown time is not selected, the timer will automatically count up in 1 second intervals whilst the mixer is in operation.
- Page 14 maximum capacities shortcrust pastry Flour weight: 910g - 2lb stiff yeast dough Flour weight: 1.5kg - 3lb 5oz Total weight: 2.4kg - 5lb 5oz soft yeast dough Flour weight: 2.6kg - 5lb 12oz Total weight: 5kg - 11lb fruit cake mix Total weight: 4.55kg - 10lb egg whites...
- Page 15 If your Kenwood product malfunctions or you find any defects, please send it or bring it to an authorised KENWOOD Service Centre. To find up to date details of your nearest authorised KENWOOD Service centre visit www.kenwoodworld.com or the website specific to your Country.
- Page 16 recipes See important points for bread making on page 15 . white bread stiff yeast dough ingredients 1.36 kg ( 3 lb) strong plain flour 15 ml ( 3 tsp) salt 25 g ( 1 oz) fresh yeast; or 15g/20 ml ( ⁄...
- Page 17 recipes continued strawberry and apricot gâteau ingredients: sponge 3 eggs 75 g ( 3 oz) caster sugar 75 g ( 3 oz) plain flour 150 ml ( ⁄ pt) double cream filling and decoration Sugar to taste 225 g ( 8 oz) strawberries 225 g ( 8 oz) apricots Halve the apricots and remove the stones.
-
Page 18: Nederlands
Lees deze instructies zorgvuldig door en bewaar ze voor toekomstig gebruik. Verwijder de verpakking en alle labels. Als het snoer beschadigd is, moet het om veiligheidsredenen door Kenwood of een door Kenwood geautoriseerd reparatiebedrijf vervangen worden. belangrijke mededeling – elektronisch-medische implantaten Net als andere inductieverwarmingsproducten genereert dit apparaat magnetische velden met beperkt bereik. - Page 19 Gebruik het apparaat alleen voor het huishoudelijke gebruik waarvoor het is bedoeld. Kenwood kan niet aansprakelijk worden gesteld in als het apparaat is misbruikt of als deze instructies niet zijn opgevolgd.
- Page 20 Was de onderdelen: zie ‘onderhoud en reiniging’ op pagina 32. inleiding Hartelijk dank voor uw aankoop van deze Kenwood Cooking Chef keukenmachine. We hopen dat u er vele jaren van kunt genieten. Kenwood heeft bijna 60 jaar ervaring en expertise met de ontwikkeling van onze keukenmachines en het grote aantal verschillende hulpstukken.
- Page 21 U ziet misschien ook dat het continu brandende lampje begint te knipperen als de mengfrequentie wordt verhoogd. U zult snel merken dat uw Kenwood Cooking Chef gemakkelijk in het gebruik is en uw dagelijkse voedselbereiding vergemakkelijkt.
- Page 22 Kenwood Cooking Chef ( Als u een hulpstuk wilt aanschaffen dat niet bij uw apparaat meegeleverd is, kunt u de sectie service en onderhoud raadplegen.) aansluitpunten voor hulpstukken hoge snelheidaansluitpunt medium snelheidaansluitpunt lage snelheidaansluitpunt fitting voor hulpstukken de mixer...
- Page 23 bedieningspaneel timer/temperatuurdisplay timer knop omlaag timer knop omhoog temperatuurregeling pulseerknop/hoge snelheid, hoge temperatuur gardetoets snelheidsknop timer/temperatuurselectietoets temperatuurlampje vouwtoets indicatielampje snelheidsknop...
- Page 24 de hoogte van de hulpstukken aanpassen Zie pagina 26 voor informatie over de montage van de mixer. garde, roestvrij stalen K-klopper, roerhulpstuk Voor de beste prestaties moeten de garde, K-klopper en het roerhulpstuk de bodem van de kom bijna aanraken .
- Page 25 de mixer de hulpstukken van de mixer en enkele gebruiksmogelijkheden K-klopper Voor het maken van cakes, biscuits, gebak, galzuur, vullingen, soezen en aardappelpuree. garde Voor eieren, room, beslag, vetvrij biscuitdeeg, schuimgebak, kwarktaart, mousse en soufflé. Gebruik de garde niet voor zware mengsels (bv. voor het kloppen van boter en suiker) –...
- Page 26 snelheidsknop De volgende snelheden zijn slechts richtlijnen; de snelheid is afhankelijk van de hoeveelheid voedsel in de kom en de ingrediënten die worden gemengd, enz. Draai de snelheidsknop naar rechts om de snelheid van ‘min’ tot ‘max’ te veranderen. K-klopper vet en suiker kloppen begin op min en schakel geleidelijk over naar max.
- Page 27 NB: Telkens wanneer op de timer/temperatuurselectieknop wordt gedrukt, worden afwisselend de timer en de temperatuur van de kominhoud weergegeven. 5 Om het mengen en verwarmen te stoppen, zet u de snelheidsknop in de uitstand (‘O’). Om de werking te hervatten, selecteert u een snelheid. tips In sommige recepten, met name recepten met een hoog watergehalte, kan de kooktemperatuur niet boven 100 °C uitstijgen (dit is het kookpunt van water).
- Page 28 Zorg dat de ventilatiegaten vrij E:10 zijn van obstructies. Steek de stekker in het stopcontact en schakel de machine Als deze of andere foutmeldingen blijven verschijnen, dient u contact op te nemen met de klantenservice van Kenwood.
- Page 29 gebruik van het aftelmechanisme De timer kan worden gebruikt in de kook- en niet-kookmodi. Als geen afteltijd is geselecteerd, telt de timer automatisch omhoog met 1 seconde terwijl de mixer in bedrijf is. De maximale bedrijfsduur is 3 uur. 1 Steek de stekker van de mixer in het stopcontact. De display geeft kort weer en is daarna leeg;...
- Page 30 problemen oplossen voor tijdens het koken Probleem Oorzaak Oplossing De mixer werkt niet in de verwarmingsmodus Een van de veiligheidssensors is geactiveerd. Zie de tabel met foutmeldingen op pagina 29. en geeft een foutmelding en een Controleer of de kop omlaag is gebracht en is waarschuwingstoon weer.
- Page 31 Als uw Kenwood product niet goed functioneert of als u defecten opmerkt, kunt u het naar een erkend Service Center van KENWOOD sturen of brengen. Voor informatie over het KENWOOD Service Center in uw buurt gaat u naar www.kenwoodworld.com of naar de specifieke...
- Page 32 BELANGRIJKE INFORMATIE VOOR DE JUISTE VERWIJDERING VAN HET PRODUCT VOLGENS DE EUROPESE RICHTLIJN BETREFFENDE AFGEDANKTE ELEKTRISCHE EN ELEKTRONISCHE APPARATUUR (AEEA) Aan het einde van de levensduur van het product mag het niet samen met het gewone huishoudelijke afval worden verwerkt. Het moet naar een speciaal centrum voor gescheiden afvalinzameling van de gemeente worden gebracht, of naar een verkooppunt dat deze service verschaft.
- Page 33 recepten Zie belangrijke aanwijzingen voor het maken van brood op pagina 30. witbrood stijf gistdeeg ingrediënten 1,36 kg sterke patentbloem 3 theelepels zout 25 g verse gist of 15 g gedroogde gist + 1 theelepel suiker 750 ml warm water: 43 °C. Gebruik een thermometer of voeg 250 ml kokend water toe aan 500 ml koud water 25 g vet bereiding 1 gedroogde gist (het soort gist dat moet worden opgelost): giet het warme water in...
- Page 34 recepten vervolg taart met aardbeien en abrikozen ingrediënten: biscuitdeeg 3 eieren 75 g basterdsuiker 75 g patentbloem vulling en versiering 150 ml volle room Suiker naar smaak 225 g aardbeien 225 abrikozen bereiding 1 Halveer de abrikozen en verwijder de pitten. Kook ze voorzichtig in erg weinig water met naar smaak een beetje suiker tot ze zacht zijn.
-
Page 35: Français
Retirez tous les éléments d’emballage et les étiquettes. Si le cordon est endommagé, il doit être remplacé, pour des raisons de sécurité, par Kenwood ou par un réparateur agréé Kenwood. remarque importante – implants médicaux électroniques Comme tous les produits de cuisson par induction, cet appareil génère des champs magnétiques à... - Page 36 Cet appareil ne doit pas être utilisé par des enfants. Veuillez garder l’appareil et le cordon hors de portée des enfants. N’employez l’appareil qu’à la fin domestique prévue. Kenwood décline toute responsabilité dans les cas où l’appareil est utilisé incorrectement...
- Page 37 Merci d’avoir acheté ce robot de cuisine Kenwood, nous espérons qu’il vous sera utile pendant de longues années. Kenwood a près de 60 ans d’expérience et d’expertise dans le développement de nos robots de cuisine et leur large gamme d’accessoires. Les robots de cuisine Kenwood Chef sont renommés pour être bien plus qu’un simple batteur.
- Page 38 Vous remarquerez aussi que la lumière statique se met à clignoter si la vitesse du mélange est augmentée. Vous vous rendrez compte rapidement que votre robot Kenwood Chef est simple à utiliser et vous facilitera la tâche pour votre cuisine de tous les jours.
- Page 39 Kenwood Chef (Si vous souhaitez acheter un accessoire qui n’était pas livré avec votre appareil, voir la rubrique service clientèle.) Orifices de branchement sortie ultra-rapide sortie moyenne sortie lente sortie planétaire le batteur couvercle des sorties ultra-rapide et moyenne tête du batteur...
- Page 40 commandes affichage minuteur/température bouton diminuer la minuterie bouton augmenter la minuterie contrôle de la température bouton pulse/vitesse haute, fouet haute température réglage de la vitesse bouton de sélection minuteur/température voyant indicateur de température bouton ‘fold’ voyant indicateur de vitesse...
- Page 41 ajuster la hauteur des accessoires Veuillez vous référer à la page 43 pour l’assemblage du batteur. Fouet, batteur K en inox, mélangeur Pour une meilleure performance, le fouet, le batteur K et le mélangeur doivent presque toucher le fond du bol .
- Page 42 le batteur les accessoires du batteur et quelques-unes de leurs utilisations possibles batteur K Pour la confection de gâteaux, biscuits, pâtes, glaçages, garnitures, éclairs et purée de pommes de terre. fouet Pour les œufs, les crèmes, les pâtes à frire, les gâteaux (type génoise) sans matière grasse, les meringues, les cheese-cakes, les mousses, les soufflés.
- Page 43 contrôle de la vitesse Les vitesses suivantes sont indicatives et peuvent varier suivant la quantité et la température des ingrédients à mélanger. Tournez le bouton des vitesses dans le sens des aiguilles d’une montre pour passer de la vitesse minimum à la vitesse maximum. batteur K travailler les matières grasses en crème avec le sucre commencez sur ‘min’, augmentez progressivement jusqu’au ‘max’.
- Page 44 astuces Certaines recettes, en particulier à forte teneur en eau, ne pourront pas atteindre une température de cuisson supérieure à 100°C (la température d’ébullition de l’eau). Pour ajouter des ingrédients dans le bol pendant la cuisson, diminuez la vitesse et ajoutez les ingrédients lentement et régulièrement.
- Page 45 Assurez-vous que toutes les grilles de ventilation ne sont pas obstruées. Rebranchez et allumez. Si ces codes d’erreur ou d’autres continuent de s’afficher, contactez le service après-vente Kenwood.
- Page 46 utiliser le minuteur Le minuteur peut être utilisé en mode cuisson ou sans cuisson. Si aucune durée n’est sélectionnée, le minuteur compte automatiquement en intervalles d’une seconde pendant que le batteur fonctionne. La durée maximale d’utilisation est de trois heures. 1 Branchez l’appareil.
- Page 47 guide de dépannage en mode cuisson Problème Cause Solution Le batteur ne fonctionne pas en mode Un des capteurs de sécurité a été activé. Voir le tableau des messages d’erreur en cuisson, l’appareil affiche un message page 46. d’erreur et émet un bip. •...
- Page 48 Si votre appareil Kenwood fonctionne mal ou si vous trouvez un quelconque défaut, veuillez l’envoyer ou l’apporter à un centre de réparation KENWOOD autorisé. Pour trouver des détails actualisés sur votre centre de réparation KENWOOD le plus proche, veuillez consultez...
- Page 49 AVERTISSEMENTS POUR L’ÉLIMINATION CORRECTE DU PRODUIT CONFORMÉMENT AUX TERMES DE LA DIRECTIVE EUROPÉENNE RELATIVE AUX DÉCHETS D’ÉQUIPEMENTS ÉLECTRIQUES ET ÉLECTRONIQUES (DEEE). Au terme de son utilisation, le produit ne doit pas être éliminé avec les déchets urbains. Le produit doit être remis à l’un des centres de collecte sélective prévus par l’administration communale ou auprès des revendeurs assurant ce service.
- Page 50 recettes Voir points importants pour la fabrication du pain en page 47. Pain blanc pâte levée ingrédients 1,3 kg de farine 15 ml (3 cc) sel 25 g de levure fraîche (levure de boulanger) ou 15 g/20 ml de levure sèche + 5 ml (1 cc) de sucre 750 ml d’eau chaude à...
- Page 51 recettes suite gâteau aux fraises et aux abricots ingrédients : gâteau type génoise 3 œufs 75 g de sucre en poudre 75 g de farine ordinaire garniture et décoration 150 ml de crème fraîche épaisse Sucre selon votre goût 225 g de fraises 225 g d’abricots méthode 1 Coupez les abricots en deux et retirez les noyaux.
-
Page 52: Deutsch
Deutsch Ihre Cooking Chef Küchenmaschine von Kenwood Sicherheit Lesen Sie diese Anleitungen sorgfältig durch und bewahren Sie sie zur späteren Bezugnahme auf. Entfernen Sie sämtliche Verpackungen und Aufkleber. Ein beschädigtes Netzkabel muss aus Sicherheitsgründen von KENWOOD oder einer autorisierten KENWOOD-Kundendienststelle ausgetauscht werden. - Page 53 Kinder müssen überwacht werden, damit sie mit dem Gerät nicht spielen. Dieses Gerät darf nicht von Kindern verwendet werden. Gerät und Netzkabel müssen für Kinder unzugänglich sein. Verwenden Sie das Gerät nur für seinen vorgesehenen Zweck im Haushalt. Bei unsachgemäßer Benutzung oder Nichteinhaltung dieser Anweisungen übernimmt Kenwood keinerlei Haftung.
- Page 54 Hitze vom Inhalt der Schüssel zurückgeleitet wird. Das Induktionskochen ist also sehr effizient, sehr sicher und sehr sauber. Die Kochfunktion Ihres Kenwood Cooking Chef ist ähnlich wie die eines Topfes auf Ihrem Herd. Der zusätzliche Vorteil besteht jedoch darin, dass der Cooking Chef ihr Kochgut automatisch umrührt und die Kochtemperatur genau nach Ihren Wünschen reguliert, so dass Sie sich anderen Aufgaben in Ihrer Küche widmen können.
- Page 55 Hinzugeben weiterer Zutaten in die Schüssel die LED wieder zu blinken beginnt, da die Temperatur des Kochguts durch das Hinzugeben kalter Zutaten sinkt. Möglicherweise blinkt die LED auch wieder bei häufigerem Rühren. Sie werden schnell herausfinden, dass Ihr Kenwood Cooking Chef einfach zu benutzen ist und Ihnen die tägliche Essenszubereitung erheblich erleichtert.
- Page 56 Komponenten Ihres Kenwood Cooking Chef ( Zum Kauf von Zubehör, das nicht zum Lieferumfang der Maschine gehört, wenden Sie sich bitte an den Wartungs- und Kundendienst.) Zubehör-Anschlüsse Hochgeschwindigkeits-Anschluss Mittelgeschwindigkeits-Anschluss Niedriggeschwindigkeits-Anschluss Steckplatz für Rührelemente Küchenmaschine Deckel für Mittel-/Hochgeschwindigkeits-Anschlüsse Maschinenkopf Deckel für Niedriggeschwindigkeits-Anschluss Hebel für Niedriggeschwindigkeits-Anschluss...
- Page 57 Bedienfeld Timer-/Temperaturanzeige Timer – Minus-Taste Timer – Plus-Taste Temperaturregler Puls-/Hochgeschwindigkeitstaste, Hochtemperatur-Rührtaste Geschwindigkeitsregler Timer-/Temperaturwahlschalter Temperatur-LED Unterheb-Taste Geschwindigkeitsregler-LED...
- Page 58 Höheneinstellung von Rührelementen Zum Zusammenbau der Küchenmaschine siehe Seite 60. Schneebesen, K-Haken aus Edelstahl, Rührpaddel Die beste Leistung des Schneebesens, K-Hakens und Rührpaddels erzielen Sie, wenn diese den Boden der Schüssel fast berühren . Verändern Sie bei Bedarf die Höhe mit dem Schraubenschlüssel (im Lieferumfang). Gehen Sie dazu wie folgt vor: 1 Ziehen Sie den Netzstecker.
- Page 59 Das Rührsystem Die Rührelemente und einige ihrer Einsatzmöglichkeiten K-Haken Zur Zubereitung von Kuchen, Plätzchen, Gebäck, Zuckerguss, Füllungen, Brandteig und Kartoffelpüree. Schneebesen Für Eier, Sahne, Rührteig, Biskuitteig ohne Fett, Baisers, Käsekuchen, Schaumspeisen und Soufflés. Den Schneebesen nicht für schwere Mischungen (z.B. zum Schaumigschlagen von Fett und Zucker) verwenden – er könnte dadurch beschädigt werden.
- Page 60 Unterheb-Taste Wenn Sie die Unterheb-Taste kurz gedrückt halten, läuft die Maschine automatisch für 2 Drehungen bei minimaler Geschwindigkeit und stoppt dann. Sie können die Taste zum Unterheben von Zutaten auch je nach Bedarf für längere Zeit gedrückt halten oder mehrmals hintereinander drücken. Hinweis: Wird die Unterheb-Taste bei laufendem Motor gedrückt, führt die Maschine die standardmäßige Unterheb-Funktion aus und kehrt dann zur ausgewählten Geschwindigkeit zurück.
- Page 61 Die Kochfunktion startet nur, wenn eine Geschwindigkeit ausgewählt wurde. 3 Stellen Sie den Geschwindigkeitsregler auf die gewünschte Geschwindigkeit. Dadurch werden Motor und Heizelement eingeschaltet. Beide LED-Anzeigen blinken. 4 Nachdem die eingestellte Temperatur erreicht wurde, leuchtet die Temperatur-LED kontinuierlich. Sie beginnt jedoch während des Kochvorgangs wieder zu blinken, sobald sich die Temperatur ändert. Dies zeigt an, dass die Maschine versucht, die eingestellte Temperatur zu bewahren (siehe Einführung Seite 55).
- Page 62 Motor und das Heizelement automatisch aus. beseitigen, die den Motor zum Stillstand E:10 gebracht haben. Sicherstellen, dass alle Entlüftungsschlitze frei liegen. Maschine wieder ans Netz anschließen und einschalten. Wenn diese oder andere Fehlercodes weiterhin auf der Anzeige erscheinen, wenden Sie sich bitte an den Kenwood Kundendienst.
- Page 63 Verwendung des Countdown-Timers Der Timer lässt sich im Kochmodus wie auch in anderen Modi verwenden. Wird keine Countdown-Zeit eingestellt, zählt der Timer automatisch in 1-Sekunden-Schritten weiter, solange die Küchenmaschine in Betrieb ist. Die maximale Laufzeit beträgt 3 Stunden. 1 Schließen Sie das Gerät an den Netzstrom an. Auf der Anzeige erscheint und verschwindet dann wieder, so dass nur noch die Betriebsanzeige sichtbar ist.
- Page 64 Fehlerbehebung beim Kochen Problem Ursache Lösung Die Küchenmaschine arbeitet nicht im Einer der Sicherheitsfühler wurde aktiviert. Siehe Tabelle der Fehlermeldungen auf Seite 63. Kochmodus. Sie zeigt eine Fehlermeldung Sicherstellen, dass Maschinenkopf an und gibt einen Warnton aus. heruntergeklappt und eingerastet ist. Sicherstellen, dass alle Anschlussdeckel korrekt aufgesetzt sind.
- Page 65 Land, in dem das Produkt gekauft wurde. Falls Ihr Kenwood-Produkt nicht ordnungsgemäß funktioniert oder Defekte aufweist, bringen Sie es bitte zu einem autorisierten KENWOOD Servicecenter oder senden Sie es ein. Aktuelle Informationen zu autorisierten KENWOOD Servicecentern in Ihrer Nähe finden Sie bei www.kenwoodworld.com bzw.
- Page 66 Rezepte Siehe „Hinweise zu Brotteigen“ auf Seite 64 . Weißbrot – fester Hefeteig Zutaten 1,36 kg Mehl zum Brotbacken 15 g (3 Teel.) Salz 15 g frische Hefe oder 15 g Trockenhefe + 5 g (1 Teel.) Zucker 750 ml warmes Wasser 43°C. Ein Thermometer benutzen oder 250 ml kochendes Wasser mit 500 ml kaltem Wasser mischen 15 g Schmalz Zubereitung 1 Trockenhefe (muss aufbereitet werden): Warmes Wasser in die Schüssel geben.
- Page 67 Rezepte - Fortsetzung Erdbeer- und Aprikosentorte Zutaten: Biskuitteig 3 Eier 75 g Streuzucker 75 g Mehl Füllung und Verzierung 150 ml Doppelsahne Zucker nach Geschmack 225 g Erdbeeren 225 g Aprikosen Zubereitung 1 Aprikosen halbieren und Steine entfernen. In sehr wenig Wasser sieden, bis sie weich sind.
-
Page 68: Italiano
Italiano per conoscere il vostro Kenwood Cooking Chef sicurezza Leggere attentamente le presenti istruzioni e conservarle come futuro riferimento. Rimuovere la confezione e le etichette. In caso il cavo sia danneggiato, per ragioni di sicurezza deve esser sostituito solo dal fabbricante oppure da un Centro Assistenza KENWOOD autorizzato alle riparazioni. - Page 69 Fare attenzione al vapore che fuoriesce dal recipiente di Kenwood Cooking Chef, in particolare nell’aprire il coperchio del paraspruzzi, oppure al momento di sollevare la testa di Kenwood Cooking Chef. Se si desidera versare alimenti caldi da Kenwood Cooking Chef nel frullatore, prima lasciarli sempre raffreddare a temperatura ambiente.
- Page 70 è molto efficiente, sicura e pulita. La funzione di cottura di Kenwood Cooking Chef è simile all’uso di una pentola su un normale fornello. Tuttavia, il vantaggio supplementare consiste nel fatto che Kenwood Cooking Chef mescolerà automaticamente i cibi e regolerà...
- Page 71 Ben presto, capirete che il vostro Kenwood Cooking Chef è molto semplice da usare e vi faciliterà la preparazione dei piatti di tutti i giorni.
- Page 72 Kenwood Cooking Chef ( Per acquistare un accessorio non in dotazione, vedere la sezione ‘manutenzione e assistenza tecnica’.) attacchi per gli accessori attacco ad alta velocità attacco a media velocità attacco a bassa velocità attacco per utensili Kenwood Cooking Chef coperchio dell’attacco a media/alta velocità...
- Page 73 pannello di controllo display per timer/temperatura tasto timer - tasto timer + controllo della temperatura tasto Funzione Pulse , per montare ad alta velocità controllo della velocità selettore per timer/temperatura spia di controllo della temperatura tasto per amalgamare spia di controllo della velocità...
- Page 74 Per le istruzioni relative al montaggio di Kenwood Cooking Chef , vedere pag. 76. frusta a fili grossi, frusta in acciaio inox, utensile per mescolare Per ottenere i migliori risultati, il frusta a fili grossi, la frusta e l’utensile per mescolare devono quasi fare contatto con il fondo del recipiente .
- Page 75 il mixer utensili per miscelare e possibili usi frusta a K Per preparare torte, biscotti, pastafrolla, glassa, farciture, bignè e purè di patate. frusta a fili grossi Per uova, panna, pastelle, pan di Spagna senza grassi, meringhe, torte alla ricotta, mousse, soufflé. Non usare la frusta a fili grossi per miscele dense (es.
- Page 76 controllo della velocità Le velocità seguenti sono a semplice titolo di guida e variano a seconda della quantità e della temperatura degli ingredienti miscelati, ecc. Ruotare in senso orario il controllo della velocità per avere velocità da ‘min’ fino a ‘max’. frusta per amalgamare burro/margarina e zucchero iniziare al min.
- Page 77 consigli Per alcune ricette, in particolare quelle ad alto contenuto di acqua, non sarà possibile raggiungere temperature di cottura oltre 100ºC (ossia il punto di ebollizione dell’acqua). Quando si desidera aggiungere ingredienti nel recipiente in fase di cottura, ridurre la velocità e versarli in modo lento e continuo.
- Page 78 Controllare E:10 che tutte le bocchette dell’aria non presentino ostruzioni. Inserire la spina dell’apparecchio nella presa elettrica e accenderlo. Se questi o altri codici di errore continuano ad apparire nel display, contattare l’Assistenza tecnica Kenwood.
- Page 79 per usare il conto alla rovescia con timer Il timer può essere usato sia in modalità di cottura che senza la cottura. Se l’utilizzatore non seleziona un tempo per il conto alla rovescia, il timer conta automaticamente in intervalli di 1 secondo durante il funzionamento del mixer.
- Page 80 • Verificare che tutti i coperchi degli attacchi siano correttamente inseriti. • Verificare che la protezione termica sia montata in modo corretto. • Controllare che il recipiente di Kenwood Cooking Chef sia ben inserito. È stata selezionata una temperatura, ma il Non è stata selezionata una velocità.
- Page 81 Paese ove l’apparecchio è stato acquistato. In caso di guasto o cattivo funzionamento di un apparecchio Kenwood, si prega di inviare o consegnare di persona l’apparecchio a uno dei centri assistenza KENWOOD.
- Page 82 ricette Vedere il promemoria per fare il pane, a pag. 80. pane bianco impasto duro con lievito ingredienti 1,36kg di farina per pane 15ml (3 cucchiaini) di sale 25g di lievito di birra fresco, oppure 15g/20ml di lievito di birra in polvere + 5ml (1 cucchiaino) di zucchero 750ml di acqua tiepida: 43ºC.
- Page 83 ricette continuaz. torta di fragole e albicocche Ingredienti: pan di Spagna 3 uova 75g di zucchero semolato 75g di farina farcitura e decorazione 150ml di panna da cucina Zucchero, secondo i gusti 225g di fragole 225g di albicocche metodo 1 Dimezzare le albicocche e privarle dei noccioli. Cuocere a bassa temperatura in pochissima acqua, aggiungendo zucchero secondo le preferenze, fino a quando le albicocche non sono ben morbide.
-
Page 84: Português
Retire todas as embalagens e eventuais etiquetas. Caso o fio se encontre danificado, deverá, por motivos de segurança, ser substituído pela Kenwood ou por um reparador Kenwood autorizado. nota importante – implantes médicos electrónicos Tal como todos os produtos de aquecimento por indução, este aparelho gera campos magnéticos de curto alcance. - Page 85 Use o aparelho apenas para o fim doméstico a que se destina. A Kenwood não se responsabiliza caso o aparelho seja utilizado de forma inadequada, ou caso estas instruções não sejam respeitadas.
- Page 86 é muito eficiente, muito segura e muito limpa. A funcionalidade de cozedura da sua Kenwood Cooking Chef é similar à utilização de uma caçarola no seu fogão. A vantagem adicional é que a Chef mexe automaticamente os seus alimentos e regula a temperatura de cozedura de acordo com as suas exigências específicas, deixando-a livre para, com toda a confiança, poder...
- Page 87 Vai também notar que a luz estática começa a piscar se a frequência do mexer aumentar. Vai também descobrir depressa que a sua Kenwood Cooking Chef é simples de utilizar e que vai ajudá-la a preparar de forma fácil as suas refeições do dia-a-dia.
- Page 88 Kenwood Cooking Chef ( Para comprar um acessório não incluído na sua embalagem, ver “serviço e cuidados ao cliente”.) entradas para acessórios entrada de alta velocidade entrada de média velocidade entrada de baixa velocidade encaixe para acessório tampa da misturadora das entradas de velocidade alta/média...
- Page 89 painel de controlo temporizador/ecrã de temperatura botão temporizador de diminuição de tempo botão temporizador de aumento de tempo controlo de temperatura botão de impulso/alta velocidade, batedora de varetas para alta temperatura controlo de velocidade temporizador/botão selector de temperatura luz indicadora de temperatura botão de envolver ingredientes luz indicadora de controlo de velocidade...
- Page 90 ajustar a altura dos acessórios Consulte por favor a pág. 92 sobre como montar a misturadora batedora de varetas, varinha em K em aço inoxidável, varinha para mexer alimentos Para um melhor desempenho a batedora de varetas, a varinha em K e a varinha de mexer devem quase tocar o fundo da taça .
- Page 91 a misturadora os acessórios de bater ou misturar e algumas das suas utilizações: varinha em K Para fazer bolos, biscoitos, massa, glacê, recheios, éclairs e puré de batata. batedora de varetas Para ovos, natas, massa para crepes, pão-de-ló sem gordura, suspiros, cheesecakes, mousses, soufflés.
- Page 92 controlo de velocidade As seguintes velocidades são apenas indicativos e variarão de acordo com a quantidade e a temperatura dos ingredientes que estão a ser misturados etc. Gire o controlo de velocidade no sentido dos ponteiros do relógio para obter velocidades do “Min.”...
- Page 93 Nota: Cada vez que o botão de seleccionar o temporizador/temperatura for pressionado, o ecrã alternará entre o ecrã temporizador e o do temperatura do conteúdo da taça. 5 Para parar ou pausar a mistura ou o processo de aquecimento, gire o controlo de velocidade para a posição “O” de desligado.
- Page 94 à corrente eléctrica e ligue. Se estes ou qualquer outro código de erro continua a aparecer no ecrã, contacte o Serviço Cuidados ao Cliente da Kenwood. para usar o temporizador em contagem regressiva O temporizador pode ser usado tanto no modo de cozinhar como no modo de não cozinhar. Se não for seleccionada uma contagem regressiva, o temporizador vai contar automaticamente para a frente em intervalos de 1 segundo enquanto a misturadoras estiver a funcionar.
- Page 95 para reiniciar o temporizador 1 Ponha o temporizado a zeros, pressionando ao mesmo tempo os botões “+” e “–” (o controlo de velocidade deve estar na posição “O” de desligado). Se a máquina estiver inactiva durante 10 minutos, o ecrã LCD e a luz de fundo entram em ‘modo de hibernação’ e todas as mensagens do ecrã...
- Page 96 guia de avarias para detectar problemas quando cozinha Problema: Causa: Solução: A misturadora não funciona no modo de Um dos sensores de segurança foi activado. Ver o quadro referente a mensagens de erro na aquecimento, o ecrã mostra uma mensagem pág.
- Page 97 Se o seu produto Kenwood funcionar mal ou lhe encontrar algum defeito, agradecemos que o envie ou entregue num Centro de Assistência Kenwood autorizado. Para encontrar informações actualizadas sobre o Centro de Assistência Kenwood autorizado mais próximo de si, visite por favor o site www.kenwoodworld.com ou o...
- Page 98 receitas Ver indicações importantes para fazer pão, na pág. 96. pão branco de massa levedada dura ingredientes: 1,36kg de farinha clara sem levedura 15ml (3c.c.) de sal 25g de fermento de padeiro; ou 15g/20ml de fermento de padeiro seco + 5ml (1c.c.) de açúcar 750ml de água morna: 43°C Use um termómetro ou adicione 250ml de água a ferver a 500ml de água fria...
- Page 99 receitas (continuação) bolo de morangos e alperces ingredientes: pão-de-ló 3 ovos 75g de açúcar em pó 75g de farinha sem levedura para o bolo e decoração 150ml de natas espessas (com alto teor de gordura) Açúcar a gosto 225g de morangos 225g de alperces preparação: 1 Corte os alperces a meio e retire os caroços.
-
Page 100: Español
Quite todo el embalaje y las etiquetas. Si el cable está dañado, por razones de seguridad, debe ser sustituido por Kenwood o por un técnico autorizado por Kenwood. nota importante - implantes médicos electrónicos Al igual que todos los productos de calentamiento por inducción, este aparato genera campos magnéticos de corto alcance. - Page 101 Utilice este aparato únicamente para el uso doméstico al que está destinado. Kenwood no se hará cargo de responsabilidad alguna si el aparato se somete a un uso inadecuado o si no se siguen estas...
- Page 102 Gracias por comprar este Robot de Cocina Cooking Chef Kenwood, esperamos que lo disfrute durante muchos años. Kenwood tiene casi 60 años de experiencia y conocimientos en el desarrollo de aparatos de cocina y su amplia variedad de accesorios. Los Robots de Cocina Chef de Kenwood tienen fama de ser algo más que una simple mezcladora de alimentos.
- Page 103 También debe tener en cuenta que la luz estática empieza a parpadear si la frecuencia de mezclado se incrementa. Enseguida se dará cuenta de que el Cooking Chef Kenwood es muy fácil de usar y que le ayudará a simplificar la preparación diaria de la comida.
- Page 104 Cooking Chef Kenwood ( Para comprar un accesorio que no esté incluido en su paquete, consulte “servicio técnico y atención al cliente”.) salidas de los accesorios salida de alta velocidad salida de velocidad media salida de baja velocidad...
- Page 105 panel de control pantalla de temperatura/temporizador botón para reducir el tiempo botón para aumentar el tiempo control de temperatura botón intermitente/botón del batidor de varillas de alta temperatura, alta velocidad control de velocidad botón selector de temperature/temporizador luz indicadora de la temperatura botón de batido lento luz indicadora del control de velocidad...
- Page 106 ajustar la altura de los utensilios Remítase a la página 108 para consultar cómo se monta la mezcladora. batidor de varillas, batidor K de acero inoxidable, utensilio para remover Para obtener el mejor resultado, el batidor de varillas, el batidor K y el utensilio para remover casi deben tocar el fondo del bol .
- Page 107 la mezcladora los utensilios de mezclado y algunos de sus usos batidor K Para hacer tartas, galletas, pastelitos, glaseado, rellenos, pastelitos rellenos de crema y puré de patata. batidor de varillas Para huevos, crema, pasta para rebozar, bizcochos sin grasa, merengues, tartas de queso, mousses, suflés.
- Page 108 botón de batido lento Apriete y suelte el botón de batido lento y la mezcladora funcionará automáticamente a velocidad mínima durante 2 revoluciones y luego se parará. El botón se puede mantener apretado para una operación más larga o se puede apretar de forma repetida, según sea necesario, para combinar ingredientes.
- Page 109 El proceso de calentamiento no comenzará a menos que se seleccione una velocidad. 3 Gire el control de velocidad hacia la velocidad deseada, lo cual hará que se encienda el motor y el calentador. Los dos luces indicadoras parpadearán. 4 Cuando se alcance la temperatura preseleccionada, la luz indicadora de la temperatura se iluminará de forma permanente.
- Page 110 Compruebe que ninguna salida de aire esté obstruida. Enchufe y conecte. Si éstos o cualquier otro código de error siguen apareciendo en la pantalla, póngase en contacto con el servicio de atención la cliente de Kenwood.
- Page 111 para usar el temporizador de cuenta atrás El temporizador se puede usar tanto en el modo de cocción como de no cocción. Si no hay un tiempo de cuenta atrás seleccionado, el temporizador contará automáticamente hacia adelante a intervalos de 1 segundo mientras la mezcladora esté...
- Page 112 guía para la solución de problemas al cocinar Problema Causa Solución La mezcladora no funciona en el modo calor Uno de los sensores de seguridad ha sido Consulte la tabla relativa a los mensajes de error y muestra un mensaje de error y emite un activado.
- Page 113 Si su producto Kenwood funciona mal o si encuentra algún defecto, envíelo o llévelo a un centro de servicios KENWOOD autorizado. Para encontrar información actualizada sobre su centro de servicios KENWOOD autorizado más cercano, visite www.kenwoodworld.com o la...
- Page 114 recetas Consulte los puntos importantes para hacer pan en la página 112. pan blanco masa de levadura dura ingredientes 1,36 kg de harina normal fuerte 15 ml (3 cucharaditas) de sal 25 g de levadura fresca; o 15 g/20 ml de levadura seca + 5 ml (1 cucharadita) de azúcar 750 ml de agua caliente: 43°C.
- Page 115 recetas continuación tarta de fresa y albaricoque Ingredientes: bizcocho 3 huevos 75 g de azúcar lustre 75 g de harina normal relleno y decoración 150 ml de nata para montar Azúcar al gusto 225 g de fresas 225 g de albaricoques preparación 1 Corte los albaricoques por la mitad y quite los huesos.
-
Page 116: Ekkgmij
Ekkgmij... - Page 117 1 1 18...
- Page 126 E:01 E:02 E:03 E:04 E:09 E:10...
- Page 133 Kenwood Ltd New Lane Havant Hampshire PO9 2NH kenwoodworld.com © 2019 Kenwood Limited. All rights reserved KW00800145/4...