Table of Contents
Advertisement
Quick Links
Advertisement
Table of Contents

Related Manuals for Iiyama DPX110

Summary of Contents for Iiyama DPX110
- Page 2 DLP PROJECTOR USER’S GUIDE Thank you for purchasing the DLP Projector. Please read this user’s guide to ensure correct use of the device. Save this user’s guide for future reference. OUTLINE This DLP Projector can display various computer signals and NTSC/PAL/SECAM video signals.
-
Page 3: Table Of Contents
Table of Contents Introduction ......1 Safety Instructions ........1 Shipping Contents . -
Page 4: Introduction
INTRODUCTION Caution TO PREVENT SHOCK, DO NOT OPEN THE CABINET. NO USER –SERVICE- ABLE PARTS INSIDE. REFER SERVICING TO QUALIFIED SERVICE PERSON- NEL. PLEASE READ THIS USER’S GUIDE BEFORE YOU OPERATE YOUR PROJECTOR. SAVE THIS USER’S GUIDE FOR FUTURE REFERENCE . Safety Instructions Read this user’s guide before you operate your projector and save it for future reference. -
Page 5: Shipping Contents
Save this user’s guide: The information contained in this manual will assist you in operating and maintaining your Personal Projector. Shipping Contents The Projector is shipped with the necessary cables required for standard PC, Macintosh or laptop computer connections.Carefully unpack and verify that you have all the items shown below. -
Page 6: Projector Description
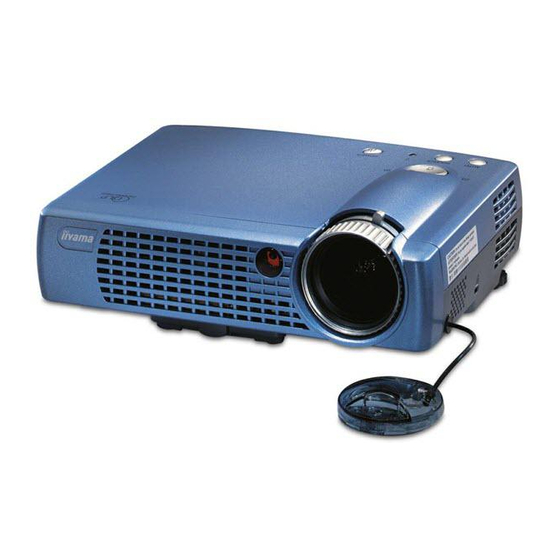
Projector Description Projector External control panel Video connector (see next page) 10. D-sub connector Projection lens (for computer/ input) Front adjustment feet 11. Audio input IR remote sensor 12. Rear adjustment feet Ventilation grill 13. Lamp access door (underneath unit) Kensington lock AC power cord input S-video connector... -
Page 7: External Control Panel
External Control Panel Exit Keystone/ Left Keystone/ Right Menu Power Auto Source Lamp status indicator • The Infrared Remote Receiver (Front and Rear) allows the projector to accept signals from the remote control. For best results, be sure to aim the control toward the sensor without any obstructions between the two, and at a distance no greater than 6 meters. -
Page 8: Adjuster
Adjuster The projector is equipped with a quick-release adjuster foot and button for adjusting its tilt angle. Lift the projector up and press the adjuster button to release the adjuster. The adjuster will drop into position and be locked. Projector Features The Projector integrates high performance optical engine projection and user- friendly design to deliver high reliability and ease of use experience. -
Page 9: Remote Control Description
Remote Control Description Power Source Auto Zoom + Zoom - Exit Keystone Freeze Menu Return Blank Volume - Mute PIP Video PIP S-video Remote Control Features The remote control sensors are located in the front/ back of the projector. The distance between the sensor and the remote control should not exceed 6 meters. - Page 10 FREEZE The image can be frozen when FREEZE is pressed. A “Pause” icon will appear in the lower right corner of the screen for three seconds. To release the freeze function, again press the FREEZE button, RETURN button or SOURCE button (when the input source is switched over during display).
-
Page 11: Installing Or Replacing Batteries
Installing or Replacing Batteries • Push and slide the battery compartment lid in the direction shown. • Install battery as indicated by the diagram inside the compartment. • Position the lid over the compartment and snap it back into place. Caution Avoid excessive heat and humidity. -
Page 12: Installation
INSTALLATION Screen Size Place the projector at the required distance from the screen according to the desired picture size (see the table below). L Projetion Distance Screen Size (Max.) L. Projection Screen Size (Min.) Diagnal A. Width (cm) C. Height (cm) B. -
Page 13: Operation
OPERATION Start Up Plug the power cord into a wall socket. Press POWER for 1 second. Projector Remote Control Power Power • The back-lit POWER key blinks green and stays green when the power is turned on. (When the power is turned off, there is a 60-second cooling period before the projector can be re-started.) Switch on all connected equipment. -
Page 14: Digital Keystone Correction
Digital Keystone Correction Keystoning is when the projected image is noticeably wider on either the top or bottom. To correct this, press KEYSTONE +/- (hot key) on the control panel of the projector or on the remote control, then adjust the sliding bar labeled Keystone, as needed. -
Page 15: Source Selection
Source Selection When several input sources are available, press the SOURCE key to make a selection from the control panel of the projector or the remote control. Remote control Projector Source Power Power Auto Source Menu System Press Menu for the main menu and press to select a sub-menu. -
Page 16: Display Menu
1. Display Menu Corrects the keystone of the image. Keystone Adjusts the brightness of image. Brightness Adjusts the degree of difference between darkness and lightness of image. Contrast Adjusts to fit in the desired image size. Phase *This function is not available when the input mode are Video, S-video. -
Page 17: Image Menu
2. Image Menu Makes the best fit of the image to the screen, Auto resize Adjusts the horizontal position of image. H-position Adjusts the vertical positon of image. V-position Adjusts the color templerature to fit your preference. Color Temp. Shows the current resolution. Information Users have 2 options for the image ratio. -
Page 18: Source Menu
3. Source Menu Mirror 1. Default 2. Ceiling - mounted projection 3. Rear screen projection 4. Ceiling - mounted and rear screen projection Selects sources between PC, Video, S-video, and YPbPr. Source Adjusts the volume level. Volume Adjusts the treble level. Treble Adjusts the bass level. -
Page 19: Control Menu
4.Control Menu Language sets the OSD to display in one of 7 languages. Language Use Left/Right key to select the languages: English, French, Ger- man, Italian, Spanish, Simplified Chinese and Traditional Chinese. Selects a desired OSD position. Sets the length of time the OSD will remain active after the last time OSD Time you pressed a button. -
Page 20: Shutdown
Shutdown Press POWER and a warning message will prompt up. To turn off the projector, press POWER again. The fan will continue to run for approximately 60 seconds. Projector Remote control Power Power Disconnect the power cord from the wall socket. Caution Please do not unplug the power cord before POWER is shut down or during the 60-second cooling process. -
Page 21: Maintenance
MAINTENANCE Lamp Information Use and Replacement of Lamp When the Lamp Indicator lights up red or a message displays to suggest the time of lamp replacement, please change a new lamp or consult your dealer.An old lamp could cause a malfunction to the projector and may explode. LED Status Indicators Lamp Life Indicators When this LED shows red continuously, it is warning you that... -
Page 22: Lamp Replacement
Lamp Replacement Caution To reduce the risk of electrical shock, always turn off the projector and dis- connect the power cord before changing the lamp. Press the POWER button to switch off the projector. Disconnect the power cord from the outlet and the projector. Loosen the screw and remove the lamp cover. -
Page 23: Resetting Lamp Hours
Caution To reduce the risk of severe burns, allow the projector to cool for at least 45 minutes before replacing the lamp. To reduce the risk of injuries to fingers and damage to internal components, use caution when removing lamp glass that has shattered into sharp pieces. To reduce the risk of injuries to fingers and/or decreasing image quality by touching the lens, do not touch the empty lamp compartment when the lamp is removed. -
Page 24: Troubleshooting
TROUBLESHOOTING Common Problems & Solutions TRY THESE SOLUTIONS PROBLEMS • Plug the power cord into the AC inlet. • Plug the power cord into the power inlet. NO POWER • Wait two minutes after the projector is turned off before turning the projector back on. -
Page 25: Status Messages
Status Messages On Screen Messages Description Projector is searching for input. SEARCHING Projector has identified the input signal and is running the auto INPUT SIGNAL image adjustment function. DETECTED, ACTIVATING AUTO IMAGE Input signal frequency exceeds the projector’s. SYNC IS OUT OF RANGE The lamp has been in operation for 1400 hours. -
Page 26: Specifications
SPECIFICATIONS Projector Specifications Technical Specifications Note: All specifications are subject to change without notice. General Product name Personal Projector Optical Display system 1-CHIP DMD Lens F/Number F/2.6 Lamp 120W VIP lamp Electrical Power supply AC100 ~ 240V, 2.3A, 50/60 Hz (Automatic) Power consumption 185 W (Max) Mechanical... -
Page 27: Timing Chart
Timing Chart Resolution H Sync (kHz) V Sync (kHz) Remark 640x350 31.5 70.1 640x400 37.9 85.1 VESA 720x400 31.5 70.0 720x400 37.9 85.1 VESA 640x480 31.5 60.0 VESA 640x480 37.9 72.8 VESA 640x480 35.0 66.7 Macintosh 640x480 43.3 85.0 VESA 800x600 35.2 56.3... -
Page 28: Dimensions
DIMENSIONS 220 mm 175 mm 52 mm DLP Personal Projector...