Table of Contents
Advertisement
Available languages
Available languages
Quick Links
Owner's Manual
Tilt Wall Mount
for Flat and Curved Screens –
Security Version
Model: DWTSC3780MUL
Español 9 • Français 17 • Русский 25 • Deutsch 33
80"
300x300 / 400x200 /
88 lb.
400x400 / 600x400
MAX
(40 kg)
MAX
PROTECT YOUR INVESTMENT!
Register your product for quicker service and ultimate peace of mind.
You could also win an ISOBAR6ULTRA surge protector—a $100 value!
www.tripplite.com/warranty
1111 W. 35th Street, Chicago, IL 60609 USA • www.tripplite.com/support
Copyright © 2018 Tripp Lite. All rights reserved.
1
Advertisement
Table of Contents

Related Manuals for Tripp Lite DWTSC3780MUL


Summary of Contents for Tripp Lite DWTSC3780MUL
- Page 1 Register your product for quicker service and ultimate peace of mind. You could also win an ISOBAR6ULTRA surge protector—a $100 value! www.tripplite.com/warranty 1111 W. 35th Street, Chicago, IL 60609 USA • www.tripplite.com/support Copyright © 2018 Tripp Lite. All rights reserved.
-
Page 2: Important Safety Instructions
PRODUCT REGISTRATION Visit www.tripplite.com/warranty today to register your new Tripp Lite product. You’ll be automatically entered into a drawing for a chance to win a FREE Tripp Lite product!* * No purchase necessary. Void where prohibited. Some restrictions apply. See website for details. -
Page 3: Component Checklist
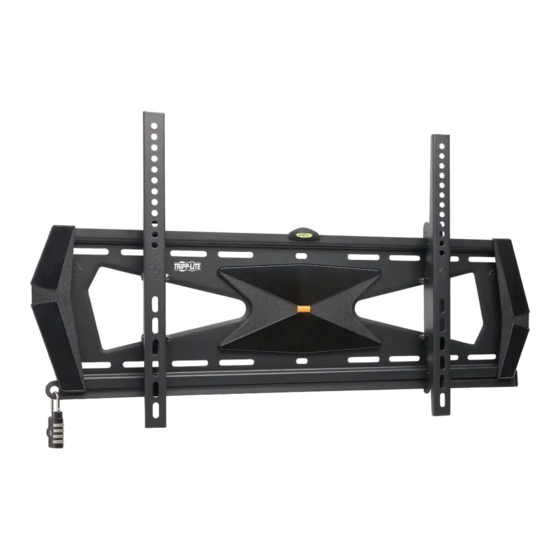
Component Checklist IMPORTANT: Ensure all parts according to the component checklist have been received prior to installation. If any parts are missing or faulty, visit www.tripplite.com/support for service. Wall Plate (x1) Security Bar (x1) Left Adapter Bracket (x1) Right Adapter Bracket (x1) Wall Plate Level End Cap (x2) End Cap... - Page 4 Installation Mount on Wood Stud Wall 55 mm (2.2 in.) O4.5 mm O(3/16 in.) Find and mark the exact Drill pilot holes Wall Plate Level location of mounting holes Screw the assembled wall plate onto the wall 20 mm Anchor Washer Bolt WARNING...
- Page 5 Installation 60 mm Mount on Solid Brick (2.4 in.) and Concrete Block O10 mm O(3/8 in.) Wall Plate Level Find and mark Drill pilot holes the exact location of mounting holes Concrete Anchor Screw the assembled wall plate onto the wall 20 mm Washer...
- Page 6 Installation Install Adapter Brackets 3-1 For Flat Back Screen M5 x 14 M6 x 14 M8 x 20 Washer Note: Choose appropriate screws, washers and spacers (if necessary) according to the type of screen. • Position the adapter brackets as close as possible to the center of the display. •...
- Page 7 Installation 3-2 For Curved Screen or Recessed Back Screen M8 x 20 M6 x 30 M6 x 30 M6 x 30 M8 x 30 M8 x 30 M8 x 30 M8 x 20 Washer Washer Washer Washer Small Small Small Spacer Spacer Spacer...
- Page 8 Installation Slide Security Bar through the Mounting Brackets and Attach Combo Lock to Secure Security Bar Combo Lock Adjustment Maintenance • Check that the bracket is secure and safe to use at regular intervals (at least every three months). • Please visit www.tripplite.com/support if you have any questions. 1111 W.
-
Page 9: Manual Del Propietario
English 1 • Français 17 • Русский 25 • Deutsch 33 80” 300x300 / 400x200 / [88 lb] 400x400 / 600x400 MÁX 40 kg MÁX 1111 W. 35th Street, Chicago, IL 60609 EE. UU. • www.tripplite.com/support Copyright © 2018 Tripp Lite. Todos los derechos reservados. -
Page 10: Instrucciones De Seguridad Importantes
Instrucciones de Seguridad Importantes NOTA: Lea todo el manual de instrucciones antes de iniciar la instalación y ensamble. ADVERTENCIA • No inicie la instalación hasta que haya leído y entendido las instrucciones y advertencias contenidas en este manual. Si tiene cualquier pregunta con respecto a cualquiera de las instrucciones o advertencias, visite www.tripplite.com/support. -
Page 11: Instalación
Accesorios y Partes Incluidas en el Empaque IMPORTANTE: Asegúrese antes de instalar, de haber recibido todas las partes de acuerdo a la lista de comprobación de componentes. Si faltase cualquier parte o estuviese dañada, visite www.tripplite.com/support para solicitar servicio. Placa de Pared Barra de Seguridad Soporte Adaptador Izquierdo Soporte Adaptador Derecho... - Page 12 Instalación Instalación en Pared sobre 55 mm [2.2"] Entramado de Madera Ø 4.5 mm Ø [3/16"] Encuentre y marque la posición Barrene los Nivel de Placa exacta de los orificios de orificios piloto de Pared instalación Atornille la placa de pared ensamblada a la pared Arandela de...
- Page 13 Instalación 60 mm Instalación sobre Ladrillos [2.4"] Sólidos y Bloques de Concreto Ø 10 mm Ø [3/8"] Nivel de Placa de Pared Encuentre Barrene los y marque orificios piloto la posición exacta de los orificios de instalación Taquete Atornille la placa de pared ensamblada a la pared...
- Page 14 Instalación Instale los Soportes del Adaptador 3-1 Para Pantalla con Respaldo Plano M5 x 14 M6 x 14 M8 x 20 Arandela Nota: Elija los tornillos, arandelas y espaciadores (si fueran necesarios) apropiados de acuerdo al tipo de pantalla. • Coloque los soportes adaptadores tan cerca como sea posible al centro de la pantalla. •...
- Page 15 Instalación 3-2 Para Pantalla Curva o Pantalla de Parte Posterior Cóncava M8 x 20 M6 x 30 M6 x 30 M6 x 30 M8 x 30 M8 x 30 M8 x 30 M8 x 20 Arandela Arandela Arandela Arandela Espaciador Espaciador Espaciador Espaciador...
- Page 16 Instalación Deslice la barra de seguridad a través de los soportes de instalación e instale el candado de combinación para asegurarla Barra de Seguridad Candado de Combinación Ajuste Mantenimiento • Compruebe a intervalos regulares (al menos cada tres meses) que el soporte esté seguro para usarse. •...
-
Page 17: Manuel De L'utilisateur
English 1 • Español 9 • Русский 25 • Deutsch 33 203,2 cm 300x300 / 400x200 / 40 kg (80 po) 400x400 / 600x400 (88 lb) 1111 W. 35th Street, Chicago, IL 60609 USA • www.tripplite.com/support Droits d'auteur © 2018 Tripp Lite. Tous droits réservés. -
Page 18: Consignes De Sécurité Importantes
Consignes de sécurité importantes REMARQUE : Lire le manuel d'instructions en entier avant de commencer l'installation et l'assemblage. AVERTISSEMENT • Ne pas commencer l'installation avant d'avoir lu et compris les instructions et les avertissements contenus dans le présent manuel. Pour toute question concernant les instructions ou les avertissements, visiter www.tripplite.com/support. •... - Page 19 Liste de vérification des composants IMPORTANT : S'assurer d'avoir reçu toutes les pièces conformément à la liste de vérification des composants avant de procéder à l'installation. Si des pièces sont manquantes ou défectueuses, visitez www.tripplite.com/support pour obtenir de l'aide. Plaque murale (x1) Barre de sécurité...
- Page 20 Installation Montage sur des montants muraux 55 mm (2,2 po) O 4,5 mm O (3/16 po) Trouver et marquer Percer des Niveau de la l’emplacement exact avant-trous. plaque murale des trous de montage. Visser la plaque murale au mur. Rondelle de Boulon 20 mm d'ancrage...
- Page 21 Installation 60 mm Montage sur de la brique solide (2,4 po) et des blocs en béton O 10 mm O (3/8 po) Niveau de la plaque murale Trouver et Percer des marquer avant-trous. l’emplacement exact des trous de montage. Ancrage à béton Visser la plaque murale...
- Page 22 Installation Installer les supports d'adaptateur. 3-1 Pour les écrans à dos plat M5 x 14 M6 x 14 M8 x 20 Rondelle Remarque : Choisir les vis, les rondelles et les entretoises appropriées (le cas échéant) en fonction du type d'écran. •...
- Page 23 Installation 3-2 Pour les écrans incurvés ou les écrans à dos encastré M8 x 20 M6 x 30 M6 x 30 M6 x 30 M8 x 30 M8 x 30 M8 x 30 M8 x 20 Rondelle Rondelle Rondelle Rondelle Petite Petite Grande...
- Page 24 Installation Glisser la barre de sécurité à travers les supports de montage, puis fixer le verrou combo pour la retenir en place. Barre de sécurité Verrou combo Ajustement Entretien • Vérifier à intervalles réguliers que le support peut être utilisé de façon sûre et sécuritaire (au moins tous les trois mois). •...
-
Page 25: Руководство Пользователя
English 1 • Español 9 • Français 17 • Deutsch 33 До 300x300 / 400x200 / 80” До 400x400 / 600x400 40 кг 1111 W. 35th Street, Chicago, IL 60609 USA • www.tripplite.com/support Охраняется авторским правом © 2018 Tripp Lite. Перепечатка запрещается. - Page 26 Важные указания по технике безопасности ПРИМЕЧАНИЕ. Перед началом установки и сборки модуля внимательно изучите все разделы руководства. ВНИМАНИЕ! • Не начинайте установку до тех пор, пока не ознакомитесь со всеми указаниями и предупреждениями, изложенными в настоящем руководстве, и не поймете их смысл. При возникновении...
- Page 27 Перечень комплектации ВНИМАНИЕ! Перед началом установки убедитесь в том, что вами получены все детали согласно перечню комплектации. В случае отсутствия или повреждения каких-либо деталей обратитесь за помощью на страницу www.tripplite.com/support. Переходный кронштейн Переходный кронштейн Пластина для крепления Защитная штанга левосторонний правосторонний...
- Page 28 Установка Крепление к стене с деревянным 55 мм каркасом Ø4,5 мм Определите и разметьте точное Высверлите Уровень пластины для местоположение монтажных отверстий направляющие крепления к стене отверстия Привинтите собранную крепежную пластину к стене Шайба Анкерный 20 мм болт ВНИМАНИЕ! • Необходимо обеспечить ввертывание крепежных винтов по центру элементов каркаса. С этой целью настоятельно рекомендуется использование детектора...
- Page 29 Установка 60 мм Крепление к сплошному кирпичу или бетонному блоку Ø10 мм Уровень пластины для крепления к стене Определите и Высверлите разметьте точное направляющие местоположение отверстия монтажных отверстий Анкер для бетона Привинтите собранную крепежную пластину к стене Шайба 20 мм Анкерный...
- Page 30 Установка Установка переходных кронштейнов 3-1 Для экранов с плоской задней стенкой Винт M5 x 14 Винт M6 x 14 Винт M8 x 20 Шайба Примечание. Выбирайте подходящие винты, шайбы и распорки (при необходимости) в соответствии с типом экрана. • Разместите переходные кронштейны как можно ближе к центру дисплея. •...
- Page 31 Установка 3-2 Для вогнутых экранов или экранов с утопленной задней стенкой Винт M8 x 20 Винт M6 x 30 Винт M6 x 30 Винт M6 x 30 Винт M8 x 30 Винт M8 x 30 Винт M8 x 30 Винт M8 x 20 Шайба...
- Page 32 Установка Вставка защитной штанги через монтажные кронштейны и установка кодового замка для защиты Защитная штанга Кодовый замок Регулировка Уход за изделием • Регулярно (не реже, чем раз в три месяца) проверяйте надежность крепления кронштейна и безопасность его использования. • В случае возникновения каких-либо вопросов приглашаем вас посетить страницу www.tripplite.com/support. 1111 W.
- Page 33 English 1 • Español 9 • Français 17 • Русский 25 80” 300x300 / 400x200 / 88 lb. 400x400 / 600x400 MAX. (40 kg) MAX. 1111 W. 35th Street, Chicago, IL 60609 USA • www.tripplite.com/support Copyright © 2018 Tripp Lite. Alle Rechte vorbehalten.
-
Page 34: Wichtige Sicherheitshinweise
Wichtige Sicherheitshinweise HINWEIS: Lesen Sie das gesamte Handbuch, bevor Sie mit der Installation und Montage beginnen. ACHTUNG • Beginnen Sie nicht mit dem Einbau, bevor Sie die Anweisungen und Warnhinweise in diesem Handbuch gelesen und verstanden haben. Sollten Sie Fragen bezüglich der Anweisungen oder Warnhinweise haben, besuchen Sie bitte www.tripplite.com/support. •... -
Page 35: Montage
Komponentenliste WICHTIG: Vergewissern Sie sich, dass alle in der Komponentenliste aufgeführten Teile vorhanden sind, ehe Sie mit der Installation beginnen. Wenn Teile beschädigt oder nicht vorhanden sind, besuchen Sie www.tripplite.com/support. Wandplatte Sicherheitsbalken Adapterwinkel links Adapterwinkel rechts (x1) (x1) (x1) (x1) Wandplatten-Nivellierung Abdeckung Abdeckungsschrauben... - Page 36 Montage Montage an Holzbalkenwand 55 mm (2,2 Zoll) O 4.5 mm O (3/16 Zoll) Ermitteln und markieren Sie Bohren Sie die Wandplatten- die genaue Position der Führungslöcher Nivellierung Montagelöcher. Schrauben Sie die montierte Wandplatte an der Wand fest 20 mm Verankerungsbolzen Beilagscheibe WARNUNG...
- Page 37 Montage 60 mm Montage an Backstein (2,4 Zoll) oder Beton O 10 mm O (3/8 Zoll) Wandplatten- Nivellierung Ermitteln und Bohren Sie die markieren Sie Führungslöcher die genaue Position der Montagelöcher. Betonbolzen Schrauben Sie die montierte Wandplatte an der Wand fest 20 mm Beilagscheibe Verankerungsbolzen...
- Page 38 Montage Montage der Adapterwinkel 3-1 für Flachbildschirme M5 x 14 M6 x 14 M8 x 20 Beilagscheibe Hinweis: Verwenden Sie für diesen Bildschirmtyp geeignete Schrauben, Beilagscheiben und Abstandhalter (falls erforderlich). • Positionieren Sie die Adapterhalterungen so nah wie möglich an der Mitte des Bildschirms. •...
- Page 39 Montage 3-2 für gekrümmte oder versenkte Bildschirme M8 x 20 M6 x 30 M6 x 30 M6 x 30 M8 x 30 M8 x 30 M8 x 30 M8 x 20 Beilag- Beilag- Beilag- Beilag- scheibe scheibe scheibe scheibe Kleiner Großer Kleiner Kleiner...
- Page 40 Montage Schieben Sie den Sicherheitsbalken durch die Halterungswinkel und bringen Sie zur Sicherung das Kombischloss an Sicherheitsbalken Kombischloss Justieren Wartung • Stellen Sie in regelmäßigen Abständen (mindestens alle drei Monate) sicher, dass die Klammer sicher angebracht ist. • Falls Sie Fragen haben, besuchen Sie www.tripplite.com/support. 1111 W.