Table of Contents
Advertisement
Quick Links
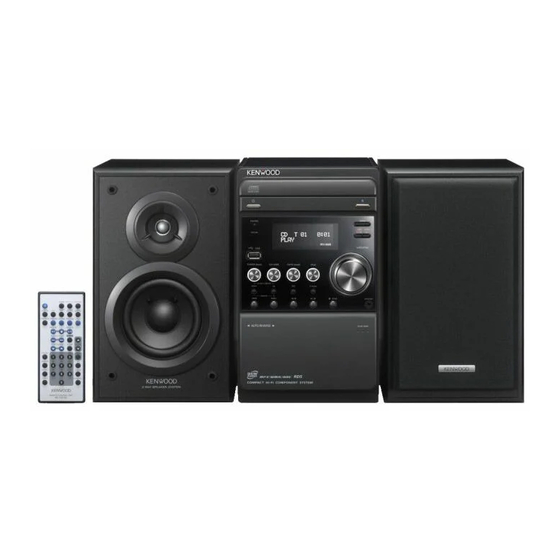
COMPACT Hi-Fi COMPONENT SYSTEM
M-707i
INSTRUCTION MANUAL
Declaration of Conformity with regard to the EMC Directive
2004/108/EC
Manufacturer:
Kenwood Corporation
2967-3 Ishikawa-machi, Hachioji-shi, Tokyo, 192-8525 Japan
EU Representative's:
Kenwood Electronics Europe BV
Amsterdamseweg 37, 1422 AC UITHOORN, The Netherlands
© B60-5763-08/01 (E, X)
Advertisement
Table of Contents

Related Manuals for Kenwood M-707i-B


Summary of Contents for Kenwood M-707i-B
-
Page 1: Fm Indoor Antenna
COMPACT Hi-Fi COMPONENT SYSTEM M-707i INSTRUCTION MANUAL Declaration of Conformity with regard to the EMC Directive 2004/108/EC Manufacturer: Kenwood Corporation 2967-3 Ishikawa-machi, Hachioji-shi, Tokyo, 192-8525 Japan EU Representative's: Kenwood Electronics Europe BV Amsterdamseweg 37, 1422 AC UITHOORN, The Netherlands © B60-5763-08/01 (E, X) -
Page 2: Before Applying Power
IMPORTANT SAFETY Before applying power INSTRUCTIONS ¤ Caution : Read this page carefully to ensure safe operation. ¤ Caution : Read this page carefully to Units are designed for operation as follows. ensure safe operation. Australia ............AC 240 V only Read Instructions –... - Page 3 6. Power Sources – This product should be operated 14. Replacement Parts – When replacement parts only from the type of power source indicated on the are required, be sure the service technician has used product. If you are not sure of the type of power supply replacement parts specifi ed by the manufacturer or have to your home, consult your product dealer or local power the same characteristics as the original part.
-
Page 4: Table Of Contents
Programming tracks/fi les ............ 14 Kenwood recommends that you retain the original carton and Random play ................15 packing materials in case you need to move or ship the unit in Repeat play................... -
Page 5: Description Of The Button Name In This Manual
⁄ Description of the button name in this manual • The supplied battery may have shorter live than ordinary battery due to use during operation checks. Most of the functions are designed to be able to • When the remote-controllable distance gets shorter than operate from the remote control unit. -
Page 6: Connections
Connections iPod dock VIDEO FM indoor antenna Video cord AM loop antenna To TV with video (composite) input terminal iPod Stereo Audio In FM ANT. ANT. 75Ω ~ AC IN SPEAKER IMPEDANCE 6 Ω Right speaker Left speaker To AC wall outlet •... - Page 7 Connecting the FM antenna Connecting the iPod adapter 1 Connect the lead to the [FM ANT. 75Ω] Compatibility of iPod adapter terminal. iPod description Capacity Adapter number F M A N T . 2 Find the location that gives the best 7 5 Ω...
-
Page 8: About Mp3 And Wma
About MP3 and WMA The playable MP3/WMA fi le (hereafter called Audio Playable fi le format of USB device fi le) and the media format have the following • For the formats supported by USB devices, refer to <About USB device> (page 9). limitation. -
Page 9: About Usb Device
About USB device Handling discs Notes on use of the USB device Handling precautions Hold a CD taking care not to touch the played surface. (The side This unit can play audio fi les stored in the fl ash without the printed label is the playback side.) memory and digital audio player that have a USB port (these devices are referred to as USB devices in this Discs playable on the system... -
Page 10: Names And Functions Of Parts
Names and functions of parts USB connector CD tray Remote sensor SLEEP USB O.T.E. TAPE REC TIMER TIMER TIME DISPLAY ON / OFF DISPLAY STEREO/MONO TUNER band CD / USB TAPE mode iPod RVS PLAY FWD PLAY SEARCH / TUNING ENTER VOLUME P.CALL / ALBUM... - Page 11 TIMER SET button X-BASS [X-bass] button To set the clock. To switch on/off bass enhancement. To set the timer. EQ [EQ] button [ ] button To select the desired sound eff ect : POP, CLASSIC, To switch the system on or to standby mode. ROCK, JAZZ, or FLAT (off ).
-
Page 12: Basic Function
Basic function Demonstration mode Volume control Press VOLUME 5 (turn [volume] knob to the right) The system is equipped with a demonstration button to increase, or press VOLUME ∞ (turn function (only display). When the power cable is plugged in and button is pressed to turn the [volume] knob to the left) to decrease the volume system on for the fi rst time, the demonstration... -
Page 13: Using The Cd/Usb Device
Using the CD/USB device Preparation device. • The icon “MP3” appears only when an MP3-file is played. The icon “WMA” appears only when an WMA-file is played. Loading a disc • When playing or recording from/to the USB device, removing Press CD/USB [CD/USB] button to select CD it or turning the power off may corrupt the sound source and get it unplayable. -
Page 14: Selecting A Desired Fi Le By Fi Le Name (For Audio Fi Le Only)
Using the CD/USB device Selecting a desired fi le by fi le name Repeat steps 2 to 3 to select and store other (For audio fi le only) desired tracks/fi les in this way. The icon “PGM” appears on the display. In stop mode, press FILE SEARCH button. -
Page 15: Random Play
Random play Recording on a USB device (For CD only) You can play all the tracks/fi les in random order. Records songs in the CD to the USB device in MP3 During playing, pause or stop mode, press format. RANDOM button to enable random play mode. The icon “RDM”... -
Page 16: Program Recording (For Cd Only)
Using the iPod Using the CD/USB device Program recording (For CD only) Inserting an iPod Connect a iPod to the iPod dock. Desired CD tracks can be programmed in the desired sequence and recorded onto a USB device. Press iPod [iPod] button. Insert a USB device to the USB connector on the The icon “iPod”... -
Page 17: Using The Radio
Using the radio ⁄ Tuning in radio stations • During program, if no button is pressed within 20 seconds, Press TUNER band [TUNER band] button to the system will exit program mode automatically. select the desired waveband: FM or AM. Press and hold SEARCH/TUNING 4 or ¢... -
Page 18: Changing The Rds Display Information
Using the radio Changing the RDS display information Oldies Music “OLDIES” Folk Music “FOLK M” While receiving a RDS station, pressing the RDS Documentary “DOCUMENT” DISPLAY button changes the contents of the display. Every time the button is pressed, the display Press PTY button to start searching. -
Page 19: Using The Cassette
Using the cassette Playing a cassette tape Recording from a CD/ audio fi le Insert a disc or a USB device. Press TAPE mode [TAPE mode] button to TAPE. Insert a blank cassette tape into the tape deck. Press the area marked [push open] to open the cassette tape door. -
Page 20: Clock/Timer Operation
Clock/timer operation Using the cassette Clock setting Program the desired sequence of CD tracks/ audio fi le. Press and hold TIMER SET button for more than See page 14 for programming procedure. 1 second. Press TAPE REC [TAPE rec] button to set the unit “CLOCK SETTING”... -
Page 21: To Activate/Deactivate The Timer
Sleep timer setting Press ENTER button. The icon “TIMER OFF” starts fl ashing. If the sleep timer is activated, the system will switch to standby mode after the selected time has expired. Repeat the step 2 to set the time to stop the timer (off time). -
Page 22: In Case Of Diffi Culty
In case of diffi culty Resetting the Microcomputer USB operation “NO USB” is displayed. The microcomputer may malfunction (unit cannot be \ Insert the USB device properly. operated, or shows an erroneous display) if the power cord is unplugged while the power is ON, or due to Cannot play. -
Page 23: General Information
General information Maintenance Cleaning the cabinet • Use a soft cloth slightly moistened with a mild detergent solution. Do not use a solution containing alcohol, spirits, ammonia or abrasive. Cleaning discs • When a disc becomes dirty, clean it with a cleaning cloth, wipe the disc from the center out. -
Page 24: Specifi Cations
D : 345 mm (13-15/16”) Weight (net) ..............5.5 kg (12.1 lb) Notes: • Kenwood follows a policy of continuous advancements in development. For this reason specifications may be changed without notice. • Sufficient performance may not be exhibited at extremely cold locations (where water freezes).