Table of Contents
Advertisement
Available languages
Available languages
Quick Links
ANS Z21.58b- 2012
CSA 1.6b- 2012
Outdoor Cooking
Gas Appliance
ATTACH YOUR RECEIPT HERE
Serial Number _____________________________ Purchase Date ______________________
Questions, problems, missing parts? Before returning to your retailer, call our customer
service department at 1-877-447-4768, 8:30 a.m. – 4:30 p.m., CST, Monday – Friday
or e-mail us at customerservice@ghpgroupinc.com.
70-10-019
.
1
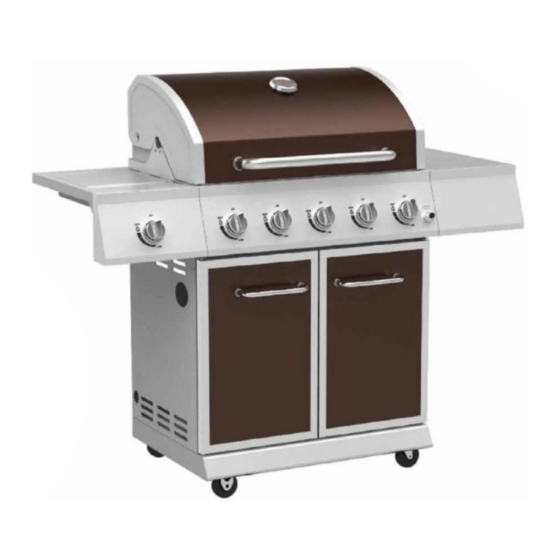
5-BURNER
LP GAS GRILL
Model #DGE530BSP-D
Français p. 34
Français p.
Español p. 67
Español p.
Rev 09/2012
XX
XX
Advertisement
Table of Contents

Related Manuals for Dyna-Glo DGE530BSP-D


Summary of Contents for Dyna-Glo DGE530BSP-D
- Page 1 5-BURNER LP GAS GRILL Model #DGE530BSP-D Français p. 34 Français p. Español p. 67 Español p. ANS Z21.58b- 2012 CSA 1.6b- 2012 Outdoor Cooking Gas Appliance ATTACH YOUR RECEIPT HERE Serial Number _____________________________ Purchase Date ______________________ Questions, problems, missing parts? Before returning to your retailer, call our customer service department at 1-877-447-4768, 8:30 a.m.
-
Page 2: Safety Information
SAFETY INFORMATION Please read and understand this entire manual before attempting to assemble, operate or install the product. If you have any questions regarding the product, please call customer service at: 1-877-447-4768, 8:30 a.m. – 4:30 p.m., CST, Monday – Friday. DANGER •... - Page 3 SAFETY INFORMATION WARNING • Do not place the grill under overhead combustible construction or awnings. Minimum clearance from sides and back of unit to combustible construction, 36in 36in 914.4mm 36 inches (914.4mm) from sides and 914.4mm back. NOTE: The installation must conform with local codes or, in the absence of local codes, with either the National Fuel Gas Code, ANSI Z223.1/NFPA 54, Natural...
-
Page 4: Checking For Leaks
OPERATION INSTRUCTIONS CHECKING FOR LEAKS After all connections are made, check all connections and fittings on the LP gas tank valve, gas hose and regulator for leaks with a water and soap solution. To prevent fire or explosion while testing for a leak: •... -
Page 5: Connecting Gas Cylinder
OPERATION INSTRUCTIONS CONNECTING GAS CYLINDER The propane gas supply cylinder to be used must be constructed and marked in accordance with the Specifications for LP Gas Cylinders of the U.S. Department of Transportation (D.O.T.) or the National Standard of Canada, CAN/CSA-B339, Cylinders, Spheres and Tubes for Transportation of Dangerous Goods;... -
Page 6: Connecting The Lp Tank
OPERATION INSTRUCTIONS NOTE: Other cylinders may be acceptable for use with this appliance provided they are compatible with the appliance nesting hole and retention means. Refer to Step 15 of the Assembly Instructions for correct cylinder to cylinder holder connection. WARNING ALL INSTRUCTIONS AND SAFEGUARDS ON THIS PAGE MUST BE FOLLOWED TO PREVENT FIRE, DAMAGE AND/OR INJURY. - Page 7 OPERATION INSTRUCTIONS Lighting The Grill Before first use: Remove all hangings or plastic straps, if present. Before you cook on your new gas grill, it is important to clean your grill with heat. To do this, operate the grill for approximately 15 minutes with the lid closed and the control knob in the highest position.
-
Page 8: Shutdown Instructions
OPERATION INSTRUCTIONS LIGHTING THE GRILL WITH A MATCH 1. Open the lid. 2. Insert a match in the end of the match holder that is installed on the inside of the cabinet door. 3. Light the match. 4. Immediately place the lit match through the spaces in the grill gates near the ports of the burner between the heat tents as shown. -
Page 9: Care And Maintenance
CARE AND MAINTENANCE Cooking Grates The best time to ‘burn-off’ the cooking grates is after every use (approx. 15 minutes). The grill is already hot from cooking thus requiring less fuel to obtain necessary temperature for ‘burn-off’. To ‘burn off’ or heat clean your grill, turn the burners to highest position and run for 15 minutes with the lid closed. - Page 10 CARE AND MAINTENANCE Burner Assembly Warming Rack Removing The Burner Assembly Cooking Grates 1. Make sure all control knobs are in the OFF position, gas supply valve is closed, and the gas hose is disconnected from the gas supply. Heat Tents 2.
- Page 11 CARE AND MAINTENANCE Cleaning the Burner Assembly – Make sure the grill is cool 1. Ensure all burner ports are clear of clogs. Use of a pin or paper clip works well. 2. Ensure burner is free of any damage. If damage is found, replace with new burner. 3.
-
Page 12: Troubleshooting
CARE AND MAINTENANCE The electronic ignition requires 1 “AA” alkaline battery, which is included. WARNING DO NOT mix old and new batteries. DO NOT mix alkaline, standard (Carbon-Zinc), or rechargeable (Nickel-Cadmium) batteries. DO NOT dispose of batteries in fire. Improper disposal may cause batteries to leak or explode. TROUBLESHOOTING If you have any questions regarding the product, please call customer service at 1-877-447-4768, 8:30 a.m. - Page 13 TROUBLESHOOTING PROBLEM POSSIBLE CAUSE CORRECTIVE ACTION The burner will not 1. Match not reaching burners 1. Use match holder found in light with a match. (when holding match with cabinet door. hand). 2. Check fuel level and refill tank if 2.
-
Page 14: Replacement Parts List
REPLACEMENT PARTS LIST... - Page 15 REPLACEMENT PARTS LIST For replacement parts, call our customer service department at 1-877-447-4768, 8:30 a.m. – 4:30 p.m., CST, Monday – Friday. PART DESCRIPTION PART # Lid assembly 105 - 02001 Temp gage assembly 104 - 12005 Badge 104 - 22006 M6 screw with cap-specially secure lid pivot pin 104 - 12001 Lid pivot pin...
- Page 16 REPLACEMENT PARTS LIST PART DESCRIPTION PART # Cart rear panel 105 - 04008 Cart side panel-left 105 - 04009 Tank shelf retaining plate A 105 - 34001 Tank shelf rail locking plate 105 - 34002 Cylinder retention screw 105 - 34003 Rail 105 - 34004 Tank shelf retaining plate B...
- Page 17 BARBECUE AU GAZ LP À 5 BRÛLEURS Modele #DGE530BSP-D ANS Z21.58b-2012 CSA 1.6b-2012 Pour la cuisson à l’extérieur Appareil au gaz JOIGNEZ VOTRE REÇU ICI Numéro de série_____________________________ Date d’achat _____________________ Des questions, des problèmes, des pièces manquantes? Avant de retourner l’article au détaillant, appelez notre service à...
-
Page 18: Consignes De Sécurité
CONSIGNES DE SÉCURITÉ Assurez-vous de lire et de comprendre l’intégralité de ce manuel avant de tenter d’assembler, d’utiliser ou d’installer le produit. Si vous avez des questions concernant ce produit, veuillez téléphoner au service à la clientèle au 1-877-447-4768, 08:30-16 heures 30, HNC, du lundi - vendredi. - Page 19 CONSIGNES DE SÉCURITÉ AVERTISSEMENT • Ne pas utiliser cet appareil sous une surface combustible ou un auvent. Dégagement minimal entre les parois latérales et l’arrière de l’appareil et la construction combustible (914,4 mm (36 36in 36in 914.4mm po) à partir des parois latérales et 914,4 mm 914.4mm (36 po) à...
- Page 20 MODE D’EMPLOI RACCORD DE LA BOUTEILLE DE GAZ La bouteille de propane liquéfié utilisée doit être fabriquée et identifiée conformément aux normes pour les bouteilles de propane liquéfié du Specifications for LP Gas Cylinders of the U.S. Department of Transportation (D.O.T.) or the National Standard of Canada, CAN/CSA-B339, Cylinders, Spheres and Tubes for Transportation of Dangerous Goods;...
- Page 21 MODE D’EMPLOI REMARQUE : Vous pouvez utiliser d’autres bouteilles avec cet appareil, pourvu qu’elles conviennent au trou pour la bouteille et aux dispositifs de fixation. Consultez l’étape 15 des instructions pour l’assemblage pour connaître la manière adéquate de fixer une bouteille au support de bouteille. AVERTISSEMENT TOUTES LES INSTRUCTIONS ET MESURES DE SÉCURITÉ...
-
Page 22: Allumage Du Barbecue
MODE D’EMPLOI ALLUMAGE DU BARBECUE Avant la première utilisation : Retirez toutes les étiquettes et les courroies de plastique, le cas échéant. Avant d’utiliser votre nouveau barbecue au gaz, il est nécessaire de le nettoyer à la chaleur. Pour ce faire, faites fonctionner le barbecue pendant une quinzaine de minutes;... - Page 23 MODE D’EMPLOI ALLUMAGE DU BARBECUE AVEC UNE ALLUMETTE 1. Insérez une allumette à l’extrémité du support à allumettes situé à l’intérieur de la porte du charriot. 2. Allumez l’allumette. 3. Insérez sans tarder l’allumette enflammée dans le trou de 20 mm (0,75 po) situé sur le côté du corps du barbecue le plus près du brûleur que vous souhaitez allumer.
- Page 24 ENTRETIEN GRILLES DE CUISSON Il est recommandé de brûler les résidus sur la grille de cuisson environ quinze minutes après chaque utilisation. Le barbecue est encore chaud et nécessite donc moins de gaz pour atteindre la chaleur nécessaire pour brûler les résidus. Pour brûler les résidus ou nettoyer votre barbecue par la chaleur, allumez les brûleurs à...
- Page 25 ENTRETIEN ENSEMBLE DE BRÛLEUR Grille de maintien au chaud RETRAIT DE L’ENSEMBLE DE BRÛLEUR Grilles de cuisson 1. Assurez-vous que tous les boutons de commande sont à la position « OFF » (arrêt), que le robinet du réservoir de propane liquéfié est fermé et que ce dernier n’est relié...
-
Page 26: Entretien
ENTRETIEN NETTOYAGE DE L’ENSEMBLE DE BRÛLEUR – Assurez-vous que le barbecue est refroidi. 1. Fermez l’alimentation en gaz en tournant les boutons de commande du barbecue et le robinet de la bouteille de propane. 2. Retirez la bouteille de gaz propane liquéfié du tuyau et du régulateur. 3. -
Page 27: Dépannage
ENTRETIEN L’allumage électronique nécessite une pile alcaline « AA » incluse. AVERTISSEMENT N’utilisez PAS de vieilles piles avec des piles neuves. NE combinez PAS des piles alcalines avec des piles ordinaires (carbone-zinc) ou avec des piles rechargeables (nickel-cadmium). NE jetez PAS les piles au feu. Une mise au rebut inadéquate pourrait causer une fuite ou faire exploser les piles. DÉPANNAGE Si vous avez des questions, veuillez téléphoner au service à... - Page 28 DÉPANNAGE PROBLÈME CAUSE POSSIBLE MESURE CORRECTIVE Le brûleur ne 1. L’allumette n’atteint pas les 1. Utilisez le support à allumettes s’allume pas à l’aide brûleurs (lorsque vous la situé dans la porte de l’armoire. d’une allumette. tenez d’une main). 2. L’alimentation en gaz est 2.
-
Page 29: Liste Des Pièces De Rechange
LISTE DES PIÈCES DE RECHANGE... - Page 30 LISTE DES PIÈCES DE RECHANGE Pour les pièces détachées, appelez notre service à la clientèle au 1-877-447-4768, 8 heures 30-16h30, HNC, du lundi - vendredi. RÉF DESCRIPTION NO DE PIÈCE Assemblage couvercle 105 - 02001 Sonde de température 104 - 12005 Logo 104 - 22006 Vis M6 avec capuchon axe de pivotement...
- Page 31 LISTE DES PIÈCES DE RECHANGE RÉF DESCRIPTION NO DE PIÈCE Panneau arrière du charriot 105 - 04008 Panneau gauche du charriot 105 - 04009 Plaque d’arrêt A étagère du réservoir 105 - 34001 Plaque de verrouillage rail étagère du réservoir 105 - 34002 Vis de retenue cylindre 105 - 34003...
- Page 32 PARRILLA A GAS PL DE 5 FOGONES Modelo #DGE530BSP-D ANS Z21.58b-2012 CSA 1.6b-2012 Cocina en exteriores Electrodoméstico a gas ADJUNTE SU RECIBO AQUÍ Número de serie _______________________ Fecha de compra __________________ ¿Preguntas, problemas, piezas faltantes? Antes de volver a la tienda, llame a nuestro Departamento de Servicio al Cliente al 1-877-447-4768, de 8:30 am - 4:30 pm, hora central, de lunes - viernes o envíe un correo electrónico a customerservice@ghpgroupinc.com.
-
Page 33: Informacion De Seguridad
INFORMACION DE SEGURIDAD Lea y comprenda completamente este manual antes de intentar ensamblar, usar o instalar el producto. Si tiene preguntas relacionadas con el producto, lIame al Servicio al Cliente al: 1-877-447-4768, de 8:30 am - 4:30 pm, hora central, de lunes - viernes. PELIGRO •... -
Page 34: Información De Seguridad
INFORMACIÓN DE SEGURIDAD ADVERTENCIA • No coloque la parrilla debajo de construcciones o cobertizos inflamables. Debe haber un espacio de separación mínimo de 91,44 cm (36”) desde los 36in 36in 914.4mm lados y la parte posterior de la unidad 914.4mm hasta construcciones de material combustible. - Page 35 INSTRUCCIONES DE FUNCIONAMIENTO BÚSQUEDA DE FUGAS Después de hacer todas las conexiones, verifique que ninguna de las conexiones y los conectores de la válvula del tanque de gas PL, la manguera de gas ni el regulador tenga fugas con una solución de agua y jabón.
- Page 36 INSTRUCCIONES DE FUNCIONAMIENTO CONEXIÓN DEL CILINDRO DE GAS El cilindro de suministro de gas propano que se utilizará debe estar fabricado y marcado según las Specifications for LP-Gas Cylinders of the U.S. Department of Transportation (D.O.T.) or the National Standard of Canada, CAN/CSA-B339, Cylinders, Spheres and Tubes for Transportation of Dangerous Goods;...
-
Page 37: Instrucciones De Funcionamiento
INSTRUCCIONES DE FUNCIONAMIENTO NOTA: Es posible que otros cilindros sean aceptables para su uso con este electrodoméstico si es que son compatibles con el orificio de alojamiento y los medios de retención del electrodoméstico. Consulte el Paso 15 de las Instrucciones de ensamblaje para conocer la conexión correcta del cilindro al soporte del cilindro. ADVERTENCIA SE DEBEN SEGUIR TODAS LAS INSTRUCCIONES Y MEDIDAS DE SEGURIDAD DE ESTA PÁGINA PARA EVITAR INCENDIOS, DAÑOS Y/O LESIONES. - Page 38 INSTRUCCIONES DE FUNCIONAMIENTO Encender la parrilla Antes del primer uso: Retire todos los ahorcamientos o correas de plástico, si está presente. Antes de cocinar en la parrilla de gas nuevo, es importante para limpiar su parrilla con el calor. Para ello, utilice el grill durante unos 15 minutos con la tapa cerrada y el botón de control en la posición más alta.
-
Page 39: Instrucciones De Apagado
INSTRUCCIONES DE FUNCIONAMIENTO ENCENDIDO DE LA PARRILLA CON UN FÓSFORO 1. Coloque un fósforo en el extremo del contenedor de fósforos instalado en el interior de la puerta del gabinete. 2. Encienda el fósforo. 3. Inmediatamente introduzca el fósforo encendido en el orificio de 1,91 cm (0,75”) del costado del cuerpo de la parrilla que esté... - Page 40 CUIDADO Y MANTENIMIENTO REJILLAS DE COCCIÓN El mejor momento para “quemar” la suciedad las rejillas de cocción es después de cada uso (aproximadamente 15 minutos). La parrilla ya está caliente desde la cocción, por lo tanto, requiere menos combustible para obtener la temperatura necesaria para “quemar” la suciedad. Para “quemar”...
- Page 41 CUIDADO Y MANTENIMIENTO ENSAMBLE DEL QUEMADOR Rejilla para Calentar Parrilla de EXTRACCIÓN DEL ENSAMBLE DEL QUEMADOR Cocción 1. Asegúrese de que todas las perillas de control se encuentran en la posición de OFF, que la válvula del tanque de PL está cerrada y que el tanque está...
-
Page 42: Cuidado Y Mantenimiento
CUIDADO Y MANTENIMIENTO LIMPIEZA DEL ENSAMBLE DEL QUEMADOR – Asegúrese de que la parrilla esté fría 1. Corte el gas en las perillas de control y en el tanque de propano. 2. Desconecte el cilindro de gas PL de la manguera y el regulador. 3. -
Page 43: Solución De Problemas
CUIDADO Y MANTENIMIENTO El encendido electrónico requiere 1 batería alcalina “AA”, que viene incluida. ADVERTENCIA NO mezcle baterías antiguas con nuevas. NO mezcle baterías alcalinas, estándar (carbono-zinc) o recargables (níquel-cadmio). NO se deshaga de las baterías en el fuego. Desechar las baterías indebidamente podría provocar que éstas exploten o tengan fugas. - Page 44 SOLUCIÓN DE PROBLEMAS PROBLEMA CAUSA POSIBLE ACCIÓN CORRECTIVA El quemador no se 1. Use el soporte para fósforos que se 1. El fósforo no alcanza los luz con un fósforo. quemadores (al sostenerlo encuentra en la puerta del gabinete. con la mano). 2.
-
Page 45: Lista De Piezas De Repuesto
LISTA DE PIEZAS DE REPUESTO... - Page 46 LISTA DE PIEZAS DE REPUESTO Para obtener piezas de repuesto, llame a nuestro Departamento de Servicio al Cliente al 1-877-447-4768, de 8:30 am - 4:30 pm, hora central, de lunes - viernes. REF. DESCRIPCIÓN PIEZA # Ensamble de la tapa 105 - 02001 Ensamble del medidor de temperatura 104 - 12005...
- Page 47 LISTA DE PIEZAS DE REPUESTO REF. DESCRIPCIÓN PIEZA # Panel trasero del carrito 105 - 04008 Panel lateral del carrito -izquierdo 105 - 04009 Placa retenedora A de la repisa del tanque 105 - 34001 Placa de bloqueo del riel de la repisa del tanque 105 - 34002 Tornillo de sujeción del cilindro 105 - 34003...