
Related Manuals for D-Link AirPlus G DWL-120


Summary of Contents for D-Link AirPlus G DWL-120
- Page 1 D-Link AirPlus G DWL-G120 802.11g (2.4GHz) Wireless USB Adapter Manual Building Networks for People...
-
Page 2: Table Of Contents
Contents Package Contents ................3 Introduction....................4 Wireless Basics ..................6 Getting Started ..................10 Using the Configuration Utility ..............13 Networking Basics ................19 Troubleshooting ...................32 Technical Specifications ..............35 Contacting Technical Support ..............36 Warranty and Registration ..............37... -
Page 3: Package Contents
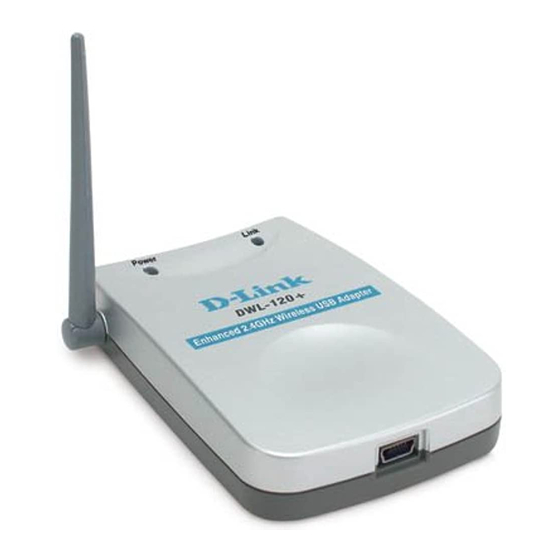
Package Contents Contents of Package: D-Link AirPlus G DWL-G120 802.11g (2.4 GHz) Wireless USB Adapter Manual on CD-ROM Quick Installation Guide USB Cable If any of the above items are missing, please contact your reseller. System Requirements: A computer or laptop with an available USB port... -
Page 4: Introduction
Unlike most network cards, the DWL-G120 provides data transfers at up to 54 Mbps when used with other D-Link AirPlus G products. The 802.11g standard is backwards compatible with 802.11b products. The DWL-G120 comes with software drivers for the most popular Microsoft... - Page 5 Features and Benefits Five times faster - achieve data transfer speeds up to 54 Mbps; up to 5x faster than conventional 802.11b networks, when used with other 802.11g devices. Convenience of Plug & Play installation. Fully 802.11g compatible. Backwards compatible with 802.11b devices.
-
Page 6: Wireless Basics
DWL-G120 to your computer Wireless Basics D-Link wireless products are based on industry standards to provide easy-to- use and compatible high-speed wireless connectivity within your home, business or public access wireless networks. D-Link wireless products will allow you access to the data you want, when and where you want it. You will be able to enjoy the freedom that wireless networking brings. - Page 7 Wireless Basics (continued) People use wireless LAN technology for many different purposes: Mobility - Productivity increases when people have access to data in any location within the operating range of the WLAN. Management decisions based on real-time information can significantly improve worker efficiency. Low Implementation Costs –...
- Page 8 OFDM reduces the amount of crosstalk (interference) in signal transmissions. The D-Link DWL-G120 will automatically sense the best possible connection speed to ensure the greatest speed and range possible.
- Page 9 Wireless Basics (continued) Installation Considerations The D-Link AirPlus G DWL-G120 lets you access your network using a wireless connection from virtually anywhere within its operating range. Keep in mind, however, that the number, thickness and location of walls, ceilings, or other objects that the wireless signals must pass through, may limit the range.
-
Page 10: Getting Started
Network and an Ad-Hoc Network. An Infrastructure network contains an access point or router. The Infrastructure Network example shown on the following page contains the following D-Link network devices (your existing network may be comprised of other devices): A wireless broadband Router-... - Page 11 Install the D-Link AirPlus G DWL-G120 Wireless USB Adapter into an available USB slot on your desktop computer. (See the Quick Installation Guide included with the DWL-G120.) Install the D-Link AirPlus G DWL-G120 Wireless USB adapter into a laptop computer. (See the Quick Installation Guide included with the DWL-G120.) If you wish, you may connect a computer that is equipped with an Ethernet network adapter (such as a DFE-530TX+) to the router also.
- Page 12 (See the Quick Installation Guide included with the product for installation instructions.) Install another DWL-G120 into the laptop computer. Or you may install another wireless adapter such as the D-Link DWL-G650 wireless PC Card adapter. (See the Quick Installation Guide included with the product for installation instructions.)
-
Page 13: Using The Configuration Utility
Select the Wireless Networks tab. Uncheck the box in the properties window that enables windows configuration. After you have done this, you can then use the D-Link Configuration Utility with XP by clicking on the D-Link Configuration Utility icon. *Configuration Utility icon... - Page 14 Using the Configuration Utility (continued) After clicking on the Configuration Utility icon, the Link Info screen will display the settings for the DWL-G120: Link Info D-Link AirPlus G Wireless Utility Status: Displays current connec- tion state of the DWL- G120.
- Page 15 Using the Configuration Utility (continued) Configuration SSID: D-Link AirPlus G Wireless Utility The Service Set Identifier is the name assigned to the wireless network. The factory SSID set- ting is set to default. Make changes here to match the Auto SSID on the existing wireless router or access point.
- Page 16 Using the Configuration Utility (continued) Encryption D-Link AirPlus G Wireless Utility Data Encryption: Enable encryption by clicking in the box. Data encryption is de-selected as the default setting. Authorization Mode: Open Authentication - communicates the key across the network Shared Authentication - allows communication only with other devices...
- Page 17 Using the Configuration Utility (continued) Site Survey D-Link AirPlus G Wireless Utility Available Networks: The top section of the window displays the Available Networks. Scroll up and down the list and highlight the network to which you wish to connect. Click on the Connect button.
- Page 18 Using the Configuration Utility (continued) Properties In this window you can configure all the properties of a profile in order to con- nect with a network of your choice. Click OK to save the changes.
-
Page 19: Networking Basics
Networking Basics Using the Network Setup Wizard in Windows XP In this section you will learn how to establish a network at home or work, using Microsoft Windows XP. Note: Please refer to websites such as http://www.homenethelp.com http://www.microsoft.com/windows2000 for information about networking computers using Windows 2000, Me or 98SE. - Page 20 Networking Basics (continued) Please follow all the instructions in this window: Click Next. In the following window, select the best description of your computer. If your computer connects to the Internet through a router, select the second option as shown. Click Next.
- Page 21 Networking Basics (continued) Enter a Computer description and a Computer name (optional.) Click Next. Enter a Workgroup name. All computers on your network should have the same Workgroup name. Click Next.
- Page 22 Networking Basics (continued) Please wait while the Network Setup Wizard applies the changes. When the changes are complete, click Next. Please wait while the Network Setup Wizard configures the computer. This may take a few minutes.
- Page 23 Networking Basics (continued) In the window below, select the option that fits your needs. In this example, Create a Network Setup Disk has been selected. You will run this disk on each of the computers on your network. Click Next. Insert a disk into the Floppy Disk Drive, in this case drive A.
- Page 24 Networking Basics (continued) Please read the information under Here’s how in the screen below. After you complete the Network Setup Wizard you will use the Network Setup Disk to run the Network Setup Wizard once on each of the computers on your net- work.
- Page 25 Networking Basics (continued) Please read the information on this screen, then click Finish to complete the Network Setup Wizard. The new settings will take effect when you restart the computer. Click Yes to restart the computer. You have completed configuring this computer. Next, you will need to run the Network Setup Disk on all the other computers on your network.
- Page 26 Networking Basics (continued) Naming your Computer To name your computer in Windows XP, please follow these directions: Click Start (in the lower left corner of the screen) Right-click on My Computer Select Properties and click Select the Computer Name tab in the System Properties window.
- Page 27 Networking Basics (continued) Naming your Computer In this window, enter the Computer name. Select Workgroup and enter the name of the Workgroup. All computers on your network must have the same Workgroup name. Click OK.. Checking the IP Address in Windows XP The wireless adapter-equipped computers in your network must be in the same IP address range (see Getting Started in this manual for a definition of IP ad- dress range.) To check on the IP address of the adapter, please do the follow-...
- Page 28 Networking Basics (continued) Checking the IP Address in Windows XP This window will appear. Click the Support tab Click Close Assigning a Static IP Address in Windows XP/2000 Note: DHCP-capable routers will automatically assign IP addresses to the computers on the network, using DHCP (Dynamic Host Configuration Protocol) technology.
- Page 29 Networking Basics (continued) Assigning a Static IP Address in Windows XP/2000 Double-click on Network Connections Right-click on Local Area Connections Double-click on Properties...
- Page 30 Networking Basics (continued) Assigning a Static IP Address in Windows XP/2000 Click on Internet Protocol (TCP/IP) Click Properties In the screen below, please do the following: Input your IP address and subnet mask. (The IP addresses on your network must be within the same range.
- Page 31 Networking Basics (continued) Checking the Wireless Connection by Pinging in Windows XP/2000* Go to Start > Run > type cmd. A window similar to this one will ap- pear. Type ping xxx.xxx.xxx.xxx, where xxx is the IP address of the wireless router or access point.
-
Page 32: Troubleshooting
Troubleshooting This chapter provides solutions to problems that can occur during the installation and operation of the DWL-G120. Read the following descriptions if you are having problems. (The examples below are illustrated in Windows XP. If you have another operating sys- tem, these solutions will still apply although the appearance on your computer screen may differ.) 1. - Page 33 Network Adapters Right-click on D-Link AirPlus G DWL-G120 Wireless USB Adapter D-Link AirPlus G DWL-G120 Wireless USB Adapter Select Properties to check that the drivers are installed properly D-Link AirPlus G DWL-G120 Wireless USB Adapter D-Link AirPlus G DWL-G120 Wireless USB Adapter...
- Page 34 Troubleshooting (continued) 2. What variables may cause my wireless products to lose reception? D-Link products let you access your network from virtually anywhere you want. However, the positioning of the products within your environment will affect the wireless range. Please refer to Installation Considerations in the Wireless Basics section of this manual for further information about the most advanta- geous placement of your D-Link wireless products.
-
Page 35: Technical Specifications
Technical Specifications Standard IEEE 802.11g IEEE 802.11b IEEE 802.11 Diagnostic LED Power Link Status Temperature Operating: 0ºC to 55ºC (32ºF to 131ºF) Storing: -20ºC to 75ºC (-4ºF to 167ºF) Humidity: 95%, non-condensing Antenna Type: Single External, Dual Diversity Modulation Technique: DSSS Physical Dimensions: L = 3 inches... -
Page 36: Contacting Technical Support
Support echni cal Support You can find software updates and user documentation on the D-Link website. D-Link provides free technical support for customers within the United States and within Canada for the duration of the warranty period on this product. -
Page 37: Warranty And Registration
D-Link’s sole obligation shall be to repair or replace the defective Hardware during the Warranty Period at no charge to the original owner or to refund at D-Link’s sole discretion. Such repair or replacement will be rendered by D-Link at an Authorized D-Link Service Office. The replacement Hardware need not be new or have an identical make, model or part. - Page 38 Canada) D-Link may reject or return any product that is not packaged and shipped in strict compliance with the foregoing requirements, or for which an RMA number is not visible from the outside of the package. The product owner agrees to pay D-Link’s reasonable handling and return shipping charges for any product...
- Page 39 LIABILITY OF D-LINK UNDER THIS WARRANTY IS LIMITED TO THE PURCHASE PRICE OF THE PRODUCT COVERED BY THE WARRANTY. THE FOREGOING EXPRESS WRITTEN WARRANTIES AND REMEDIES ARE EXCLUSIVE AND ARE IN LIEU OF ANY OTHER WARRANTIES OR REMEDIES, EXPRESS, IMPLIED OR STATUTORY.
- Page 40 Federal Communication Commission Interference Statement This equipment has been tested and found to comply with the limits for a Class B digital device, pursuant to Part 15 of the FCC Rules. These limits are designed to provide reasonable protection against harmful interference in a residential installation.