Table of Contents
Advertisement
Quick Links
Advertisement
Table of Contents

Related Manuals for LG G5220C


Summary of Contents for LG G5220C
- Page 1 êìëëäàâ ENGLISH Revision 1.4 P/N : MMBB0094401 PRINTED IN KOREA íÂÎÂÙÓÌ GPRS àçëíêìäñàü èéãúáéÇÄíÖãü åéÑÖãú: G5220C èÓ˜ÚËÚÂ, ÔÓʇÎÛÈÒÚ‡, ‰‡ÌÌÛ˛ ËÌÒÚÛÍˆË˛ ‚ÌËχÚÂθÌÓ Ô‰ ËÒÔÓθÁÓ‚‡ÌËÂÏ Ç‡¯Â„Ó ‡ÔÔ‡‡Ú‡. ëÓı‡ÌËڠ ‰Îfl ‰‡Î¸ÌÂÈ¯Â„Ó ËÒÔÓθÁÓ‚‡ÌËfl. í • Ö • ã • Ö • î •...
- Page 15 •...
- Page 16 • • •...
- Page 18 . , ' ? ! - & 1 A B C Ä À Á Â Ã Æ Ç a b c ä à á â ã æ ç D E F È É Ë Ê d e f è é ë ê G H I Î...
- Page 22 – • •...
- Page 23 —...
- Page 24 ˜ •...
- Page 25 ™ • • • •...
- Page 26 – —...
- Page 34 •...
- Page 37 •...
- Page 48 •...
- Page 49 •...
- Page 51 • •...
- Page 54 •...
- Page 60 •...
- Page 70 •...
- Page 77 • •...
- Page 95 ❏ ❏ ❏ ❏ ❏ ❏ ❏ ❏...
- Page 97 ➝ ➝...
- Page 108 ENGLISH GPRS Phone USER’S MANUAL MODEL: G5220C Please read this manual carefully before operating your set. Retain it for future reference.
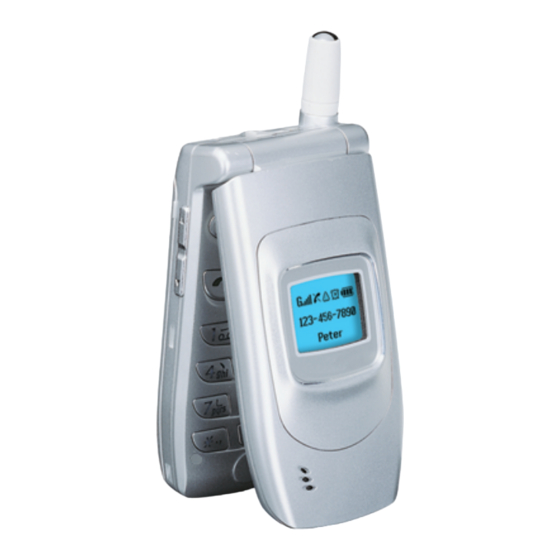
- Page 110 G5220C has a polished style which provides users with a better feel and more convenience. G5220C Phone...
- Page 111 For Your Safety All radio transmitters carry risks of interference with electronics in close proximity. GSM Phones must be switched off at all times in an aircraft. Do not activate near petrol stations, fuel depots, chemical plants or blasting operations. Switch off the phone in any area where you are required by special regulations.
- Page 112 Do not touch the charger with wet hands. For your safety, use ONLY specified ORIGINAL batteries and chargers. Please note: Unusable batteries should be disposed of in accordance with relevant legislation. Only use ORIGINAL accessories to avoid damage to your phone. Emergency call may not be available under all cellular networks.
-
Page 113: Table Of Contents
Contents Overview ................Accessories ..............Part of the Phone • Front of the Phone .............. 12 • Rear of the Phone ............... 13 • Sub LCD of the phone ............14 ..............Key Description • Side of the Key ..............16 •... - Page 114 Accessing the Menu ................Phonebook ................Menu Tree ............. Messages [Menu 1] • Write message [Menu 1-1] ..........31 • Inbox [Menu 1-2] ..............36 • Outbox [Menu 1-3] ............. 37 • Info service [Menu 1-4] ............38 • Voice mail [Menu 1-5] ............40 •...
- Page 115 ..............Settings [Menu 4] • Alarm clock [Menu 4-1] ............53 • Date & Time [Menu 4-2] ............. 54 • Phone settings [Menu 4-3] ..........55 • Call settings [Menu 4-4] ............. 57 • Security settings [Menu 4-5] ..........60 •...
- Page 116 ............WAP services [Menu 8] • Home [Menu 8-1] ............... 84 • Bookmarks [Menu 8-2] ............84 • Push messages [Menu 8-3] ..........84 • Profiles [Menu 8-4] ............. 85 • Go to URL [Menu 8-5] ............87 • Cache settings [Menu 8-6] ..........88 •...
-
Page 117: Accessories
Accessories Overview There are various accessories for your mobile phone. You can select these options according to your personal communication requirements. Standard Battery Portable Handsfree This connects to your phone, allowing handsfree operation. Travel Adapter This charger allows you to charge the battery while away from home or your office. - Page 118 Overview Data Kit/CD You can connect your phone to PC to exchange the data between them. Handsfree Kit The handsfree car kit enables you to attach the phone to the power jack in your car, providing you with handsfree operation. Note •...
-
Page 119: Part Of The Phone
Part of the Phone Overview Front of the Phone 1 Earpiece 10 Message key 2 Active Folder 11 Soft Right Key 3 Display Screen 12 End/Power Key 4 Soft Left Key 13 Cancel Key 5 Up/Down Side Key 14 Numeric Keys 6 Confirm Key 15 Hash Key 7 Send Key... -
Page 120: Rear Of The Phone
Overview Rear of the Phone 1 Battery 2 Cable Connector/ Battery Charging Connector/ Hands-Free Car kit Connector 3 Battery Terminals 4 SIM Card Socket 5 Battery Lock 6 Neckstrap Hole... -
Page 121: Sub Lcd Of The Phone
Part of the Phone Overview Sub LCD of the phone Sub LCD You can view the icon of receiving text message or voicemail even not opening folder. In addition, you can check the name and number for incoming and outgoing calls. Note! •... -
Page 122: Key Description
Key Description Overview The following shows key components of the phone. Keypad Description Description Soft Left Key / Soft Right Key Each of these keys performs the function indicated by the text on the display immediately above it. Vibration key You can activate the vibration directly. -
Page 123: Side Of The Key
Key Description Overview Description END/PWR Key Used to end or reject a call. This key is also used as Power Key by pressing this key for a few seconds. Used to delete the characters, go back the menu or deactivate the function. Side of the Key Description Up/Down Side Key... -
Page 124: Alphanumeric Keys
Overview Alphanumeric Keys The alphabet and numerical keypad mapping relation are listed as the following table. Description . , ' ? ! - & 1 Ä Å Ç É 2 ‡ · ‚ „ A B C Ä À Á Â Ã Æ Ç a b c ä à á â... -
Page 125: Display Information
Display Information Display Information The screen displays several icons the following describe each of them you may see on the phone. On-Screen Icons Icon/Indicator Description Tells you the strength of the network signal. Call is connected. You can use GPRS service. Shows that you are using a roaming service. - Page 126 Display Information Icon/Indicator Description Silent menu in profile. Headset menu in audio profile. Car menu in audio profile. You can divert a call. You can use Push message service through WAP.
- Page 127 Display Information Display Information Top Menu Icons Icon Description Messages Call Register Profiles Settings Call Divert Organizer Fun & Tools WAP services SIM Service (Dependent on SIM)
-
Page 128: Getting Started
Installation Getting Started – Inserting the SIM Card Locate the SIM card socket in the back of the phone. Follow the steps below to install the SIM card. 1. Remove the battery if attached. 2. Slide the SIM card into the slot, under the silvery holders, with the golden connectors facing down and the cut corner to the right. -
Page 129: Installing The Battery
Installation Getting Started — Installing the Battery 1. Place the battery on the back of the phone. 2. Push it until you hear a click. -
Page 130: Charging The Battery
Getting Started ˜ Charging the Battery To connect the travel adapter to the phone, you must have installed the battery. 1. Insert one end of the travel adapter into the bottom of the phone. 2. Connect the other end of the travel adapter to an AC wall outlet. -
Page 131: Disconnecting The Charger
Installation Getting Started ™ Disconnecting the charger Disconnect the travel adapter from the phone by pressing its side buttons. Notice • The battery delivered with your phone has to be fully charged before using it. • Do not remove your battery or the SIM card while charging. •... -
Page 132: Powering On Sequence
Powering On Sequence Getting Started – To get started with the phone 1. Press and hold key until you hear a tone. 2. Depending on setting PIN code request, you can enter PIN code or not. 3. If your phone connects to a network, the network name will be displayed shortly. -
Page 133: Access Codes
Access Codes Getting Started You can use the access codes described in this section to avoid unauthorised use of your phone. The access codes (except PUK1 and PUK2 codes) can be changed by using [Menu 4-5-6]. PIN code (4 to 8 digits) The PIN (Personal Identification Number) code protects your SIM card against unauthorised use. -
Page 134: Puk2 Code (4 To 8 Digits)
Getting Started PUK2 code (4 to 8 digits) The PUK2 code, supplied with some SIM cards, is required to change a blocked PIN2 code. If you lose the code, also contact your service provider. Security code (4 to 8 digits) The security code protects the unauthorised use of your phone. -
Page 135: Accessing The Menu
Phonebook Accessing the Menu To select a menu in phonebook, press [Names] in standby mode and then scroll to a desired item. Name Description Name Description Search Allows you to search for a specific name, number. Add new Allows you to add new names and numbers. Speed dials Allows you to assign up to 8 ( one-touch dial allocations. -
Page 136: Menu Tree
Menu Tree Accessing the Menu 1 Messages 3 Profiles 1 Write message 1 Vibrate only 2 Inbox 2 Quiet 3 Outbox 3 General 4 Info service 4 Loud 5 Voice mail 5 Headset 6 Namecard 6 Car 7 Templates 8 Delivery report 9 Settings 0 Memory status 4 Settings... - Page 137 Menu Tree Accessing the Menu 5 Call Divert 8 WAP services 1 Home 1 All voice calls 2 If busy 2 Bookmarks 3 If no reply 3 Push messages 4 If out of reach 4 Profiles 5 All data calls 5 Go to URL 6 All fax calls 6 Cache settings...
-
Page 138: Messages [Menu 1]
Messages [Menu 1] Accessing the Menu This menu includes functions related to SMS (Short Message Service), voice mail, as well as the network’s service messages. Write message [Menu 1-1] You can write and edit text message up to 918 characters. Also, you can check the number of characters. - Page 139 Messages [Menu 1] Accessing the Menu Save Your phone asks whether you will save the edited message. Use template The template is pre-defined message. You can add the template of the list to the message when you edit it. Use namecard The items of the name card are a name, mobile, office, fax, and email.
- Page 140 Accessing the Menu Dictionary • Add new If you add a word you use often, you can input it by pressing a key once for each character. 1. Enter the menu. 2. Scroll to highlight Add new, and then press [Select]. 3.
- Page 141 Messages [Menu 1] Accessing the Menu eZi-Text The eZi text allows you to type easily and quickly. If you just press a key marked a character on the keypad, you can get a character you want. It is useful to make a word and a sentence. If you press key, you can change the type of language.
- Page 142 Accessing the Menu • How to use in Numeric mode To input a number in Numeric mode, you press a number key displayed on the keypad. • How to use in Capital mode To input Capital letter, you press a character key displayed on the keypad.
-
Page 143: Inbox [Menu 1-2]
Messages [Menu 1] Accessing the Menu Inbox [Menu 1-2] When you receive a text message, your phone shows the symbol and stores it in the incoming message lists. Scroll to the desired message by using . In addition, you can see Delete all for deleting all incoming messages at the bottom of the list. -
Page 144: Outbox [Menu 1-3]
Accessing the Menu Outbox [Menu 1-3] When you enter this menu, you can see the outgoing call list. Scroll to the desired message by using and press to see the message. And if you want to exit Outbox menu, press In addition, you can see Delete all for deleting all outgoing messages at the bottom of the list. -
Page 145: Info Service [Menu 1-4]
Messages [Menu 1] Accessing the Menu Info service [Menu 1-4] (Dependent to network and subscription) Cell Broadcast messages (CB Message) are text messages by the network to GSM phone users. They provide general information such as weather reports, traffic news, taxis, pharmacies, and stock prices. Each type of information has the number;... - Page 146 Accessing the Menu Alert • Yes If you select this menu, your phone will beep when Cell broadcast message is received. • No If you select this menu, your phone will not beep despite Cell broadcast message is received. Languages You can select the language you want.
-
Page 147: Voice Mail [Menu 1-5]
Messages [Menu 1] Accessing the Menu Voice mail [Menu 1-5] You can listen to your voice message(s) and get the voicemail centre number. Listen to voice mail You can call voicemail centre if you want to listen to voice message. Voicemail centre You can get the voicemail if this feature is supported by the network service provider. -
Page 148: Namecard [Menu 1-6]
Accessing the Menu Namecard [Menu 1-6] It’s for editing the namecard. The items of the namecard are a name, mobile, office, fax, and email. • Edit : You can edit a namecard. • Delete : You can delete a namecard. Templates [Menu 1-7] It’s for editing pre-defined messages. -
Page 149: Delivery Report [Menu 1-8]
Messages [Menu 1] Accessing the Menu Delivery report [Menu 1-8] You can read and delete delivery report messages. Settings [Menu 1-9] Message types Text, Voice, Fax, Natl. paging, X.400, E-mail, ERMES Usually, the type of message is set to Text. You can convert your text into alternative formats, which are suitable for the device that will be received the message. -
Page 150: Memory Status [Menu 1-0]
Accessing the Menu Pay for reply? When a message is sent, it allows the person to whom you sent the message to reply and charges the cost of the reply to your telephone bill. SMS centre If you want to send the text message, you can get the address of SMS centre through this menu. -
Page 151: Call Register [Menu 2]
Call Register [Menu 2] Accessing the Menu Missed calls [Menu 2-1] This menu shows recently missed numbers. You can call by this number, also save and view date and time this menu as well as writing messages. Received calls [Menu 2-2] This menu shows recently received numbers. -
Page 152: Call Charge [Menu 2-6]
Accessing the Menu Call charge [Menu 2-6] Within these submenus, you can view the duration and the call cost of your calls. Call duration This function allows you to view the duration of your Last Call, All Calls, Received calls and Dialled calls in hours, minutes and seconds. - Page 153 Call Register [Menu 2] Accessing the Menu Note • The actual call cost may be different depending on network features, billing, and tax. Settings [SIM Dependent] • Set tariff You can set the currency type and the unit price. Contact your services providers to obtain charging unit prices.
- Page 154 Accessing the Menu Note • When all units have been used, no calls can be made except emergency calls. Depending on SIM card, you need the PIN2 code to set a call cost limit. • Auto display This network service allows you to see automatically cost of your last call.
-
Page 155: Gprs Information [Menu 2-7]
Call Register [Menu 2] Accessing the Menu GPRS information [Menu 2-7] You can check the amount of data transferred over the network through GPRS. In addition, you can also view how much time you are online. Call duration You can check the duration of GPRS call. You can also reset the call timers. -
Page 156: Profiles [Menu 3]
Profiles [Menu 3] Accessing the Menu In this menu, you can adjust and customize the phone tones for different events, environments and caller’s group. Note • When your phone is connected to the Handsfree kit, it’ll be automatically set to the Car profiles menu and when your phone is connected to the Earmic, it’ll be automatically set to Headset profiles menu then each submenu related to them will be displayed automatically. -
Page 157: General [Menu 3-3]
Profiles [Menu 3] Accessing the Menu General [Menu 3-3] • Activate : You can adjust the profile as General. • Personalise : You can change the values of Profile submenus. Loud [Menu 3-4] • Activate : You can adjust the profile as Loud if you are in a noisy environment. -
Page 158: Car [Menu 3-6]
Accessing the Menu Car [Menu 3-6] • Activate : You can adjust the Profiles as Car when you activate Handsfree Kit. • Personalise : You can change the values of Profile submenus. A Group of Profiles submenus [Menu 3-x-x] Profiles menu have the submenus as shown below. Incoming alert type Allows to alert for the incoming call for adjusting environment. - Page 159 Profiles [Menu 3] Accessing the Menu Auto answer Allows to set to answer automatically for adjusting environment. Please note that only Car and Headset has this sub menu so that you can activate this function. • Off Even though your phone is ringing, your phone will not answer automatically.
-
Page 160: Settings [Menu 4]
Settings [Menu 4] Accessing the Menu You can set the following menus for your convenience and preferences. Alarm clock [Menu 4-1] You can set the phone to alarm at a specified within this menu. You can set the time (Hour and Minute) for raising the alarm. 1. -
Page 161: Date & Time [Menu 4-2]
Settings [Menu 4] Accessing the Menu Date & Time [Menu 4-2] Date • Set date In this menu, you can set the date of your phone. 1. Enter the menu. 2. Select Set date by pressing [Select]. 3. Enter the number you want to set the date. 4. -
Page 162: Phone Settings [Menu 4-3]
Accessing the Menu • Time format: Your can select time format between 12-hour or 24-hour. 1. Scroll to highlight Time format by pressing [Select]. 2. Select 12 hour or 24 hour you want by pressing [Select]. Phone settings [Menu 4-3] You can set the phone figures you want. - Page 163 Settings [Menu 4] Accessing the Menu • Network name If you select On, you can set network name displayed on the phone as you want. • Backlight You can set the light-up duration you want whenever you press a key. •...
-
Page 164: Call Settings [Menu 4-4]
Accessing the Menu Call settings [Menu 4-4] You can set the menu relevant to a call by pressing [Select] in Setting menu. Answer mode • Anykey answer If you select this menu, you can receive a call by pressing any key except key. - Page 165 Settings [Menu 4] Accessing the Menu Call waiting (network dependent) If this service is Enable, you can accept a waiting (incoming) call. • On Activating the corresponding service. • Off Deactivating the corresponding service. • View status Checking the Status of the service. Minute minder If you select On, you can check the call duration by beep sound every minute during a call.
- Page 166 Accessing the Menu Auto redial • On When this function is set on, your phone will make up to 10 attempts for a call after not connecting. • Off Your phone will not make any attempts to connect the call after not connecting.
-
Page 167: Security Settings [Menu 4-5]
Settings [Menu 4] Accessing the Menu Security settings [Menu 4-5] PIN code request In this menu, you can set the phone to ask for the PIN code of your SIM card when the phone is switched on. If this function is activated, you’ll be requested to enter the PIN code. - Page 168 Accessing the Menu Call barring The Call barring service prevents your phone from making or receiving certain category of calls. This function requires the call barring password. You can view the following submenus. • All outgoing : The barring service of all outgoing calls. •...
- Page 169 Settings [Menu 4] Accessing the Menu Fixed dial number (SIM dependent) You can restrict your outgoing calls to selected phone number. The numbers are protected by your PIN2 code. 1. Press [Menu] in standby mode. 2. Press key for direct access or use to enter Settings.
-
Page 170: Network Settings [Menu 4-6]
Accessing the Menu Network settings [Menu 4-6] You can select the network which you will be registered either automatically or manually. Usually, the selection of the network used by the handset is automatic. Automatic The phone automatically selects network which is available in the area. -
Page 171: Call Divert [Menu 5]
Call Divert [Menu 5] Accessing the Menu (network and subscription dependent) The Call divert service allows to divert incoming voice calls, fax calls, and data calls to another number. For details, contact your service provider. All voice calls [Menu 5-1] Diverts voice calls unconditionally. -
Page 172: All Fax Calls [Menu 5-6]
Accessing the Menu All fax calls [Menu 5-6] Diverts to a number with a fax connection unconditionally. The submenus [Menu 5-x-x] Call Divert menus have the submenus as shown below. Activate Activating the corresponding service. • To other number Inputs the number for diverting. •... -
Page 173: Cancel All [Menu 5-7]
Call Divert [Menu 5] Accessing the Menu (network and subscription dependent) Cancel Deactivating the corresponding service. View status Checking the Status of the corresponding service. Cancel all [Menu 5-7] Cancels all call divert service. -
Page 174: Organizer [Menu 6]
Organizer [Menu 6] Accessing the Menu Scheduler [Menu 6-1] On top of the screen there are sections for date and icons. Whenever you change the date, the calendar will be updated according to the date. And square cursor will be used to locate the certain day. - Page 175 Organizer [Menu 6] Accessing the Menu - Repeat Once : no repeat. Daily : repeat schedule daily for 5 days. Weekly : repeat schedule weekly for 5 weeks. Monthly : repeat schedule monthly for 5 months. Yearly : repeat schedule yearly for 5 years. •...
- Page 176 Accessing the Menu View day Shows the note for the chosen day. Use to browse through the note lists. If you set alarm for the note, Alarm watch is displayed. Press [Options] to delete, edit the note you selected. • Options - Edit You can edit the subject, time, the repeat time and alarm time by pressing [Select].
-
Page 177: Phone Book [Menu 6-2]
Organizer [Menu 6] Accessing the Menu Phone book [Menu 6-2] Search (Calling from phonebook) 1. Open the phonebook first by pressing [Names] in a standby mode. 2. Search by Pressing [Select] to enter. 3. You can find an entry by name and number. 4. - Page 178 Accessing the Menu Add new You can add phonebook entry by using this function. Phone memory capacity is 200 entries. SIM card memory capacity depends on the service provider. You can also save 20 characters of name in the Phone memory, and you can save characters in the SIM card.
- Page 179 Organizer [Menu 6] Accessing the Menu You should speak a word within 2 seconds, and the phone asks you to speak it again to ensure the accuracy of voice recognition. After voice recognition has finished, Voice is attached automatically. Note •...
- Page 180 Accessing the Menu Speed dials You can associate any of the keys with a Name list entry. You can call directly by pressing this key for 2-3 seconds. 1. Open the phonebook first by pressing [Names] in a standby mode. 2.
- Page 181 Organizer [Menu 6] Accessing the Menu Voice list You can see all phone numbers which contain voice. You can also call directly by pressing [Send]. After selecting phone number by using press [Options], you can see following the submenus. • Play : You can play voice which is attached to phone number.
- Page 182 Accessing the Menu 5. Then submenus below will be displayed. • View member - You can view the number list in Caller groups. - You can select the member you want by pressing [Options] then you can enable the submenu such as Edit, Delete, Write message, Copy, Voice and Main number.
- Page 183 Organizer [Menu 6] Accessing the Menu Copy all You can copy/move entries from SIM card memory to Phone memory or from Phone memory to SIM card memory. 1. Open the phonebook first by pressing [Names] in standby mode. 2. Scroll to Copy all, then press [Select] to enter this menu. 3.
- Page 184 Accessing the Menu Settings You can set preferred memory which includes Variable, SIM or Phone and preferred search which includes Variable, Name and Number. 1. Open the phonebook first by pressing [Names] in a standby mode. 2. Scroll to Settings, then Press [Select] to enter. 3.
- Page 185 Organizer [Menu 6] Accessing the Menu Information Service dial number Use this function to access a particular list of services provided by your network operator (if supported by the SIM card). 1. Open the phonebook first by pressing [Names] in a standby mode.
-
Page 186: Fun & Tools [Menu 7]
Fun & Tools [Menu 7] Accessing the Menu My folder [Menu 7-1] All the contents downloaded through M-service or EMS such as images, ringtones and etc, are available in the My folder menu. In this menu you can check the contents, edit their name and, eventually, set them as wallpapers or ringtones. -
Page 187: Game [Menu 7-2]
Fun & Tools [Menu 7] Accessing the Menu Game [Menu 7-2] The phone offers you enjoyable games to play with. Note The Control keys are different for each game. But each game has screens to explain the main control key (see key info.). Other common control keys are below. -
Page 188: Melody Composer [Menu 7-3]
Accessing the Menu Melody composer [Menu 7-3] You can compose ringing sounds as you want. When you enter this function, the tone that you created previously is displayed. To enter a new or edit an existing tone: 1. Enter the desired notes. ( : CDEFGAB) 2. -
Page 189: Unit Converter [Menu 7-5]
Fun & Tools [Menu 7] Accessing the Menu Note In edit mode, default is set in move mode and drawing. With a , you can move fast between pixels. Unit converter [Menu 7-5] This converts any measurement into a unit you want. -
Page 190: Calculator [Menu 7-6]
Accessing the Menu Calculator [Menu 7-6] This contains the standard functions such as +, –, *, ÷ : Add, Subtract, Multiply, Divide. 1. Input the numbers by pressing numeric keys. 2. Use a navigation key to select a sign for calculation. 3. -
Page 191: Wap Services [Menu 8]
WAP services [Menu 8] Accessing the Menu Your phone supports services based on Wireless Application Protocol (WAP). You can access services supported by your network. The services menu allows you to get the information such as news, weather reports, and flight times. Home [Menu 8-1] You can connect to the configured homepage of the activated profile. -
Page 192: Profiles [Menu 8-4]
Accessing the Menu Profiles [Menu 8-4] You can make up to 5 profiles and activate only one of them. Scroll to the desired profile and press to access available options. • Activate You can activate the selected profile. • Settings You can edit and change WAP settings of the selected profile. - Page 193 WAP services [Menu 8] Accessing the Menu - Conn. security The options are On and Off depend on the gateway you are using. - Gateway information Most of WAP gateways do not require a User ID and Password. If your gateway need them to connect to it, then your network should provide them, and you must set them up correctly before trying to browse a WAP site.
-
Page 194: Go To Url [Menu 8-5]
Accessing the Menu - GPRS settings The service settings are only available when GPRS is chosen as a bearer service. - Linger timer You can input timeout periods between 30sec, and 300sec. if any data wasn’t input or transferred, the service will be unavailable. •... -
Page 195: Cache Settings [Menu 8-6]
WAP services [Menu 8] Accessing the Menu Cache settings [Menu 8-6] You can remove the contents of Cache memory and change the Cache check mode. Clear cache The contents of Cache memory will be removed. Check cache You can change the time for checking the Cache memory. •... -
Page 196: Internet On-Line Menu
Internet On-line menu Accessing the Menu If you are on line, you can see the following menus. ❏ Home This is the same as [Menu 8-1]. ❏ Reload This reloads the current page. ❏ Bookmarks This is the same as [Menu 8-2]. ❏... -
Page 197: Additional Functions
How to Use Data and Fax call Additional Functions To be able to data or fax service, you need the communicate software such as a data or a fax program. Before using these functions, you need to connect your phone to a computer or make sure that your phone is in connection with a compatible device. - Page 198 Additional Functions Receiving Data or Fax Calls – Single number If you have a SIM card that does not support separate voice, data and fax numbers, the phone does not recognize the type of incoming call. To use a data or a fax service, make sure that you want to receive a data or fax call mode.
-
Page 199: In Call Menu
In call Menu Additional Functions During a call, the following menus will be displayed, not in a standby mode. 1 During a call 1-1 Putting a Call on Hold You can place a call on hold or retrieve by just pressing the [Send] key. - Page 200 Additional Functions 1-4 Answering an Incoming Call To answer an incoming call, simply press the [Send] key. The handset is also able to warn you of an incoming call while you are already in a call. A tone sounds in the earpiece, and the display will show that a second call is waiting.
- Page 201 In call Menu Additional Functions 1-7 Muting the Microphone You can mute the microphone during a call by pressing the [Options] key then selecting Mute. The handset can be unmuted by pressing the [Unmute]. When the handset is muted, the caller cannot hear you, but you can still hear them.
-
Page 202: Multiparty Or Conference Calls
Additional Functions 2 Multiparty or Conference Calls The multiparty or conference service provides you with the ability to have a simultaneous conversation with more than one caller, if your network service provider supports this feature. A multiparty call can only be set up when you have one active call and one call on hold, both calls having been answered. - Page 203 In call Menu Additional Functions 2-3 Putting the Multiparty Call on Hold To put a multiparty call on hold, select the [Options] key then Multiparty/Hold all. 2-4 De-activate the Multiparty Call on Hold To de-activate a multiparty call on hold, select the [Options] key then Multiparty/Join all.
- Page 204 Additional Functions 2-9 Ending a Multiparty Call The currently displayed caller of a multiparty call can be disconnected by pressing the [End] key. To end a multiparty call, press the [Options] key then select Multiparty/End multiparty. Selecting the [Options] key then Multiparty/End all, will end all the active and held calls.
-
Page 205: Care And Maintenance
Care and Maintenance When using this unit, basic safety precautions as below should be always followed. • Do not touch the adapter with wet hands. • Do not disassemble this unit. (Take it to a qualified service technician when repair work is required.). •... - Page 206 Unlike other battery systems, there is no memory effect that could compromise the battery’s performance. • Use only LG batteries and chargers. LG chargers are designed to maximize the battery life. • Do not disassemble or short-circuit the battery pack.
-
Page 207: Technical Data
Technical Data General Product Name : G5220C System : GSM 900/DCS 1800 Ambient Temperatures Max : +55°C Min : -10°C... - Page 209 Memo...