
Summary of Contents for Regency 600PHSHEATER
- Page 1 INSTRUCTION MANUAL 2.5GALLON 120VOLT WATER HEATER FOR POTABLE WATER HEATING ONLY NOT SUITABLE FOR SPACE HEATING #600PHSHEATER 07/2021 REGENCYTABLESANDSINKS.COM...
-
Page 2: Safe Installation, Use And Service
SAFE INSTALLATION, USE AND SERVICE Your safety and the safety of others is extremely important in the installation, use, and servicing of this water heater. Many safety-related messages and instructions have been provided in this manual and on your own water heater to warn you and others of a potential injury hazard. -
Page 3: General Safety
GENERAL SAFETY WARNING CAUTION Improper installation and use may result in property damage. Read and understand this instruction manual and safety messages before installing, • Do not operate water heater if flood damaged. operating, or servicing this water • heater. Inspect and replace anode. -
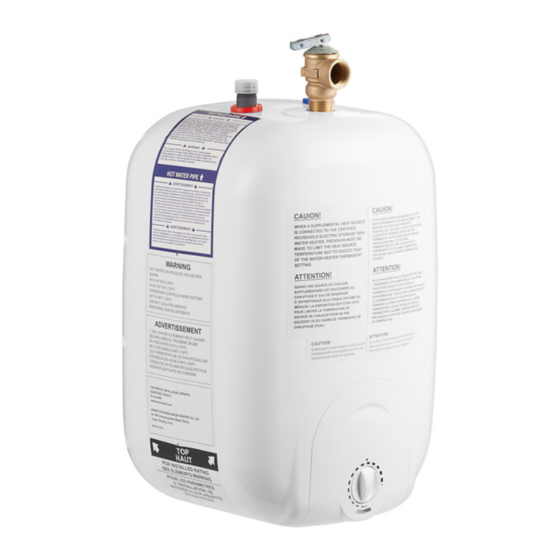
Page 4: Introduction
INTRODUCTION Thank You for purchasing this water heater. Properly installed and maintained, it should give you years of trouble free service. Abbreviations Found In This Instruction Manual: • ANSI-American National Standards Institute • AS ME-American Society of Mechanical Engineers • NFPA-National Fire Protection Association •... -
Page 5: Table Of Contents
TABLE OF CONTENTS SAFE INSTALLATION, USE AND SERVICE ..........................2 GENERAL SAFETY ....................................3 INTRODUCTION ....................................4 Preparing for the Installation ................................4 TABLE OF CONTENTS ..................................5 TYPICAL INSTALLATION .................................6 MIXING VALVE USAGE ..................................6 MATERIALS AND BASIC TOOLS NEEDED ..........................7 Deciding on the Type of Installation ...............................7 LOCATING THE NEW WATER HEATER .............................8 Facts to Consider About Location ..............................8 Insulation Blankets....................................8... -
Page 6: Typical Installation
TYPICAL INSTALLATION Hot (Outlet) DANGER Temperature Cold (Inlet) Pressure Relief Valve Fire Hazard/Electrical Shock Hazard Explosion Hazard Discharge Pipe (Do Not Cap Or Plug) THIS WATER HEATER MUST: • Be properly grounded. 6" Maximum • Be connected to a properly Al R Gap grounded electrical supply with the proper voltage rating as... -
Page 7: Materials And Basic Tools Needed
MATERIALS AND BASIC TOOLS NEEDED DECIDING ON THE TYPE OF INSTALLATION There are typically two different types of installation. The installation section of this manual has been broken into these two methods. Look at your old water heater installation to determine which type of installation you have. After finding out what type of installation you have, look at these options: Section A Section B... -
Page 8: Locating The New Water Heater
LOCATING THE NEW WATER HEATER Facts To Consider About The Location available from your local plumbing contractor. Such a drain pan must have a minimum length and width of at least 2 inches (51 mm) greater than the water heater dimensions and must be piped CAUTION to an adequate drain. -
Page 9: Installing The New Water Haeter
INSTALLING THE NEW WATER HEATER MOUNTING Hot (Outlet) MOUNTING-DRYWALL (HOLLOW WALL) Temperature Cold (Inlet) The selected wall or cabinet must be capable of supporting Pressure double the weight of the unit when completely full of Relief Valve water(77Ibs). Union The installation area must provide adequate clearances for Discharge removal of the front panel and servicing the unit. -
Page 10: Water Piping Pressure Test
Union WARNING Temperature- Discharge Pressure Toxic Chemical Hazard Pipe Relief Valve • Do not connect non-potable water system Cold Inlet Outlet This water heater shall not be connected to any heating systems or components used with a non potable water heating appliance. Toxic chemicals, such as those used for boiler treatment shall not be introduced into this system. -
Page 11: Filling The Water Heater
This heater is provided with a properly certified combination DANGER temperature-pressure relief valve by the manufacturer. The valve is certified by a nationally recognized testing laboratory Water temperature over 125°F that maintains periodic inspection of production of listed (52°C) can cause severe burns equipment of materials as meeting the requirements for Relief instantly resulting in severe injury Valve for Hot Water Supply Systems, ANSI Z21.22 •... -
Page 12: Wiring Diagram
WIRING DIAGRAM WARNING • Before removing any access panels or servicing the water heater, make sure the electrical supply to the water heater is turned "OFF". • Failure to do this could result in death, serious bodily injury, or property damage. High Element Thermostat Black... -
Page 13: Wiring
WIRING You must provide all wiring of the proper size outside of the CAUTION water heater. You must obey the local codes and the electric company requirements when you install this wiring. Improper installation and use may result in property damage. This water heater is supplied with a flexible, grounded power cord and connects to a standard three-wire 120 volt 60Hz •... -
Page 14: Temperature Regulation
TEMPERATURE REGULATION TEMPERATURE ADJUSTMENT DANGER Water temperature over 125°F WARNING (52°C) can cause severe burns instantly resulting in severe injury • Before removing any access or death. panels or servicing the water Children, the elderly, and the heater, make sure the electrical physically or mentally disabled are supply to the water heater is at highest risk for scald injury. -
Page 15: For Your Information
FOR YOUR INFORMATION for further information concerning an Anode Replacement and THERMAL EXPANSION chlorination treatment; we can only suggest that chlorination or aeration of the water supply be considered to eliminate the water problem. CAUTION Do not remove the anode leaving the tank unprotected. By doing so, all warranty on the water heater tank is voided. -
Page 16: Periodic Maintenance
PERIODIC MAINTENANCE TEMPERATURE-PRESSURE RELIEF VALVE ANODE ROD INSPECTION CAUTION Property Damage Hazard • Avoid water heater damage. • Inspection and replacement of anode rod required. DISCHARGE PIPE FIGURE 7. The anode rod is used to protect the tank from corrosion. Most If after manually operating the valve, it fails to completely reset hot water tanks are equipped with an anode rod. -
Page 17: Thermostat Removal/Replacement
REPLACEMENT Place the new thermostat against the front panel and secure it with the two screws. Reattach the wires at the spade connections, taking care to place then in their original locations. Be sure to push the connector completely onto the spade terminals. Secure the temperature sensor to the tank by tightening the nuts. -
Page 18: Element Cleaning/Replacement
HIGH LIMIT SWITCH REMOVAL AND REPLACEMENT CAUTION Turn off and unplug the heater from the electrical outlet. Remove the front panel; see the "REMOVING THE FRONT Improper installation and use may result in property damage. PANEL" section in this manual. Remove the insulation pad. Remove personnel barrier. -
Page 19: Leakage Checkpoints
LEAKAGE CHECKPOINTS WARNING Read and understand this instruction manual and safety messages before installing, operating, or servicing this water heater. Failure to follow these instructions and safety messages could result in death or serious injury. This manual must remain with water heater. -
Page 20: Troubleshooting Guidelines
TROUBLESHOOTING GUIDELINES Problem Possible Cause Corrective Action Improperly sealed, hot or cold supply WATER LEAKS Tighten threaded connections connection, relief valve or drain valve. (See Leakage Checkpoints in this manual) Leakage from other appliances or water lines. Inspect other appliances near water Turn on electrical switch. -
Page 21: Repair Parts List
NOTES...