Advertisement
Table of Contents
- 1 Table of Contents
- 2 Features
- 3 Things to be Take Care of
- 4 Important Safety Instructions
- 5 Installing Your Phone
- 6 Phone Layout
- 7 Lcd Description
- 8 Menu Structure
- 9 Initial Settings
- 10 Phone Operation
- 11 Menu Settings
- 12 Battery Usage & Safety Precautions
- 13 Trouble Shooting
- 14 Warranty
- Download this manual
Before Initial Use: Connect battery in battery compartment and charge the
battery for at least 6-8 hrs. before initial use.
For better RF performance, it is recommended to place the fixed wireless
phone at an appropriate location where the signal strength is good.
The battery consumption varies according to the network signal strength. So
for better Standby Time & Talk Time it is recommended to place the fixed
wireless phone at an appropriate location where the signal strength is good.
It is recommended to always use the power adaptor when phone is
connected as Wi-Fi hotspot.
User's Manual
Advertisement
Table of Contents

Summary of Contents for BEETEL F5-4G
- Page 1 User's Manual Before Initial Use: Connect battery in battery compartment and charge the battery for at least 6-8 hrs. before initial use. For better RF performance, it is recommended to place the fixed wireless phone at an appropriate location where the signal strength is good. ...
- Page 2 Its amazing features have been specially designed to add comfort and easy to your life. The F5-4G will make receiving and sending calls the most pleasant experience for you. To begin, please refer to the friendly Instruction Manual for easy installation.
-
Page 3: Table Of Contents
CONTENTS FEATURES....................01 THINGS TO BE TAKE CARE OF ..............01 IMPORTANT SAFETY INSTRUCTIONS...........02 INSTALLING YOUR PHONE ..............03 PHONE LAYOUT .................04-05 LCD DESCRIPTION ................06-07 MENU STRUCTURE ................08-09 INITIAL SETTINGS ..................09 PHONE OPERATION ................10-13 MENU SETTINGS ................14-44 BATTERY USAGE & SAFETY PRECAUTIONS ........45 TROUBLE SHOOTING ...............46-47 WARRANTY ....................48... -
Page 4: Features
Use of this phone may interfere with nearby medical equipment with poor shielding such as heart Pacemaker etc. As the phone (F5-4G) emits radio signal which could interfere with other electronic equipment such as TV, Radio, Telephones etc.It is recommended that a distance of at least 1 meter should be maintained between F1N and other electronic equipment. -
Page 5: Important Safety Instructions
Do not use damaged antenna with the product. It may affect the RF performance of the product. If the antenna is damaged then use only the antenna approved by “beetel” and get it replaced by qualified technician or visit nearby “beetel” service centre for replacement of antenna. -
Page 6: Installing Your Phone
Press and hold the “Power ON/OFF” ( ) key to switch “ON” the 4G Fixed Wireless Phone. “beetel” will be displayed on the LCD display for some time. After that service provider name will appear on the LCD display which indicates that now your phone is ready to receive and make calls. -
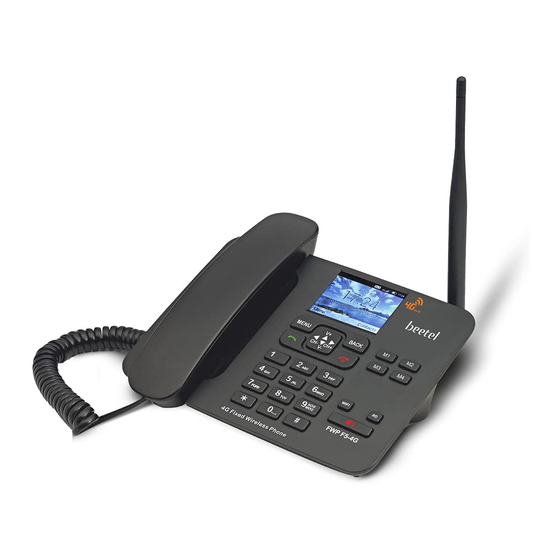
Page 7: Phone Layout
PHONE LAYOUT WIFI 1. MENU KEY(LEFT SOFT KEY): Press to go in to the main menu in idle mode. In sub Menu mode: Press to confirm the selection. Press to answer the incoming calls (if wants to attend the call). 2. - Page 8 In phonebook list/missed calls list/ received calls list/ dialled calls list. Press to scroll down the list. During FM Radio use: Press to decrease the FM Radio Volume. 6. RIGHT KEY ( ): Press to access the Calculator in idle mode. During a call: Press to increase the receive volume in handset and speaker mode.
-
Page 9: Lcd Description
LCD DESCRIPTION VoLTE 9:05 airtel 4G 09:05 TUESDAY, OCT 15, 2019 Menu Contacts Main Icons with Description When SMS notification tone volume Missed Call Indicator Notifications set default (Level 5) When transmit signal is mute Unread SMS Indicator during conversation Missed Call-Arrow in RED colour When Call is on Hold (During review of call list) - Page 10 More bars will show when 2G signal Indicates when battery is fully charged strength is strong (Strong Network) When adaptor is connected to the When 4G signal strength is poor phone for charging the battery (Poor Network) When adaptor is connected to the phone When 3G signal strength is poor without battery (Power ON Mode) (Poor Network)
-
Page 11: Menu Structure
MENU STRUCTURE MAIN FILE MEMORY CONTACTS HISTORY SETTINGS MESSAGING MUSIC EXTRA EXPLORER CLEANUP RADIO MENU • Sound • Turn off • Select • Songs • Calulator • Audio Contact MISSED • Display • Auto • New • Playlists • Calendar •... -
Page 12: Initial Settings
MAIN FILE MEMORY CONTACTS HISTORY SETTINGS MESSAGING MUSIC EXTRA EXPLORER CLEANUP MENU RADIO Date & Time • Automatic date & time • Automatic time zone • Set date • Set time • Use 24-hour format Language • English • Espanol (Spanish) Wallpaper Setting... -
Page 13: Phone Operation
PHONE OPERATION Switch the phone on/off If your phone is powered off before, press and hold “POWER ON/OFF KEY” to turn on the phone. You can press and hold “POWER ON/OFF KEY” again to power off the phone. Making a call ... - Page 14 Enter the telephone number that you want to dial (if any mistake is committed during entering the telephone number, it can be corrected by using “BACK” key). The telephone number which has to be dialled out is displayed on the LCD display. Lift the handset or press Speaker key or press “MENU”...
- Page 15 “SOS” Button for Emergency Calls F5-4G supports to make the emergency calls by using the “SOS” button. The key “9” on the phone keypad is configured as “SOS” button to make the emergency calls when you have a bad/invalid SIM card in your phone, your phone is without SIM card and if your phone is in locked mode.
- Page 16 3-Party Call Conferencing During call waiting service when you are on a call and a new call comes, you will hear a beep tone. The Caller ID information of third party is also displayed on the LCD display along ...
-
Page 17: Menu Settings
MENU SETTINGS PHONEBOOK (Contacts) You can store 1000 private phonebook entries with name & number in the Phonebook/Contacts list of your phone. You can save the phonebook entries in the SIM Card or Phone Memory. By using the phonebook function Add contact, Search & Delete/Batch Delete the contact/contacts from Phonebook Memory. - Page 18 description with each new entry to be stored in phonebook, press the “DOWN” key. Press the “LEFT SOFT KEY” and choose the option “Select”. Press the “UP/DOWN” key to select the desired option (Mobile/Home/Work etc). Press the “LEFT SOFT KEY” & select the option “Save”. Press the “LEFT SOFT ...
- Page 19 “UP/DOWN” key to select the desired option (Mobile/Home/Work etc). Press the “LEFT SOFT KEY” & select the option “Save”. Press the “LEFT SOFT KEY” again, “Contact saved” appears on the LCD display. Now the desired phone number is edited and stored in the Phonebook Memory with name successfully.
- Page 20 Press the “LEFT SOFT KEY” again and choose the option “Dial”. Press the “LEFT SOFT KEY” again, the desired phone number from the phonebook entries is dialled out successfully. Memory in Use: In standby mode, press “LEFT SOFT KEY” to enter in the main menu. You will ...
- Page 21 Press the “LEFT SOFT KEY” once again, LCD will display the recent SIM Card memory status for phonebook entries i.e. SIM Card 28/200, if there are 28 phonebook entries in SIM Card. View Memory Status (Phone capacity) In standby mode, press “LEFT SOFT KEY” to enter in the main menu. You will ...
- Page 22 Press the “LEFT SOFT KEY” again and select the desired phone number to be entered in the phonebook memory from ALL/MISSED/OUTGING/INCOMING call entries. Press the “LEFT SOFT KEY” again and select the option “Add to contacts” from sub menu. Press the “LEFT SOFT KEY”...
- Page 23 MESSAGING Your phone is having receive and send SMS storing capacity up to 500 nos. There are options of New message, Settings, Delete thread, Cell broadcasts and Memory information (SIM Capacity, Phone Capacity) etc. There is common SMS memory to store the received, sent, not sent & draft messages.
- Page 24 The SMS message can be of maximum 160 characters & digits. Use “Insert Common phrases” to load the readymade messages in the write message for sending in the short time. Use “Insert Contacts” to load the contact number from phonebook memory for sending in ...
- Page 25 Press “UP/DOWN” key and select the message from SMS list to delete. Press the “LEFT SOFT KEY” & choose the option “Delete”. Press the “LEFT SOFT KEY” to select the message for delete & select the option “Delete”.
- Page 26 CALL LOGS (HISTORY) Your Phone can store Missed, Dialled & Received calls with date & time information. The phone number will be shown on the LCD display when the phone is ringing. If the phone number matches with one of the entries in the phonebook, the caller's name stored in the phonebook will be displayed on the LCD display.
- Page 27 View Received/Incoming Calls In standby mode, press “LEFT SOFT KEY” to enter in the main menu. Press “LEFT/RIGHT” key to select the option “History” from the main menu. Press the “LEFT SOFT KEY” & “RIGHT” key to select the option “INCOMING” ...
- Page 28 Note: On activating the “Add to blacklist” in Call Logs (History), the call made from the Blacklisted number (Calling party) will not be through and the busy message is received by calling party. Delete from blacklist In standby mode, press “LEFT SOFT KEY” to enter in the main menu. ...
- Page 29 EXTRA Your phone supports the Calendar, Alarm and Calculator functions. Alarm: Facilitates you to alert according to the stored timings. Calculator: Use this application for simple calculations. Calendar: Helps you to check the date & week days. Calculator In standby mode, press “LEFT SOFT KEY” to enter in the main menu. Press “LEFT/RIGHT”...
- Page 30 “Call Fire Wall” from sub menu. Press the “LEFT SOFT KEY” again, List of blacklisted phone numbers appears on the LCD display. Press the “LEFT SOFT KEY” again & select the option Choose/Add/Batch delete as desired. Clock (Alarm) In standby mode, press “LEFT SOFT KEY”...
- Page 31 from sub menu. Press the “LEFT SOFT KEY” again & select the option “Status”. Press the “LEFT SOFT KEY” & “UP/DOWN” key to select the option “On”. Press the “DOWN” key & select the option “Time delay”. Press the “LEFT SOFT KEY”...
- Page 32 Press the “LEFT SOFT KEY” & “UP/DOWN” key to select the option “Recording file list” to see the list of recorded files. Press the “LEFT SOFT KEY”, “List of recorded file” appears on the LCD display. Press the “UP/DOWN” key to select the desired file for play. Note: You can delete the recorded file when required.
- Page 33 SETTINGS Your phone comes with a selection of settings that you can change to personalise your phone the way you like it to work. This part includes Sound Settings, Display Settings, Call Settings, VoLTE Setting, Security Settings, Date & Time Settings, Reset &...
- Page 34 Press the “LEFT SOFT KEY” again after selection of desired SMS tone (default notification) to be set at the time of receiving the SMS. “Default notification” will appear on the LCD display again. Note: The default setting for SMS tone (default notification) is at “Pixie Dust”. Tap sounds (Key tone) ...
- Page 35 from sub menu. Press the “LEFT SOFT KEY” again to select the option Ringtone/Notifications/ Media Volume/Alarm for volume adjustment as desired. Press the “UP/DOWN” key to select the desired option for volume adjustment and adjust the desired volume for selected option from the “LEFT/RIGHT” key. Note: ...
- Page 36 can select the desired LCD backlight time by pressing the “UP/DOWN” key. Press the “LEFT SOFT KEY” after selection of desired LCD backlight time to save. “Sleep” will appear on the LCD display. Menu mode In standby mode, press “LEFT SOFT KEY” to enter in the main menu. ...
- Page 37 for the selected option (i.e. Always forward/Forward when busy/Forward when unanswered/Forward when unreachable) will be forwarded/diverted on the alternate phone number. You can “Disable” the call forward/ call divert setting by following the above said steps 1-8. Note: This feature is related to service provider.
- Page 38 Press “LEFT/RIGHT” key to select the option “Settings” from the main menu. Press the “LEFT SOFT KEY” & “UP/DOWN” key to select the option “Call settings” from sub menu. Press the “LEFT SOFT KEY” again and select the option “Service Provider PRI”.
- Page 39 Press the “LEFT SOFT KEY” again and select the option “General Settings”. Press the “LEFT SOFT KEY” & “UP/DOWN” key to select the option “Fade-in ringer” from sub menu. Press the “LEFT SOFT KEY”, “Fade-in ringer” appears on the LCD display with an option to enable/disable fade-in ringer mode.
- Page 40 Press the “LEFT SOFT KEY” again to save the setting. Family number (Direct Memory settings at M1, M2, M3 & M4) In standby mode, press “LEFT SOFT KEY” to enter in the main menu. Press “LEFT/RIGHT” key to select the option “Settings” from the main menu. ...
- Page 41 Call time remind In standby mode, press “LEFT SOFT KEY” to enter in the main menu. Press “LEFT/RIGHT” key to select the option “Settings” from the main menu. Press the “LEFT SOFT KEY” & “UP/DOWN” key to select the option “Call ...
- Page 42 Press the “LEFT SOFT KEY” & “UP/DOWN” key to select the option “Wi-Fi” from sub menu. Press the “LEFT SOFT KEY”, “To see available networks, turn Wi-Fi on” appears on the LCD display with option of On/Off the Wi-Fi setting. Press the “LEFT SOFT KEY”...
- Page 43 Security In standby mode, press “LEFT SOFT KEY” to enter in the main menu. Press “LEFT/RIGHT” key to select the option “Settings” from the main menu. Press the “LEFT SOFT KEY” & “UP/DOWN” key to select the option “Security” ...
- Page 44 You can follow 12/24 Hrs format for time setting as desired (Default: 24 Hrs) You phone is set “On” in “Automatic date & time” & “Automatic time zone” setting. So, the phone auto selects the date & time as per service provider network. You can set these settings at “Off”...
- Page 45 KEY” and choose the option “On” to activate the “Scheduled power off” function. Press the “LEFT SOFT KEY” to select the time & days of repeat for scheduled power off. The power of phone becomes “off” at the set time & schedule. Follow the step 1-4 stated above for “Scheduled power on”.
- Page 46 Press the “LEFT SOFT KEY” again, “Erase all data? You can't reverse this action!” will be displayed on the LCD display. Press the “LEFT SOFT KEY” again. Phone will power off & on automatically. All the internal storage data will be deleted, and all the customised settings will switch back to default settings.
- Page 47 Press the “LEFT SOFT KEY” again and select the option “Off/On” for Wi-Fi hotspot. The default Wi-Fi hotspot setting is at “On”. Press the “LEFT SOFT KEY” again and choose the option “Select”. “Set up Wi- Fi. hotspot” is displayed on the LCD display. Press the “UP/DOWN”...
-
Page 48: Battery Usage & Safety Precautions
BATTERY USAGE & SAFETY PRECAUTIONS For optimum use of battery & its safe use, pls. read the following instructions carefully: Use 3.7V, 800mAh Li-ion rechargeable battery supplied with the product. Install the battery as per the instructions in user's manual under the heading “INSTALLING YOUR PHONE”. -
Page 49: Trouble Shooting
TROUBLE SHOOTING No display Check the phone is Power on. Check the battery is connected properly and battery is not in dip discharged state. Check the Switching adaptor is connected properly. Your device does not Power on When the battery is completely/deep discharged, your device will not turn on. - Page 50 If the problem is still not resolved, contact nearby Beetel Service Centre. Calls are not connected Ensure that you have accessed the correct GSM network. Others cannot hear you speaking on a call Ensure that the MIC is close to your mouth.
-
Page 51: Warranty
WARRANTY The Beetel phone instrument is warranted for a period of 12 months from date of purchase. Warranty for Adaptor/UPS Adaptor (if applicable) is for 06 months from date of purchase. Any defective instrument will be repaired by Brightstar Telecommunication India Limited. (Hereinafter referred to as 'The company') free of charge within the period of warranty subject to the following conditions: This warranty card must be duly filled in, stamped &... - Page 52 BRIGHTSTAR TELECOMMUNICATIONS INDIA LIMITED (Erstwhile Beetel Teletech Limited) M/s Brightstar Telecommunications India Limited, 1st Floor, Plot No. 16, Udyog Vihar, Phase-IV, Gurugram – 122015, Haryana, India Toll Free Number : 1800-10-23456, E-mail: customer.care@beetel.in, Website: www.brightstarcorp.in...