Table of Contents
Advertisement
Quick Links
User's Manual
◆
In the initial settings, exclusive channel for DVD/Video is set to CH 3.
Set the TV channel to CH3 before using it.
◆
Region code of DVD/Video player for home is 1 or ALL.
In inserting a disc with other region code, it does not operate.
Please only use a disc with region code 1 or ALL.
◆
is a 'Prohibition' mark. If this mark is displayed in operating the product,
please wait for a while, then use it. If 'Prohibition' mark
in pressing a button after that, it means the button does not
function in the currently played disc.
MODEL NO.:PLDVCR600
view
continues to be displayed
PLDVCR500
Advertisement
Table of Contents

Related Manuals for Pyle view PLDVCR500


Summary of Contents for Pyle view PLDVCR500
- Page 1 'Prohibition' mark. If this mark is displayed in operating the product, please wait for a while, then use it. If 'Prohibition' mark in pressing a button after that, it means the button does not function in the currently played disc. MODEL NO.:PLDVCR600 view continues to be displayed PLDVCR500...
-
Page 2: Important Safeguards
Important Safeguards CAUTION RISK OF ELECTRIC SHOCK DO NOT OPEN CAUTION: TO REDUCE THE RISK OF ELECTRIC SHOCK, DO NOT REMOVE COVER (OR BACK). NO USER- SERVICEABLE PARTS INSIDE. REFER SERVICING TO QUALIFIED SERVICE PERSONNEL. WARNING : TO REDUCE THE RISK OF FIRE OR ELECTRIC SHOCK, DO NOT EXPOSE THIS APPLIANCE TO RAIN OR MOISTURE. - Page 3 This set has been designed and manufactured to assure personal safety. Improper use can result in electric shock or fire hazard. The safeguards incorporated in this unit will protect you if you observe the following procedures for installation, use and servicing. This unit is fully transistorized and does not contain any parts that can be repaired by the user.
- Page 4 12 POWER-CORD PROTECTION Power-supply cords should be routed so that they are not likely to be walked on or pinched by items placed upon or against them, paying particular attention to cords at plugs, convenience receptacles, and the point where they exit from the unit.
- Page 5 22 DAMAGE REQUIRING SERVICE Unplug this unit from the wall outlet and refer servicing to qualified service personnel under the following conditions. A. When the power-supply cord or plug is damaged. B. If liquid has been spilled, or objects have fallen into the unit. C.
-
Page 6: Read Carefully Before Using
Read Carefully before Using Cautions in use of DVD-Video player are described below. Please read carefully before using a DVD-Video player. Installation place and handling ◆ - When you place this player near other devices, they may affect poorly together. - When you place DVD-Video player and TV in the upper and lower sides, it may cause flickering of pictures or failure (tape is not ejected). - Page 7 Tape and Disc Handling ◆ - Do not use any tape and disc below. Damage of video head or cut/coiling of tape may cause failure. ① Tape with mold ② Tape or disc stained with juice or attachments ③ Tape having breakage connection ④...
-
Page 8: Table Of Contents
Contents Important Safeguards Read Carefully before Using Advantages of This Product Are... Idenificatuion of Controls front palel rear panel remote Controller instructions in using remote Connecting with TV Connecting with Cable box Connecting with other vcr or camcorder Language Setup Manu Select Manu Language Select Audio Language Select Subtitle Language... -
Page 9: Advantages Of This Product Are
Advantages of This Product Are ... ◆ BUILT-IN TV TUNER (TV/CATV) ◆ Hi-Fi stereo system [VCR] ◆ Digital Auto Tracking [VCR] ◆ BACK LIGHTING OF FUNCTION BUTTONS ◆ EXTERNAL IR REMOTE CONTROLLER WITH RECEIVER ◆ DEW & HEAT SENSORS FOR TAPE PROTECTION ◆... -
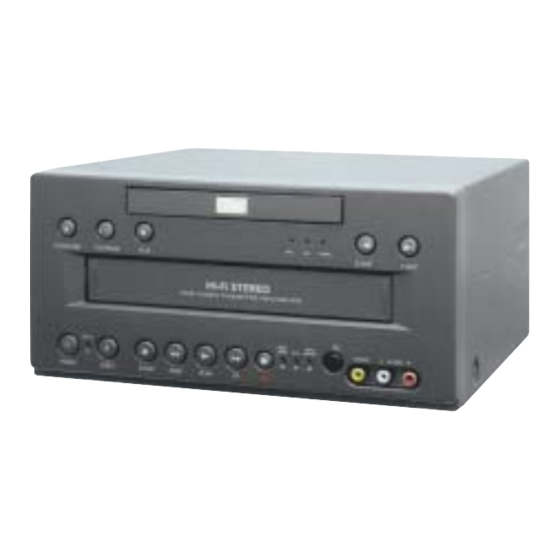
Page 10: Idenificatuion Of Controls
Identification of Controls Identification of Controls Front Panel ② ① OPEN/CLOSE Open/Close button ① If this key is pressed while power is supplying . disc tray will open,the open/close button lamp will light up in red then insert the disc and the disc will be played automatically ②... - Page 11 Identification of Controls Play key. Press this key to playback a recorded tape, or to release special operation such as the search mode. In the playback mode the playback indicator lamp will be light in red, and Auto Tracking mode, this indicator lamp will blink.
-
Page 12: Rear Panel
Rear Panel ④ ANT IN Connector. ① Connect the TV antenna (or cable if available- home use) to this connector. ② RF OUT Connector. This connectors provides an interface to the antenna input connectors terminal of your television using a coaxial cable. Tuner the television to channel 3 or 4 to watch video tapes. -
Page 13: Remote Controller
REMOTE CONTROLLER POWER OPEN/CLOSE ANGLE SUBTITLE AUDIO REPEAT REPEAT A-B ZOOM TOP MENU MENU ENTER A/V SEL. SETUP DISPLAY RETURN CLEAR PROGRAM MUTE SLOW GOTO STEP PLAY/PAUSE R.SKIP STOP F.SKIP CH3/CH4 TV/VCR A. SEARCH EJECT PLAY STOP PAUSE/STILL ENCORE REPLAY AUDIO --- TRK --- R.TRK... -
Page 14: Instructions In Using Remote
Instructions in Using REMOTE ▶ Operate REMOTE within 7m from the unit. ▶ Do not press 2(two) buttons at the same time. ▶ Do not light up sending part of ▶ REMOTE Do not keep in the place with much dust and humidity... -
Page 15: Connecting With Tv
Connecting with TV ■ In the initial SET, exclusive channel for video is set to CH 3. To change this setting, set again in “ CHANNEL SET” screen in VCR operation. ■ In connecting RF cable to TV, set TV channel to CH3. How to Connect with RF cable REAR PANEL OF DVD-VIDEO OUTSIDE ANTENNA OR... -
Page 16: Connecting With Cable Box
Connecting with Cable Box If your cable system only requires you to use a converter box for some channels (i.e., pay-TV channels), follow these steps: Find the primary incoming RF cable. Plug this cable into a splitter (available at your local electronics store.) Connect one RF cable between one OUT terminal on the splitter and the IN terminal on the converter box. -
Page 17: Connecting With Other Vcr Or Camcorder
Connecting with Other VCR or Camcorder 1. Connect AUDIO/VIDEO OUT jack in Camcorder(or playback video) to AUDIO/VIDEO IN jack in rear panel (or front panel) of DVD-Video with connecting cable. 2. Connect “ ANT. IN” jack in TV to “ RF.OUT” jack in DVD-Video with RF cable. 3. - Page 18 How to Copy(Edit) Tape with Other VCR or Camcorder 1. Turn on DVD-Video. 2. Press [OUTPUT] button of remote control and adjust DVD-Video to display "External Input 1" or "External Input 2" in TV screen. 3. Press [PLAY] button in Camcorder or playback video. 4.
-
Page 19: Language Setup Manu
LANGUAGE SETUP MENU Select DISC Menu Language 1. Press the "SETUP" button on the remote control. The initial MENU is displayd. SETUPM MENU LANGUAGE SETUP DISPLAY SETUP AUDIO SETUP PARENTAL SETUP OTHERS SETUP VCR SETUP EXIT SETUP LANGUAGE SETUP 2. Press the select(ENTER) button then the LANGUAGE SETUP MENU is displayed. -
Page 20: Select Subtitle Language
Select SUBTITLE Language 1. Press the "SETUP" button on the remote control. The initial MENU is displayd. SETUPM MENU LANGUAGE SETUP DISPLAY SETUP AUDIO SETUP PARENTAL SETUP OTHERS SETUP VCR SETUP EXIT SETUP LANGUAGE SETUP 2. Press the select(ENTER) button then the "LANGUAGE SETUP"... -
Page 21: Display Setup Manu
DISPLAY SETUP MENU Set TV DISPLAY Mode 1. Press the "SETUP" button on the remote control. The initial MENU is displayd. SETUPM MENU LANGUAGE SETUP DISPLAY SETUP AUDIO SETUP PARENTAL SETUP OTHERS SETUP VCR SETUP EXIT SETUP LANGUAGE SETUP 2. Press the SHIFT ▼ button to select (ENTER) the "DISPLAY SETUP". -
Page 22: Set Plcture Mode
Set Picture Mode 1. Press the "SETUP" button on the remote control. The initial MENU is displayd. SETUPM MENU LANGUAGE SETUP DISPLAY SETUP AUDIO SETUP PARENTAL SETUP OTHERS SETUP VCR SETUP EXIT SETUP LANGUAGE SETUP 2. Press the SHIFT ▼ button to select (ENTER) the "DISPLAY SETUP". -
Page 23: Audio Setup Manu
AUDIO SETUP MENU DIGITAL OUT Setup 1. Press the "SETUP" button on the remote control. The initial MENU is displayd. SETUPM MENU LANGUAGE SETUP DISPLAY SETUP AUDIO SETUP PARENTAL SETUP OTHERS SETUP VCR SETUP EXIT SETUP LANGUAGE SETUP 2. Press the SHIFT ▼ button to select (ENTER) the "AUDIO SETUP". -
Page 24: Dynamic Range Compression Setup
Setup DYNAMIC Range Compression 1. Press the "SETUP" button on the remote control. The initial MENU is displayd. SETUPM MENU LANGUAGE SETUP DISPLAY SETUP AUDIO SETUP PARENTAL SETUP OTHERS SETUP VCR SETUP EXIT SETUP LANGUAGE SETUP 2. Press the SHIFT ▼ button to select (ENTER) the "AUDIO SETUP". -
Page 25: Parental Lock Setup Manu
PARENTAL LOCK SETUP MENU Setup Parental Lock 1. Press the "SETUP" button on the remote control. The initial MENU is displayd. SETUPM MENU LANGUAGE SETUP DISPLAY SETUP AUDIO SETUP PARENTAL SETUP OTHERS SETUP VCR SETUP EXIT SETUP LANGUAGE SETUP 2. Press the SHIFT ▼ button to select (ENTER) the "PARENTAL LOCK". -
Page 26: Others Setup Menu
OTHERS SETUP MENU Setup the FM Transmitter ※ Option Function 1. Press the "SETUP" button on the remote control. The initial MENU is displayd. SETUPM MENU LANGUAGE SETUP DISPLAY SETUP AUDIO SETUP PARENTAL SETUP OTHERS SETUP VCR SETUP EXIT SETUP LANGUAGE SETUP 2. -
Page 27: Vcr Setup Manu
VCR SETUP MENU VCR OSD (On Screen Display) 1. Press the "SETUP" button on the remote control. The initial MENU is displayd. SETUPM MENU LANGUAGE SETUP DISPLAY SETUP AUDIO SETUP PARENTAL SETUP OTHERS SETUP VCR SETUP EXIT SETUP LANGUAGE SETUP 2. -
Page 28: Vcr Auto Repeat
VCR Auto Repeat 1. Press the "SETUP" button on the remote control. The initial MENU is displayd. SETUPM MENU LANGUAGE SETUP DISPLAY SETUP AUDIO SETUP PARENTAL SETUP OTHERS SETUP VCR SETUP EXIT SETUP LANGUAGE SETUP 2. Press the SHIFT ▼ button to select(ENTER) the "VCR SETUP", then the VCR SETUP menu is displayed. -
Page 29: Operating Tv Tuner
OPERATING TV TUNER TV CHANNEL SET ※ NOTE : If RF-Sigmal is not input, searching channel will be displayed blue-back picture. 1. Press "A/V SEL." button on the remote control, until " TV" is selected. (DVD ▶ TV ▶ CATV ▶ AV1 ▶ AV2) TV 02 3. -
Page 30: Other's Operation
Other's Operation Using a zoom function A user can enlarge the current screen about 2,4 or 8 times. Keep pressing [ZOOM] button till the preferred zoom appears. Every time a user presses [ZOOM] button, a zoom magnification changes 2 times ( X2 ) → 4 times ( X4 ) → 8 times ( X8 ) →... -
Page 31: To Skip Chapter In A Dvd
To skip chapter in a DVD 1. Press POWER button to power on. 2. Press [OPEN/CLOSE] button to open the disc tray. 3. Insert the disc and press [OPEN/CLOSE] button to close the tray. 4. To playback it, press [PLAY/PAUSE] button. 5. -
Page 32: Repeating A Defined Period
Repeating a defined period You may repeat a desired chapter or track. 1. Keep pressing REPEAT button till the preferred system appears. DVD : Chapter Repeat on → Title Repeat on → Repeat off → Chapter Repeat on VCD : REP-ONE → REP-ALL → REP OFF → REP-ONE MP3(CD) : REP-ONE →... -
Page 33: To Display Menus In A Disc
To display menus in a disc If a disc includes menus, a user may use them. 1. Press "MENU" button. It shows menus in the disc. Also they are different according to discs. Move a cursor to a relative item with "MOVE IN OSD" buttons of ◀ , ▶, ▼, ▲ button and select one with "ENTER"... -
Page 34: Repeating A Defined Period (Dvd)
Repeating a defined period (DVD) You may repeat a desired chapter or track. 1 Select A-B Repeat Function In Play mode, press the REPEAT button, then press left/right to select A-B Repeat. o "A-" will highlight when A-B Repeat is selected. NOTE: If you are playing a CD, the menu will display "Track"... -
Page 35: About Vcr
About VCR VIDEO HEAD CLEANING The video heads enable the VCR to read video information pictures from the tape during playback. In the unlikely event that the heads become clogged with dirt video playback will be impossible. This can easily be determined during playback of a known good tape, there is good sound, but the picture is extremely snowy. -
Page 36: About Dvd
About DVD Playable Disc DVD,Video CD (Version 1.1,2.0),S-VCD and Audio CD Disc type Playable Possible Possible Video CD Possible CD-R Possible Possible CD-RW Possible DVD-R S-VCD Possible REGION MANAGEMENT INFORMATION This unit is designed and manufactured to respond to the Region Management information that is recorded on a DVD disc. The region number of this player is “... -
Page 37: Terms Related With Dvd
Terms related with DVD A DVD (abbreviation of Digital Versatile Disc or Digital Video Disc) can include 135 minutes of video information. And for audio, it can hold up to 8 kinds of languages and 32 kinds of subtitle languages. By using MPEG-2 video compression and digital 3D surround sound, DVD realizes highdefined screen and quality sound like a movie theater. -
Page 38: Before Doubting About Troubles (Dvd)
Before doubting about troubles (DVD) Symptom The recorder does not play. No sound comes through. A disc is playing but screen does not appear or poor screen appears. Sound is irregular REMOTE does not work. “ AUDIO” or “ SUBTITLE” button does not work. -
Page 39: Before Doubting About Troubles (Vcr)
Before doubting about troubles (VCR) Symptom “ Power On” does not work. It does not work even in “ Power On” . A videotape is not inputted in. On inputting a videotape, the tape is re-ejected. A videotape is not ejected. A channel on video and a play screen does not appear. - Page 40 Symptom While recording and playing, the top of screen extremely waves. A screen is not clear. A screen at pause is trembling or slow screen is not clear. Recording a TV program is impossible. In spite of pressing “ CHANNEL” , a channel can not be set.
-
Page 41: Specifications
Specifications VCR PART Power Supply Consumed electricity Weight Dimension (WxHxD) Operative temperature Installation condition Received channels Signal type Antenna Input/output VIDEO input AUDIO input VHF output VIDEO output TAPE WIDTH Record System of Luminance Signal Record System of Color Signal Tape Speed REC Time (T-120) FF/REW Time... -
Page 42: Dvd Part
Distortion Wow Flutter Hi-Fi Channel Balance Hi-Fi CH Seperation (A.Weighted) DVD PART Pick-up System Playable disc Audio Signal Output Audio S/N(A. W) Audio Frequency range Hi-Fi; sp/slp 0.7% Maximum Mono ; SP 4.0% Maximum/SLP 5.0% Maximum Hi-Fi ; SP/SLP 0.012% Maximum Mono ;... - Page 43 Analogue Audio output (2CH. L/R) Digital Audio output (COAXIAL) Vibration Shock Electrostatic Discharge Requirements Loader Reliability Data Transfer Rate(Sustained) Access Time Data Buffer Error Rate Disc Loading * DVD : 48/96KHz sampling * VCD : 44.1KHz sampling * CD : 44.1KHz sampling * DVD : 48KHz sampling * VCD : 44.1KHz sampling * CD : 44.1KHz sampling...
- Page 44 Operating time Laser parameters FM Transmitter * Spin-up time : Less than 13 sec (Typical) * Stop time : Less than 2 sec(Typical) * DVD Semiconductor Laser / Wave length : 650nm / Emission power : 0.28 mV Semiconductor Laser / Wave length : 780nm Emission power : 0.30 mV *FM 88.1MHz ~89.9 MHz(11 Step, 0.2MHz)
- Page 45 Pyle Audio Inc. 1600 63rd Street Brooklyn, NY 11204 www.pyleaudio.com...