Cambridge Audio DacMagic 100 User Manual
Hide thumbs
Also See for DacMagic 100:
- User manual ,
- Technical specifications (2 pages) ,
- Quick start manual (2 pages)
Table of Contents
Advertisement
Quick Links
Advertisement
Table of Contents

Related Manuals for Cambridge Audio DacMagic 100


Summary of Contents for Cambridge Audio DacMagic 100
- Page 1 DacMagic 100 Manual Generated: 10/06/2022 - 15:08...
-
Page 2: Table Of Contents
Table of Contents DacMagic 100 ..........................................Introduction ..........................................What's included with the DacMagic 100? ................................Front panel controls ........................................Rear panel connections ......................................Getting connected ........................................Further USB audio information ..................................... Auto Power Down (APD) ......................................Frequently asked questions .................................... -
Page 3: Dacmagic 100
DacMagic 100 Last updated: June 8, 2022 02:19. Revision #4579 User's Manual... -
Page 4: Introduction
This guide is designed to make installing and using this product as easy as possible. Information in this document has been carefully checked for accuracy at the time of printing; however, Cambridge Audio’s policy is one of continuous improvement, therefore design and specifications are subject to change without prior notice. -
Page 5: What's Included With The Dacmagic 100
What's included with the DacMagic 100? Last updated: June 7, 2022 08:18. Revision #4560 Inside the box of your DacMagic 100 you will receive: DacMagic 100 Digital to Analogue Converter 12V Power Supply USB Type ‘B’ Cable Quick Start Guide... -
Page 6: Front Panel Controls
Last updated: June 6, 2022 10:46. Revision #4546 1. Standby/On - Switches the unit between on, and low power standby where the DacMagic 100 is off, and the PSU draws < 0.5W. 2. Source - Select incoming audio source. Toggle between USB, S/P DIF 1, S/P DIF 2, and TOSLINK as indicated by the corresponding LED. -
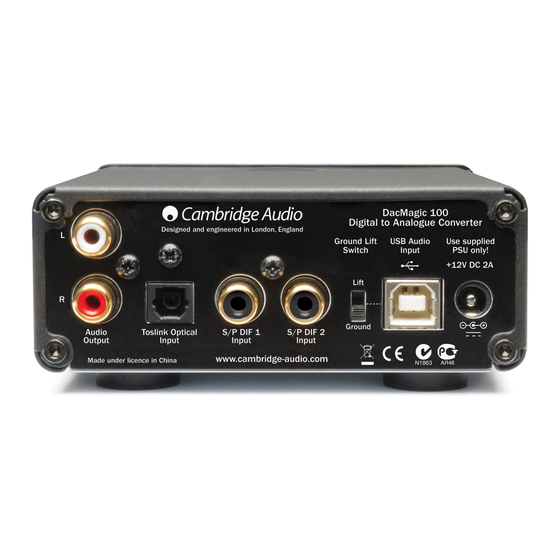
Page 7: Rear Panel Connections
DVD/BD player, a smart TV or similar device please ensure that the output is set to two-channel PCM. 3. Ground/Lift Switch – When connected to a PC via USB, and with the switch set to ‘ground’, the DacMagic 100 will ground itself via the USB connection. -
Page 8: Getting Connected
If there is no power to the unit, please follow the steps below Check that the supplied 12V PSU is securely connected to the power adaptor socket on the rear of the DacMagic 100. Confirm that the PSU is securely connected to the mains socket, and that the socket is switched on. - Page 9 Audio output connections Output connection to AXA35...
- Page 10 Digital audio input connections Connection to CXC via S/P DIF coaxial Connection to CXC via TOSLINK optical...
- Page 11 Connection to TV via TOSLINK optical...
- Page 12 USB audio connection Note: The DacMagic 100 is not designed to work with mobile devices such as phones, and tablets. Whilst there may be instances where connection is possible, this is not a function that is fully supported.
-
Page 13: Further Usb Audio Information
Your DacMagic 100 will arrive ready to plug-and-play in USB Audio Class 1.0 mode. For use in USB Audio Class 2.0 mode, the Cambridge Audio USB Audio 2.0 Driver will need to be installed. Information regarding this can be found here: https://techsupport.cambridgeaudio.com/hc/en-us/articles/207434895-Windows-Audio-USB-Class-2-Driver-... - Page 14 Use with Linux Due to the many configuration options and range of target hardware, we cannot say that Linux is officially supported by the DacMagic 100. However, most recent Linux distros are supporting USB Audio Class 2.0 natively, so the DacMagic 100 should work without any specific action...
-
Page 15: Auto Power Down (Apd)
Auto Power Down (APD) Last updated: June 6, 2022 10:48. Revision #4551 Your DacMagic 100 comes with APD (Auto Power Down) enabled as default, and after 60 minutes of inactivity the unit will automatically switch to standby. To disable Auto Power Down (APD) Turn the DacMagic 100 on using the Standby/On button. -
Page 16: Frequently Asked Questions
How do I select the correct speaker properties on my PC/Mac to ensure I am receiving Hi-Res audio? To ensure that the DacMagic 100 is receiving Hi-Res audio, you may need to adjust some of the sound settings on your PC or Mac. - Page 17 4. Highlight the device named ‘CA USB Audio’, then click ‘Properties’. 5. In the advanced tab you will be given the option to change the Windows output sample rate. If you are using your DacMagic 100 in USB Audio Class 1.0 mode, set this to ‘24-bit, 96000Hz’.
- Page 18 3. Next, open ‘Finder’ and navigate to ‘Applications. Then open the folder named ‘Utilities’. 4. Within the utilities folder, open ‘Audio MIDI setup’. In here select the DacMagic 100, and you will be given the option to modify the output sample rate.
-
Page 20: Technical Specifications
Technical Specifications Last updated: May 9, 2022 11:13. Revision #4477 D/A converters Wolfson WM8742 24-bit DAC Frequency response 20Hz to 20kHz (±0.1dB) THD @ 1kHz 0dBFs <0.0025% 24-bit THD @ 1kHz -10dBFs <0.0025% 24-bit THD @ 20kHz 0dBFs <0.0025% S/N ratio -113dBr Total correlated jitter <130pS...