Philips CD280 User Manual
Philips cordless telephone user manual
Hide thumbs
Also See for CD280:
- Quick start manual (9 pages) ,
- User manual (40 pages) ,
- User manual (40 pages)

Related Manuals for Philips CD280


Summary of Contents for Philips CD280
- Page 1 Register your product and get support at www.philips.com/welcome User manual CD280 CD285...
-
Page 2: Ec Declaration Of Conformity
(Year in which the CE mark is affixed / Année au cours de laquelle le marquage CE a été apposé) (DECLARATION DE CONFORMITE CE) We / Nous, PHILIPS CONSUMER LIFESTYLE B.V. (Name / Nom de l’entreprise) (address / adresse) (Type version or model, référence ou modèle) (Directive R&TTE 1999/5/CE) -
Page 3: Table Of Contents
Contents 1 Important safety instructions 2 Your CD280/CD285 What is in the box Overview of the phone Display icons 3 Get started Connect the base station Install the handset Set the date and time Charge the handset Check the battery level... -
Page 4: Important Safety Instructions
1 Important safety instructions Power requirements • This product requires an electrical supply of 100-240 volts AC. In case of power failure, the communication can be lost. • The voltage on the network is classified as TNV-3 (Telecommunication Network Voltages), as defined in the standard EN 60950. Warning • The Electrical network is classified as hazardous. The only way to power down the charger is to unplug the power supply from the electrical outlet. -
Page 5: Your Cd280/Cd285
2 Your CD280/ CD285 Congratulations on your purchase and welcome to Philips! To fully benefit from the support that Philips offers, register your product at www.philips. com/welcome. What is in the box Handset Charger Power adapter Guarantee User Manual Quick start guide Note • In some countries, you have to connect the line adapter to the line cord, then plug the line cord to the telephone socket. -
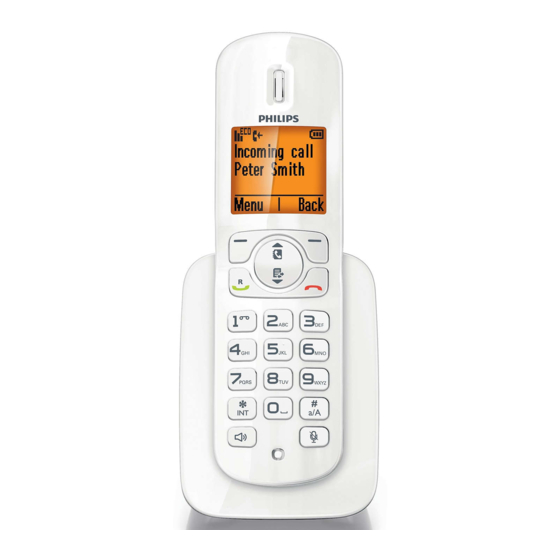
Page 6: Overview Of The Phone
Overview of the phone a Earpiece • Select the function displayed on the handset screen directly above the key. • Scroll up on the menu. • Increase the earpiece/speaker volume. • Enter the phonebook. • End the call. • Exit the menu/operation. •... -
Page 7: Display Icons
Display icons In standby mode, the icons shown on the main screen tell you what features are available on your handset. Icon Descriptions When the handset is off the base station/charger, the bars indicate the battery level (full, medium and low). When the handset is on the base station/charger, the bars keep scrolling until charging completes. -
Page 8: Get Started
3 Get started Caution • Ensure you have read the safety instructions in the “Important” section before you connect and install your handset. Connect the base station Warning • Risk of product damage! Ensure that the power supply voltage corresponds to the voltage printed on the back or the underside of the phone. -
Page 9: Install The Handset
Install the handset Caution • Risk of explosion! Keep batteries away from heat, sunshine or fire. Never discard batteries in fire. • Use only the supplied batteries. • Risk of decreased battery life! Never mix different brands or types of batteries. Warning • Check the battery polarity when inserting in the battery compartment. -
Page 10: Check The Battery Level
Check the battery level The battery icon displays the current battery level. When the handset is off the base station/charger, the bars indicate the battery level (full, medium and low). When the handset is on the base station/charger, the bars flash until charging completes. The empty battery icon flashes. The battery is low and needs recharging. -
Page 11: Calls
4 Calls Note • When the power fails, the phone cannot access emergency services. • Check the signal strength before you make a call or when you are in a call. For more information, see “Check the signal strength” in the Get started section. -
Page 12: Answer A Call
Answer a call When the phone rings, press answer the call. Warning • When the handset rings or when the handsfree is activated, keep the handset away from your ear to avoid ear damage. Note • The caller ID service is available if you have registered to the caller ID service with your service provider. -
Page 13: Toggle Between Two Calls
Toggle between two calls You can toggle your calls in these ways: • Press ; or [Option] and select [Switch calls], • Press then press [OK] again to confirm. » The current call is put on hold, and you are now connected to the other call. -
Page 14: Intercom And Conference Calls
5 Intercom and conference calls An intercom call is a call to another handset that shares the same base station. A conference call involves a conversation among you, another handset user and the outside callers. Make a call to another handset Note •... -
Page 15: During An External Call
During an external call Press and hold to initiate an internal call. » The handsets available for intercom are displayed. » The external caller is put on hold. Select or enter a handset number, then press [OK] to confirm. The selected handset rings. »... -
Page 16: Text And Numbers
6 Text and numbers You can enter text and numbers for handset name, phonebook records, and other menu items. Enter text and numbers Press once or several times on the alphanumeric key to enter the selected character. Press [Clear] to delete the character. Press to move the cursor left and right. -
Page 17: Switch Between The Upper Case And Lower Case
Upper case characters (for Romanian/ Polish/Czech/Hungarian/Slovakian/Slovenian/ Croatian) [Sp]. 0 , / : ; “ ‘ ! ¡ ? ¿ * + - % \^ ~| 1 @ _ # = < > ( ) & £ $ ¥ [ ] { } ¤ § ... A B C 2 Â Æ Á Ă Ä Å Ą Ç Ć Č D E F 3 Ď Đ Ė Ě É Ę Δ Φ G H I 4 Í Î Γ J K L 5 Λ Ł Ĺ Ľ M N O 6 Ñ Ň Ń Ó Ö Ő P Q R S 7 Ř Ş Š Ś Π Θ Σ T U V 8 Ţ Ť Ú Û Ü Ů Ű W X Y Z 9 Ý Ž Ź Ż ſ Ø Ω Ξ Ψ Lower case characters (for Romanian/ Polish/Czech/Hungarian/Slovakian/Slovenian/ Croatian) [Sp] . -
Page 18: Phone Settings
7 Phone settings You can customize the settings to make it your own phone. Name the handset The name of the handset can be up to 14 characters. It is displayed on the handset screen in standby mode. Select [Menu] > [Phone setup] > [Phone name], then press [OK] to confirm. -
Page 19: Eco Mode
Set the docking tone Docking tone is the sound made when you place the handset on the base station or charger. Select [Menu] > [Phone setup] > [Sounds] > [Docking tone], then press [OK] to confirm. Select [On]/[Off], then press [OK] to confirm. -
Page 20: Alarm Clock
8 Alarm clock Your phone has a built-in alarm clock. Check the information below to set your alarm clock. Set the alarm Select [Menu] > [Alarm], then press [OK] to confirm. Select [On once] or [On daily], then press [OK] to confirm. Enter an alarm time, then press [OK] to confirm. -
Page 21: Services
9 Services The phone supports a number of features that help you handle and manage the calls. Auto conference To join an external call with another handset, press Activate/Deactivate auto conference Select [Menu] > [Services] > [Conference], then press [OK] to confirm. -
Page 22: Manage The Area Code
Activate auto removal of the carrier code Select [Menu] > [Services] > [Carrier code], then press [OK] to confirm. Enter the carrier code, then press [OK] to confirm. The setting is saved. » Deactivate auto removal of the carrier code Select [Menu] > [Services] > [Carrier code], then press [OK] to confirm. -
Page 23: Register The Handsets
Register the handsets You can register additional handsets to the base station. The base station can register up to 5 handsets. Select [Menu] > [Services] > [Register], then press [OK] to confirm. Press and hold on the base station for 5 seconds until you hear a confirmation beep, then press [OK] to confirm. Enter the system PIN. -
Page 24: Default Settings
10 Default settings Language* Country dependent Handset name PHILIPS Date 01/01/11 Date format* Country dependent Time* Country dependent Time format* Country dependent [Off] Alarm Phonebook list Unchanged Recall time* Country dependent [Off] Conference [Tone] Dial mode* Handset ring melody* Country dependent... -
Page 25: Technical Data
Philips: SSW-1920UK-2, Input: 100-240V50/60Hz 0.2A, Output: 6V 500mA Power consumption • Power consumption at standby mode: around 0.60W (CD280); 0.65W (CD285) Weight and dimensions (CD280) • Handset: 125.6 grams • 46.1 x 164.5 x 27.5 mm (W x H x D) •... -
Page 26: Frequently Asked Questions
12 Frequently asked questions No signal bar displays on the screen. • The handset is out of range. Move it closer to the base station. • If the handset displays [Unregister], register your handset . • For more information, see “Register the handsets”... -
Page 27: Notice
One of Philips’ leading Business Principles is to take all necessary health and safety measures for our products, to comply with all applicable legal requirements and to stay well within the EMF standards applicable at the time of producing the products. - Page 28 When this crossed-out wheeled bin symbol is attached to a product it means that the product is covered by the European Directive 2002/96/ EC. Please inform yourself about the local separate collection system for electrical and electronic products. Please act according to your local rules and do not dispose of your old products with your normal household waste.
- Page 29 è conforme ai requisiti essenziali ed alle altre disposizioni pertinenti stabilite dalla direttiva 1999/5/CE. Spanish Por medio de la presente, Philips Consumer Lifestyle, Accessories, declara que el equipo cumple con los requisitos esenciales y cualesquiera otras disposiciones aplicables o exigibles de la Directiva 1999/5/CE.
- Page 30 0168 © 2011 Koninklijke Philips Electronics N.V. All rights reserved. IFU_CD280-285_EN_V1.1 WK11251...