Table of Contents
Advertisement
Quick Links
INSTRUCTIONS
U-APT
ARROW POINTER
Optical Microscope Accessory
This instruction manual is for the Olympus Arrow Pointer Model U-APT. To ensure the safety, obtain
optimum performance and to familiarize yourself fully with the use of this attachment, we recommend that
you study this manual thoroughly before operating the microscope. Retain this instruction manual in an
easily accessible place near the work desk for future reference.
A X 9 8 9 7
Advertisement
Table of Contents

Related Manuals for Olympus U-APT


Summary of Contents for Olympus U-APT
- Page 1 ARROW POINTER Optical Microscope Accessory This instruction manual is for the Olympus Arrow Pointer Model U-APT. To ensure the safety, obtain optimum performance and to familiarize yourself fully with the use of this attachment, we recommend that you study this manual thoroughly before operating the microscope. Retain this instruction manual in an easily accessible place near the work desk for future reference.
- Page 2 In accordance with European Directive on Waste Electrical and Electronic Equipment, this symbol indicates that the product must not be disposed of as unsorted municipal waste, but should be collected separately. Refer to your local Olympus distributor in EU for return and/or collection systems available in your country. For Korea only...
-
Page 3: Table Of Contents
U-APT CONTENTS Correct assembly* and adjustments are critical for the arrow pointer to exhibit its full performance. If you are going to assemble the attachment yourself, please carefully read Chapter 4, “ASSEMBLY” (pages 10 to 11). IMPORTANT — Be sure to read this section for safe use of the equipment. —... -
Page 4: Important
3. If the eyepiece in use incorporates a micrometer, ghost may be observed with dark specimens. 4. Always use the power cord and AC adapter provided by Olympus. If no power cord is provided, please select the proper power cord by referring to the section “PROPER SELECTION OF THE POWER SUPPLY CORD” at the end of this instruction manual. - Page 5 U-APT Safety Symbols The following symbols are found on the microscope. Study the meaning of the symbols and always use the equipment in the safest possible manner. Symbol Meaning Supply DC current (from the provided AC adapter). Indicates an input jack.
- Page 6 · The only intermediate attachments that can be used on top of the arrow pointer is the U-EPA or U-EPA2 eyepoint adjuster. For the intermediate attachments that can be used below the arrow pointer, consult the following sketch and select the optimum one. Observation tube Arrow pointer U-APT Magnification Intermediate Polarizing Universal...
- Page 7 U-APT Caution If the system is used in a manner not specified by this manual, the safety of the user may be imperiled. In addition, the system equipment may also be damaged. Always use the system as outlined in this instruction manual.
-
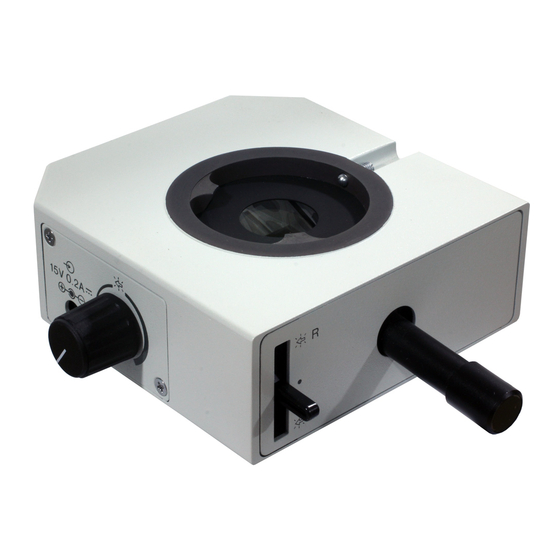
Page 8: Controls
CONTROLS Arrow Pointer U-APT Tube mounts Pointer control lever (Page 6) AC adapter input connector Pointer color switch lever (Page 6) Up: Red. Middle: Shielded. Down: Green. Pointer brightness control (Page 6) OFF/Continuously variable Output plug AC Adapter Input connector... -
Page 9: Operation
U-APT OPERATION 2-1 Focus Adjustment of the Arrow Pointer (Figs 1 & 2) }For use in focusing of the pointer, one of the eyepiece sleeves should be equipped with a helicoid (or a focusing mask). 1. Turn the pointer brightness control @ of the arrow pointer clockwise to turn on the pointer ( }Set the pointer color switching lever ²... -
Page 10: Pointer Operation
2-2 Pointer Operation Adjusting the Pointer Brightness (Fig. 3) }Light intensity alignment range of the pointer has been set to comply with a dark specimen, such as the case of fluorescence observation. For this reason, in case of brightfield observation with high light illumination, you may feel it difficult to identify the pointer even by rotating the pointer bright- ness control dial which is not defect of this product. -
Page 11: Notes On Photomicrography
1. Using the trinocular observation tube on top of the microscope, you can take photographs that include the pointer. # When you use genuine Olympus trinocular observation tubes, photo eyepiece and photomicrographic equip- ment, the pointer ( ) is always focused on the film plane. -
Page 12: Specifications
SPECIFICATIONS Item Specification Maximum field number Pointer color 3 steps switchable (Top: Red. Middle: Shielded. Down: Green.) Pointer movement Joystick control. Pointer power supply AC adapter Input rating: 100-240 V 50-60 Hz 1.2 A MAX. Output rating: 15 V 3.34 A Arrow pointer 115(W) x 165(D) x 45(H) mm, approx. -
Page 13: Assembly
The power cord is vulnerable when bent or twisted. Never subject it to excessive force. ƒ Always use the power cord and AC adapter provided by Olympus. IF no power cord is provided with the microscope, please select the proper power cord by referring to section “PROPER SELECTION OF ³... - Page 14 Fixing the Cord Stopper To prevent the AC adapter cord @ from coming in the way of microscope operation and from contacting the lamp housing, peel off the backings from the two provided cord stopper ² stickers and fix the power cord at two positions on the arrow pointer using them.
-
Page 15: Proper Selection Of The Power Supply Cord
If no power supply cord is provided, please select the proper power supply cord for the equipment by referring to “ Specifications ” and “ Certified Cord ” below: CAUTION: In case you use a non-approved power supply cord for Olympus products, Olympus can no longer warrant the electrical safety of the equipment. - Page 16 Certification Certification Country Agency Country Agency Mark Mark Italy Argentina IRAM JET, JQA , TÜV, Japan Australia UL-APEX / MITI Netherlands Austria ÖVE KEMA Norway Belgium CEBEC NEMKO Spain Canada Sweden Denmark DEMKO SEMKO Switzerland Finland United ASTA France Kingdom U.S.A.
- Page 17 U-APT Table 2 HAR Flexible Cord APPROVAL ORGANIZATIONS AND CORDAGE HARMONIZATION MARKING METHODS Alternative Marking Utilizing Printed or Embossed Harmoniza- Black-Red-Yellow Thread (Length tion Marking (May be located on Approval Organization of color section in mm) jacket or insulation of internal wir-...
- Page 18 Österreichischer Verband für <ÖVE> <HAR> Elektrotechnik (ÖVE) Danmarks Elektriske Materialkontroll <DEMKO> <HAR> (DEMKO) National Standards Authority of Ireland <NSAI> <HAR> (NSAI) Norges Elektriske Materiellkontroll NEMKO <HAR> (NEMKO) Asociacion Electrotecnica Y <UNED> <HAR> Electronica Espanola (AEE) Hellenic Organization for ELOT <HAR> Standardization (ELOT) Instituto Portages da Qualidade <HAR>...
- Page 20 Manufactured by Shinjuku Monolith, 2-3-1 Nishi-Shinjuku, Shinjuku-ku, Tokyo 163-0914, Japan Distributed by 48 Woerd Avenue Waltham, MA 02453, U.S.A. 8F Olympus Tower, 446 Bongeunsa-ro, Gangnam-gu, Seoul, 06153 Korea AX9897 11 Printed in Japan 20161028 M0000...